- Table of Contents
- Overview
- Prerequisites
- Usage
- Operating System
- Networking
- Display
- Processing Power
- Compatibility
MIMIC® Online Documentation
HOWTO: MIMIC on AWS
-
Table of Contents
-
Overview
MIMIC Simulator
 runs on public clouds, including
Amazon AWS
,
Google Cloud Platform
and
Microsoft Azure
.
runs on public clouds, including
Amazon AWS
,
Google Cloud Platform
and
Microsoft Azure
.
Every public cloud environment has many choices to run software. This HOWTO document details the recommendations and best practices to run MIMIC on AWS EC2 and access the simulated devices over the Internet from your application.
There are many references on the Internet, but we have found them to be flawed, and we have correct instructions below. We'll refer to external pages that we believe have the best instructions, and amend the ones that need it.
If you follow the instructions below, you should have MIMIC running in less than 2 hours and being accessed from the Internet, including another instance on AWS. The basic MIMIC installation on any physical system is normally 15 minutes, the workarounds for AWS are the rest. If you are stuck and spend more than 5 minutes on a task below, contact our Technical Support for quick assistance.
-
Prerequisites
In order to run MIMIC on AWS, you need an AWS account
.
It helps to have a working knowledge of the operating systems that MIMIC runs under (Linux and Windows).
-
Usage
AWS EC2
, like all other public clouds, has limitations that we
have to workaround to harness the power of MIMIC. These limitations
fall into 4 categories:
-
operating system
-
networking
-
display
- processing power
The following sections detail the best choices.
-
operating system
-
Operating System
Although MIMIC runs on a variety of operating systems, as detailed in our supported platforms page
,
the recommended choice on AWS is
RedHat Enterprise Linux
or
Windows 2019
.
We recommend to pick one of those OSs when creating your AWS EC2 instance for MIMIC. Windows is adequate for up to 10,000 agents, but we recommend Linux for higher scale.
We recommend at least 2 vCPUs, 4 GiB RAM and 32 GiB data disk for upto 100 agents in MIMIC. Later you can increase these resources if needed.
While creating the EC2 instance, you need to customize the network security group
to allow external access to certain ports (including the default port
22 for SSH on Linux or 3389 for RDP on Windows,
in particular
- UDP port 1194 - the default OpenVPN port
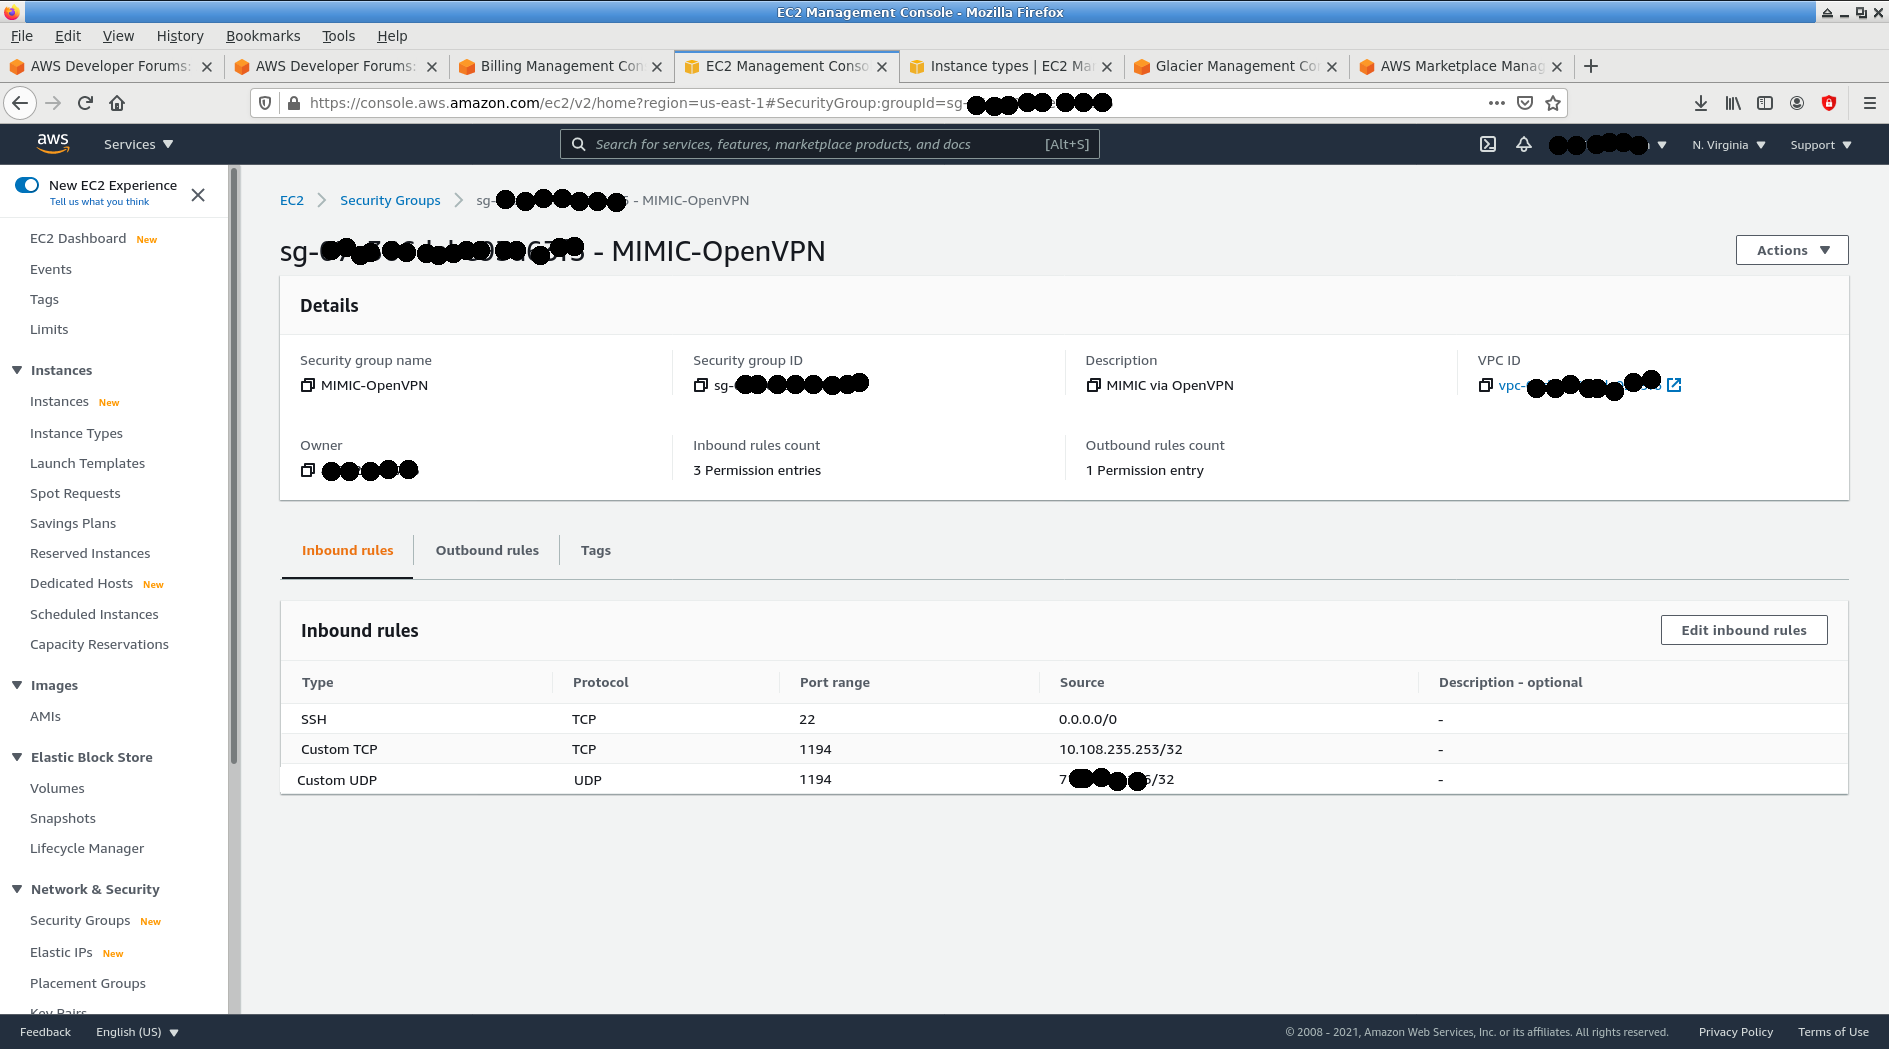
NOTE: make sure the security group for the EC2 instance is correct. This has caused a lot of grief for a lot of people. For example, if tcpdump does not display the expected packets, it's likely the security group.
More OS-specific instructions below.
-
RedHat Enterprise Linux
More considerations while creating the MIMIC EC2 instance:
-
SSH
In the Select an exiting key pair or create a new key pair page, select Create a new key pair for the first VM you create. You can reuse those keys later on to reduce the number of keys to maintain.
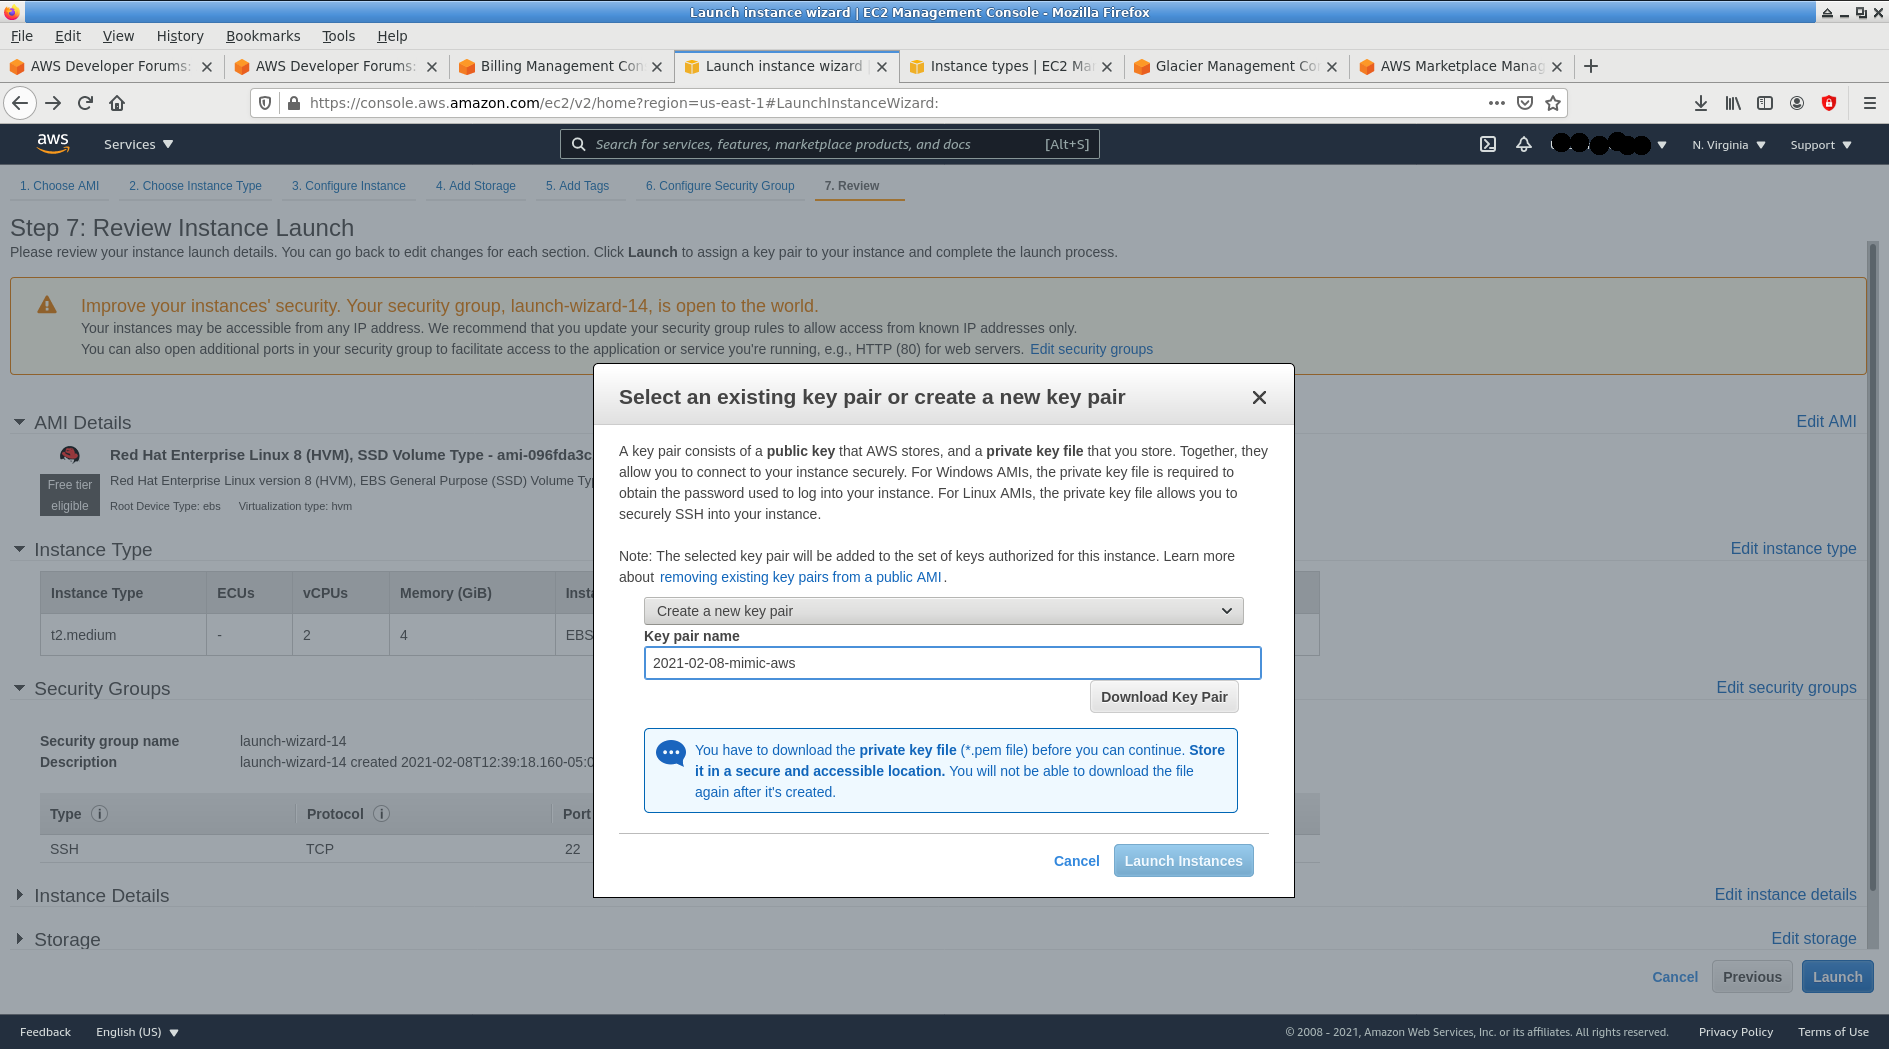
Make sure to save the keys on your local system to access the MIMIC VM with ssh.
Press Launch instances.
Once the VM is running, we need to configure certain things in the OS to run MIMIC. Use SSH to login to the MIMIC VM, then:
-
SELINUX
By default SELINUX is enabled and we need to disable it as detailed in this page
;
For example:
[ec2-user@MIMIC ~]$ getenforce
Enforcing
[ec2-user@MIMIC ~]$ sudo vi /etc/selinux/config
[ec2-user@MIMIC ~]$ sudo reboot
Connection to xx.xx.xx.xx closed by remote host.
Connection to xx.xx.xx.xx closed.
After the reboot you should get the following output:
[ec2-user@MIMIC ~] getenforce
Disabled
-
Firewall
If the firewall is enabled then we need to disable the firewall
,
since the AWS network security group already filters all external access:
[ec2-user@MIMIC ~]$ systemctl status firewalld
● firewalld.service - firewalld - dynamic firewall daemon
   Loaded: loaded (/usr/lib/systemd/system/firewalld.service; enabled; vendor p>
   Active: active (running) since Thu 2020-07-02 14:17:04 UTC; 3min 49s ago
...
[ec2-user@MIMIC ~]$ sudo systemctl stop firewalld
[ec2-user@MIMIC ~]$ systemctl status firewalld
● firewalld.service - firewalld - dynamic firewall daemon
   Loaded: loaded (/usr/lib/systemd/system/firewalld.service; enabled; vendor p>
   Active: inactive (dead) since Thu 2020-07-02 14:21:19 UTC; 5s ago
and when it works, you can permanently disable the firewall with
[ec2-user@MIMIC ~]$ sudo systemctl disable firewalld
Removed /etc/systemd/system/multi-user.target.wants/firewalld.service.
Removed /etc/systemd/system/dbus-org.fedoraproject.FirewallD1.service.
-
Latest OS
Since RHEL is very stable, there is little risk and a lot of benefit to update the OS, eg.:
[ec2-user@MIMIC ~]$ sudo yum update
...
Dependencies resolved.
================================================================================
 Package
   Arch   Version              Repository                                  Size
================================================================================
Installing:
 kernel
...
Complete!
[ec2-user@MIMIC ~]$ sudo reboot
Connection to xx.xx.xx.xx closed by remote host.
Connection to xx.xx.xx.xx closed.
-
Install MIMIC
Install MIMIC according to the Linux installation instructions you received. On systems without a GUI web browser, you can copy from another system (eg. via scp), or use command-line browsers like curl to download the MIMIC images from the web.
When you invoke MIMICD and it shows ready, eg something like:
[ec2-user@MIMIC bin] ./mimicd
INFO  06/24.09:12:27 - MIMIC Simulator ... v20.00
 built May 21 2020 10:28:56
 Copyright (c) 1997-2019 Gambit Communications, Inc.
 Evaluation license, expires 7/21/2020
INFO  06/24.09:12:27 - Running 64-bit
 machine x86_64
 OS Linux 3.14.27-100.fc19.x86_64
 4 CPUs
...
INFO  06/24.09:12:29 - ready
then you can CTL-C it and go onto the next step. Else, contact support@gambitcomm.com.
Now you need to tackle network access via OpenVPN below.
-
-
Windows 2019
More considerations while creating the MIMIC VM:
-
RDP
Follow the directions from Amazon
to connect to your EC2 instance via RDP.
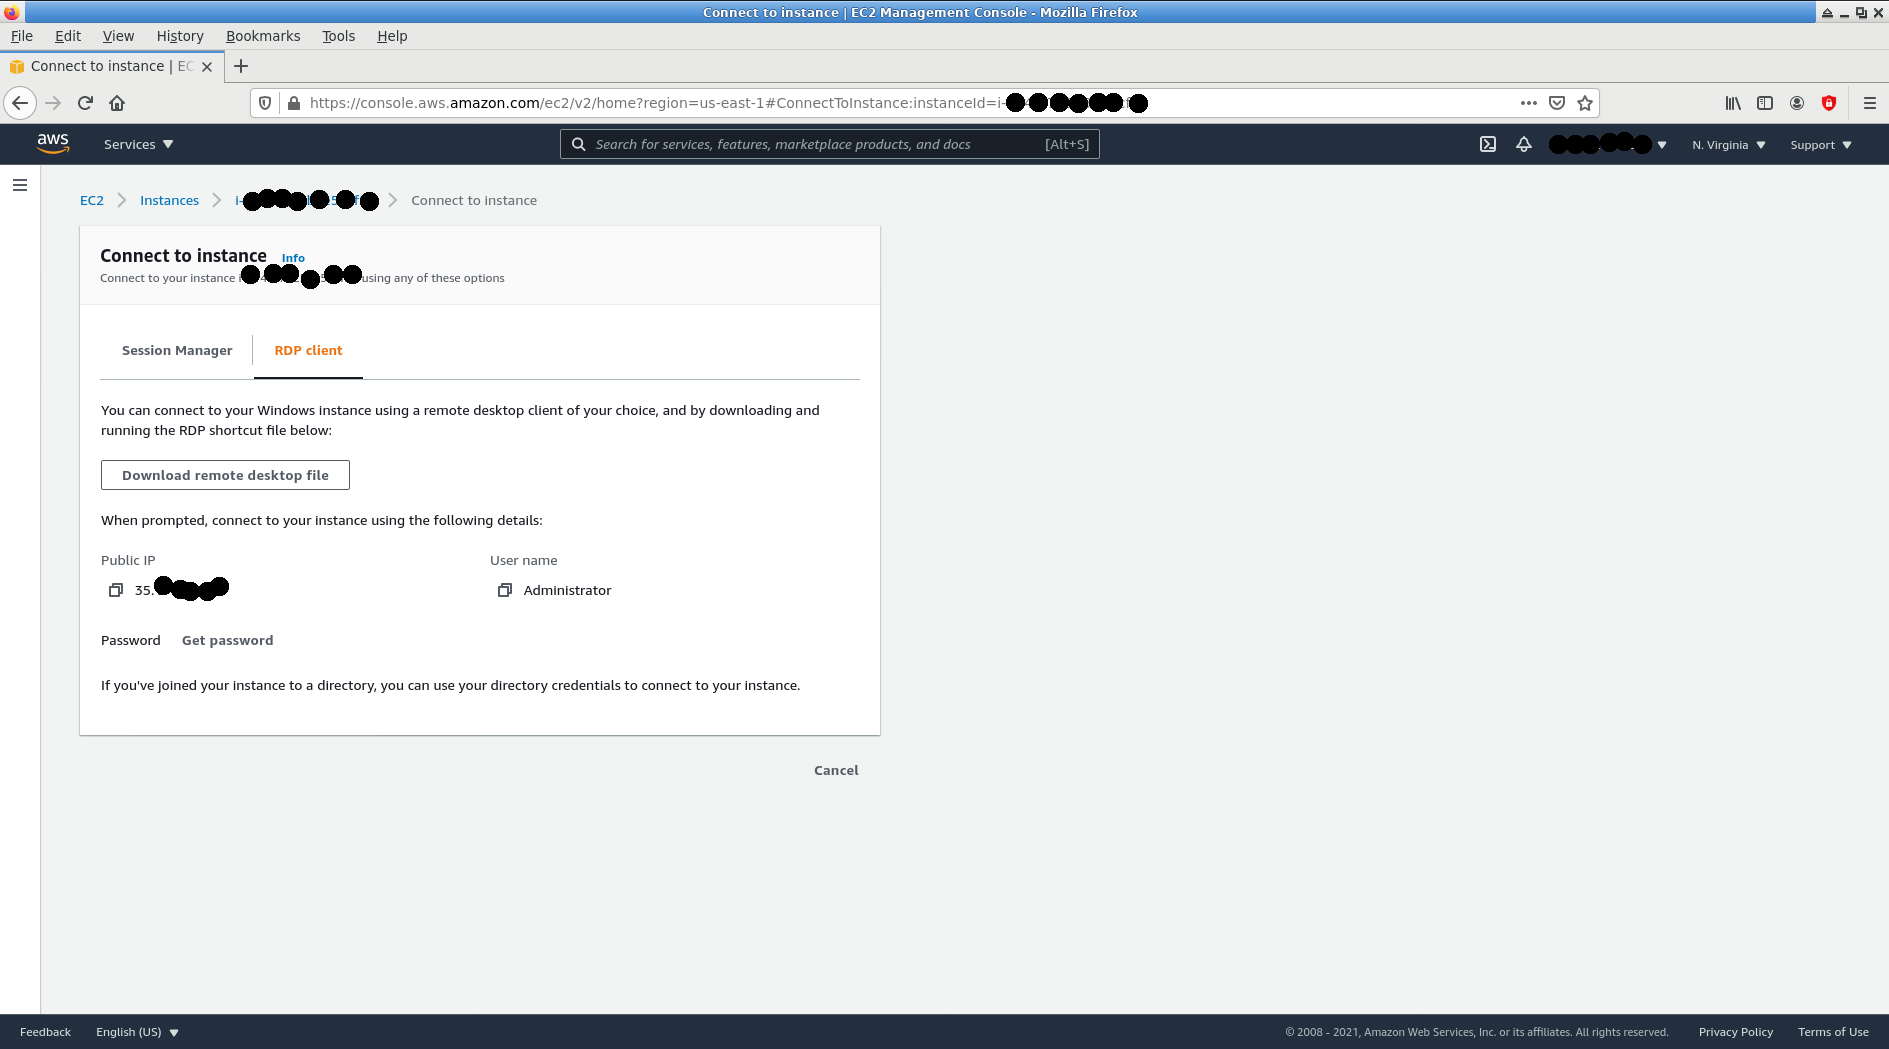
Use the decrypted password or save the RDP file on your local system to access the VM with Remote Desktop.
Once the VM is running, we need to configure certain things in the OS to run MIMIC. Use RDP to login to the MIMIC VM, then:
-
Firewall
Configuring your firewall is your policy decision. Nothing will work unless your firewall is setup correctly. We recommend to temporarily disable any firewall with Settings, then Update & Security, then Windows Security. The AWS security group already filters all inbound connections except the ones you explicitely allowed above.
-
Routing
Enable the Routing and Remote Access service in the Services Administrative Tool.
-
Install a usable Web Browser
We found the Internet Explorer browser to be unusable, thus recommend to install a recent browser like Firefox .
-
Install MIMIC
Install MIMIC according to the Windows installation instructions you received.
Now you need to tackle network access via OpenVPN below.
-
-
Networking
AWS like most public clouds virtualizes networking in Amazon Virtual Private Cloud
, so there are
rules
that prevent MIMIC from operating by default. In particular, the VM
exposes only the
IP addresses
that you configure (and rent). MIMIC
needs to export potentially hundreds or thousands of IP addresses for the
simulated devices, as it can do when you run it in a physical network.
The workaround is to run a VPN
between the MIMIC system and any external
system that wants to access the IP addresses of simulated devices in MIMIC.
There are many choices, including AWS Client VPN
.
We recommend to install the free, open-source
OpenVPN
, which is distributed for
many operating systems:
-
RedHat Enterprise Linux
-
Install EPEL
install EPEL as detailed at this page
.
[ec2-user@MIMIC ~]$ sudo dnf install https://dl.fedoraproject.org/pub/epel/epel-release-latest-8.noarch.rpm
...
epel-release-latest-8.noarch.rpm                791 kB/s |  22 kB     00:00
Dependencies resolved.
================================================================================
 Package              Architecture   Version         Repository            Size
================================================================================
Installing:
 epel-release         noarch         8-8.el8         @commandline          22 k

Transaction Summary
================================================================================
Install  1 Package

Total size: 22 k
Installed size: 32 k
Is this ok [y/N]: y
Downloading Packages:
Running transaction check
Transaction check succeeded.
Running transaction test
Transaction test succeeded.
Running transaction
  Preparing        :                                                        1/1
  Installing       : epel-release-8-8.el8.noarch                            1/1
  Running scriptlet: epel-release-8-8.el8.noarch                            1/1
  Verifying        : epel-release-8-8.el8.noarch                            1/1
Installed products updated.

Installed:
  epel-release-8-8.el8.noarch

Complete!
-
Install OpenVPN
install OpenVPN as detailed at this page
,
eg:
[ec2-user@MIMIC ~]$ sudo dnf install openvpn Extra Packages for Enterprise Linux Modular 8 - 202 kB/s | 154 kB 00:00 Extra Packages for Enterprise Linux 8 - x86_64 17 MB/s | 7.1 MB 00:00 ... Dependencies resolved. ================================================================================ Package Architecture Version Repository Size ================================================================================ Installing: openvpn x86_64 2.4.9-1.el8 epel 542 k Installing dependencies: pkcs11-helper x86_64 1.22-7.el8 epel 64 k Transaction Summary ================================================================================ Install 2 Packages Total download size: 606 k Installed size: 1.6 M Is this ok [y/N]: y Downloading Packages: (1/2): openvpn-2.4.9-1.el8.x86_64.rpm 1.9 MB/s | 542 kB 00:00 (2/2): pkcs11-helper-1.22-7.el8.x86_64.rpm 180 kB/s | 64 kB 00:00 -------------------------------------------------------------------------------- Total 1.5 MB/s | 606 kB 00:00 ... Extra Packages for Enterprise Linux 8 - x86_64 1.6 MB/s | 1.6 kB 00:00 Importing GPG key 0x2F86D6A1: Userid : "Fedora EPEL (8)
-
Install easy-rsa
[ec2-user@MIMIC ~]$ sudo dnf install easy-rsa
...
Dependencies resolved.
================================================================================
 Package            Architecture     Version               Repository      Size
================================================================================
Installing:
 easy-rsa           noarch           3.0.7-1.el8           epel            46 k

Transaction Summary
================================================================================
Install  1 Package

Total download size: 46 k
Installed size: 117 k
Is this ok [y/N]: y
Downloading Packages:
easy-rsa-3.0.7-1.el8.noarch.rpm                 203 kB/s |  46 kB     00:00
--------------------------------------------------------------------------------
Total                                            52 kB/s |  46 kB     00:00
Running transaction check
Transaction check succeeded.
Running transaction test
Transaction test succeeded.
Running transaction
  Preparing        :                                                        1/1
  Installing       : easy-rsa-3.0.7-1.el8.noarch                            1/1
  Verifying        : easy-rsa-3.0.7-1.el8.noarch                            1/1
Installed products updated.

Installed:
  easy-rsa-3.0.7-1.el8.noarch

Complete!
-
Configure OS parameters
[ec2-user@MIMIC ~]$ cat /proc/sys/net/ipv4/ip_forward
0
[ec2-user@MIMIC ~]$ echo 1 | sudo tee /proc/sys/net/ipv4/ip_forward
1
These commands need to be issued at every reboot. For example, if your system uses sysctl then do this:
echo "net.ipv4.ip_forward=1" > /etc/sysctl.d/openvpn-ipforward.conf
sysctl -p /etc/sysctl.d/openvpn-ipforward.conf
-
Configure OpenVPN server
We ship a set of OpenVPN configuration files that will let you get started faster than configuring all the certificates and keys by hand. Later, when you want to configure the keys by hand, you can follow the instructions at this page
.
Download and install our OpenVPN patch with these commands
[ec2-user@MIMIC ~]$ cd /tmp [ec2-user@MIMIC tmp]$ curl --output patch-openvpn.tar.gz http://mirror2.gambitcommunications.com/update/images/patch-openvpn.tar.gz % Total % Received % Xferd Average Speed Time Time Time Current Dload Upload Total Spent Left Speed 100 12976 100 12976 0 0 3004 0 0:00:04 0:00:04 --:--:-- 3004 [ec2-user@MIMIC tmp]$ cd /etc [ec2-user@MIMIC etc]$ gunzip -c /tmp/patch-openvpn.tar.gz | sudo tar xf - -
Run OpenVPN server
[ec2-user@MIMIC etc]$ sudo systemctl start openvpn-server@server.service
[ec2-user@MIMIC etc]$ sudo systemctl status openvpn-server@server.service
● openvpn-server@server.service - OpenVPN service for server
   Loaded: loaded (/usr/lib/systemd/system/openvpn-server@.service; enabled; ve>
   Active: active (running) since Thu 2020-07-02 18:39:05 UTC; 10s ago
     Docs: man:openvpn(8)
           https://community.openvpn.net/openvpn/wiki/Openvpn24ManPage
           https://community.openvpn.net/openvpn/wiki/HOWTO
 Main PID: 3524 (openvpn)
   Status: "Initialization Sequence Completed"
    Tasks: 1 (limit: 23807)
   Memory: 1.6M
   CGroup: /system.slice/system-openvpn\x2dserver.slice/openvpn-server@server.s>
           └─3524 /usr/sbin/openvpn --status /run/openvpn-server/status-server.>

Jul 02 18:39:05 MIMIC systemd[1]: Starting OpenVPN service for server...
Jul 02 18:39:05 MIMIC systemd[1]: Started OpenVPN service for server.
Now you can connect one or more OpenVPN clients as detailed below.
-
-
Windows 2019
-
Install and run OpenVPN
Download the appropriate binaries from the OpenVPN downloads page
and install. Run the
OpenVPN GUI
.
-
Configure OpenVPN client
We ship a set of OpenVPN configuration files that will let you get started faster than configuring all the certificates and keys by hand. Later, when you want to configure the keys by hand, you can follow the instructions at this page
.
Download our OpenVPN patch from our download site
.
Extract all the files in the ZIP file in a temporary directory, eg. in Windows Explorer under your Downloads folder. We'll call this the patch folder below.
Follow the instructions in the file install-openvpn\README_CLIENT_WINDOWS.txt.
-
Run OpenVPN server
Follow the instructions in the file install-openvpn\README_SERVER_WINDOWS.txt in the patch you downloaded in the previous section.
Now you can connect one or more OpenVPN clients as detailed below.
-
-
RedHat Enterprise Linux
-
Display
MIMIC can be controlled in a variety of ways:
-
command-line only as detailed in the
MIMICshell reference
;
-
MIMICview GUI
;
-
web-browser based
WEBUI
;
- Custom clients in a variety of programming languages;
The most feature rich of these, particularly at the outset, is the MIMICview GUI. In order to display the MIMICview GUI, you need to have a display connected to the VM. This section details your choices for the supported MIMIC operating systems:
-
RedHat Enterprise Linux
On Linux, the MIMICview GUI is a X client that needs an X server to display. On a Linux desktop that is the physical monitor of the machine, but in the cloud we need to find other choices:
-
Display on a remote X server
If your AWS VM has access to a remote X server, all you need to do to display MIMICview on it is to set the DISPLAY environment variable as detailed in our Linux instructions
;
-
Access via Remote Desktop
as detailed in this Microsoft page
;
-
Display on a Windows VM in AWS
You can run Windows on another VM in AWS and display to it as documented in this AWS document
or
this one
;
-
-
Windows 2019
MIMICview displays natively in the Windows desktop that you RDP to.
-
command-line only as detailed in the
MIMICshell reference
-
Processing power
Running a small scenario with hundreds of simulated agents does not need much processing power, as detailed in our scalability recommendations
.
But, if you are running simulations with thousands of agents or higher performance requirements, you'll need to scale up your MIMIC system as detailed in this FAQ entry
.
In addition, on cloud platforms the physical
CPUs are sometimes multiplexed for several vCPUs, so you are not getting
the entire processing power. This is beyond our control. Eg. if 8 vCPUs
are maxed out with CPU usage, then you need to scale up to the next level.
-
Compatibility
This section lists the OpenVPN clients we have tested for the latest version 2.4.9:
-
CentOS 8
-
Install EPEL
install EPEL as detailed at this page
.
[root@localhost ~]# dnf install epel-release
...
Dependencies resolved.
================================================================================
 Package               Architecture    Version            Repository       Size
================================================================================
Installing:
 epel-release          noarch          8-8.el8            extras           23 k

Transaction Summary
================================================================================
Install  1 Package

Total download size: 23 k
Installed size: 32 k
Is this ok [y/N]: y
Downloading Packages:
epel-release-8-8.el8.noarch.rpm                 134 kB/s |  23 kB     00:00
--------------------------------------------------------------------------------
Total                                            70 kB/s |  23 kB     00:00
Running transaction check
Transaction check succeeded.
Running transaction test
Transaction test succeeded.
Running transaction
  Preparing        :                                                        1/1
  Installing       : epel-release-8-8.el8.noarch                            1/1
  Running scriptlet: epel-release-8-8.el8.noarch                            1/1
  Verifying        : epel-release-8-8.el8.noarch                            1/1

Installed:
  epel-release-8-8.el8.noarch

Complete!
-
Install OpenVPN
install OpenVPN as above, eg:
root@localhost ~]# yum install openvpn Extra Packages for Enterprise Linux Modular 8 - 184 kB/s | 154 kB 00:00 Extra Packages for Enterprise Linux 8 - x86_64 2.0 MB/s | 7.1 MB 00:03 ... Dependencies resolved. ================================================================================ Package Architecture Version Repository Size ================================================================================ Installing: openvpn x86_64 2.4.9-1.el8 epel 542 k Installing dependencies: pkcs11-helper x86_64 1.22-7.el8 epel 64 k Transaction Summary ================================================================================ Install 2 Packages Total download size: 606 k Installed size: 1.6 M Is this ok [y/N]: y Downloading Packages: (1/2): pkcs11-helper-1.22-7.el8.x86_64.rpm 327 kB/s | 64 kB 00:00 (2/2): openvpn-2.4.9-1.el8.x86_64.rpm 1.7 MB/s | 542 kB 00:00 -------------------------------------------------------------------------------- Total 780 kB/s | 606 kB 00:00 warning: /var/cache/dnf/epel-6519ee669354a484/packages/openvpn-2.4.9-1.el8.x86_64.rpm: Header V3 RSA/SHA256 Signature, key ID 2f86d6a1: NOKEY Extra Packages for Enterprise Linux 8 - x86_64 1.6 MB/s | 1.6 kB 00:00 Importing GPG key 0x2F86D6A1: Userid : "Fedora EPEL (8)
-
Install easy-rsa
[root@localhost ~]# yum install easy-rsa
...
Dependencies resolved.
================================================================================
 Package            Architecture     Version               Repository      Size
================================================================================
Installing:
 easy-rsa           noarch           3.0.7-1.el8           epel            46 k

Transaction Summary
================================================================================
Install  1 Package

Total download size: 46 k
Installed size: 117 k
Is this ok [y/N]: y
Downloading Packages:
easy-rsa-3.0.7-1.el8.noarch.rpm                 101 kB/s |  46 kB     00:00
--------------------------------------------------------------------------------
Total                                            62 kB/s |  46 kB     00:00
Running transaction check
Transaction check succeeded.
Running transaction test
Transaction test succeeded.
Running transaction
  Preparing        :                                                        1/1
  Installing       : easy-rsa-3.0.7-1.el8.noarch                            1/1
  Verifying        : easy-rsa-3.0.7-1.el8.noarch                            1/1

Installed:
  easy-rsa-3.0.7-1.el8.noarch

Complete!
-
Configure OpenVPN client
We ship a set of OpenVPN configuration files that will let you get started faster than configuring all the certificates and keys by hand. Later, when you want to configure the keys by hand, you can follow the instructions at this page
.
Download and extract our OpenVPN patch with these commands
[root@localhost ~]# cd /tmp
[root@localhost tmp]#  curl --output patch-openvpn.tar.gz http://mirror2.gambitcommunications.com/update/images/patch-openvpn.tar.gz
  % Total    % Received % Xferd  Average Speed   Time    Time     Time  Current
                                 Dload  Upload   Total   Spent    Left  Speed
100 17024  100 17024    0     0  21147      0 --:--:-- --:--:-- --:--:-- 21121

[root@localhost tmp]# cd /etc
[root@localhost etc]#  gunzip -c /tmp/patch-openvpn.tar.gz | tar xf -
We need to change one line to point to the IP address of the MIMIC VM running the OpenVPN server at the line indicated with GAMBIT.
[root@localhost tmp]# cd openvpn/client
[root@localhost client]# vi azure.ovpn
The line to be changed is the line starting withremote
-
Run OpenVPN client
[root@localhost client]#  openvpn --config azure.ovpn
Mon Jul  6 13:58:56 2020 OpenVPN 2.4.9 x86_64-redhat-linux-gnu [SSL (OpenSSL)] [LZO] [LZ4] [EPOLL] [PKCS11] [MH/PKTINFO] [AEAD] built on Apr 24 2020
Mon Jul  6 13:58:56 2020 library versions: OpenSSL 1.1.1c FIPS  28 May 2019, LZO 2.08
Mon Jul  6 13:58:56 2020 WARNING: --ns-cert-type is DEPRECATED.  Use --remote-cert-tls instead.
Mon Jul  6 13:58:56 2020 Outgoing Control Channel Authentication: Using 512 bit message hash 'SHA512' for HMAC authentication
Mon Jul  6 13:58:56 2020 Incoming Control Channel Authentication: Using 512 bit message hash 'SHA512' for HMAC authentication
Mon Jul  6 13:58:56 2020 TCP/UDP: Preserving recently used remote address: [AF_INET]52.255.165.38:1194
Mon Jul  6 13:58:56 2020 Socket Buffers: R=[212992->212992] S=[212992->212992]
Mon Jul  6 13:58:56 2020 UDP link local: (not bound)
Mon Jul  6 13:58:56 2020 UDP link remote: [AF_INET]52.255.165.38:1194
Mon Jul  6 13:58:56 2020 TLS: Initial packet from [AF_INET]52.255.165.38:1194, sid=317be4a9 c723e38c
Mon Jul  6 13:58:56 2020 VERIFY OK: depth=1, CN=MIMIC-azure
Mon Jul  6 13:58:56 2020 VERIFY OK: nsCertType=SERVER
Mon Jul  6 13:58:56 2020 VERIFY OK: depth=0, CN=MIMIC-azure
Mon Jul  6 13:58:56 2020 Control Channel: TLSv1.3, cipher TLSv1.3 TLS_AES_256_GCM_SHA384, 2048 bit RSA
Mon Jul  6 13:58:56 2020 [MIMIC-azure] Peer Connection Initiated with [AF_INET]52.255.165.38:1194
Mon Jul  6 13:58:57 2020 SENT CONTROL [MIMIC-azure]: 'PUSH_REQUEST' (status=1)
Mon Jul  6 13:58:57 2020 PUSH: Received control message: 'PUSH_REPLY,route 10.8.0.1,topology net30,ping 10,ping-restart 120,ifconfig 10.8.0.6 10.8.0.5,peer-id 1,cipher AES-256-GCM'
Mon Jul  6 13:58:57 2020 OPTIONS IMPORT: timers and/or timeouts modified
Mon Jul  6 13:58:57 2020 OPTIONS IMPORT: --ifconfig/up options modified
Mon Jul  6 13:58:57 2020 OPTIONS IMPORT: route options modified
Mon Jul  6 13:58:57 2020 OPTIONS IMPORT: peer-id set
Mon Jul  6 13:58:57 2020 OPTIONS IMPORT: adjusting link_mtu to 1625
Mon Jul  6 13:58:57 2020 OPTIONS IMPORT: data channel crypto options modified
Mon Jul  6 13:58:57 2020 Data Channel: using negotiated cipher 'AES-256-GCM'
Mon Jul  6 13:58:57 2020 Outgoing Data Channel: Cipher 'AES-256-GCM' initialized with 256 bit key
Mon Jul  6 13:58:57 2020 Incoming Data Channel: Cipher 'AES-256-GCM' initialized with 256 bit key
Mon Jul  6 13:58:57 2020 ROUTE_GATEWAY 10.0.0.1/255.255.255.0 IFACE=enp0s3 HWADDR=08:00:27:b7:d6:22
Mon Jul  6 13:58:57 2020 TUN/TAP device tun0 opened
Mon Jul  6 13:58:57 2020 TUN/TAP TX queue length set to 100
Mon Jul  6 13:58:57 2020 /sbin/ip link set dev tun0 up mtu 1500
Mon Jul  6 13:58:57 2020 /sbin/ip addr add dev tun0 local 10.8.0.6 peer 10.8.0.5
Mon Jul  6 13:58:57 2020 /sbin/ip route add 10.8.0.1/32 via 10.8.0.5
Mon Jul  6 13:58:57 2020 WARNING: this configuration may cache passwords in memory -- use the auth-nocache option to prevent this
Mon Jul  6 13:58:57 2020 Initialization Sequence Completed
You can verify by pinging the OpenVPN server IP address:
[root@localhost ~]# ping 10.8.0.1
PING 10.8.0.1 (10.8.0.1) 56(84) bytes of data.
64 bytes from 10.8.0.1: icmp_seq=1 ttl=64 time=23.0 ms
64 bytes from 10.8.0.1: icmp_seq=2 ttl=64 time=29.6 ms
^C
--- 10.8.0.1 ping statistics ---
2 packets transmitted, 2 received, 0% packet loss, time 2ms
rtt min/avg/max/mdev = 23.001/26.303/29.606/3.306 ms
-
Add routes
To get to the remote agent addresses over the OpenVPN tunnel, you can add static routes for the networks that these agent addresses are in, eg. to get to the 10.48.0.1 or 10.201.0.110 agents in the default MIMIC agent configuration agent.cfg:
[root@localhost client]# route add -net 10.48.0.0 netmask 255.255.0.0 tun0
[root@localhost client]# route add -net 10.201.0.0 netmask 255.255.0.0 tun0
-
Access the agents
Once the routes are in place, you should be able to access the running agents, eg. with NET-SNMP
snmpwalk:
[root@localhost client]# ping 10.48.0.1
PING 10.48.0.1 (10.48.0.1) 56(84) bytes of data.
64 bytes from 10.48.0.1: icmp_seq=1 ttl=64 time=22.1 ms
^C
--- 10.48.0.1 ping statistics ---
2 packets transmitted, 1 received, 50% packet loss, time 3ms
rtt min/avg/max/mdev = 22.080/22.080/22.080/0.000 ms

[root@localhost client]# snmpwalk -v 1 -c public 10.201.0.110 system
SNMPv2-MIB::sysDescr.0 = STRING: Cisco Internetwork Operating System Software ..
IOS (tm) 3000 Software (IGS-D-L), Version 11.0(14a), RELEASE SOFTWARE (fc1)..
Copyright (c) 1986-1997 by cisco Systems, Inc...
Compiled Wed 02-Apr-97 19:23 by tlane
SNMPv2-MIB::sysObjectID.0 = OID: SNMPv2-SMI::enterprises.9.1.74
DISMAN-EVENT-MIB::sysUpTimeInstance = Timeticks: (2594) 0:00:25.94
SNMPv2-MIB::sysContact.0 = STRING: support@gambitcomm.com
SNMPv2-MIB::sysName.0 = STRING: cisco-2524
SNMPv2-MIB::sysLocation.0 = STRING: 603-881-3500
SNMPv2-MIB::sysServices.0 = INTEGER: 6
SNMPv2-MIB::sysORLastChange.0 = Timeticks: (0) 0:00:00.00
[root@localhost client]# snmpwalk -v 1 -c public 10.48.0.1 system
SNMPv2-MIB::sysDescr.0 = STRING: Cisco Internetwork Operating System Software ..
IOS (tm) RSP Software (RSP-JSV56I-M), Version 12.1(7), RELEASE SOFTWARE (fc1)..
Copyright (c) 1986-2001 by cisco Systems, Inc...
Compiled Fri 23-Feb-01 05:14 by kellythw
SNMPv2-MIB::sysObjectID.0 = OID: SNMPv2-SMI::enterprises.9.1.46
DISMAN-EVENT-MIB::sysUpTimeInstance = Timeticks: (16922) 0:02:49.22
SNMPv2-MIB::sysContact.0 = STRING: support@gambitcomm.com
SNMPv2-MIB::sysName.0 = STRING: cisco-7513
SNMPv2-MIB::sysLocation.0 = STRING:
SNMPv2-MIB::sysServices.0 = INTEGER: 78
SNMPv2-MIB::sysORLastChange.0 = Timeticks: (0) 0:00:00.00
-
Limitations
We have found and solved these limitations. Anything else is beyond our support for this third-party software:
- Change Keys
The configuration files we supply uses the same keys for anyone who runs them. If you want to change the keys, you will have to configure them on the server. First, stop the OpenVPN server, and move the existing keys aside, eg.:
[ec2-user@MIMIC etc]$ sudo systemctl stop openvpn-server@server.service
[ec2-user@MIMIC etc]$ sudo mv /etc/openvpn/easy-rsa /etc/openvpn/easy-rsa.GAMBIT
and copy a new easy-rsa area, eg.:
[ec2-user@MIMIC etc]$ sudo cp -r /etc/openvpn/easy-rsa.GAMBIT /etc/openvpn/easy-rsa
[ec2-user@MIMIC etc]$ cd /etc/openvpn/easy-rsa
then overwrite the old keys with the instructions at this page
starting at the line
sudo ./easyrsa init-pki
until (and including) the line
openvpn --genkey --secret pfs.key
Then restart the OpenVPN server. The new keys will be picked up by the server.conf config file, but also need to be copied to the client system. You need to copy these files to your client OpenVPN configuration folder:
- ca.crt
- client.crt
- client.key
- Multiple OpenVPN clients
Once you can issue client certificates, to allow multiple clients to your OpenVPN server you need to give each client a different CN (common name) in its certificate. Else use the --duplicate-cn option as detailed in this post
.
- Change Keys
-
-
Windows
-
Install and run OpenVPN
Download the appropriate binaries from the OpenVPN downloads page
and install. Run the OpenVPN client.
-
Configure OpenVPN client
We ship a set of OpenVPN configuration files that will let you get started faster than configuring all the certificates and keys by hand. Later, when you want to configure the keys by hand, you can follow the instructions at this page
.
Download our OpenVPN patch from our download site
.
Extract all the files in the ZIP file in a temporary directory, eg. in Windows Explorer under your Downloads folder. We'll call this the patch folder below.
Import the file openvpn\client\azure.ovpn under your patch folder with the OpenVPN GUI Import file... menu item.
This will create a azure folder under your OpenVPN configuration folder. You can find the location with the OpenVPN GUI Settings... menu item, Advanced tab.
Copy the rest of the files under openvpn\client from the patch folder to the azure folder under the OpenVPN Configuration Files folder. It will complain about overwriting the existing azure.ovpn file, select Don't overwrite.
Once the files are copied, you need to edit one line in the azure.ovpn file with the Edit Config menu item under the azure menu in the OpenVPN GUI to point to the AWS VM IP address. The line to be changed is the line starting with
remote
Once the changes are saved, you can run the client by picking Connect under the azure menu in the OpenVPN GUI. A log will popup with the progress, and it will finally indicate
azure is now connected
in the status bar.
You can verify by pinging the OpenVPN server IP address:
$ ping 10.8.0.1 Pinging 10.8.0.1 with 32 bytes of data: Reply from 10.8.0.1: bytes=32 time=22ms TTL=64 Reply from 10.8.0.1: bytes=32 time=27ms TTL=64 Reply from 10.8.0.1: bytes=32 time=23ms TTL=64 Reply from 10.8.0.1: bytes=32 time=23ms TTL=64 Ping statistics for 10.8.0.1: Packets: Sent = 4, Received = 4, Lost = 0 (0% loss), Approximate round trip times in milli-seconds: Minimum = 22ms, Maximum = 27ms, Average = 23ms -
Add routes
To get to the remote agent addresses over the OpenVPN tunnel, you can add static routes for the networks that these agent addresses are in, eg. to get to the 10.48.0.1 or 10.201.0.110 agents in the default MIMIC agent configuration agent.cfg:
First, print the routing table, something like (only important lines included below):
$ route print
===========================================================================
Interface List
...
===========================================================================

IPv4 Route Table
===========================================================================
Active Routes:
Network Destination        Netmask          Gateway       Interface  Metric
          0.0.0.0          0.0.0.0      192.168.0.1    192.168.0.106    266
         10.8.0.1  255.255.255.255         10.8.0.5         10.8.0.6    266
...
The gateway is in the Gateway column of the route entry to 10.8.0.1, usually it is 10.8.0.5 with the azure.ovpn configuration we provide.
To get to the remote agent addresses over the OpenVPN tunnel, you can add static routes for the networks that these agent addresses are in, eg. to get to the 10.48.0.1 or 10.201.0.110 agents in the default MIMIC agent configuration agent.cfg. NOTE: this has to be done from an Administrator CMD prompt:
$ route add 10.48.0.0 mask 255.255.0.0 10.8.0.5
 OK!
$ route add 10.201.0.0 mask 255.255.0.0 10.8.0.5
 OK!
After that, you can access both the MIMIC agents and the Internet simultaneously.
-
Access the agents
Once the routes are in place, you should be able to access the running agents, eg. with NET-SNMP
snmpgetnext:
$ ping 10.48.0.1 Pinging 10.48.0.1 with 32 bytes of data: Reply from 10.48.0.1: bytes=32 time=23ms TTL=64 Reply from 10.48.0.1: bytes=32 time=22ms TTL=64 Reply from 10.48.0.1: bytes=32 time=21ms TTL=64 Reply from 10.48.0.1: bytes=32 time=22ms TTL=64 Ping statistics for 10.48.0.1: Packets: Sent = 4, Received = 4, Lost = 0 (0% loss), Approximate round trip times in milli-seconds: Minimum = 21ms, Maximum = 23ms, Average = 22ms $ ./snmpgetnext -v 1 -c public -One 10.48.0.1 .1.3 .1.3.6.1.2.1.1.1.0 = STRING: "Cisco Internetwork Operating System Software .. IOS (tm) RSP Software (RSP-JSV56I-M), Version 12.1(7), RELEASE SOFTWARE (fc1).. Copyright (c) 1986-2001 by cisco Systems, Inc... Compiled Fri 23-Feb-01 05:14 by kellythw" -
Limitations
We have found and solved these limitations. Anything else is beyond our support for this third-party software:
- Change Keys
Create new ca.crt, client.key and client.crt files for your client as detailed above.
- Multiple OpenVPN clients
Once you can issue client certificates, to allow multiple clients to your OpenVPN server you need to give each client a different CN (common name) in its certificate. Else use the --duplicate-cn option as detailed in this post
.
- Change Keys
-
-
CentOS 8