MIMIC® Online Documentation
MIMIC MQTT Module Compatibility
The MIMIC MQTT Protocol Module is an optional facility that simulates the Internet of Things (IoT) Message Queue Telemetry Transport (MQTT) standard. This section details interoperability of MIMIC MQTT Simulator with third-party MQTT brokers, IoT platforms and subscriber applications.
If your broker supports unencrypted access, then by all means use it to get started. The below are additional instructions to get MIMIC to interoperate over encrypted channels and other access policies, specially for cloud-based platforms.
-
Table of Contents
- MIMIC MQTT Module configuration for TLS
- On premise
-
Cloud
-
Amazon AWS IoT
-
Azure Event Grid
-
Azure IoT Hub
-
IBM IoT Connection Service

-
IBM Bluemix
-
Google IoT Core
-
Siemens MindSphere
-
Akamai IoT Edge Connect

-
Bosch IoT Hub

-
Alibaba IoT Platform
-
Cumulocity
-
Losant
-
TagoIO
-
Ubidots

-
Qubitro
-
Cloud Studio

-
Telit
-
Solace Cloud

-
Clearblade
-
OSRAM Lightelligence

- RelayR
-
CloudMQTT
-
Pubnub
-
wolkabout
-
flespi
-
thethings.io

-
wia.io

-
EVRYTHNG

-
Orange Live Objects

-
Databoom

-
Eclipse Hono
-
Eclipse Vorto
-
KaaIoT

-
2smart

-
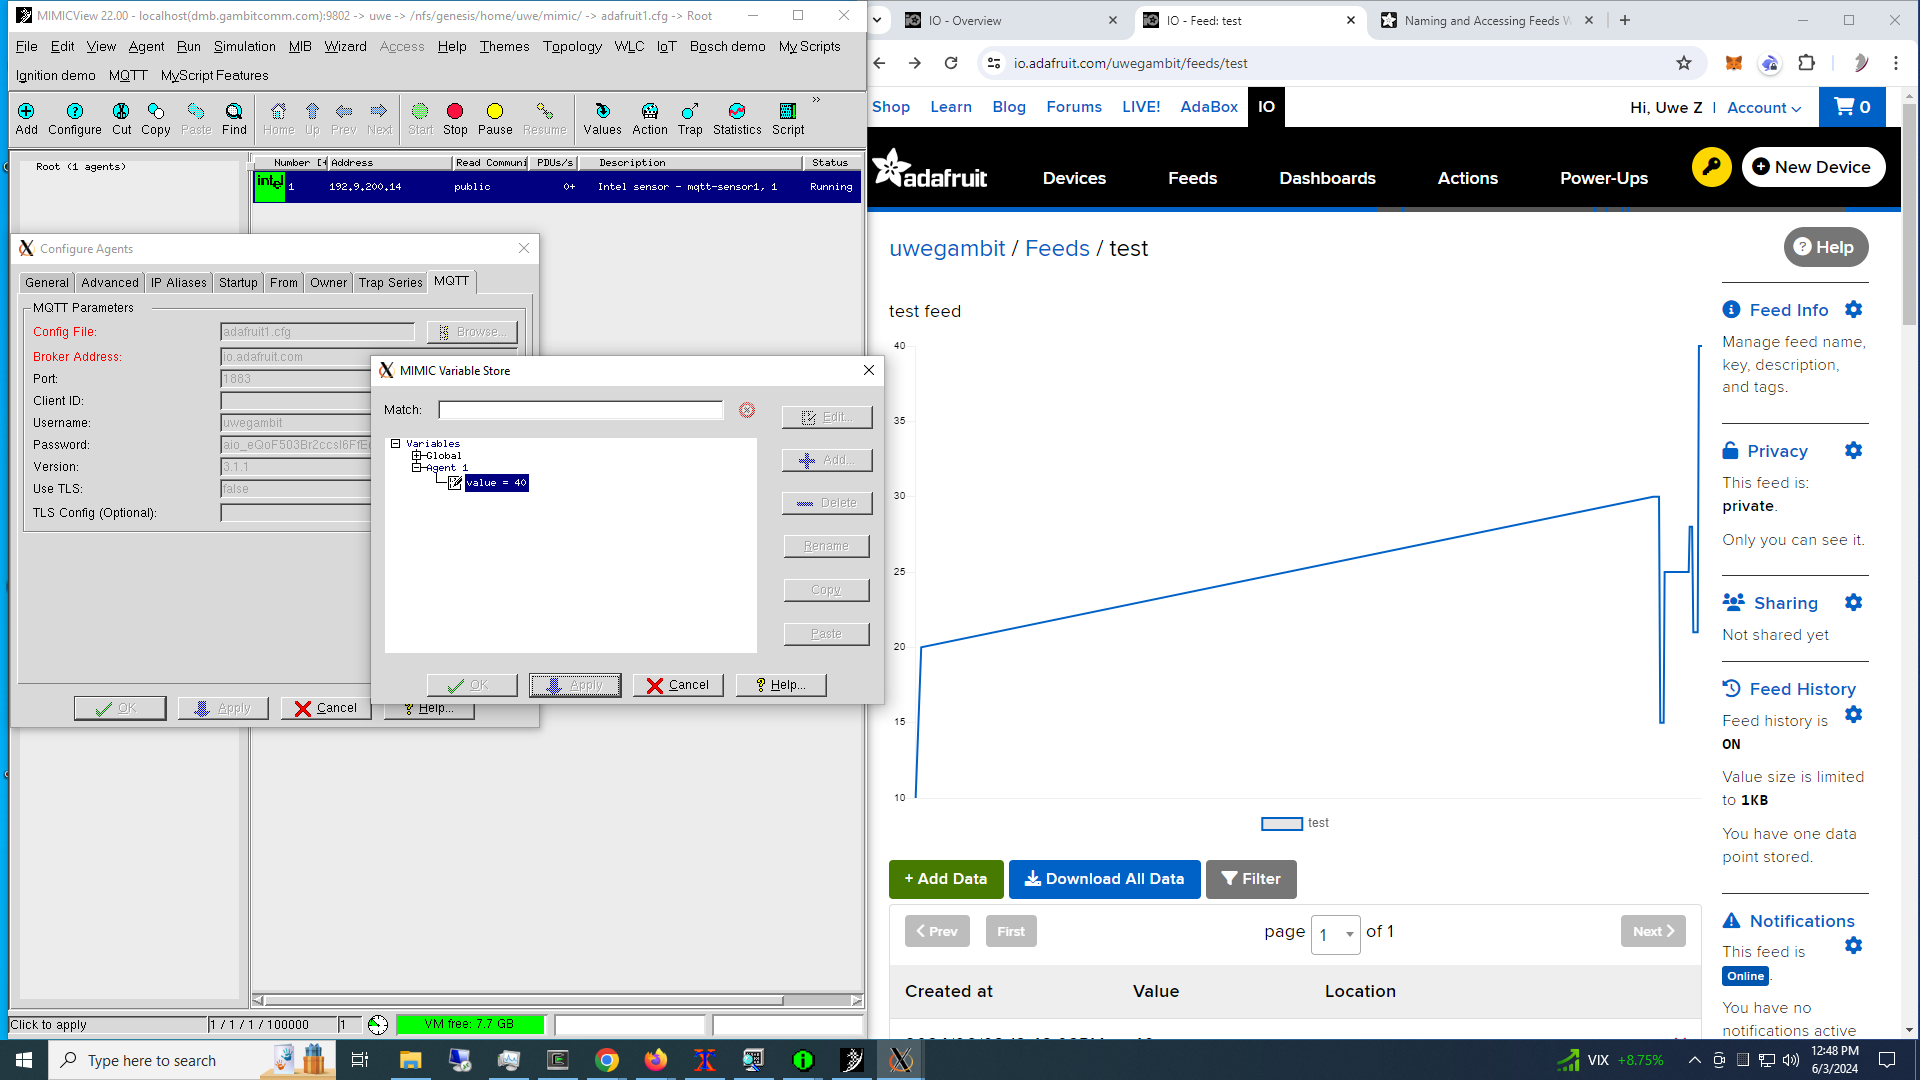
Adafruit
- Samsung Artik
-
Amazon AWS IoT
- Edge
-
MIMIC MQTT Module configuration for TLS
To use TLS, you need to set the Use TLS configurable to true, as detailed in the Using MQTT from MIMICview section, and set the TLS Config File, eg. to the file that ships with MIMIC.
The tls.cfg invokes client.crt and client.key. This crt/key pair can be an arbitrary, self-signed RSA certificate/key pair. But for brokers like IBM MessageSight which verify this crt/key pair, we can for the MIMIC MQTT client reuse mosquitto's testing client crt/key pair mosquitto-1.4.5/test/ssl/{client.crt,client.key}, because it is signed by mosquitto's all-ca.crt, and we can in MessageSight, reuse all-ca.crt, thereby ensuring the signing relation between client and server CA certificates later in the MessageSight testing.
To reuse mosquitto's client.crt and client.key, download mosquitto source code then copy like this (assuming default mimic private area),
$ cp mosquitto-1.4.5/test/ssl/client.{crt,key} ~/mimic/config/mqtt/then touch tls.cfg like this,
$ touch ~/mimic/config/mqtt/tls.cfg
The touching gives a new timestamp of the tls.cfg file, so that MQTT module reloads the cert/key from disk. So, every time you change cert/key in disk after a tls.cfg has been loaded by a started agent, you need to touch the tls.cfg file. Overall, in this test case, MimicView GUI MQTT configuration looks like this,
Then, as soon as you start the agent, it immediately connects the MQTT broker via TLS.
-
Mosquitto
To work with mosquitto TLS, mosquitto's configuration needs to have 4 parameters , cafile, certfile, and keyfile , such as this diff from default server config,
$ diff mosquitto-1.4.5/mosquitto.conf mosquitto-tls.conf
136c136
< #port 1883
---
> port 8883
187c187
< #cafile
---
> cafile mosquitto-ca.crt
191c191
< #certfile
---
> certfile mosquitto-server.crt
194c194
< #keyfile
---
> keyfile mosquitto-server.key
This configuration does not enforce verifying clients for signing relation between client's certificate and the mosquitto-ca.crt certificate. To enforce, the parameters "require..." are needed.
The server side's crt and key files are part of mosquitto package in mosquitto-1.4.5/test/ssl/ directory as all-ca.crt, server.crt, and server.key . Simply copy like this,
$ cp mosquitto-1.4.5/test/ssl/all-ca.crt ./mosquitto-ca.crt
$ cp mosquitto-1.4.5/test/ssl/server.crt ./mosquitto-server.crt
$ cp mosquitto-1.4.5/test/ssl/server.key ./mosquitto-server.key
then invoke the broker server with -c mosquitto-tls.conf argument.
Else, you can generate certificates from scratch as detailed at Mosquitto . NOTE: make sure the CN is different between server and client certificates.
-
Eclipse Amlen
We installed Amlen according to their installation instructions were quickly able to connect 1000 connections.
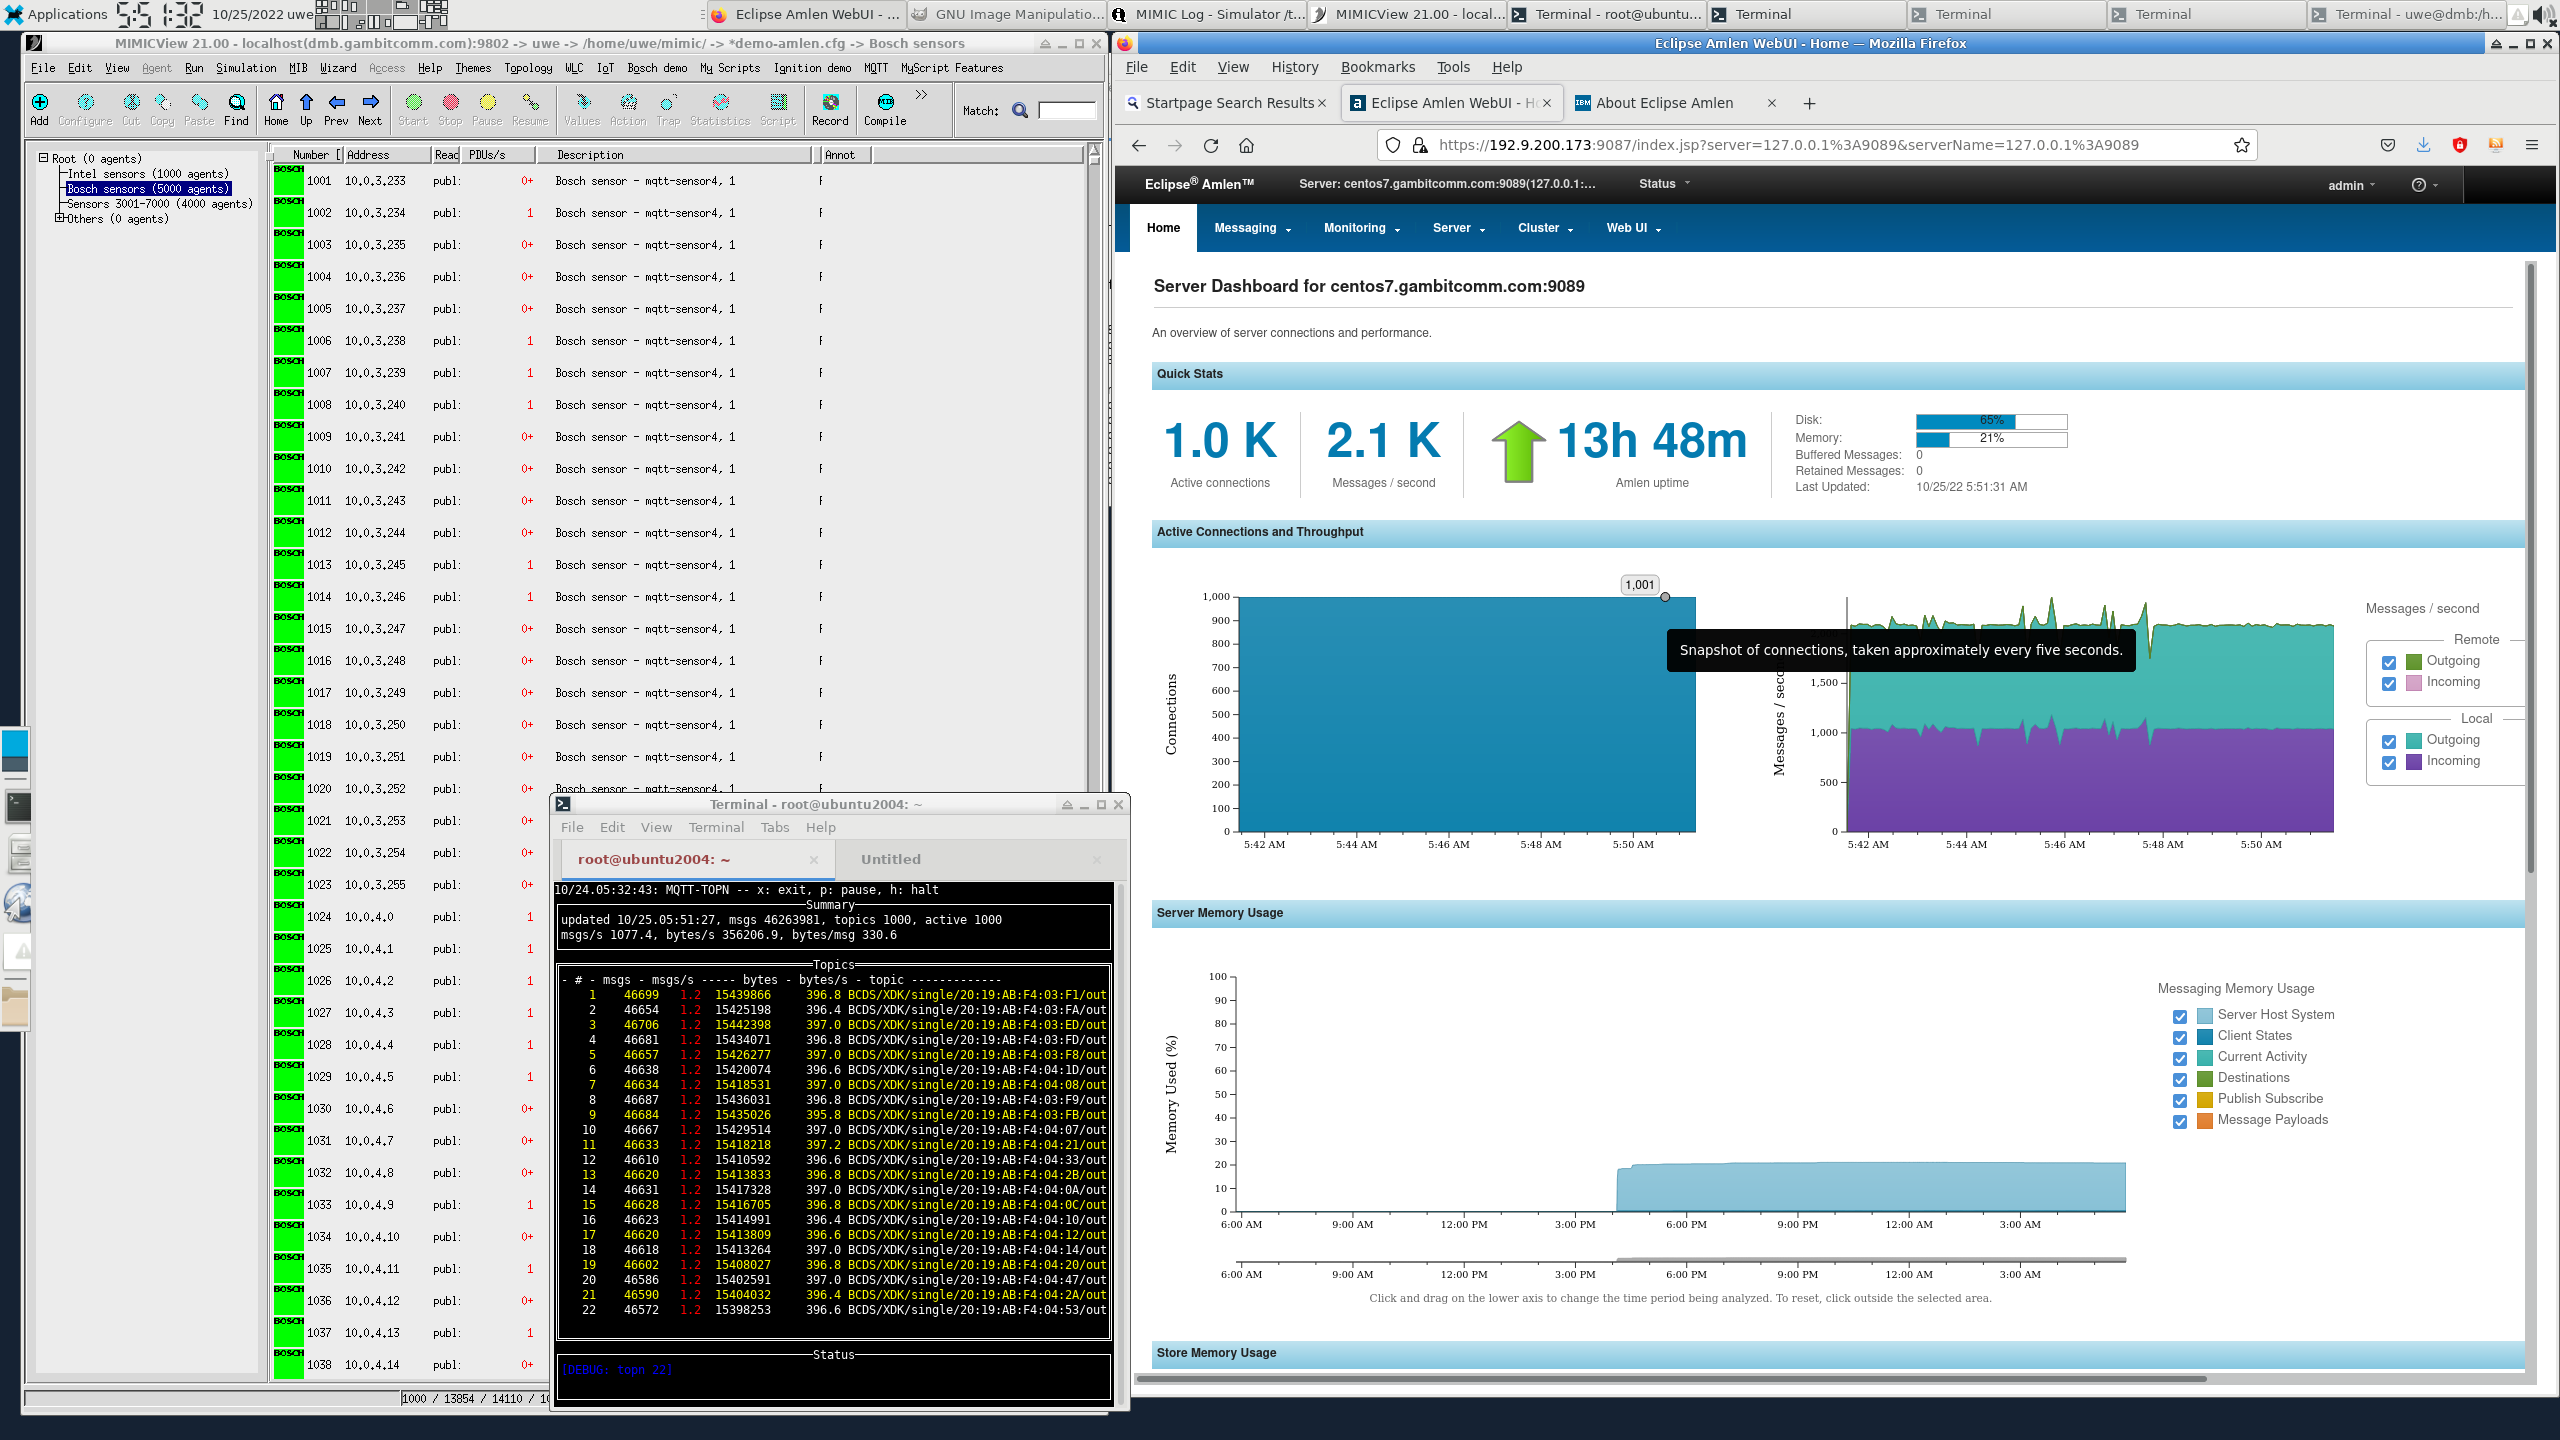
A little tuning allowed us to connect 10,000 sensors, as seen in this 4-minute video on Youtube.
We then followed their TLS setup to allow encrypted connections.
-
IBM MessageSight
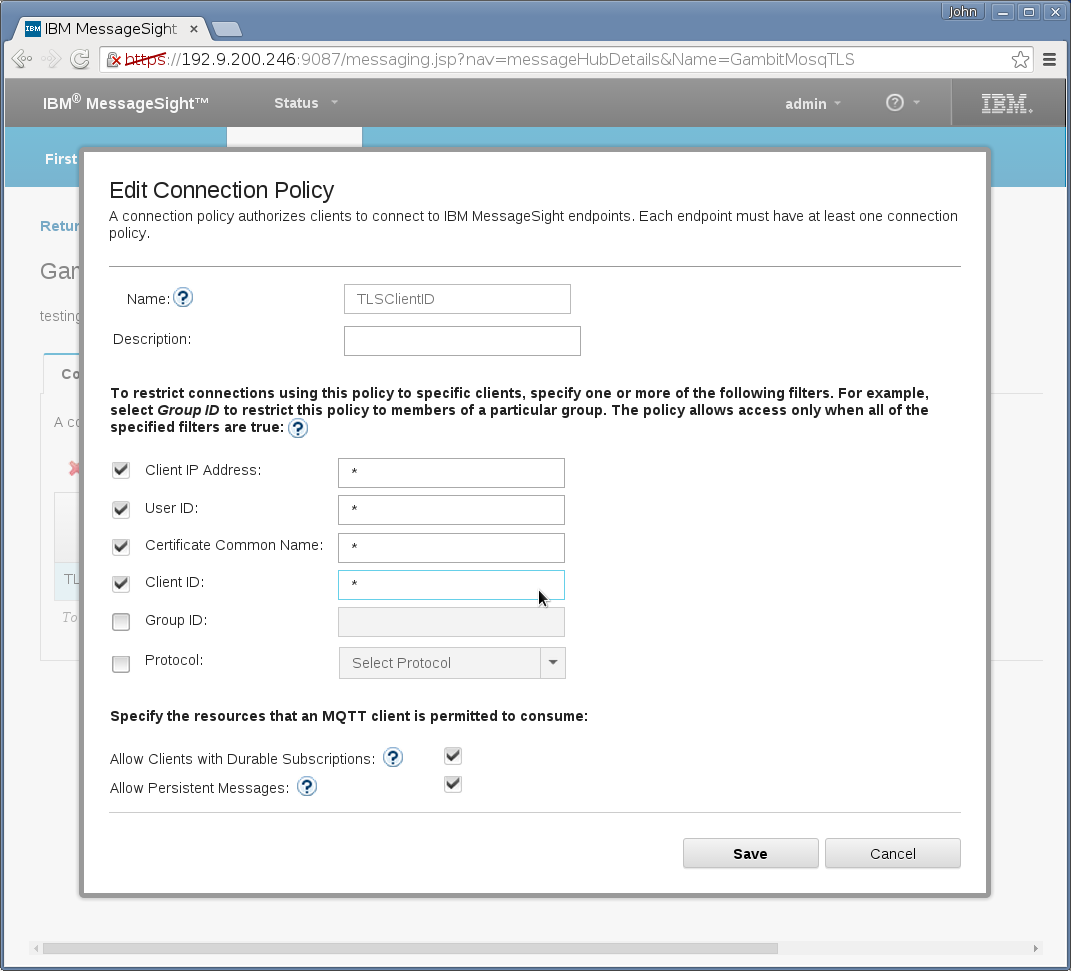
To set up the MQTT broker for TLS, 3 GUI pages are needed:
-
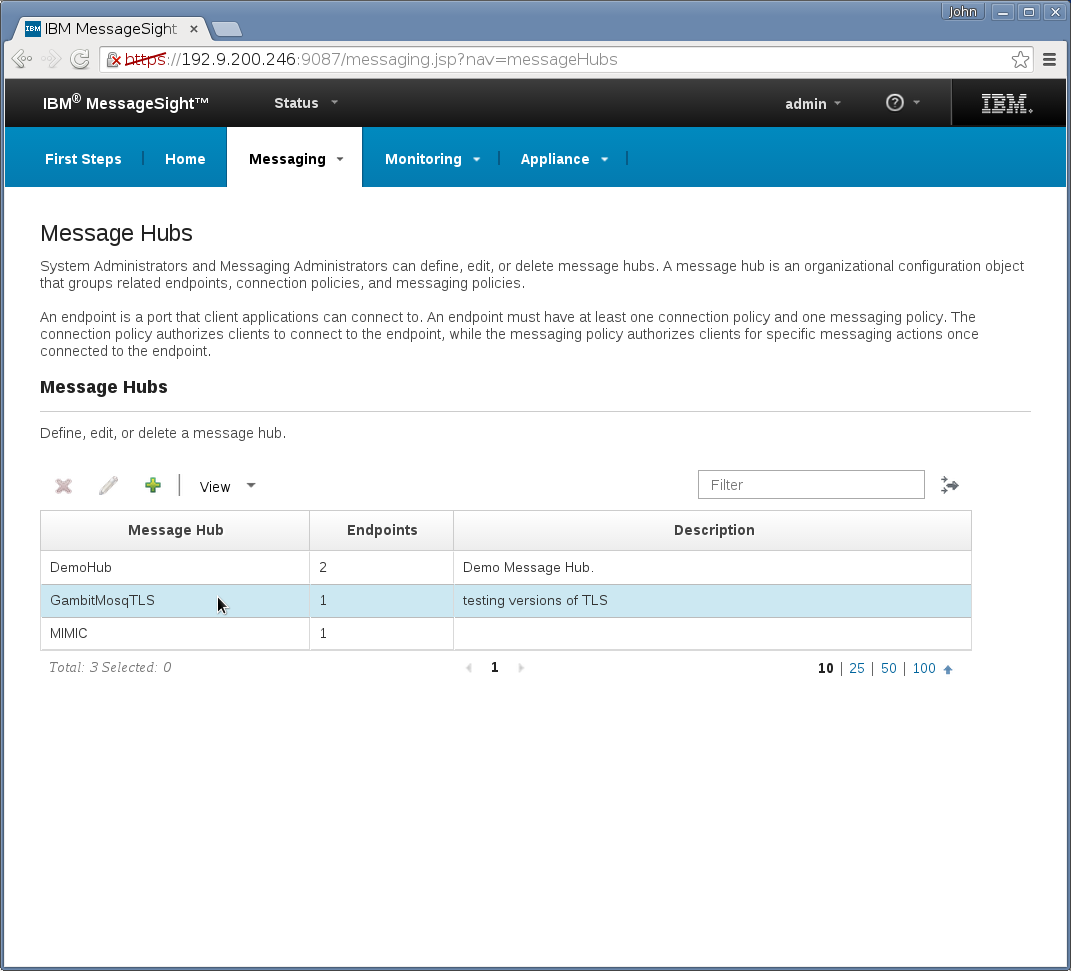
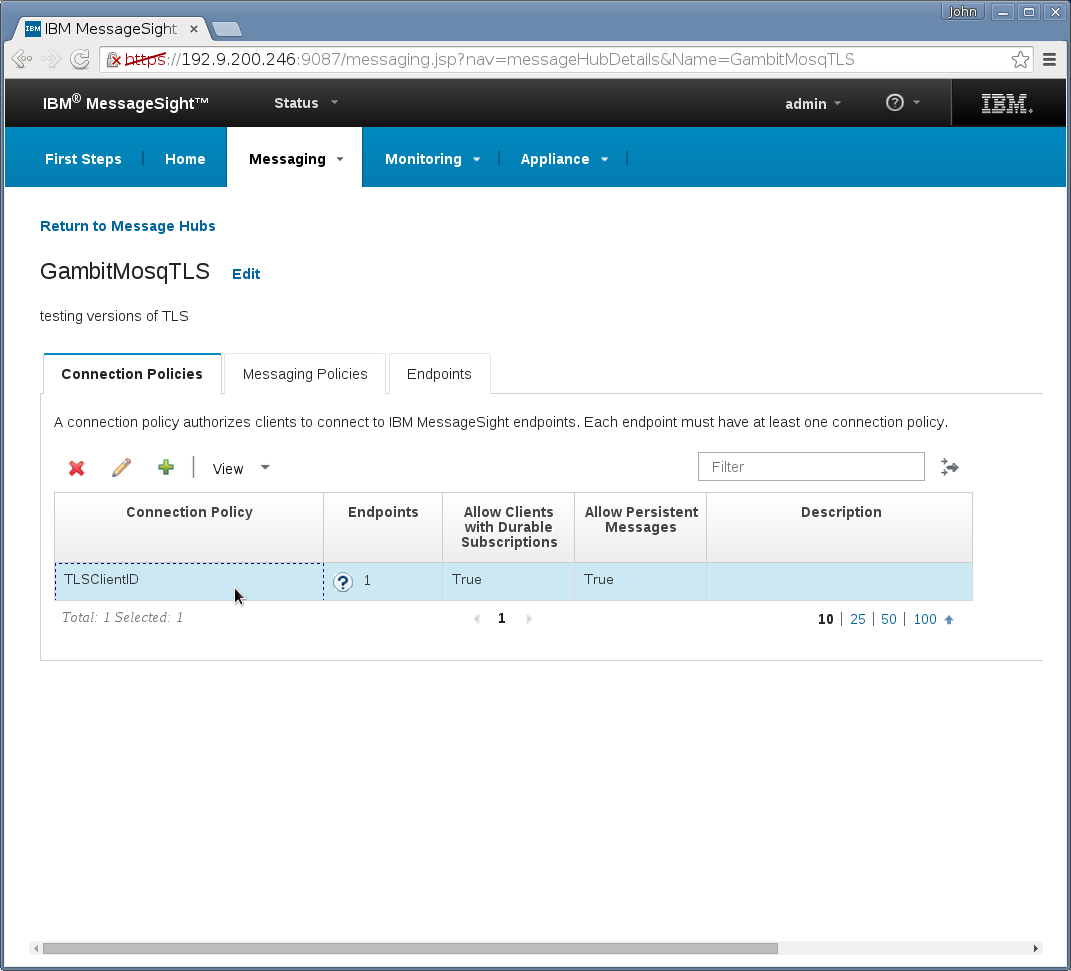
Messaging→Hubs→Connection Policies needs a new entry that
specifies all client IDs are accepted (enter “*”):
-
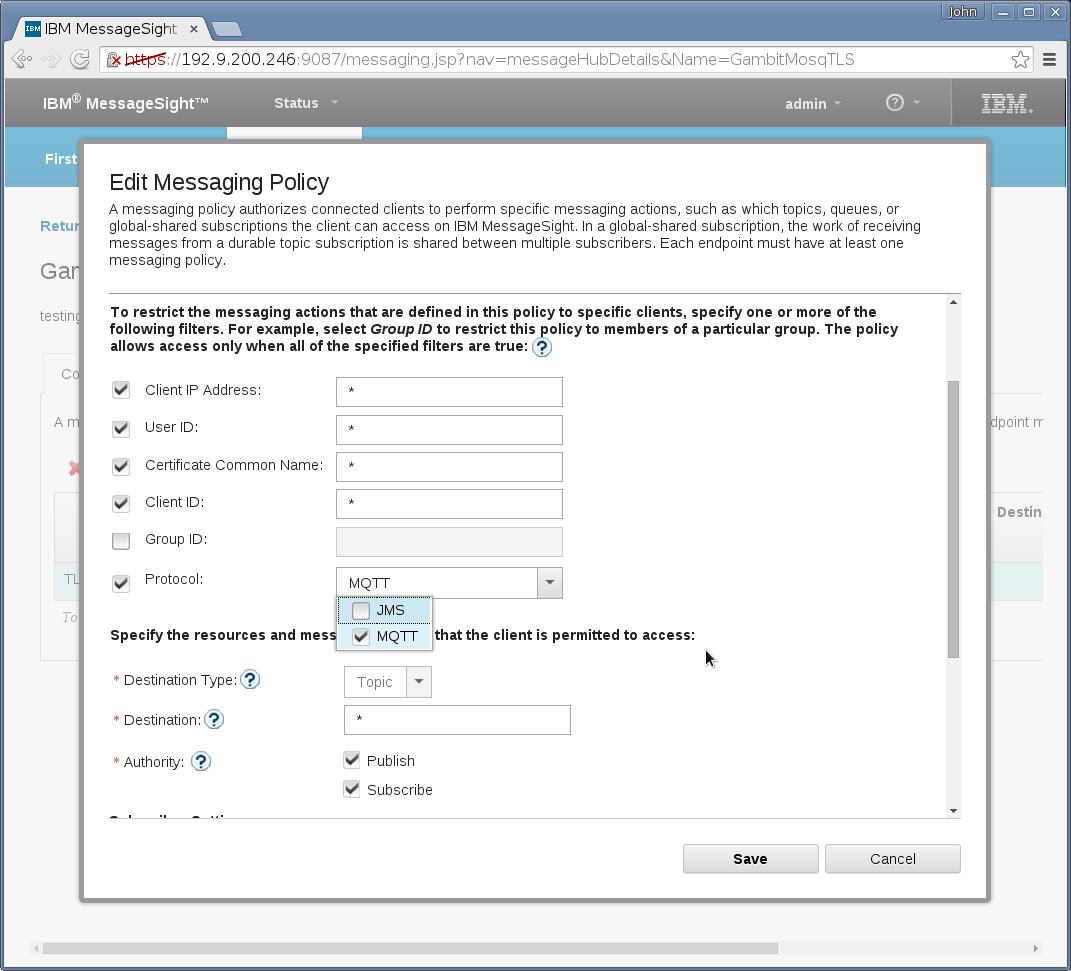
Messaging→Hubs→Messaging Policies needs a new entry that
picks MQTT among the list of MQTT and JMS:
-
Messaging→Hubs→End Points needs a new entry that specifies
TCP port number, but omit Security Profile if using plain TCP clients
without TLS . And this end point ties above step 1 and step 2's
entries:

Overall, the Messaging→Hubs GUI new entry should look like this
and the following
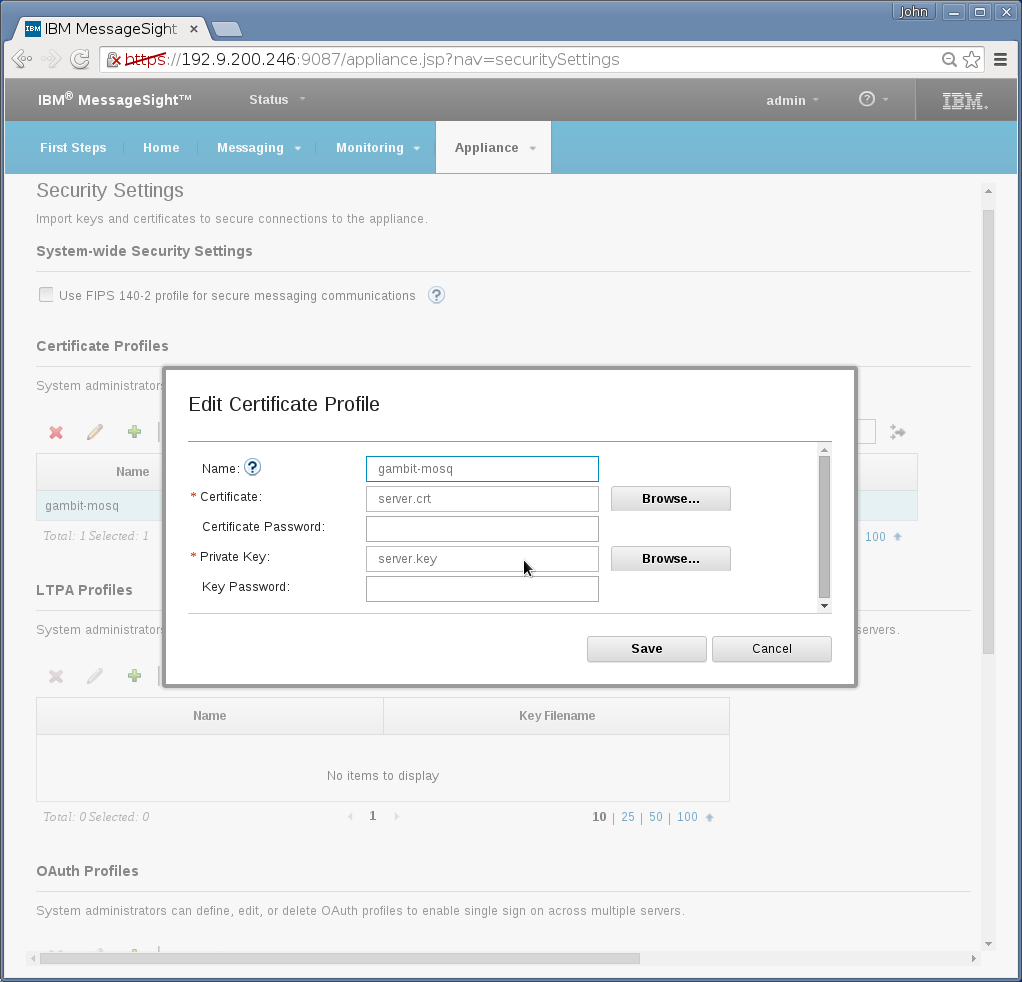
There are 3 extra GUI pages to configure for TLS,
-
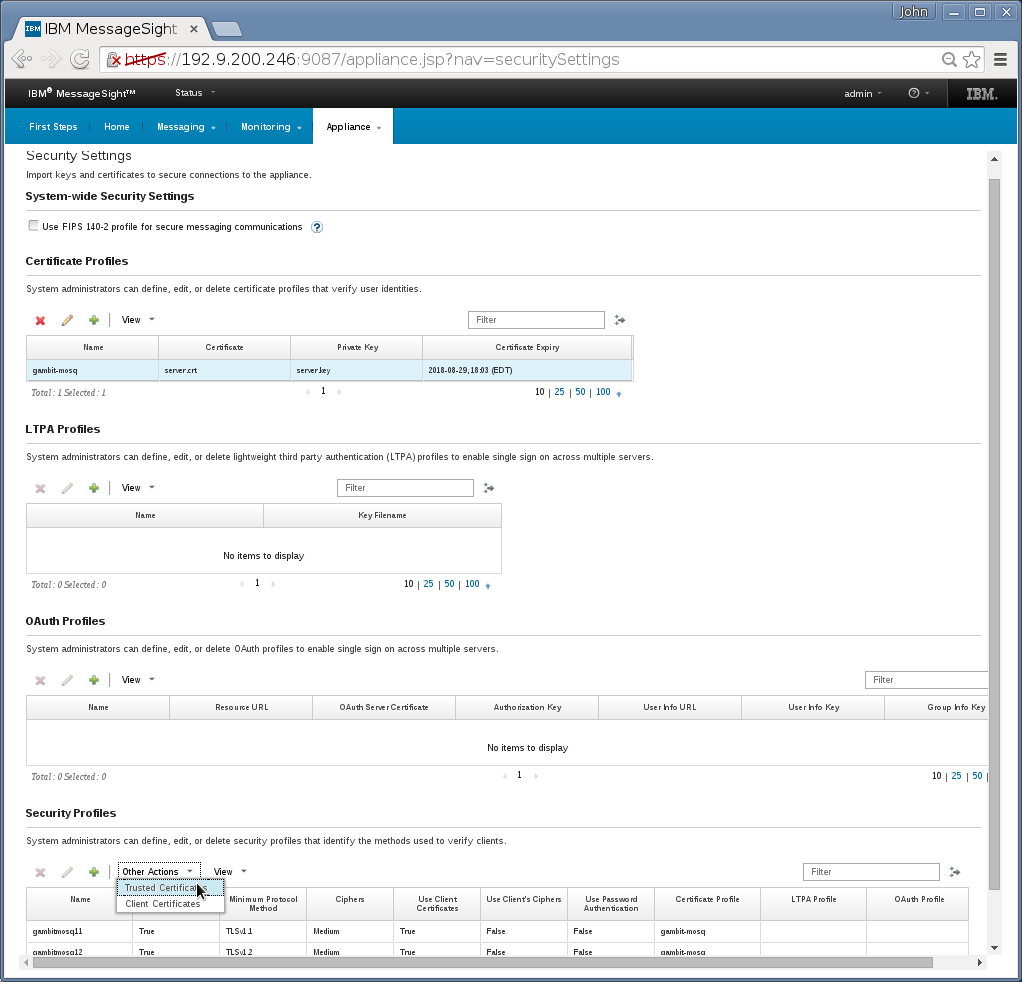
Appliance→Security→Certificate Profile needs a new entry
to hold uploading server certificate/key:
-
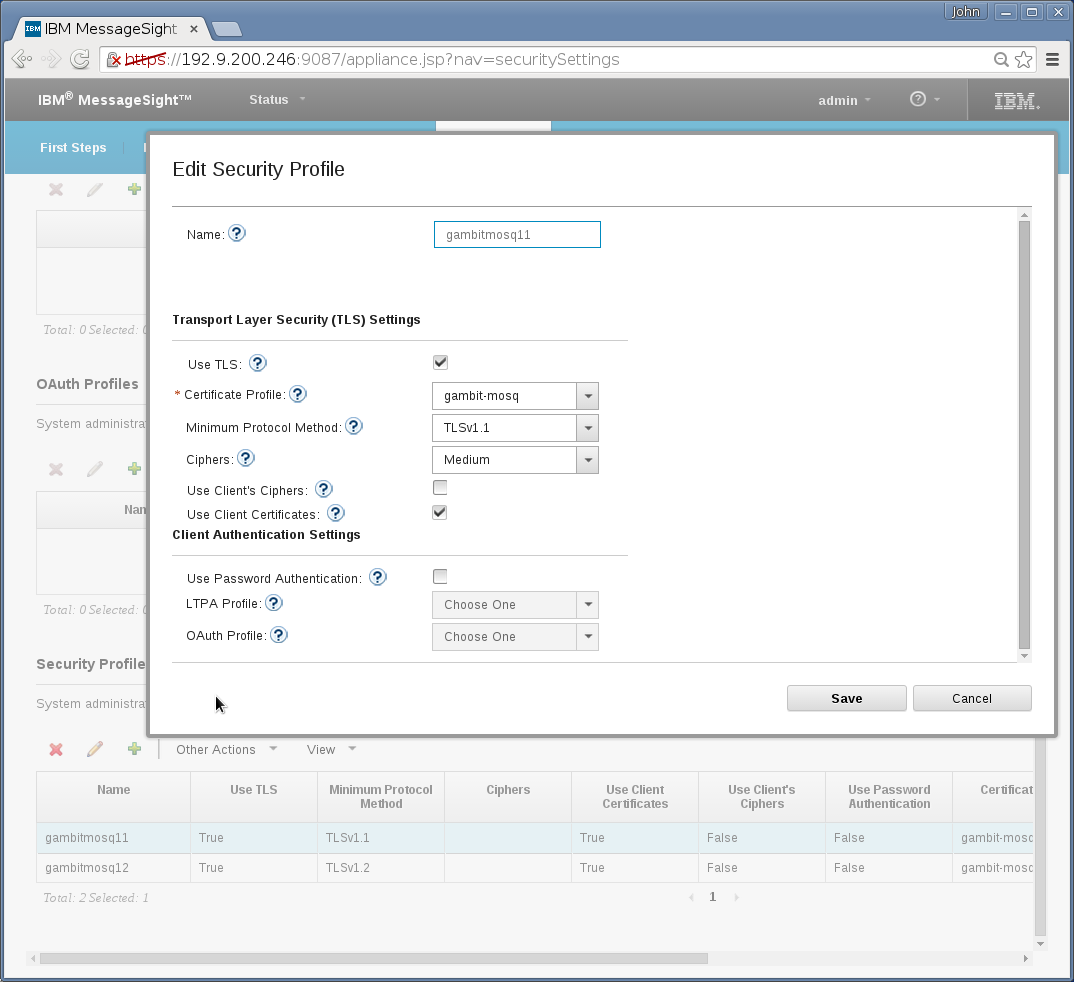
Appliance→Security→Security Profile needs a new entry that
specifies minimum TLS version. Set it to TLSv1.1:
-
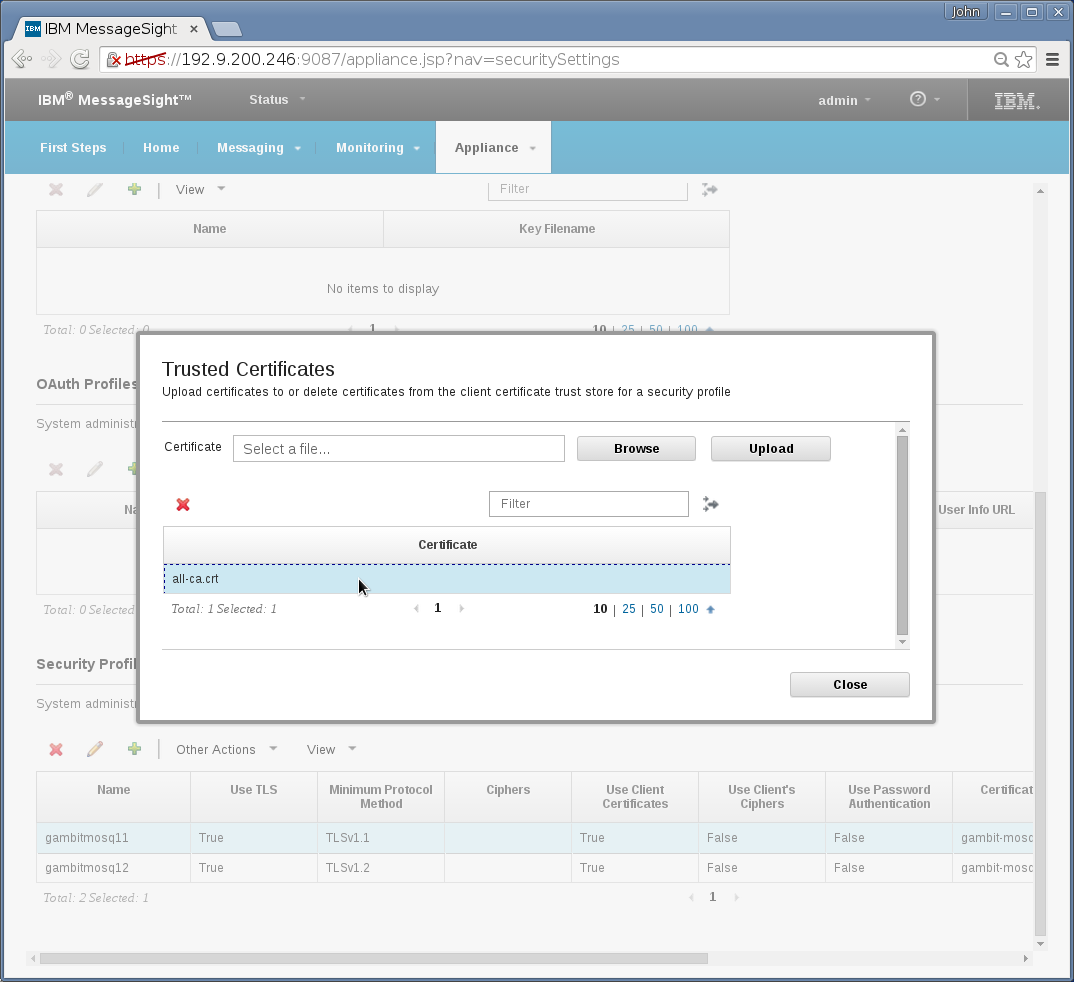
Appliance→Security→Profile→Other Action(Trusted
Certificate) needs uploading CA certificate. You can simply
reuse Mosquitto's all-ca.crt that was mentioned in the above
Mosquitto section:
And there is 1 dialog of a regular broker hub configuration that needs to change to make it TLS,
Messaging→Message Hubs→Endpoints→Security Profile field needs to point to the new entry created in above step 2:
Overall, the Security Settings page should look like this
For tuning, check this IBM support page.
With MessageSight 2.0 running on a 16-CPU, 132 GB RAM server we got to 300,000 connections as detailed in this blog post.
With MessageSight 5.0 (aka IBM Watson IoT Platform - Message Gateway ) running on a 16-CPU, 132 GB RAM server we got to 400,000 connections.
MessageSight was open sourced as Eclipse Amlen by IBM and integration with MIMIC is now detailed in the Eclipse Amlen section.
-
Messaging→Hubs→Connection Policies needs a new entry that
specifies all client IDs are accepted (enter “*”):
-
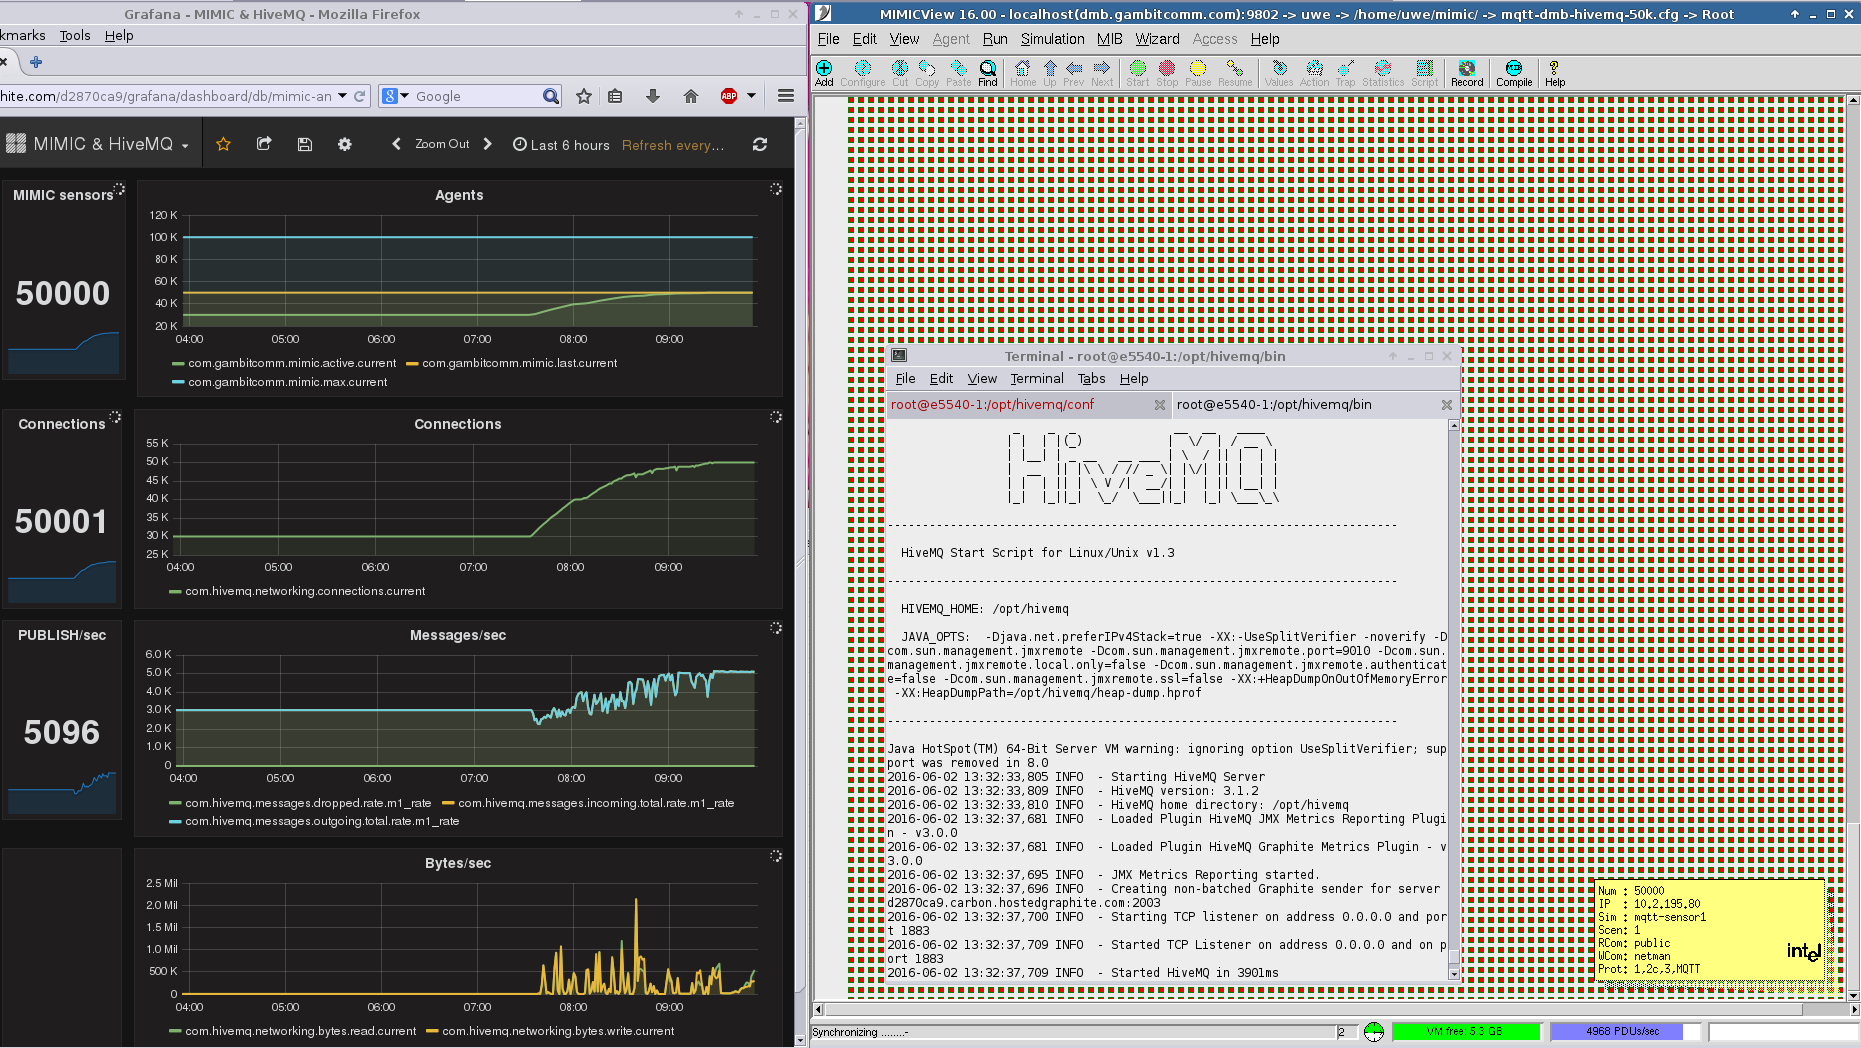
HiveMQ
To set up the MQTT broker for TLS, the instructions in the HiveMQ documentation are sufficient.
We have run MIMIC with 50,000 simulated sensors against HiveMQ 3 as shown below.
-
Ignition
Inductive Automation's Ignition platform with their MQTT Edge module implements an Industrial IoT standard called Sparkplug. which is based on Google Protocol Buffers and defines a state machine that all devices that connect to Ignition must support.
We have implemented this state machine in an MQTT PUBLISH action script which allowed us to register many simulated Bosch sensors with Ignition and publish unique temperature telemetry.
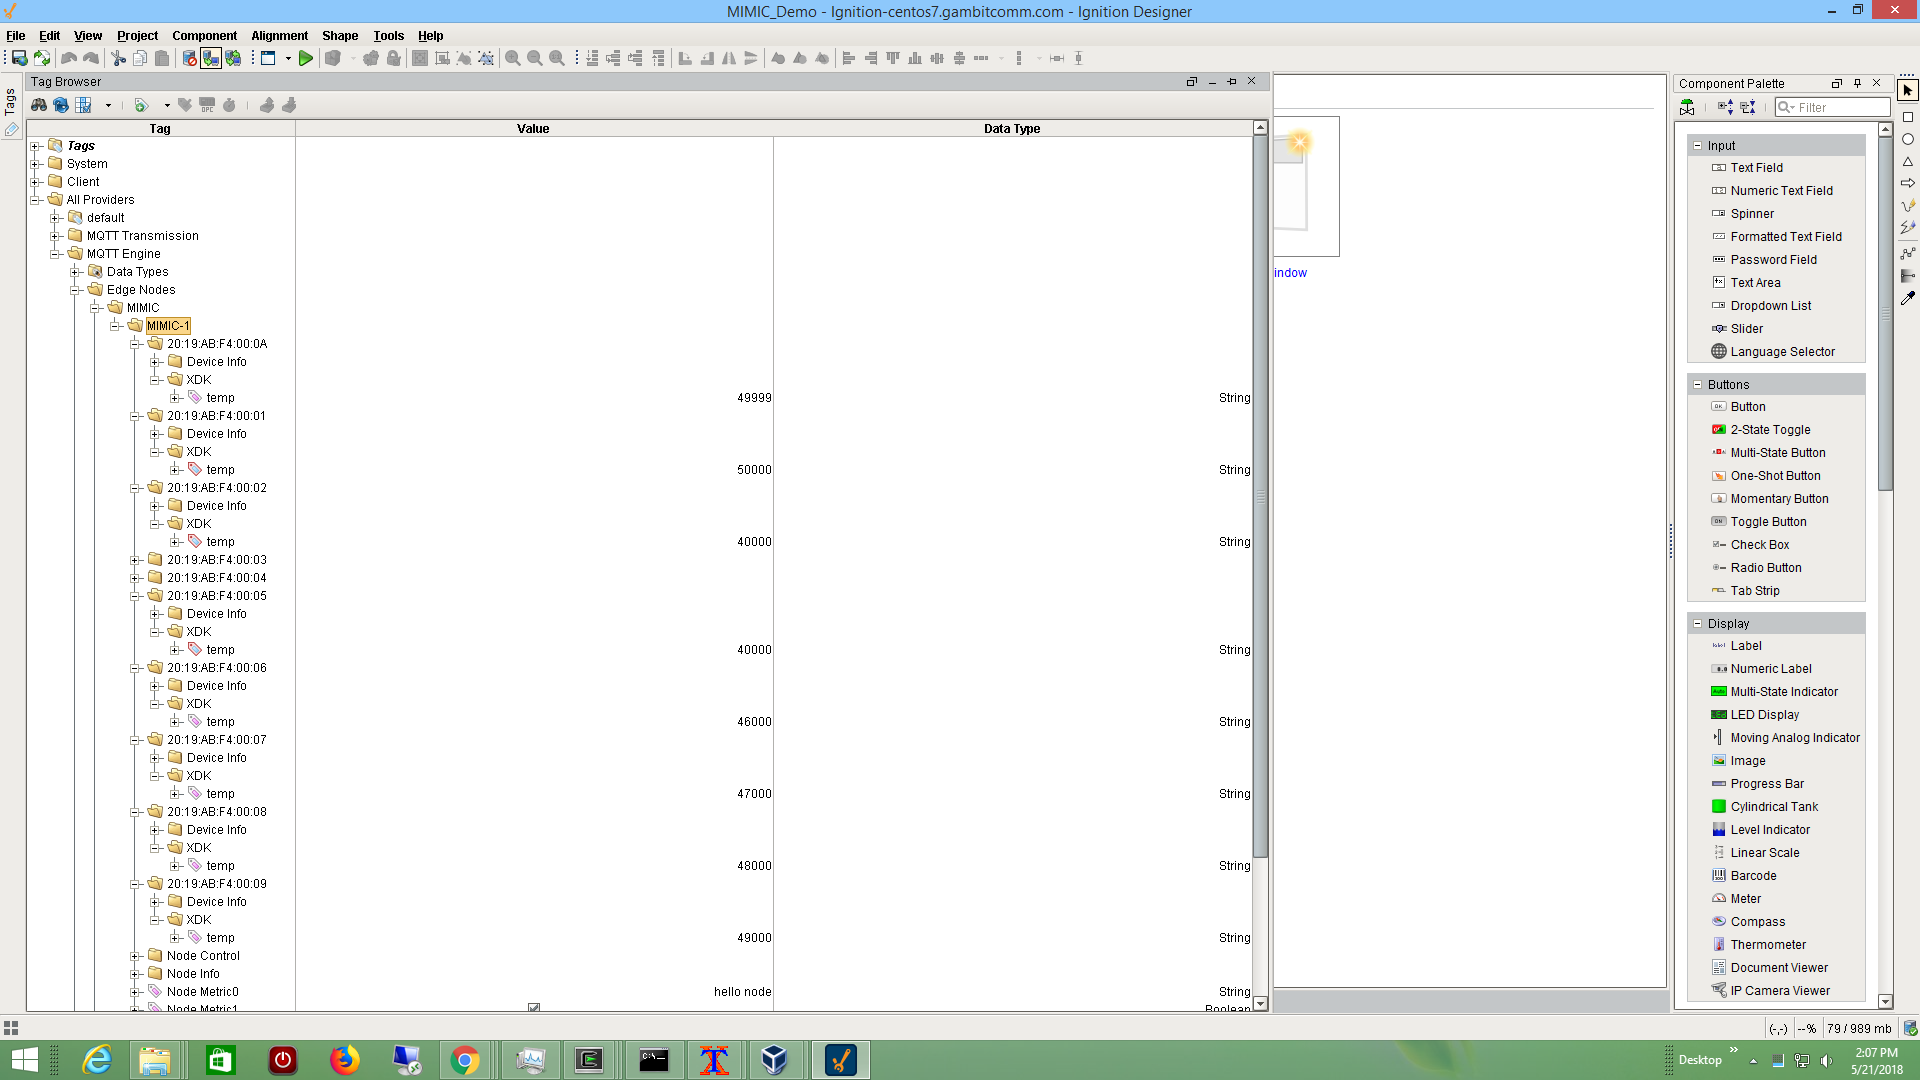
See also this blog post, and this one that points to a video.
We have published a MIMIC MQTT Lab to investigate the Sparkplug protocol.
-
Thingworx
We followed PTC Thingworx Industrial Connectivity Guide to setup a local Industrial Connectivity instance talking to a hosted Thingworx Foundation instance. Then we instantiated a IoT Gateway Thing to subscribe to the necessary topic to import telemetry from our simulated sensor. This telemetry was then bound to a Thing in Foundation, and charted in a Mashup.
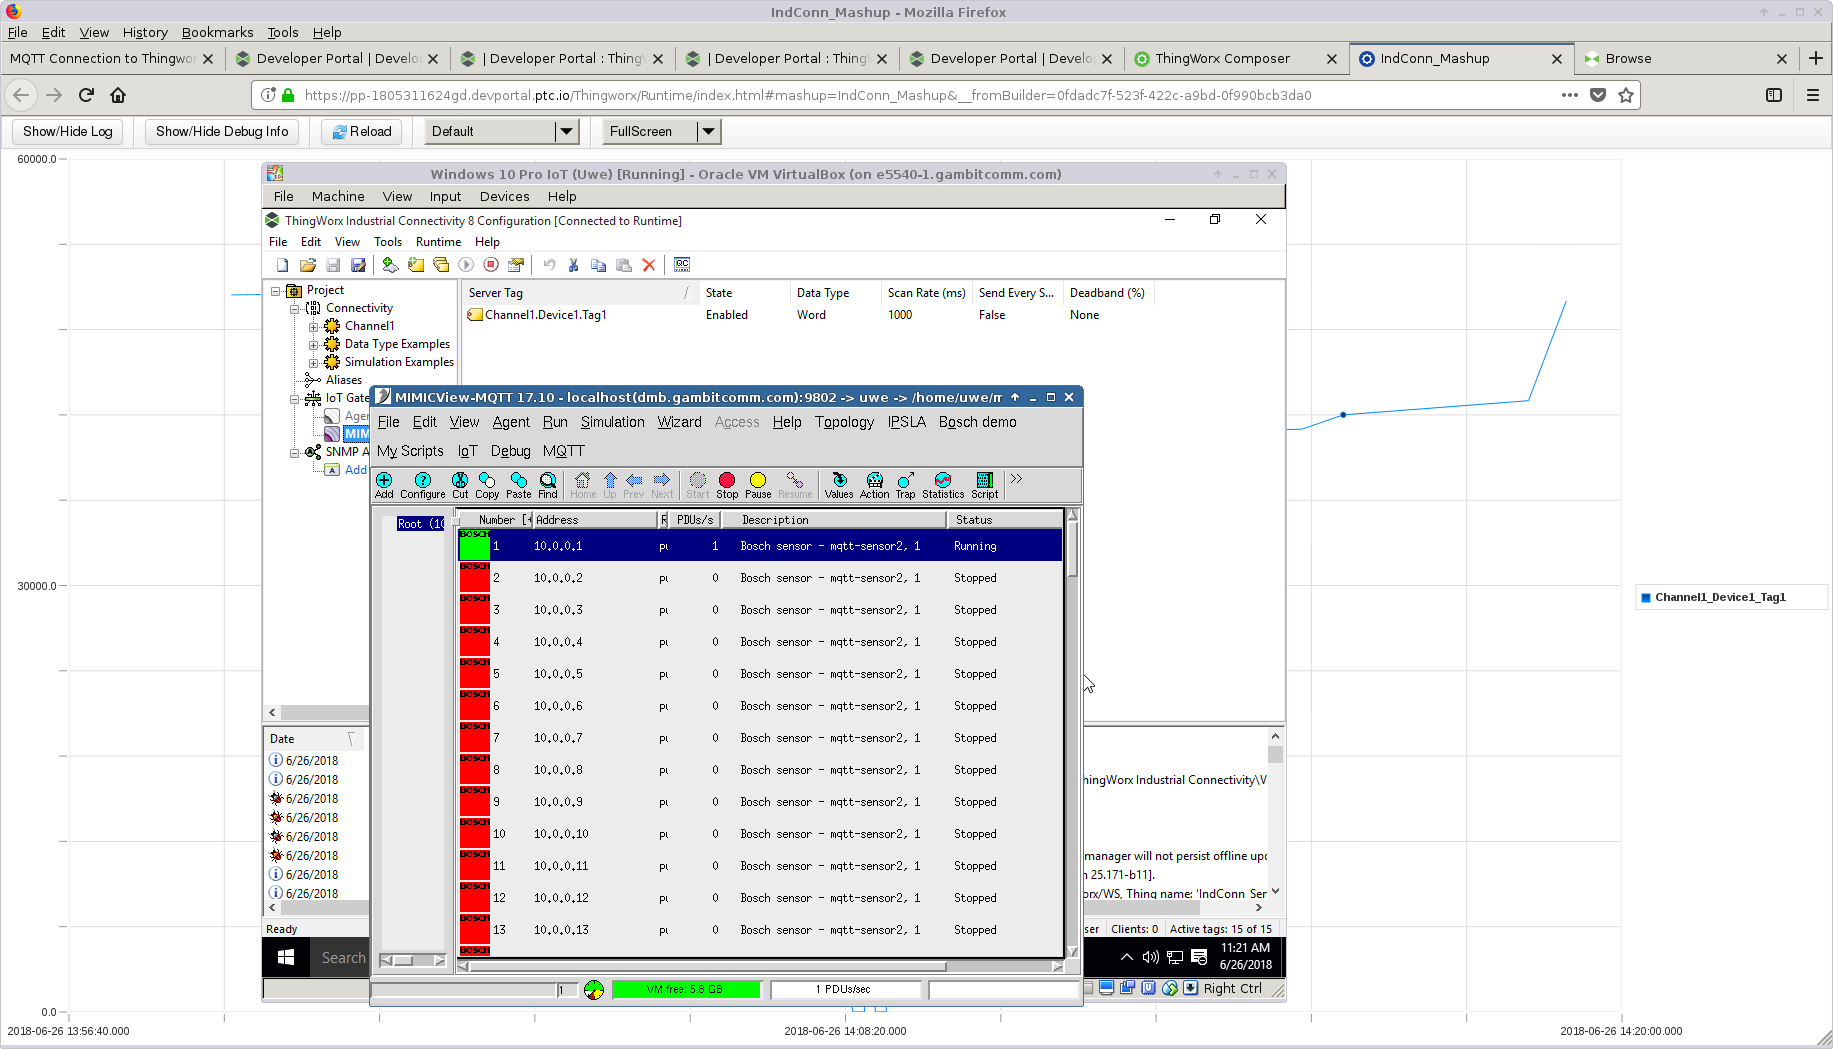
See also this blog post that points to a video showing a simulated sensor producing arbitrary and precise telemetry as charted in a hosted Thingworx Foundation instance
-
N3uron
After downloading the N3uron software, we followed the Quick User Guide , in particular the MQTT Client module to subscribe from a public broker, which received telemetry from our public MQTT Lab and graphed it.
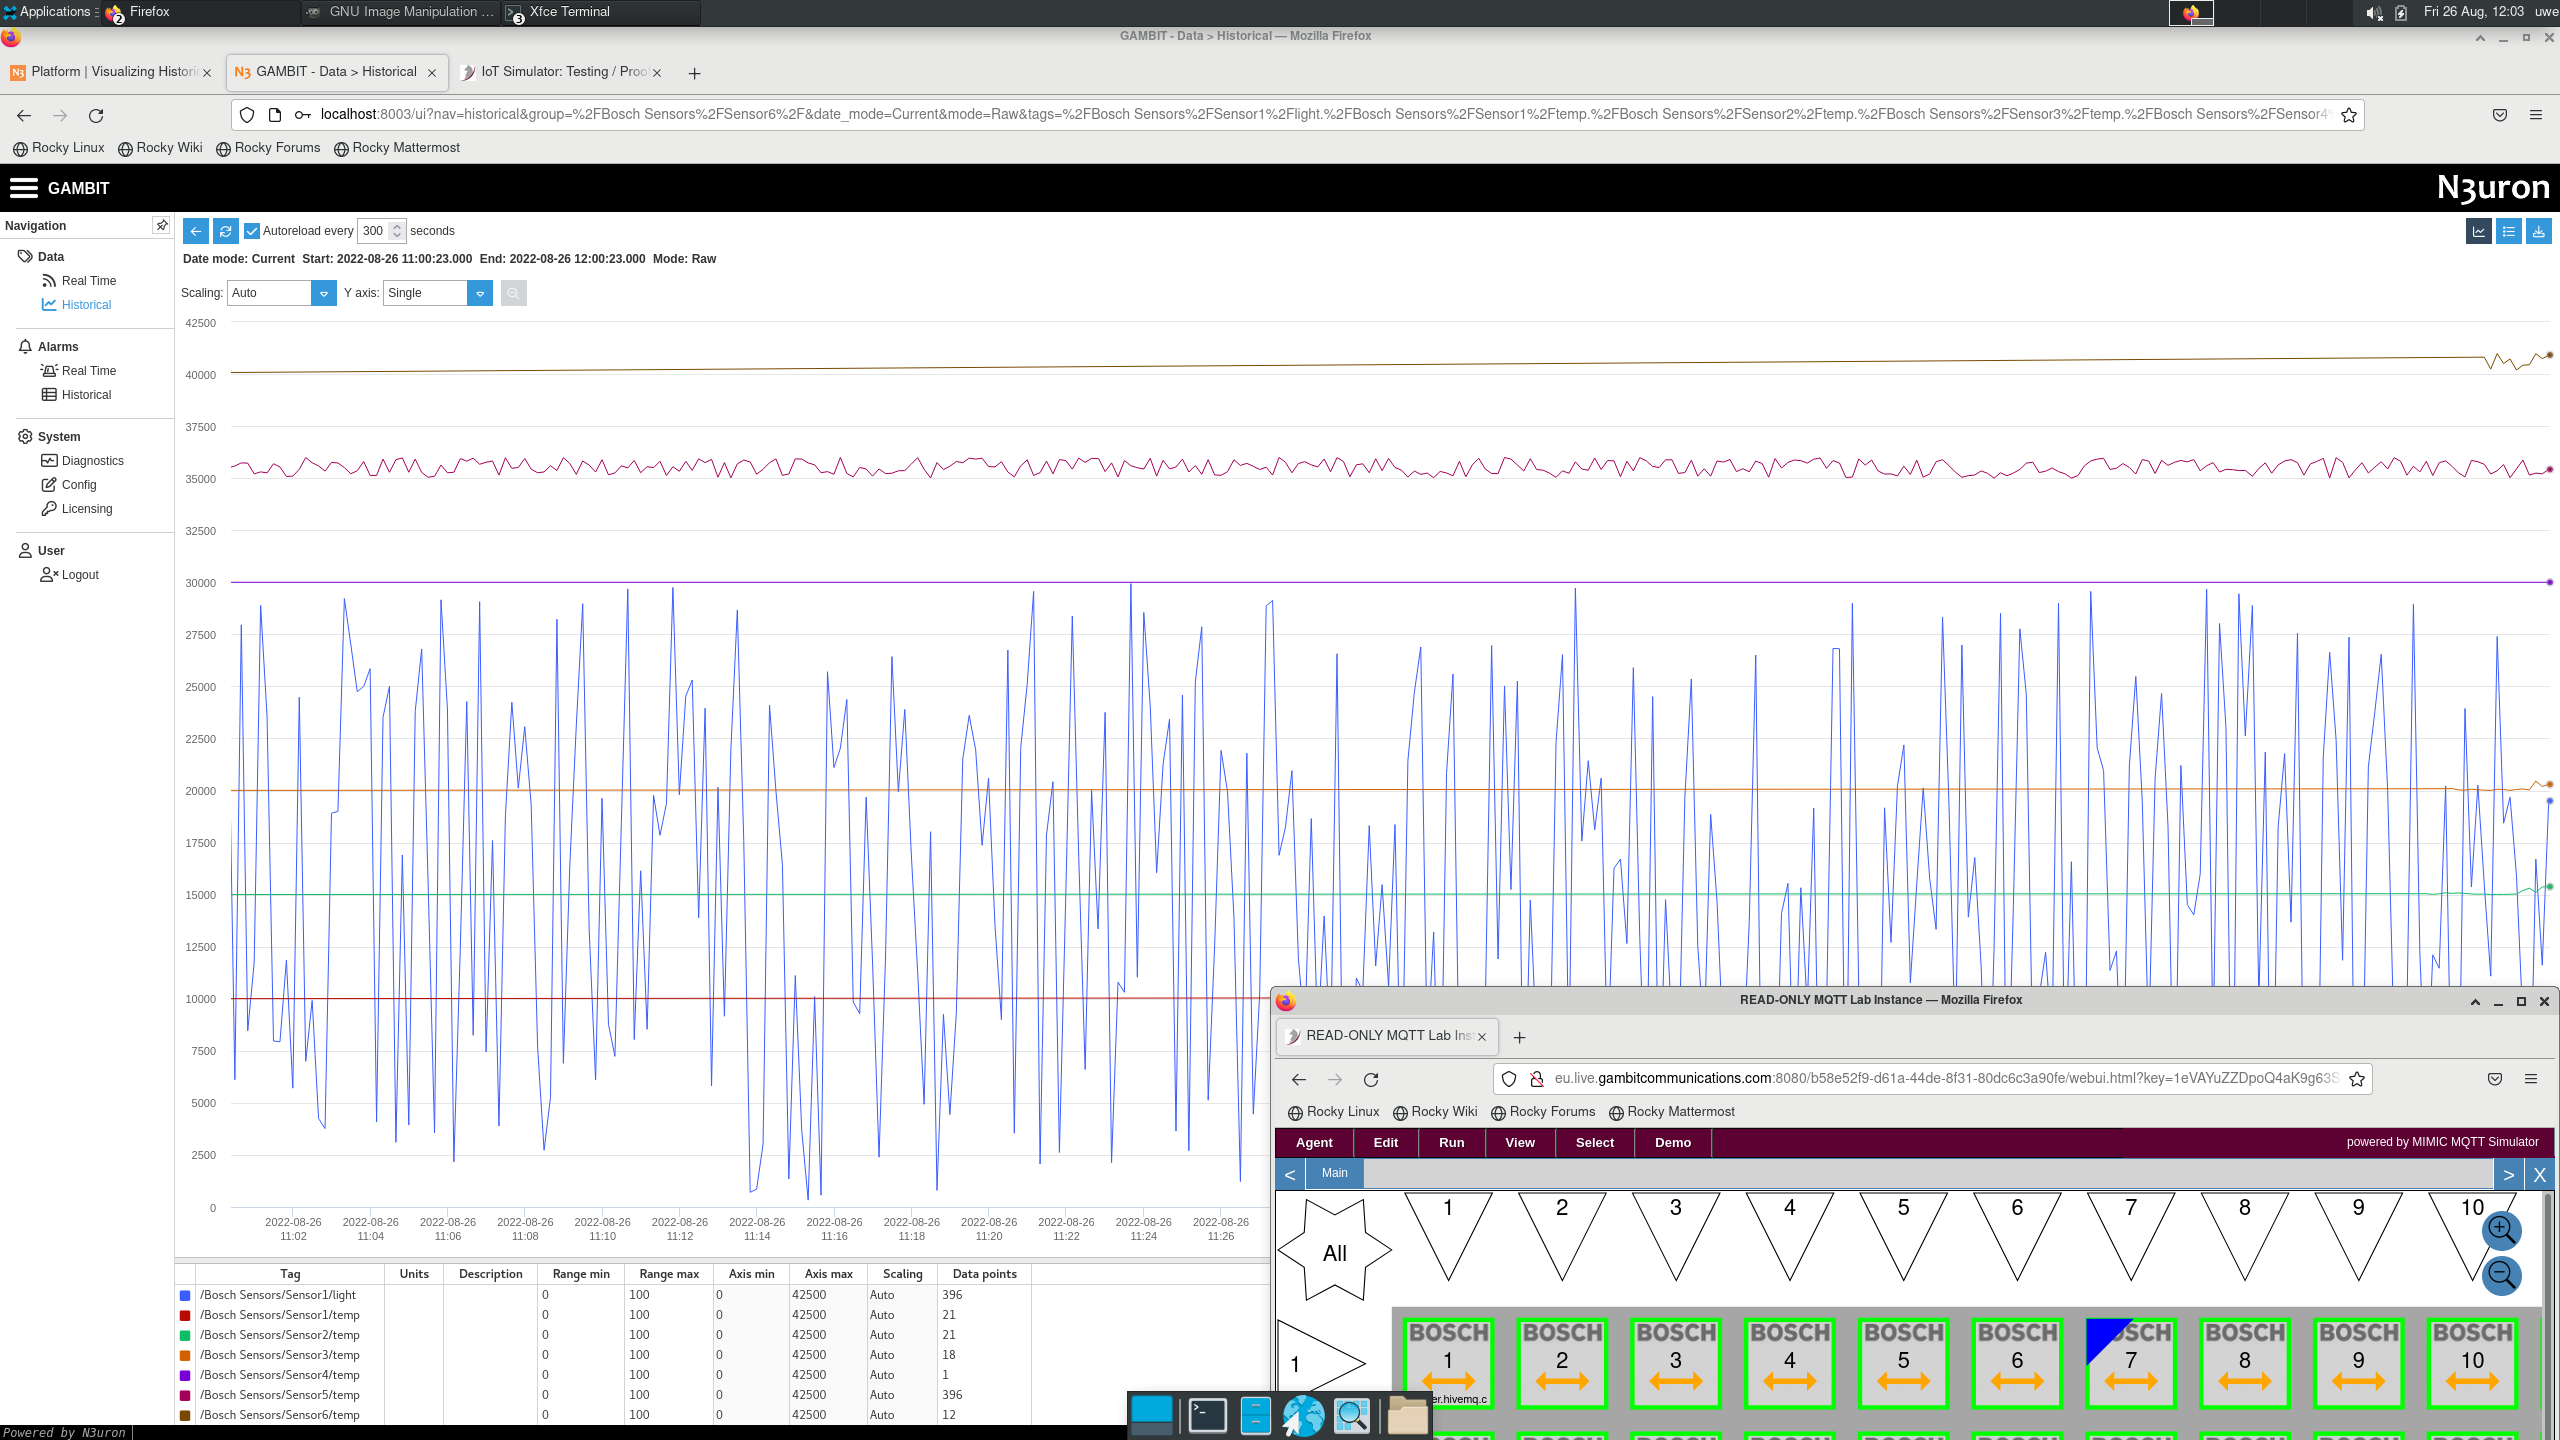
For example, see this 2-minute video on Youtube.
-
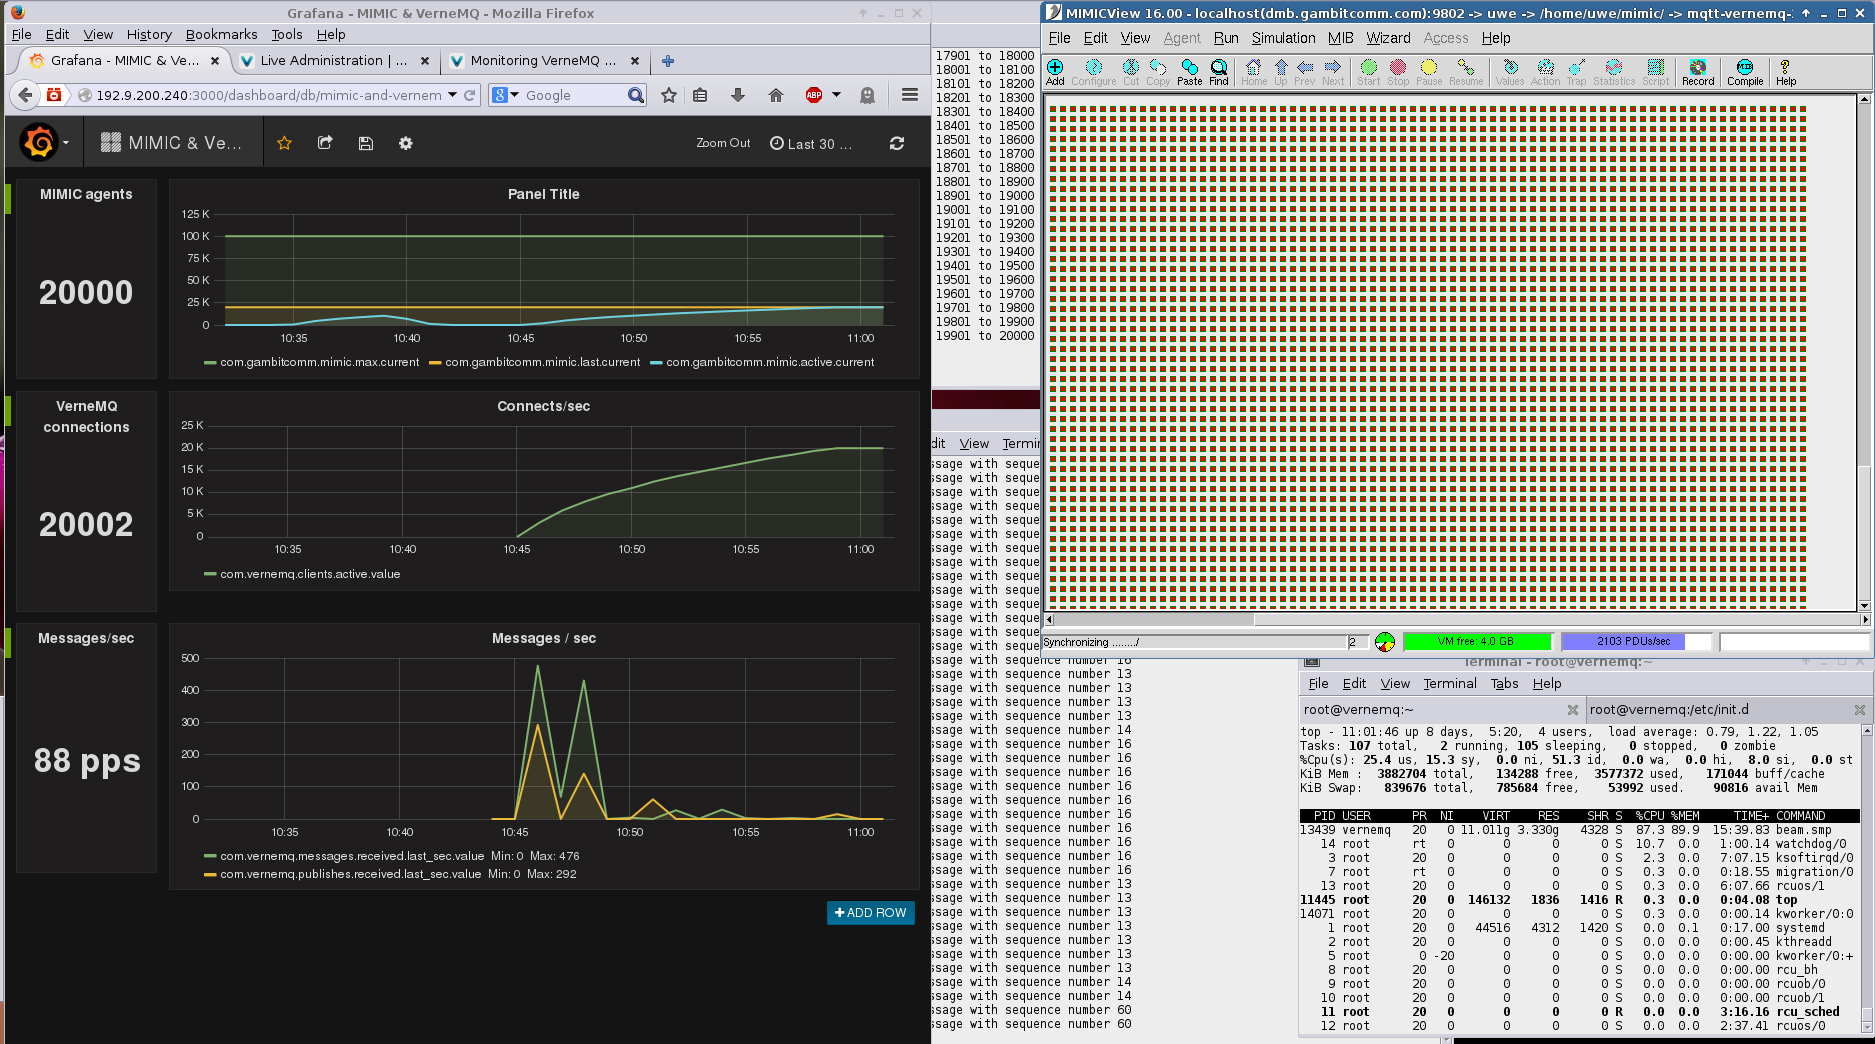
VerneMQ
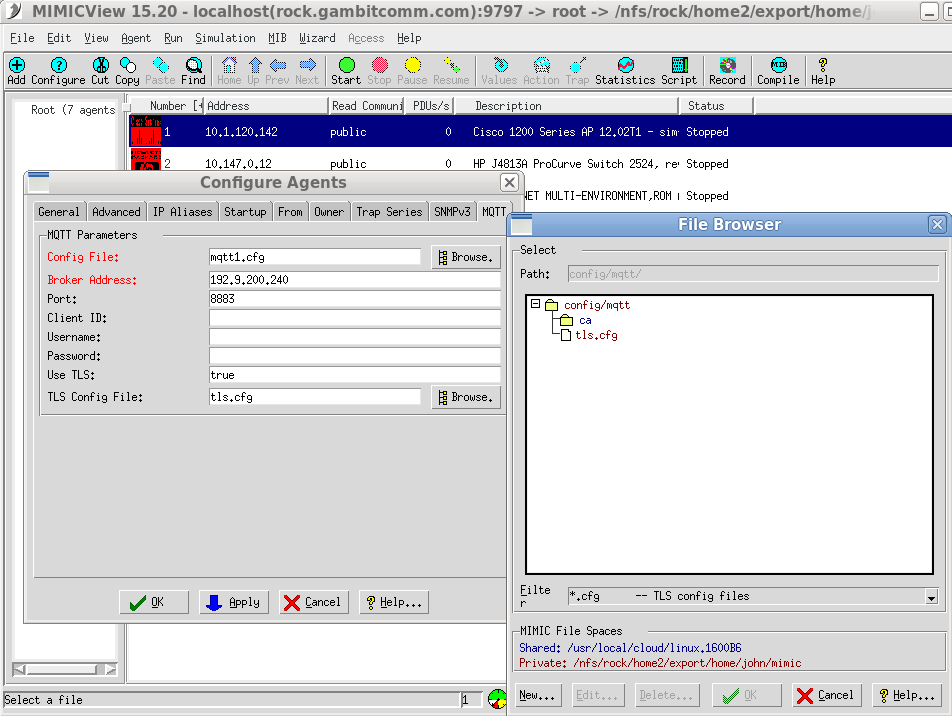
To set up the MQTT broker for TLS, the instructions in the Sample SSL Config section of the VerneMQ documentation are sufficient, eg. to configure the certificates as created for Mosquitto assuming they are stored in the mosquitto-tls/ subdirectory, you just have to change these lines in vernemq.conf:
listener.ssl.default = 0.0.0.0:8883
listener.ssl.cafile = /etc/vernemq/mosquitto-tls/ca.crt
listener.ssl.certfile = /etc/vernemq/mosquitto-tls/server.crt
listener.ssl.keyfile = /etc/vernemq/mosquitto-tls/server.key
We have run MIMIC with 20,000 simulated sensors against VerneMQ as shown below.
-
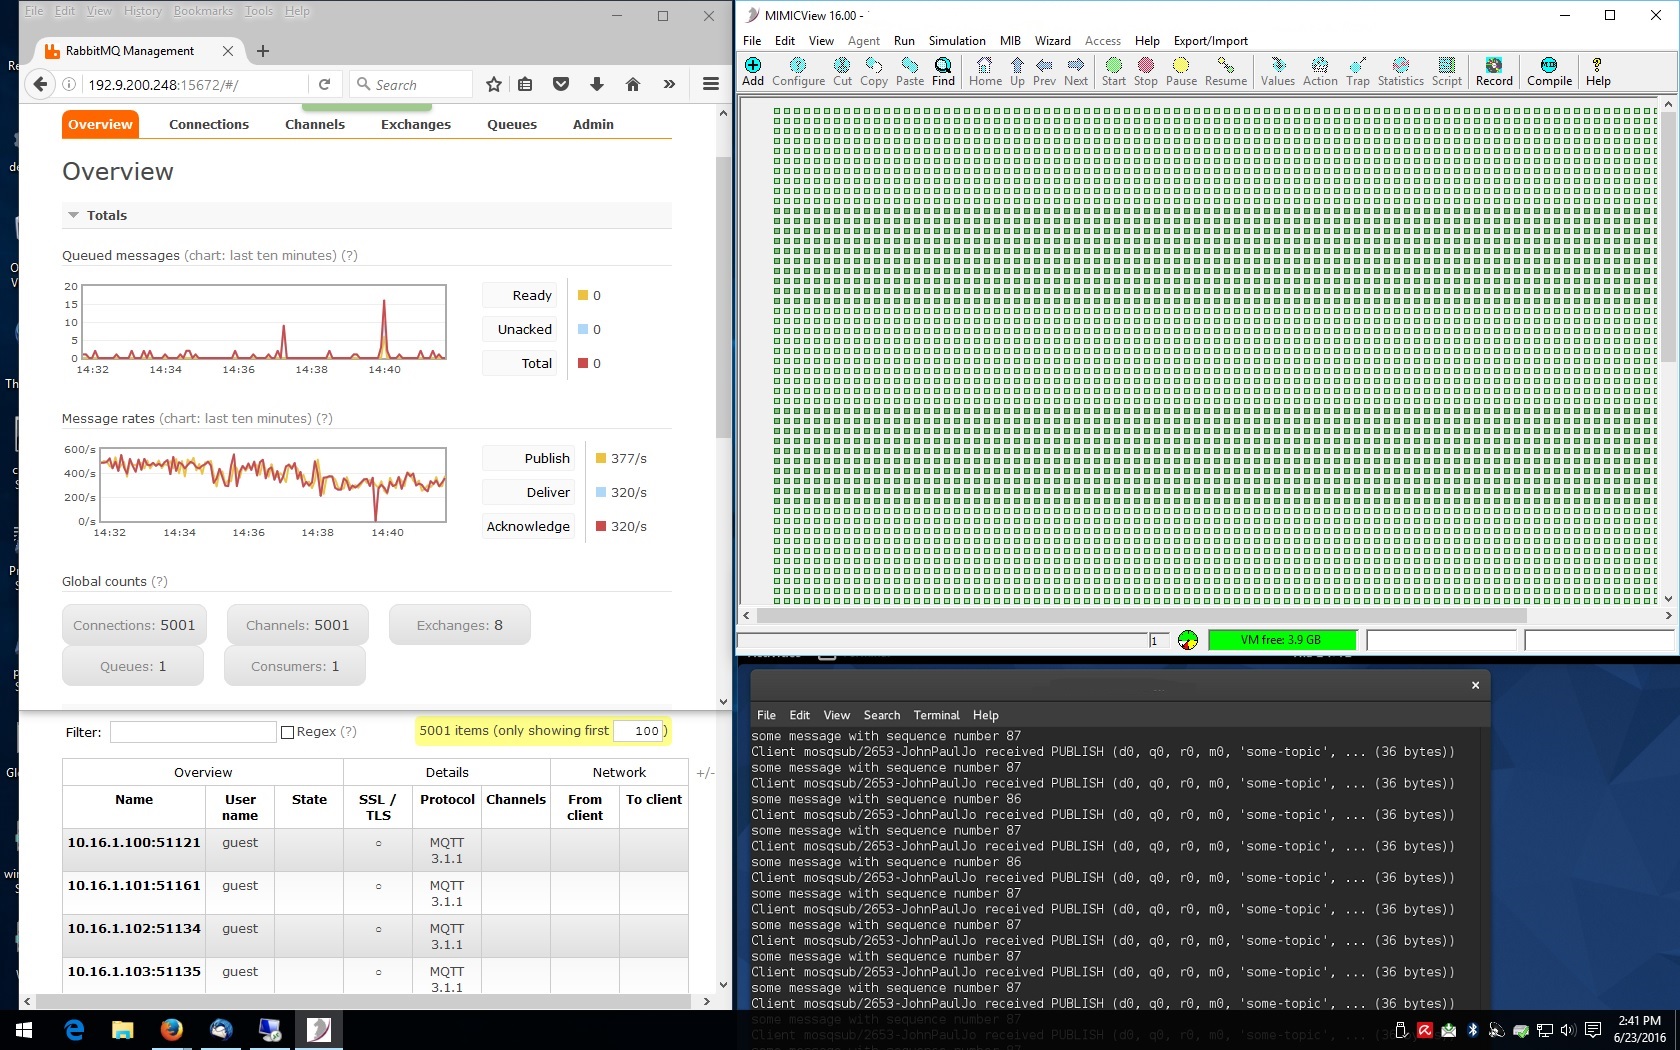
RabbitMQ
To set up the RabbitMQ MQTT broker for TLS follow the instructions in the RabbitMQ MQTT Adapter documentation and in the general RabbitMQ TLS Support instructions . MIMIC MQTT agents only require enabling TLS, set Use TLS to true, to connect securely to the RabbitMQ server. MIMIC can optionally supply client certificates if required, by setting the TLS Config File, otherwise this can be left blank.
We have run MIMIC with 5,000 simulated sensors against RabbitMQ as shown below.
-
EMQTT
To set up the EMQTT MQTT broker for TLS simply enable the MIMIC agent TLS and connect to port 8883. The EMQTT TLS configuration can be customized according to the emqtt configuration documentation .
This screenshot shows 5,000 simulated sensors talking to EMQTT.
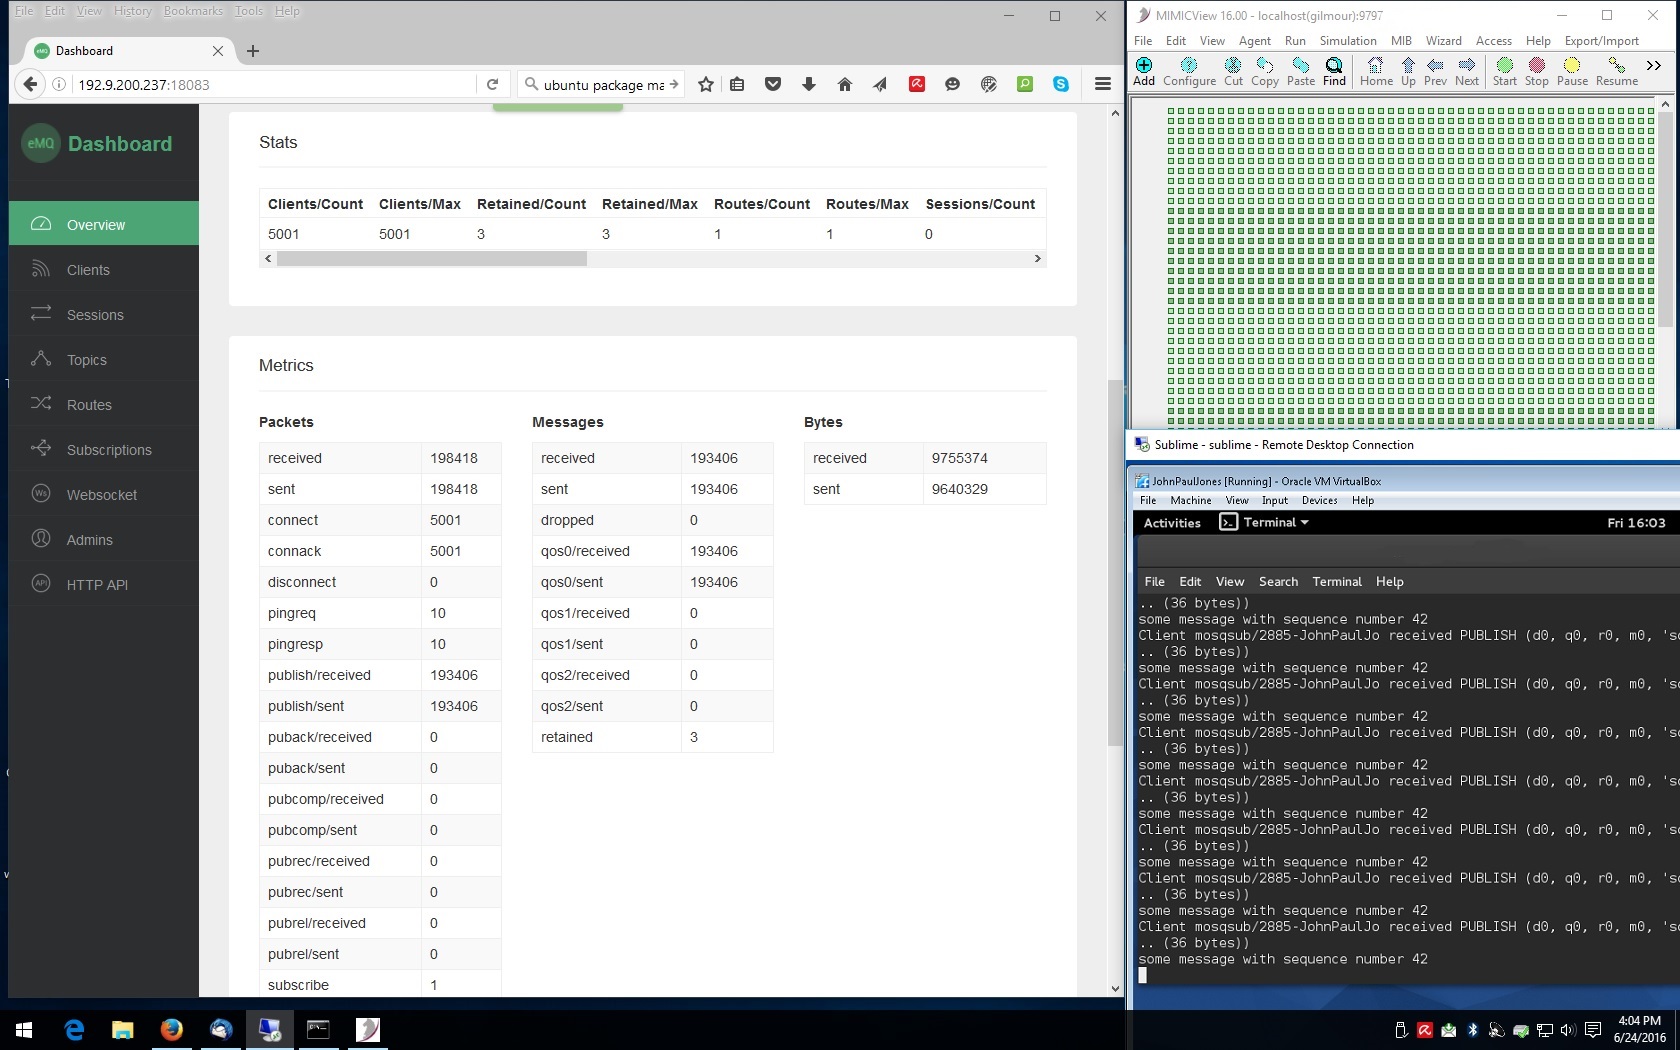
Here is a Youtube video of MIMIC MQTT Lab and EMQ running on same VPC on Amazon AWS with 1000 sensors connected to EMQ and publishing telemetry.
-
Solace
We have tested the Enterprise Edition VMR downloadable from their download page and connected 10,000 simulated sensors.
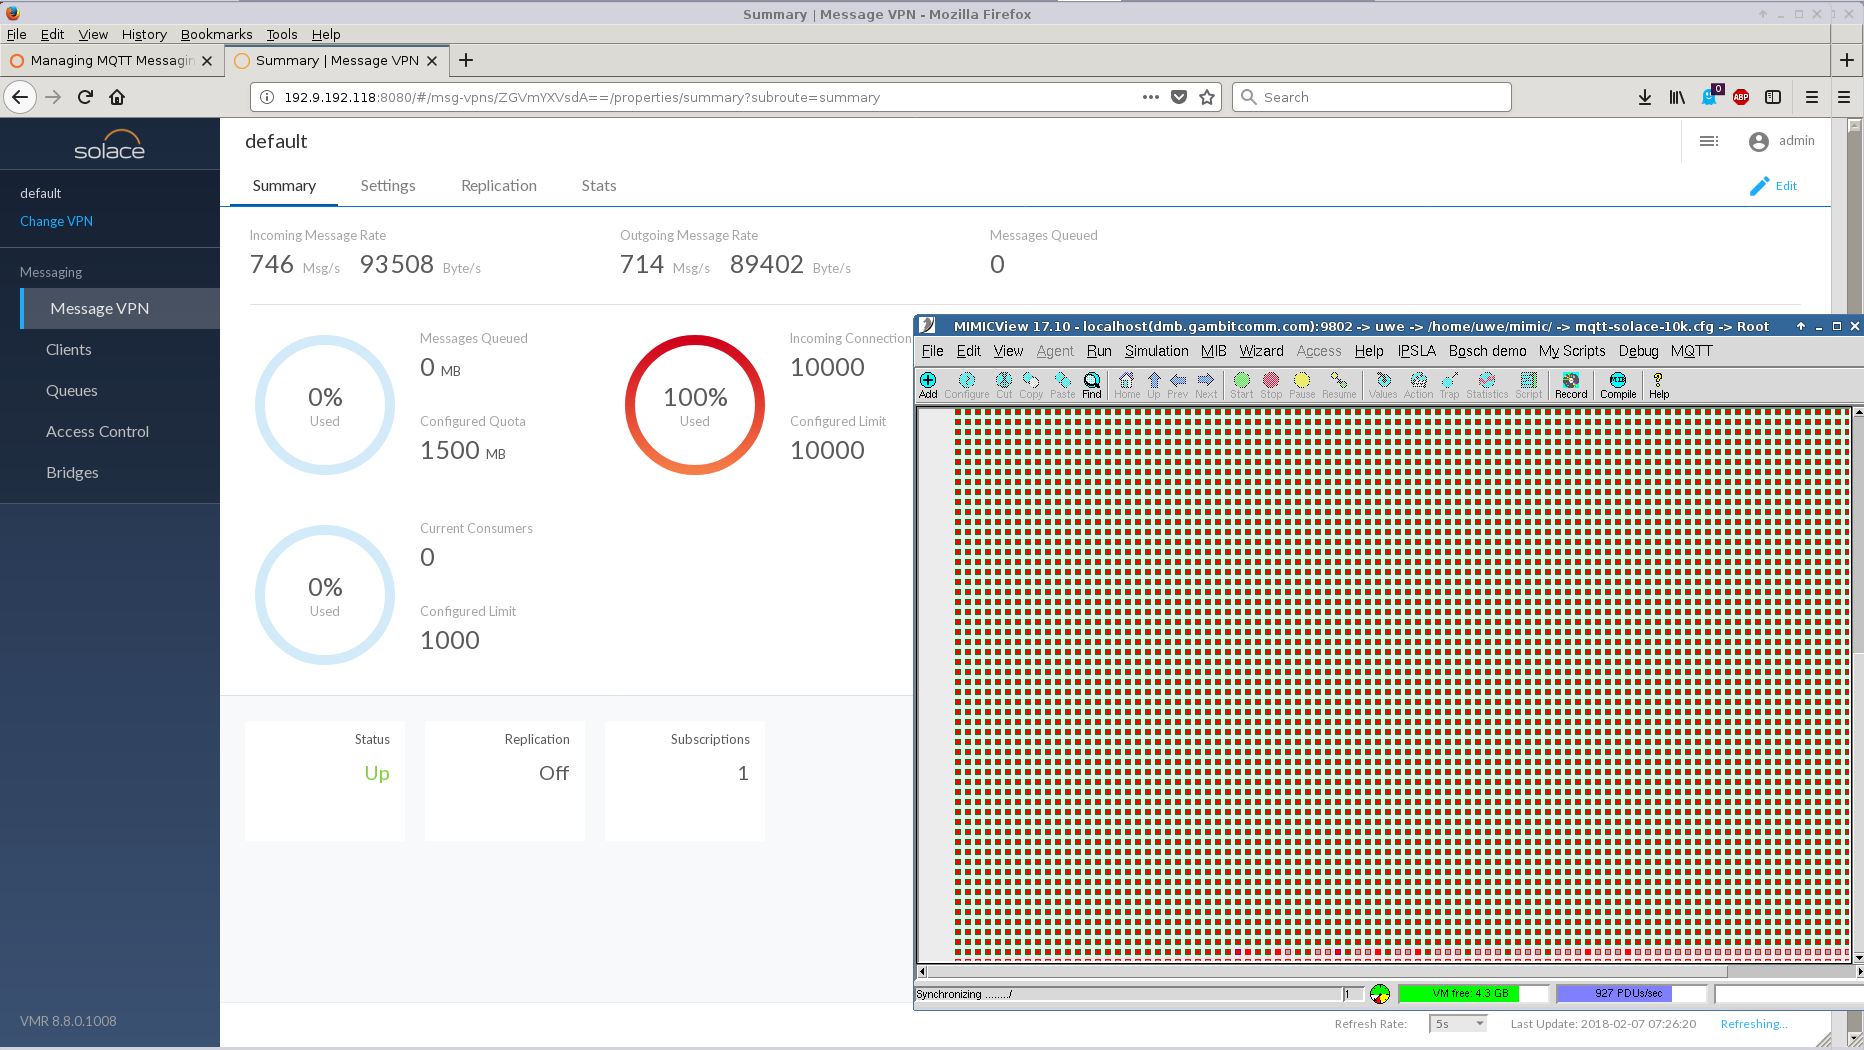
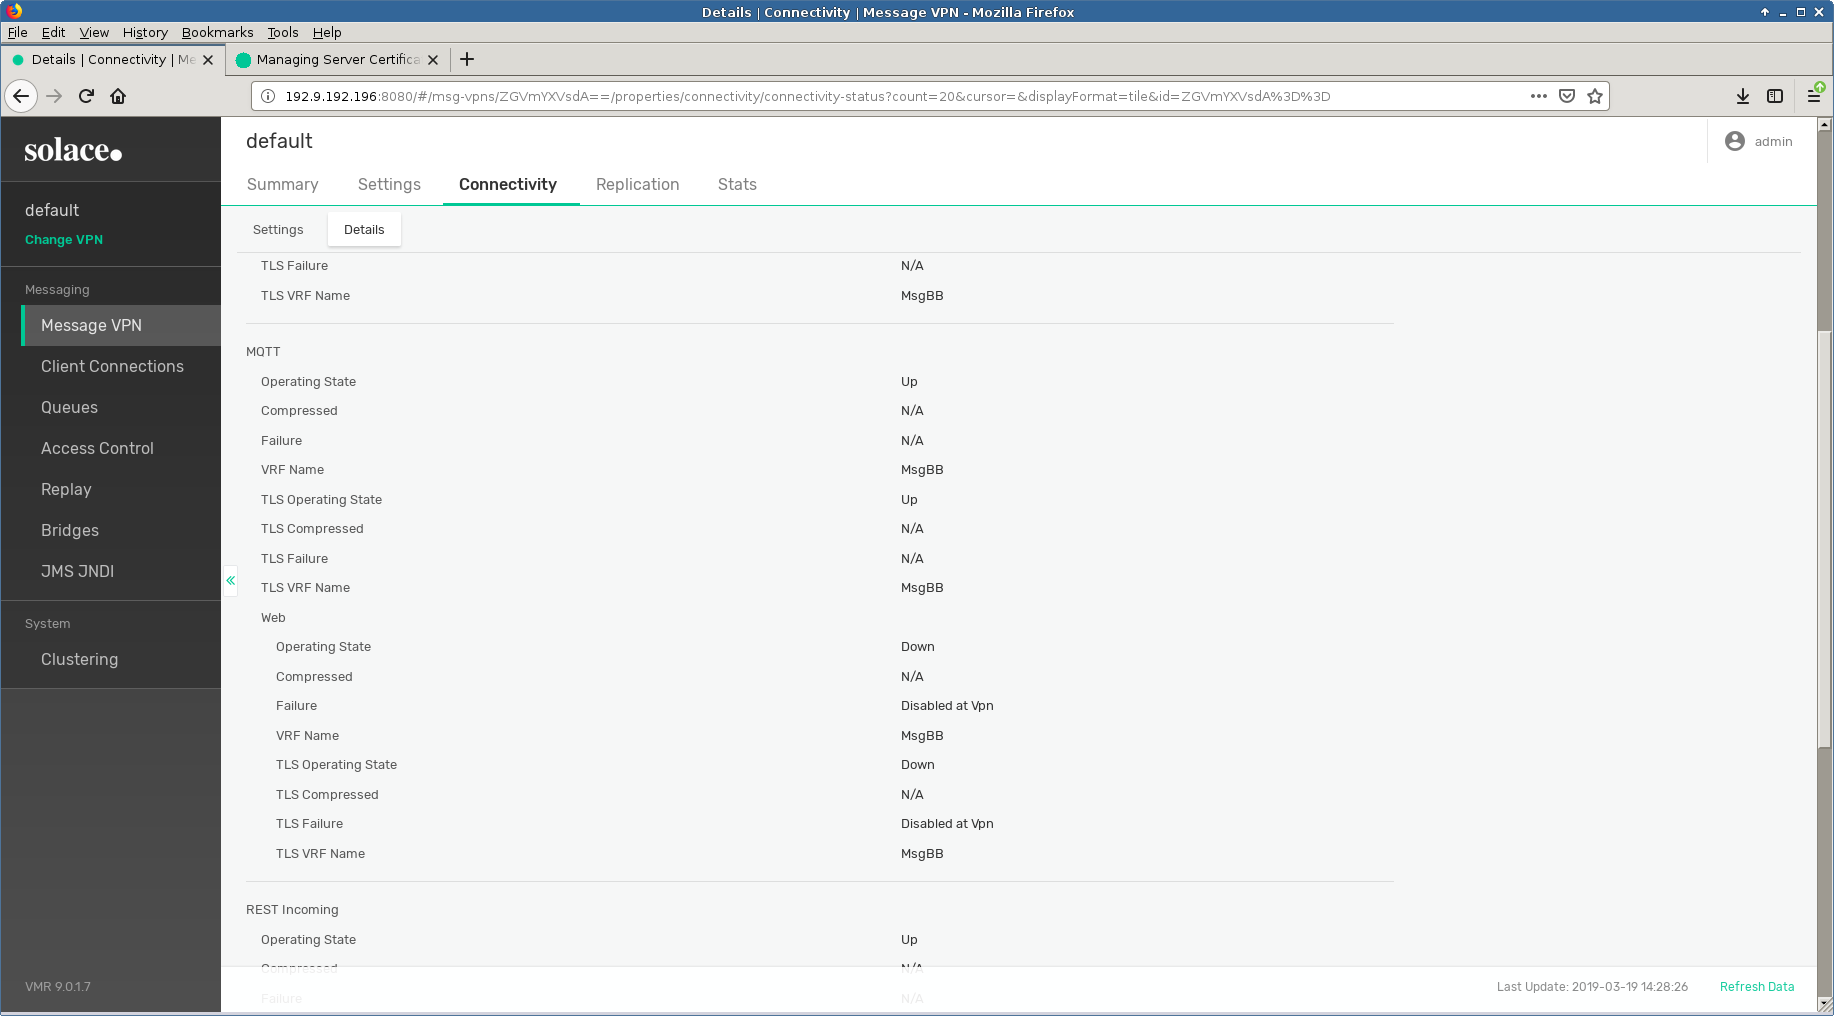
In order to configure TLS service in their latest version 9.0.1.7 we had to upload a certificate as detailed in their documentation . Only after that would the TLS service come up.
-
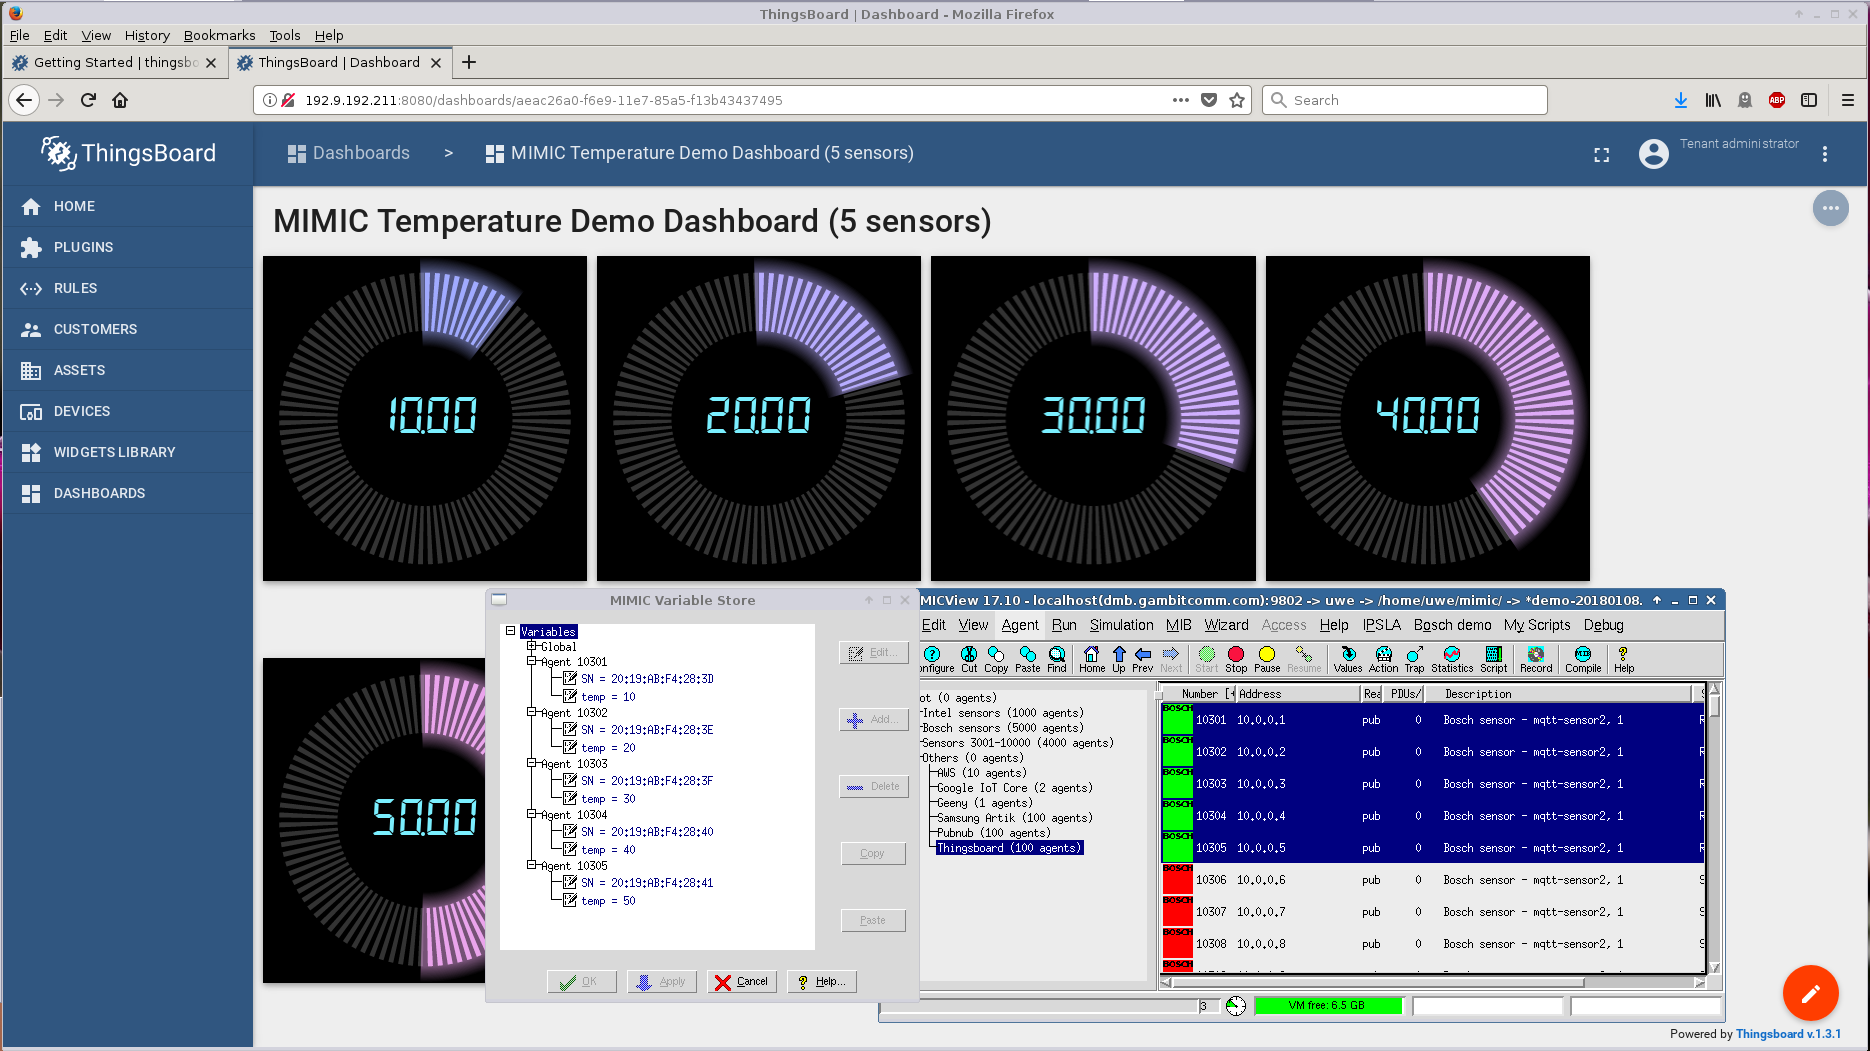
Thingsboard
Thingsboard is a free open-source software (FOSS) IoT platform. We downloaded version 1.3.1 from their download page and installed on a CentOS 7 VM. Following their Getting Started guide we quickly setup a simulated sensor to export temperature telemetry to their dashboard and change it at will in real-time.
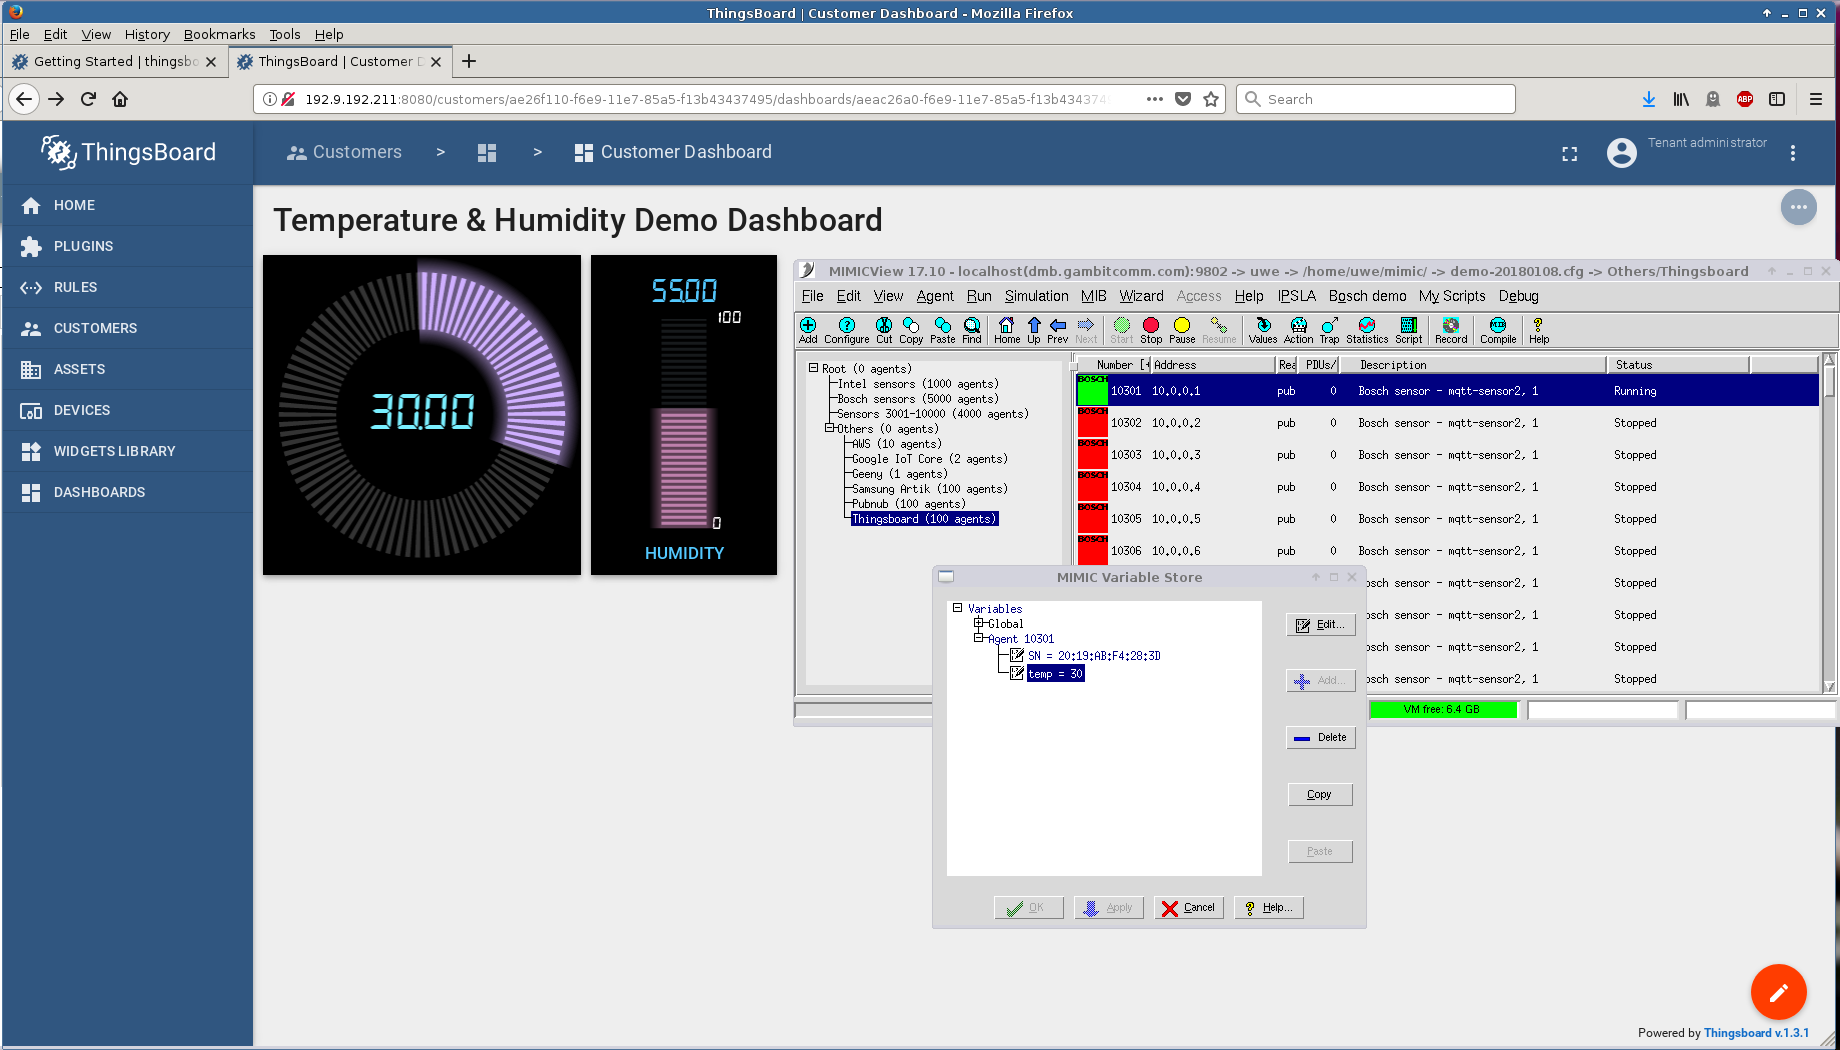
It only took a little while longer to extend this to 5 sensors.
-
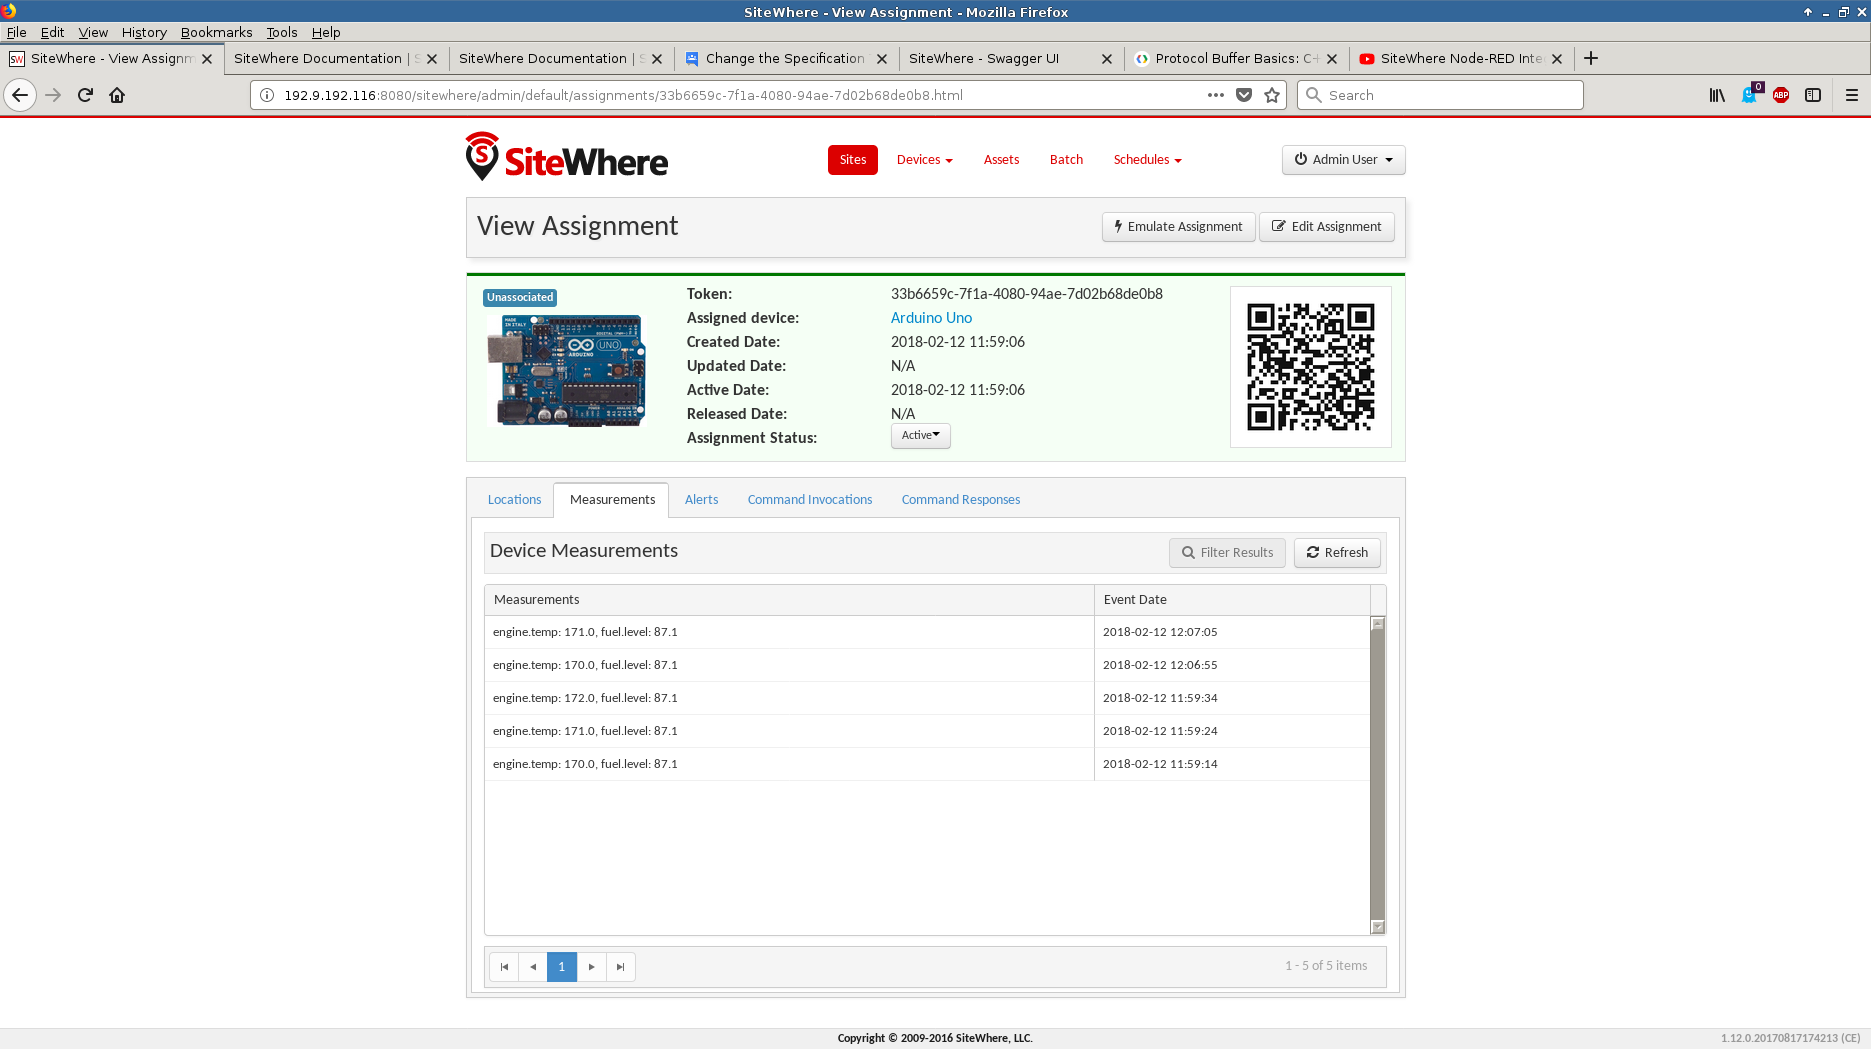
SiteWhere
This free open-source software (FOSS) IoT platform version 1.12.0 allowed us to register our standard simulated Bosch sensor through their JSON API
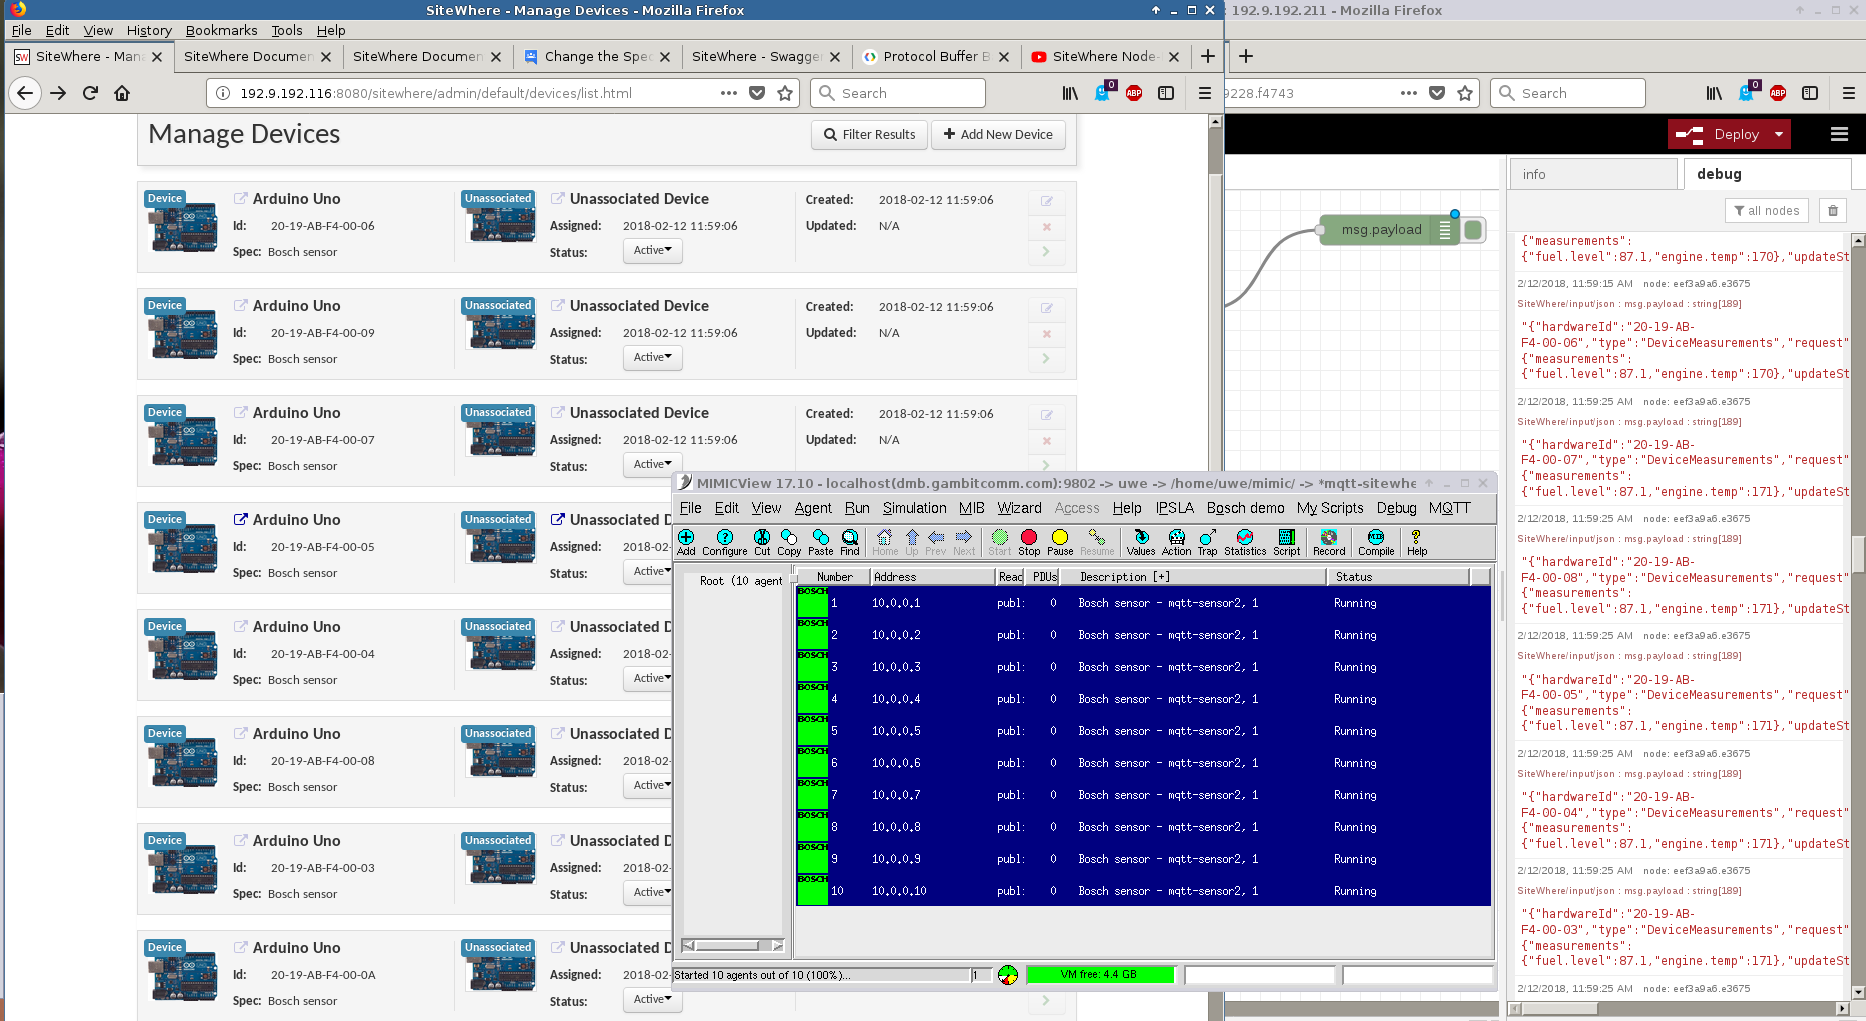
and send telemetry.
-
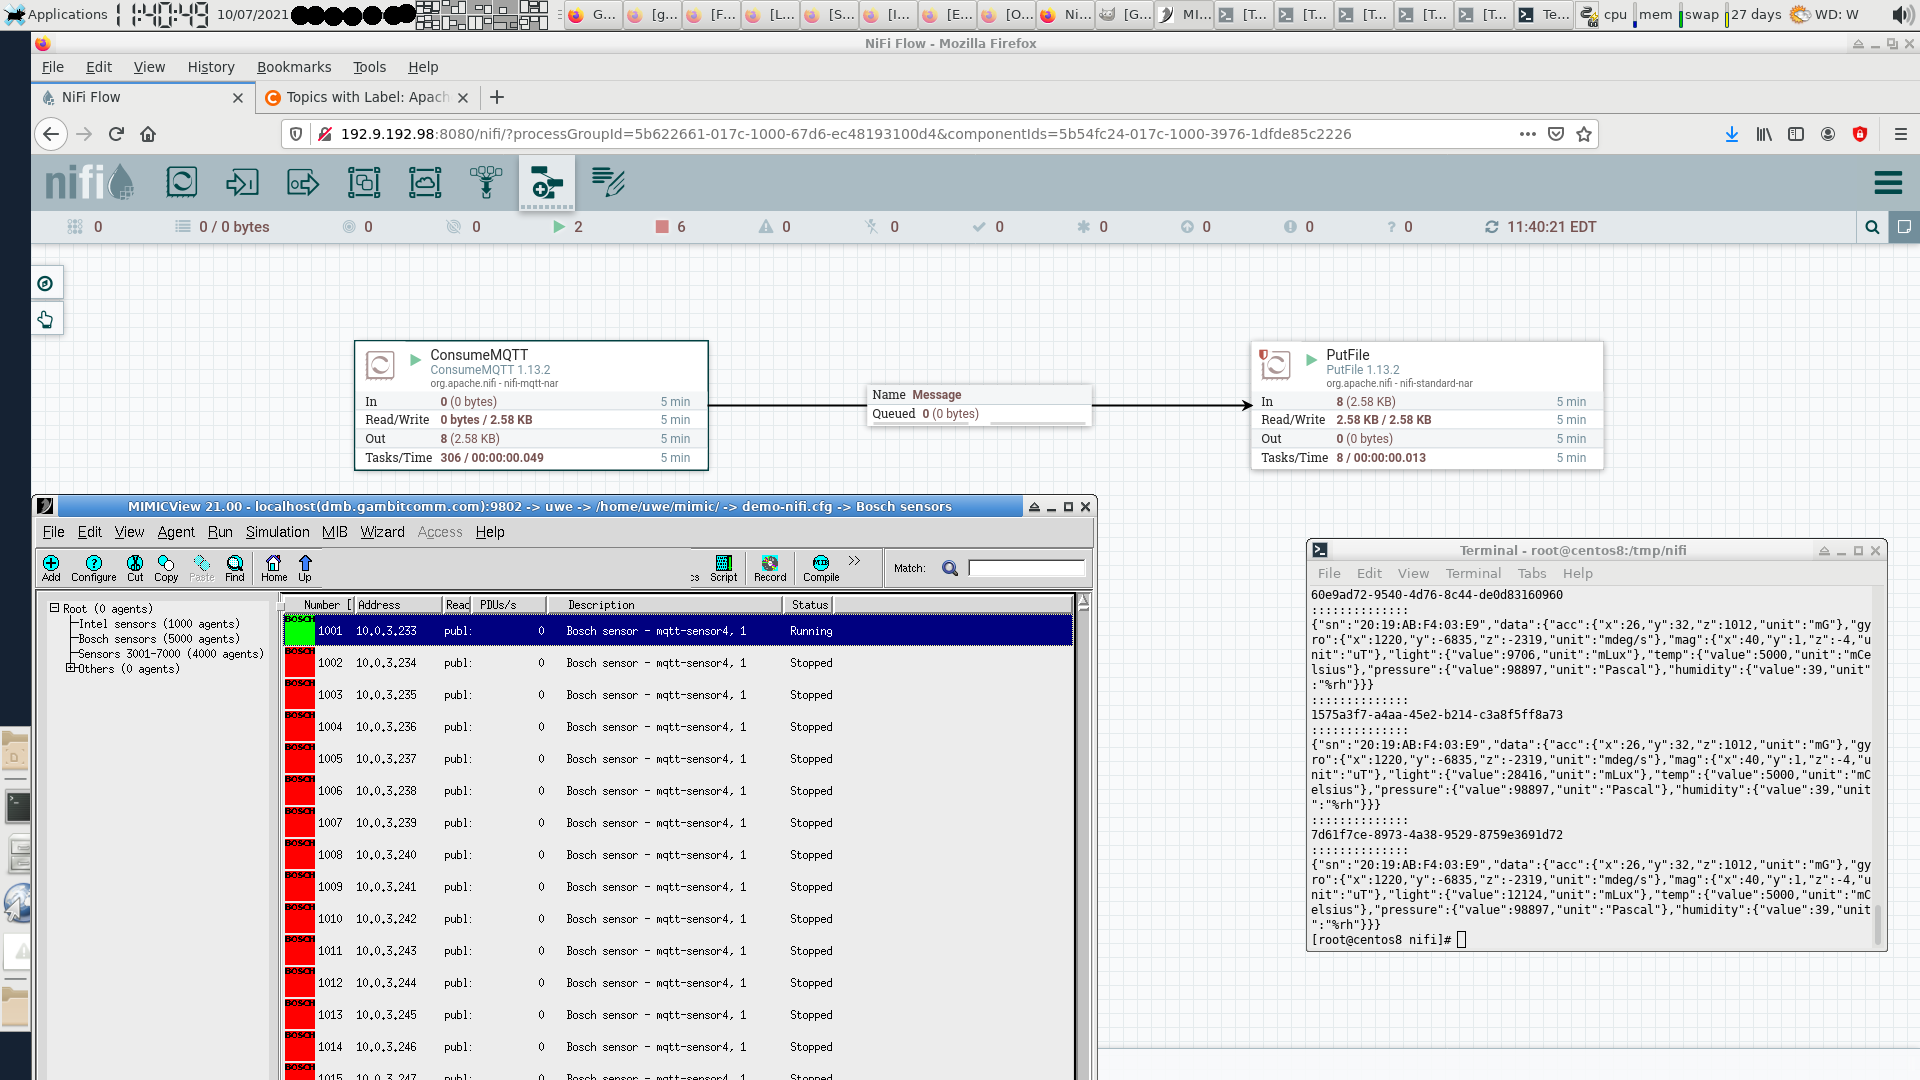
Apache Nifi
We used the ConsumeMQTT processor of this free open-source software (FOSS) graphical programming environment to subscribe to MQTT messages from our simulated Bosch sensor and save them with the PutFile processor in files.
-
Node-RED
This free open-source software (FOSS) graphical programming environment allowed us to easily create simple IoT applications with our standard simulated Bosch sensor through their built-in features and extensions such as dashboard and counter,
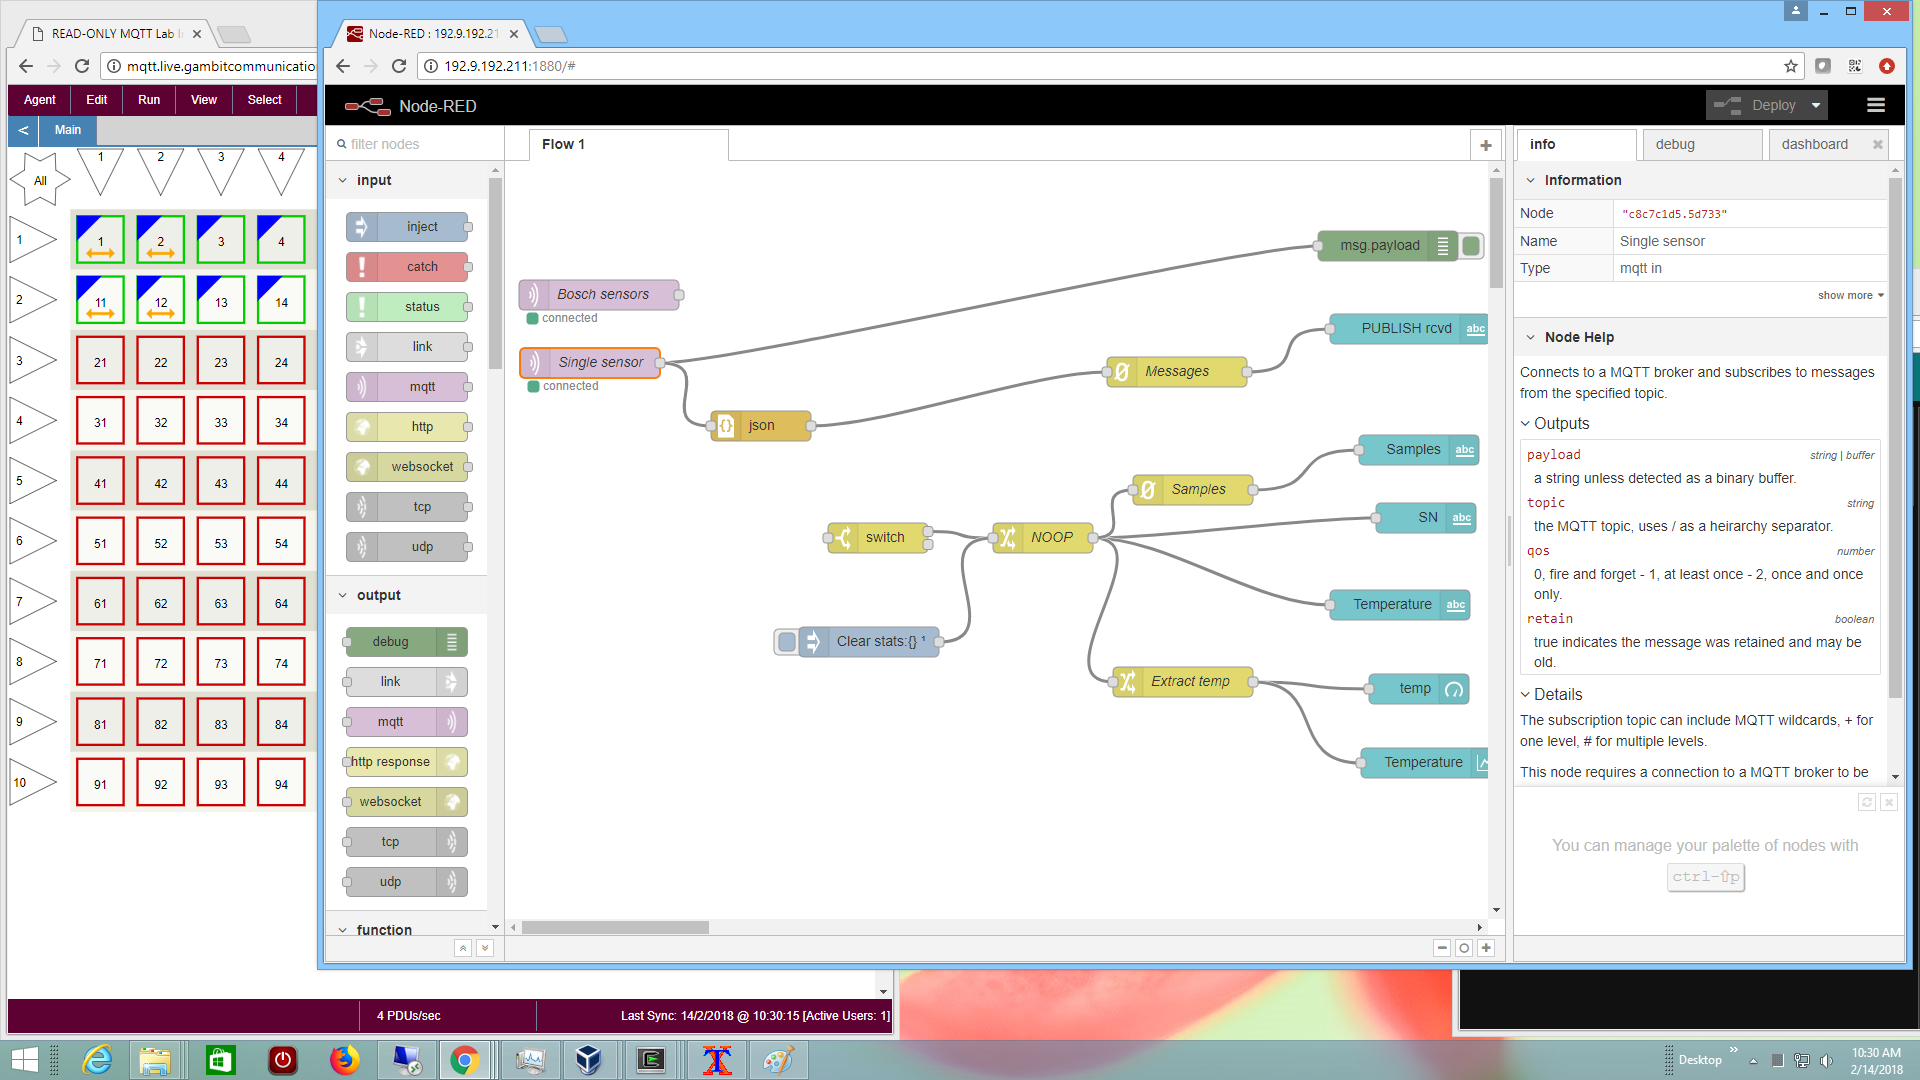
and visualize telemetry for many sensors
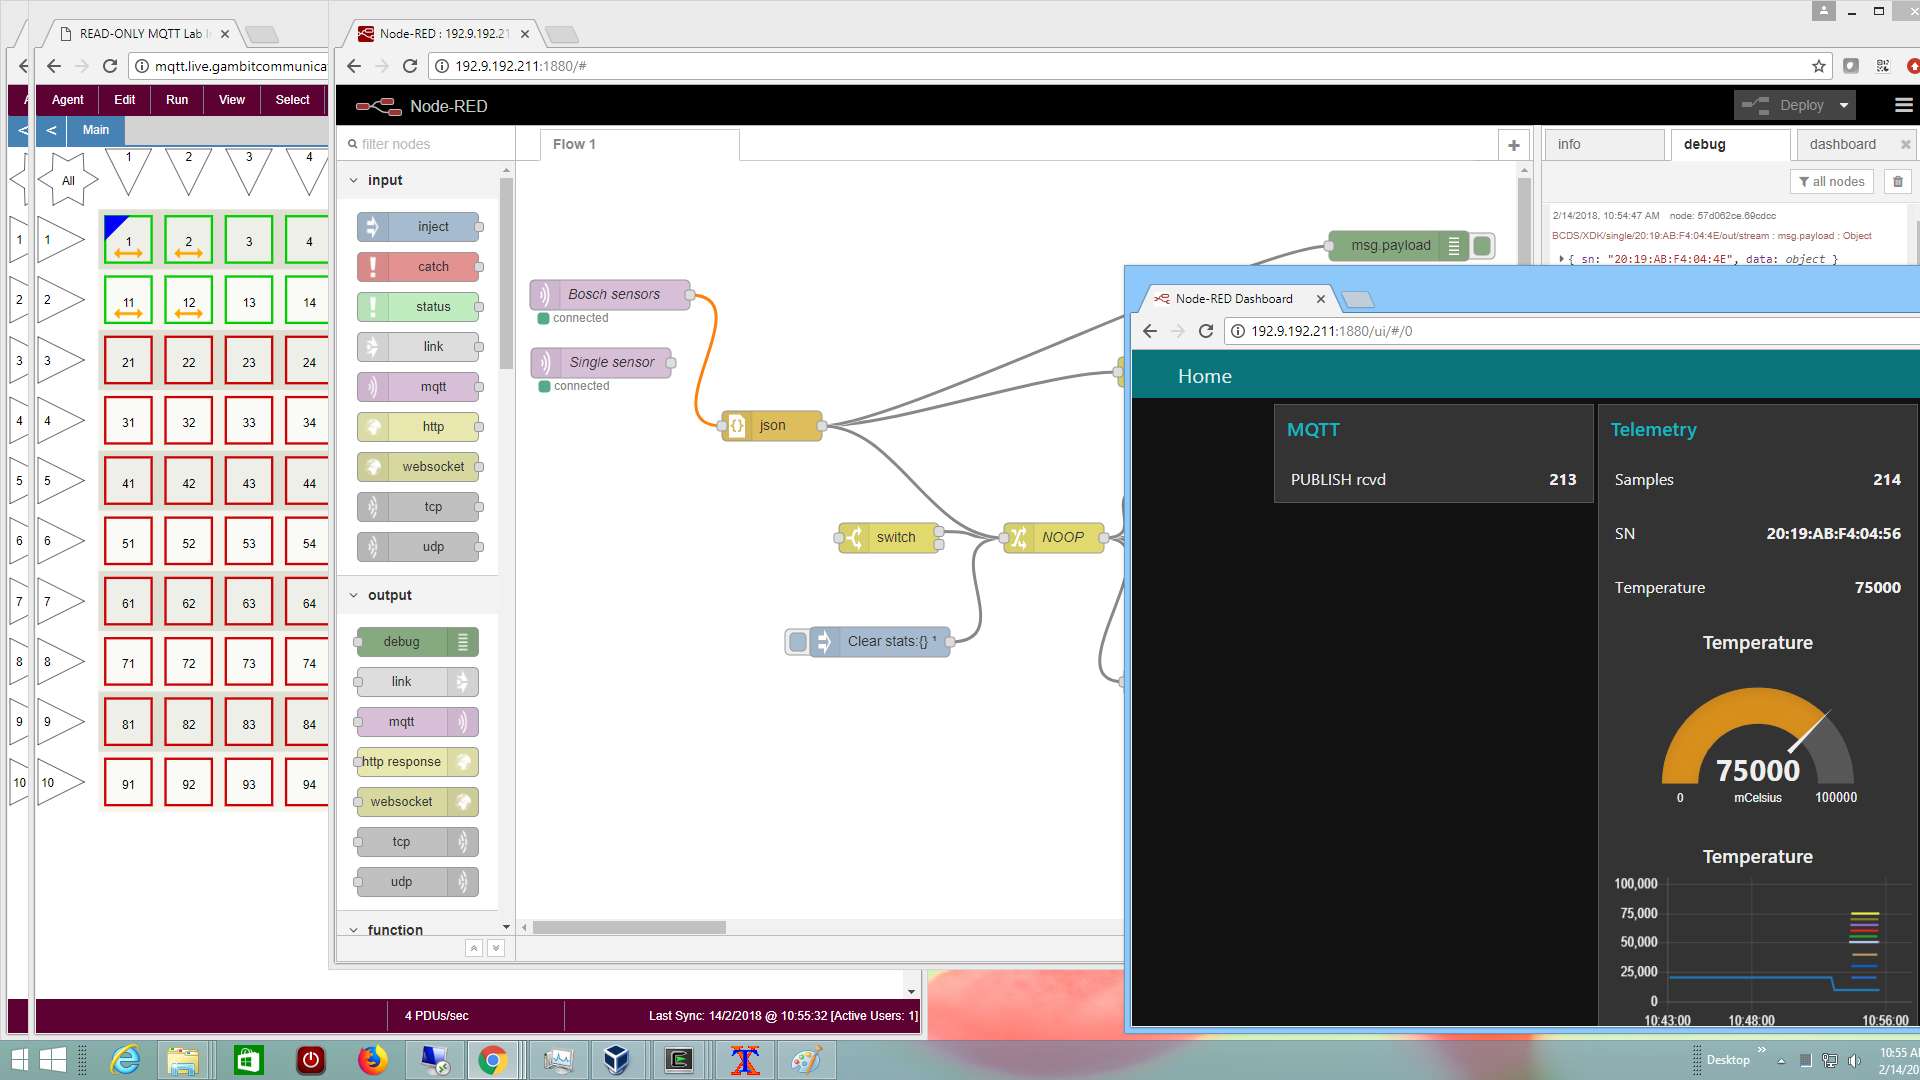
Details on our blog.
-
Moquette
This open-source Java-based broker is the underpinning for some other IoT platforms. We were able to run up to 4000 connected sensors on a 4-CPU system, but with considerable hand-holding (slow start), even though CPU usage was only around 40%.
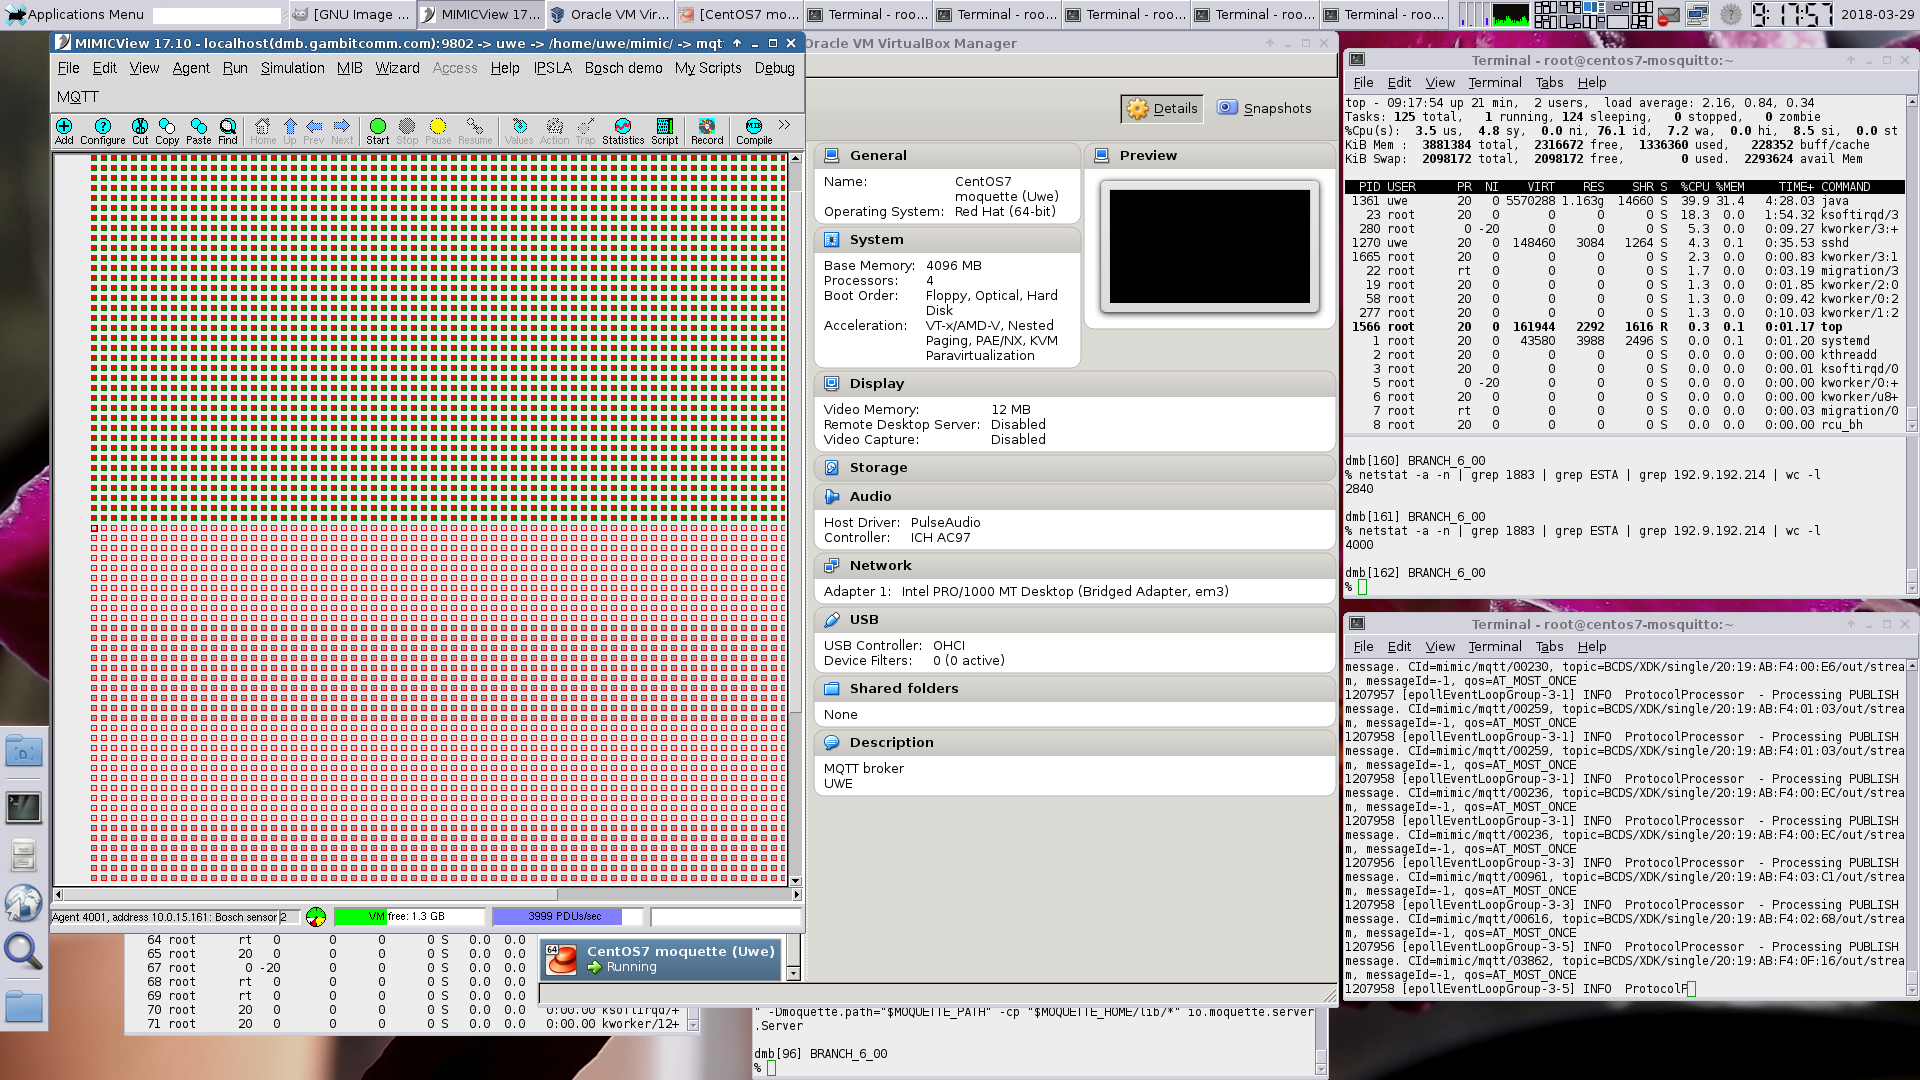
It failed a little later with a memory allocation failure:
1259528 [epollEventLoopGroup-3-5] ERROR NettyMQTTHandler  - An unexpected exception was
caught while processing MQTT message. Closing Netty channel. CId=mimic/mqtt/00927,
cause=null, errorMessage=failed to allocate 16777216 byte(s) of direct memory (used:
989855744, max: 994050048)
1259528 [epollEventLoopGroup-3-5] INFO  ProtocolProcessor  - Processing connection
lost event. CId=mimic/mqtt/00927
-
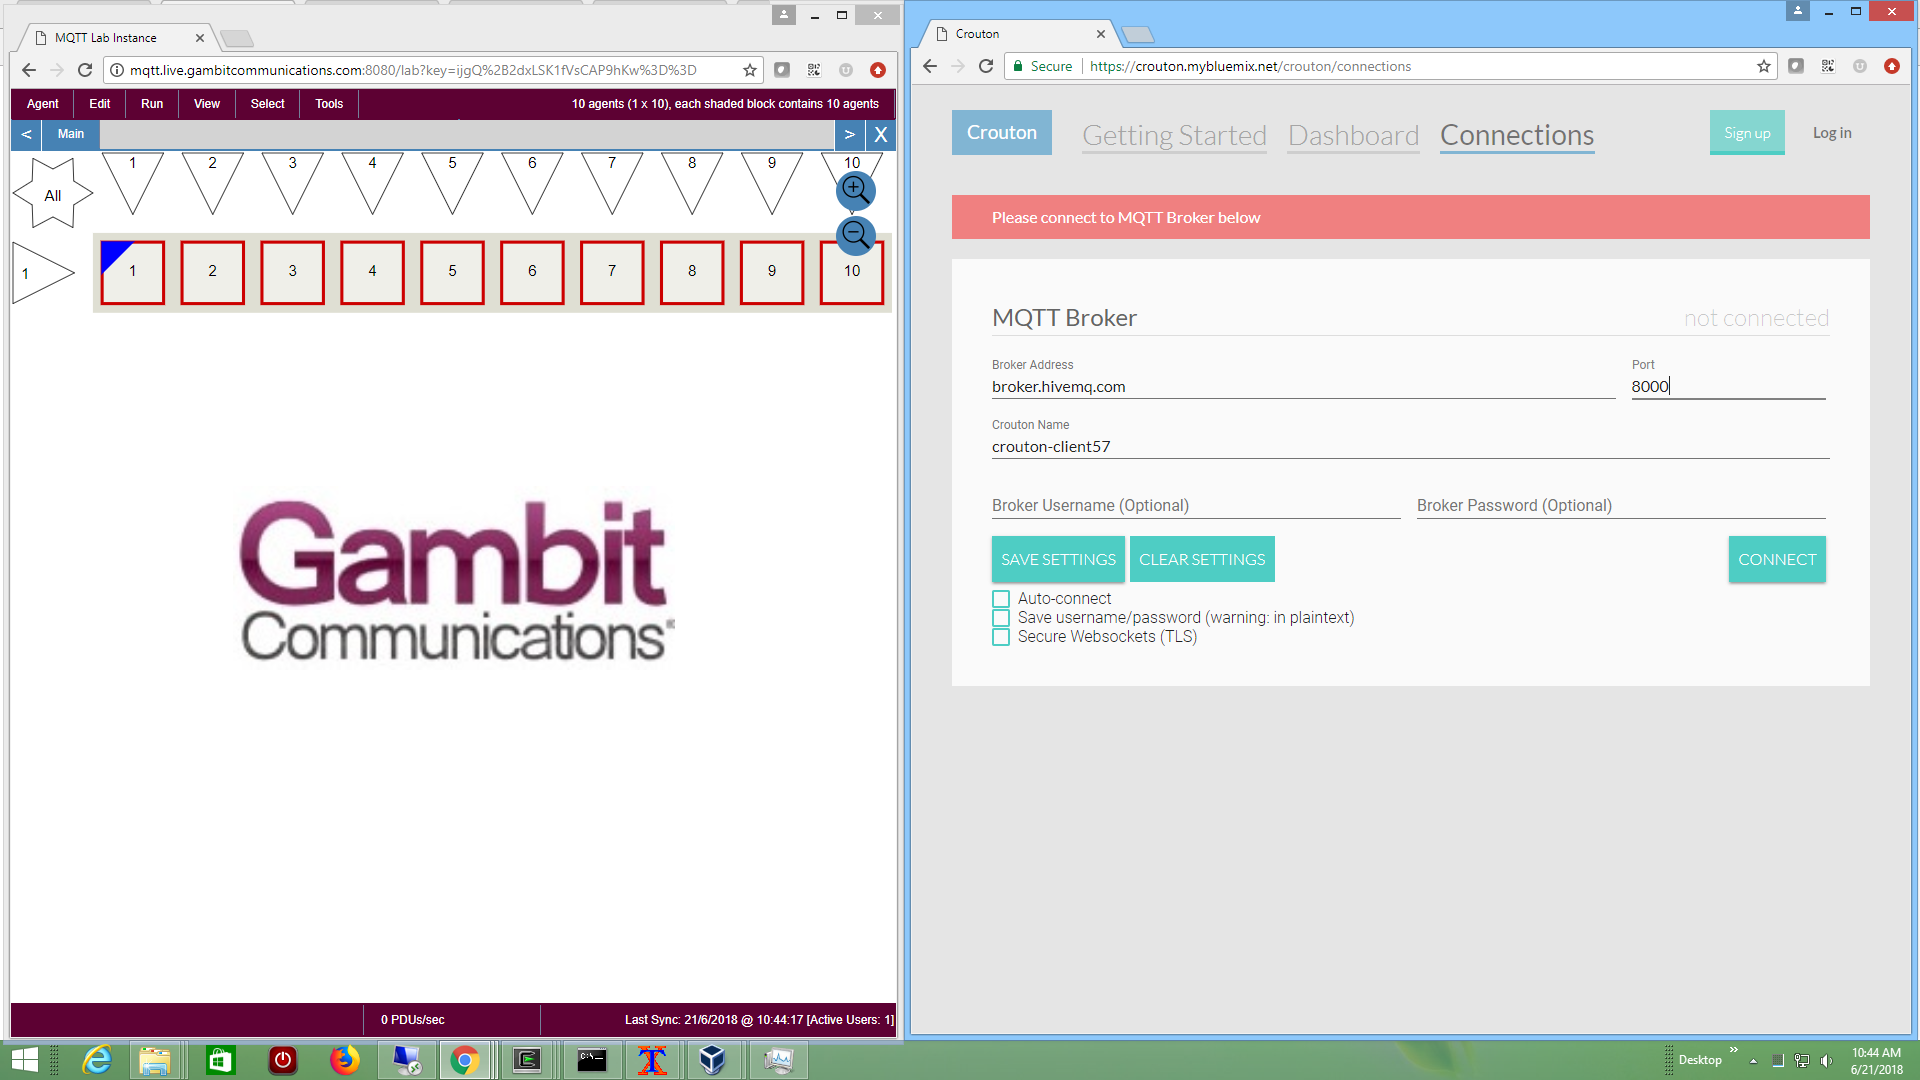
Crouton
Crouton is a open-source MQTT subscriber dashboard application based on Node.js . It relies on its own protocol layered on top of MQTT to deliver dashboard features.
We have tailored one of our MQTT Labs to interact with Crouton through any supported public broker.
This Youtube video shows it in action.
-
Amazon AWS IoT
You need to setup an account at Amazon AWS IoT. Once logged into the AWS IoT console, and a device has been created according to their tutorial, and connected to a policy, you are ready to configure your simulated MQTT sensor in MIMIC.
Since MQTT is only accepted over TLS, according to their security policies, you will have to configure your simulated sensor with TLS as detailed above. First you need to configure the device certificate into MIMIC by creating a certificate when you Connnect a device. then downloading the private key, public key and certificate from the AWS IoT console into the config/mqtt/ folder in your MIMIC private area. The key and certificate filenames will be a bunch of hex characters followed by -private.pem.key, -public.pem.key and -certificate.pem.crt respectively, let's use 7e7ab414c3-private.pem.key, 7e7ab414c3-public.pem.key and 7e7ab414c3-certificate.pem.crt as an example. Configure them into MIMIC with a config/mqtt/amazon-tls.cfg TLS config file containing:
version = 16.00

tls-parameter = {
certificate = 7e7ab414c3-certificate.pem.crt
key = 7e7ab414c3-private.pem.key
}
Since the MQTT broker is accessible over the Internet, your MIMIC machine must have access to the Internet, in particular, to the AWS IoT broker address as detailed in for example the Embedded C instructions and use the AWS_IOT_MQTT_HOST value, as well as the shown port and client ID.
That address needs to be the Broker Address configurable of your agent's MQTT configuration. Also, any IP address you choose for your simulated sensors needs to be routable to the Internet. You can either setup your internet gateway to route the addresses that you choose, or if your Internet access is through a NAT gateway, you might as well just setup multiple agents with the same address as your MIMIC system, since the connections will appear to the broker to come from your NAT gateway IP address. If you do the latter, make sure to assign different SNMP ports to your agent, or use different community strings.
This screenshot shows a simulated sensor talking to AWS IoT.
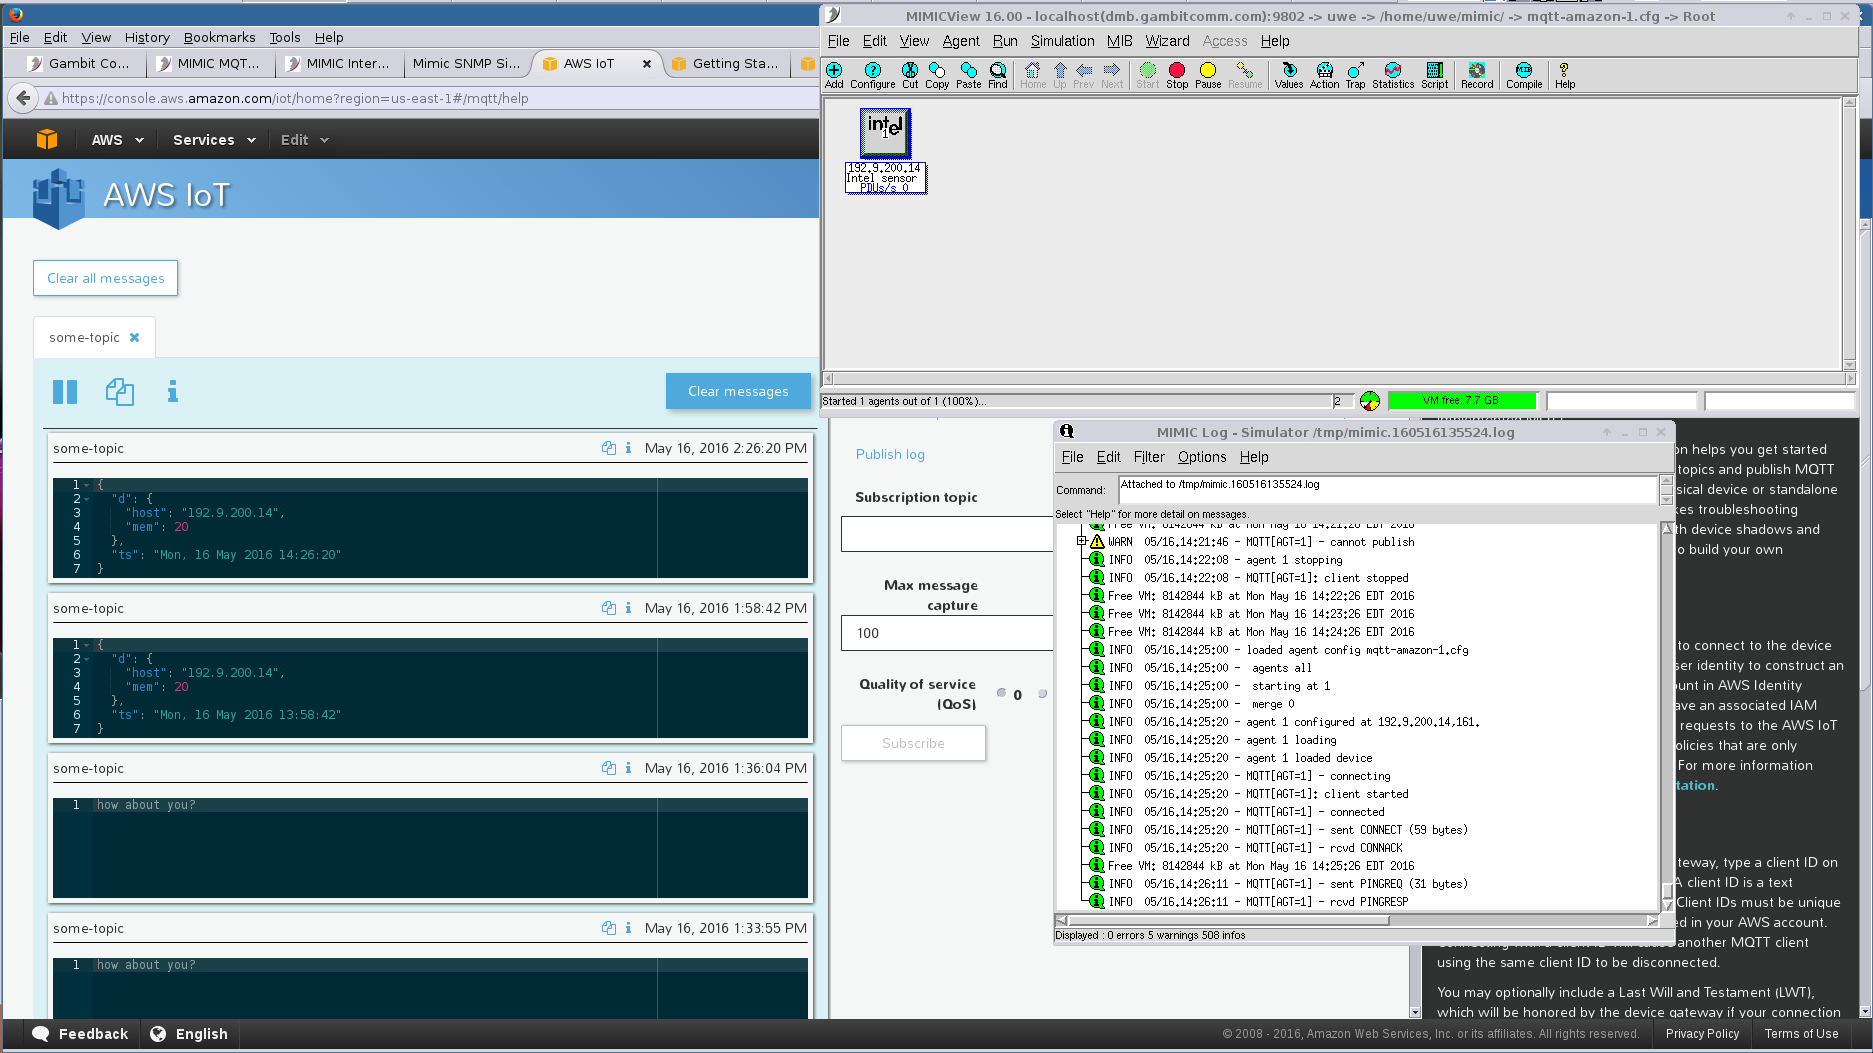
NOTE AWS IoT does NOT support the "Will Retain" feature of MQTT, and will fail silently to connect your sensors.
We followed their documentation to produce this 2-minute Youtube video of scalable, dynamic device shadow updates.
Our MIMIC MQTT Lab uses MIMIC MQTT Simulator to implement a web-based Get Started lab for AWS IoT.
Check out our Youtube video channel AWS IoT playlist for more demo videos.
-
Azure Event Grid
We followed the recently announced Azure Event Grid Quickstart page to connect simulated MQTT publishers and our subscriber to consume dynamic telemetry.
This screenshot shows a simulated sensor publishing messages to Azure Event Grid, and a subscriber client analyzing them.
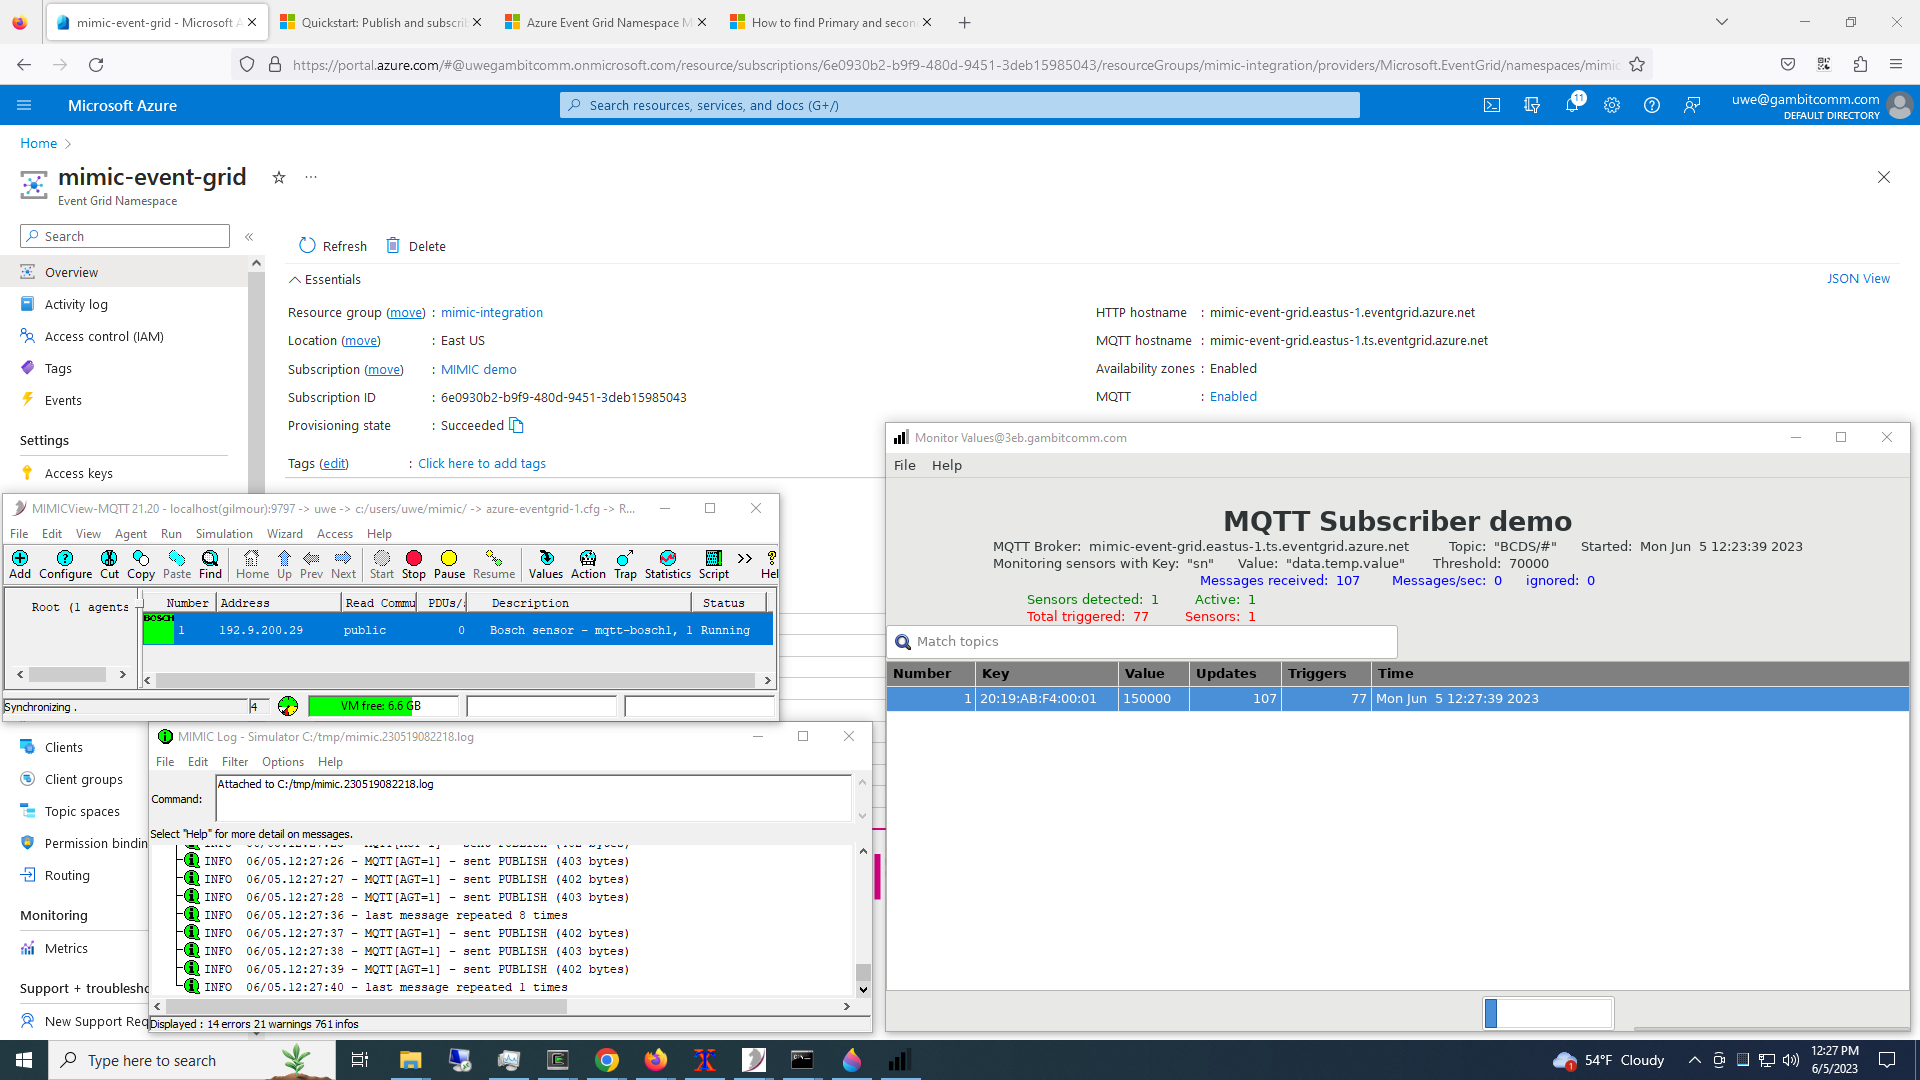
See it in action in this Youtube video.
-
Azure IoT Hub
To interoperate with Microsoft's Azure IoT Hub login to the Azure Control Center. This will supply the parameters necessary to connect as detailed in their IoT Hub MQTT support page.
This screenshot shows 25 simulated sensors publishing messages to Azure and a subscriber client logging them.
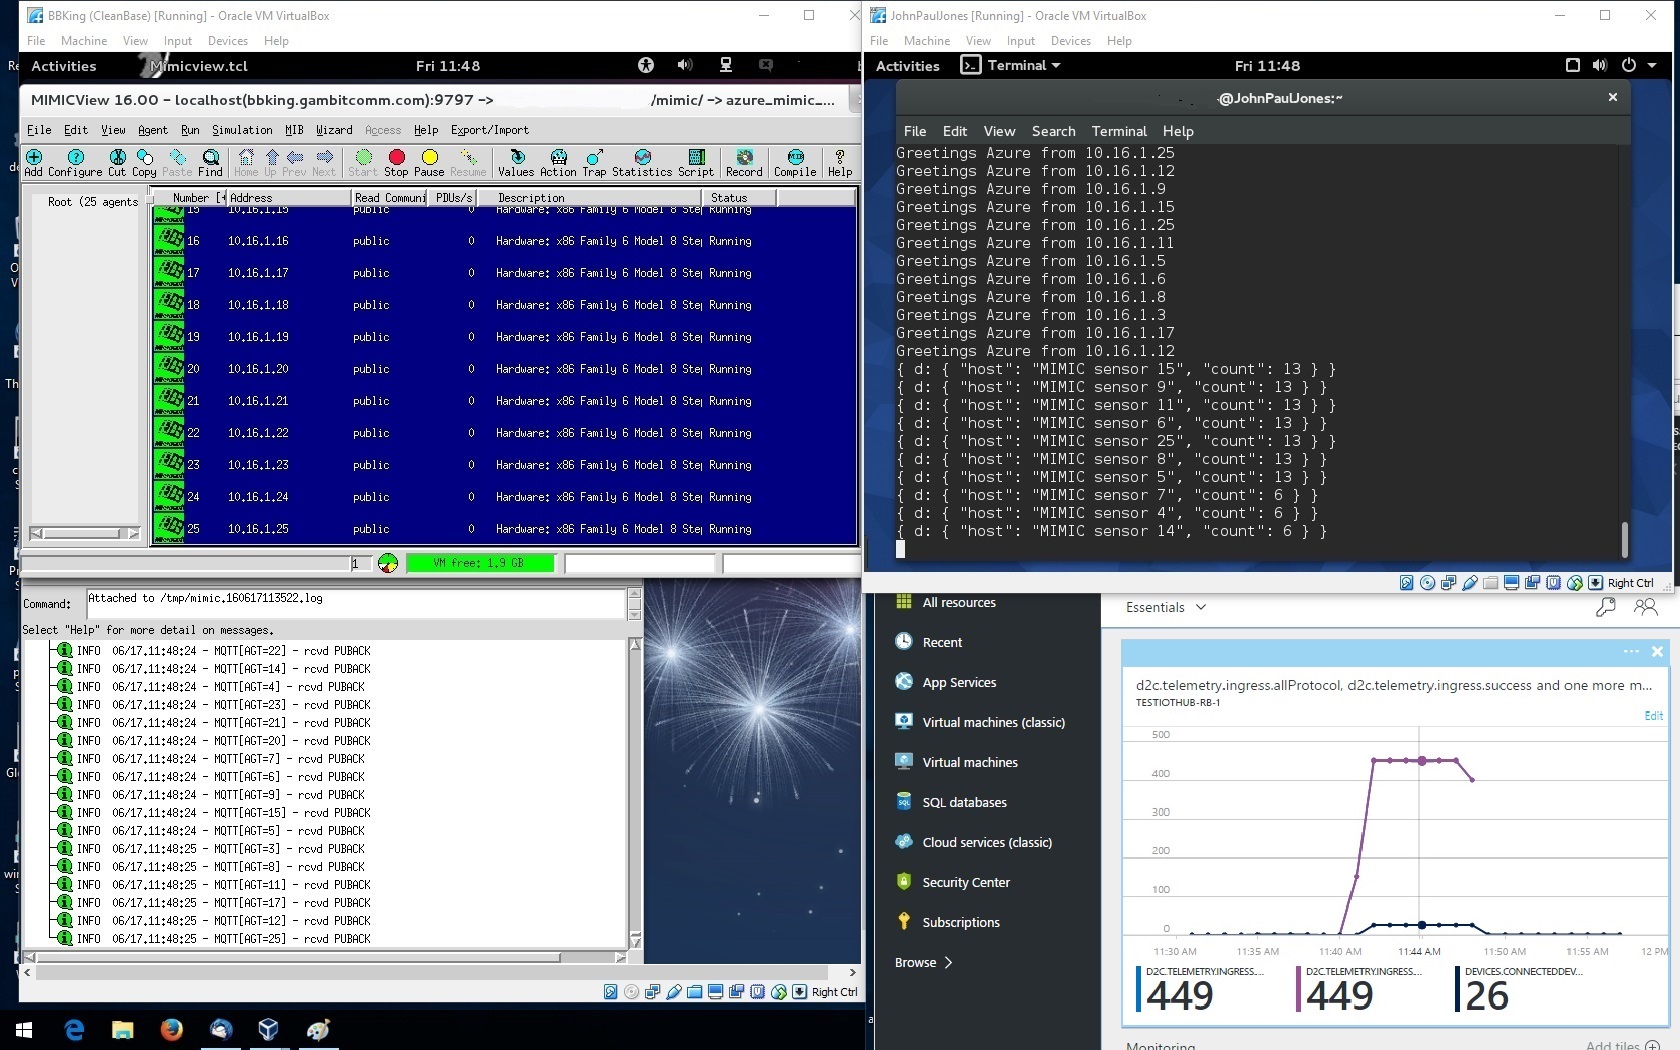
You can install an optional update package with Update Wizard which allows adding many more simulated devices into Azure.
Our MIMIC MQTT Lab uses MIMIC MQTT Simulator to implement a web-based Get Started lab for Azure IoT.
Check out our Youtube video channel Azure IoT playlist for more demo videos.
-
IBM IoT Connection Service
The IBM IoT Connection Service is the cloud front-end to allow devices to connect to the Watson IoT Platform. We used these instructions to connect simulated MQTT devices. The rules are detailed here.
This screenshot shows 2 simulated sensors publishing unique, customizable, programmable telemetry to this platform.
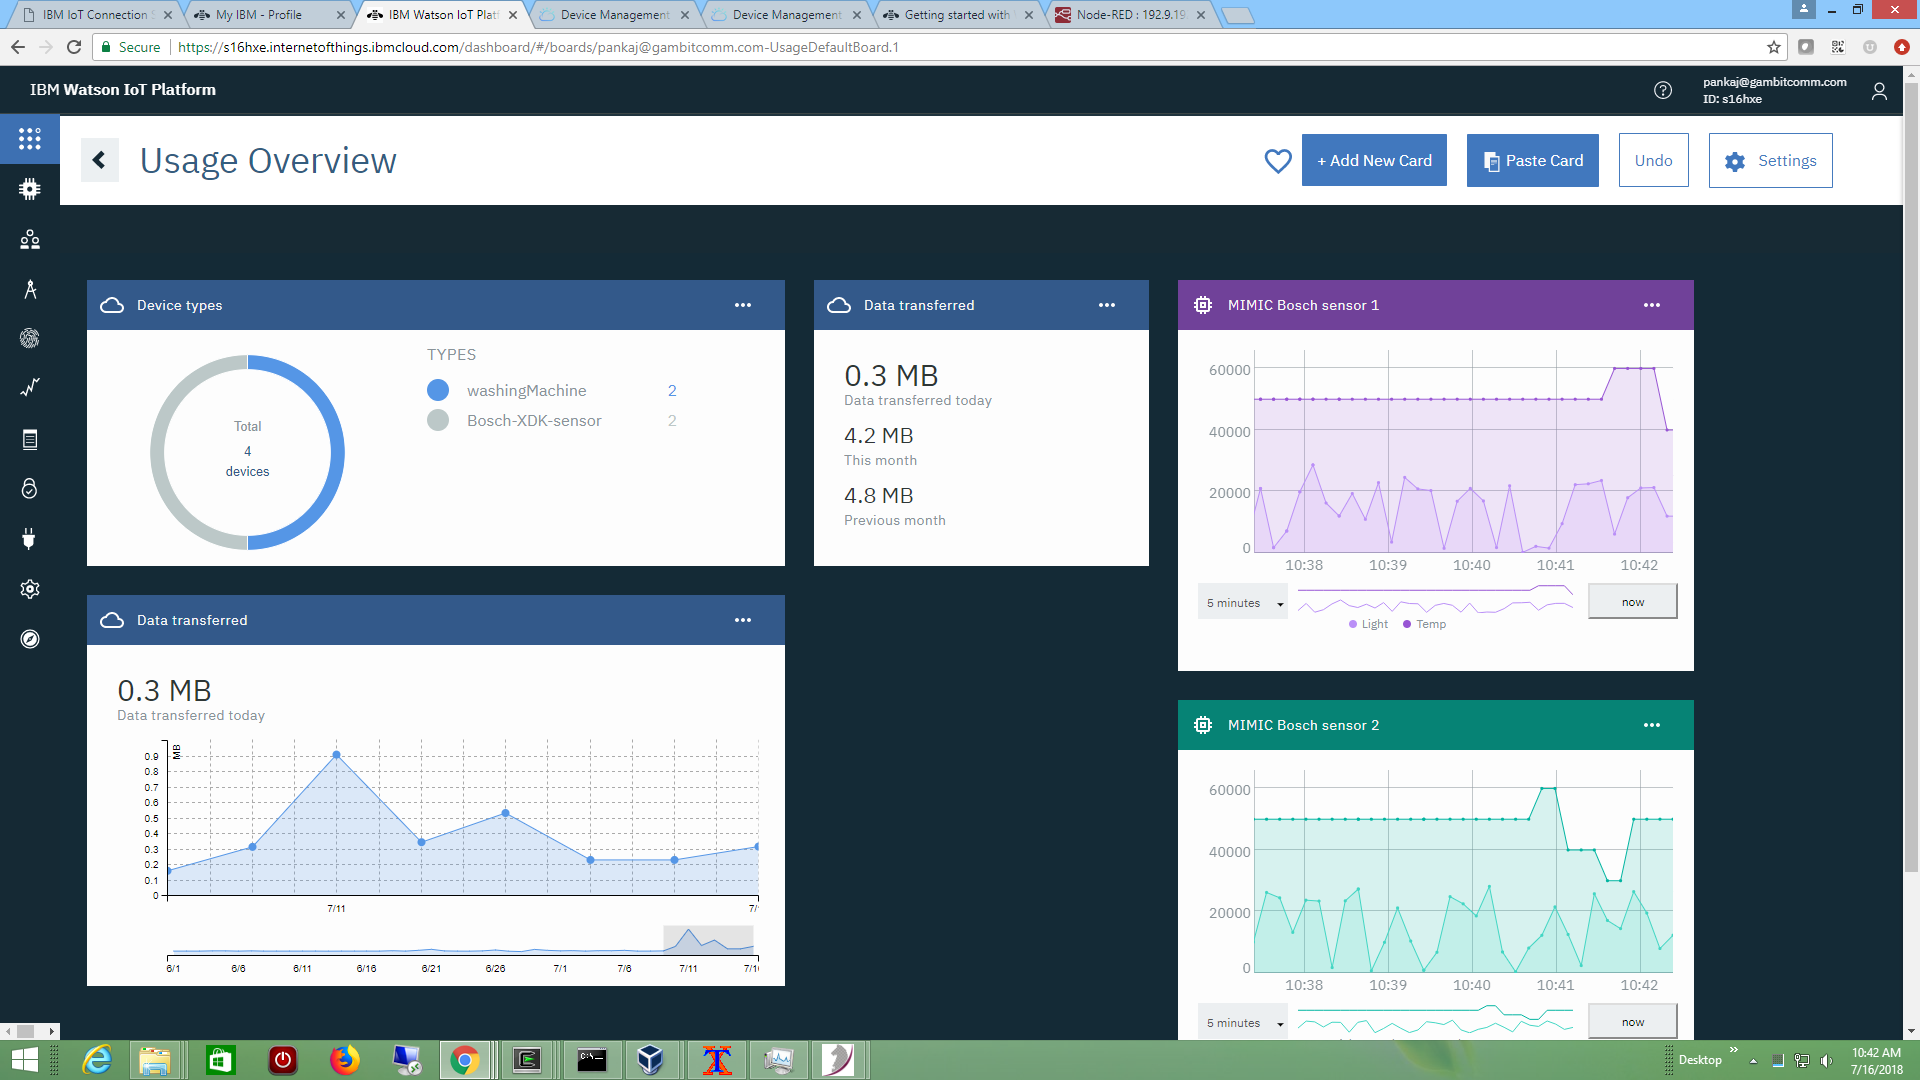
See it in action in this Youtube video.
To control the platform with the REST API invoke the Apps tab in your IBM Watson IoT Platform dashboard to define a new Standard Application. That application Key and secret token will become the username/password parameters to the REST operations. Eg. from a command-line, use this curl invocation:
% curl --request POST \
--url https://ORGID.internetofthings.ibmcloud.com/api/v0002/bulk/devices/add \
-H 'content-type: application/json' -u 'APP-KEY:APP-TOKEN' \
-d '[{"typeId":"Bosch-XDK-sensor","deviceId":"20-19-AB-00-00-06", \
"deviceInfo":{"description":"MIMIC simulated Bosch sensor"}, \
"metadata":{}, "authToken":"hellohowareyou"}]'
[{"typeId":"Bosch-XDK-sensor","deviceId":"20-19-AB-00-00-06",\
"success":true,"authToken":"hellohowareyou"}]
where ORGID is organization ID of our account, APP-KEY is the application key defined above, and APP-TOKEN is the secret token, we are able to add another device instance of the device type Bosch-XDK-sensor with the given authToken.
-
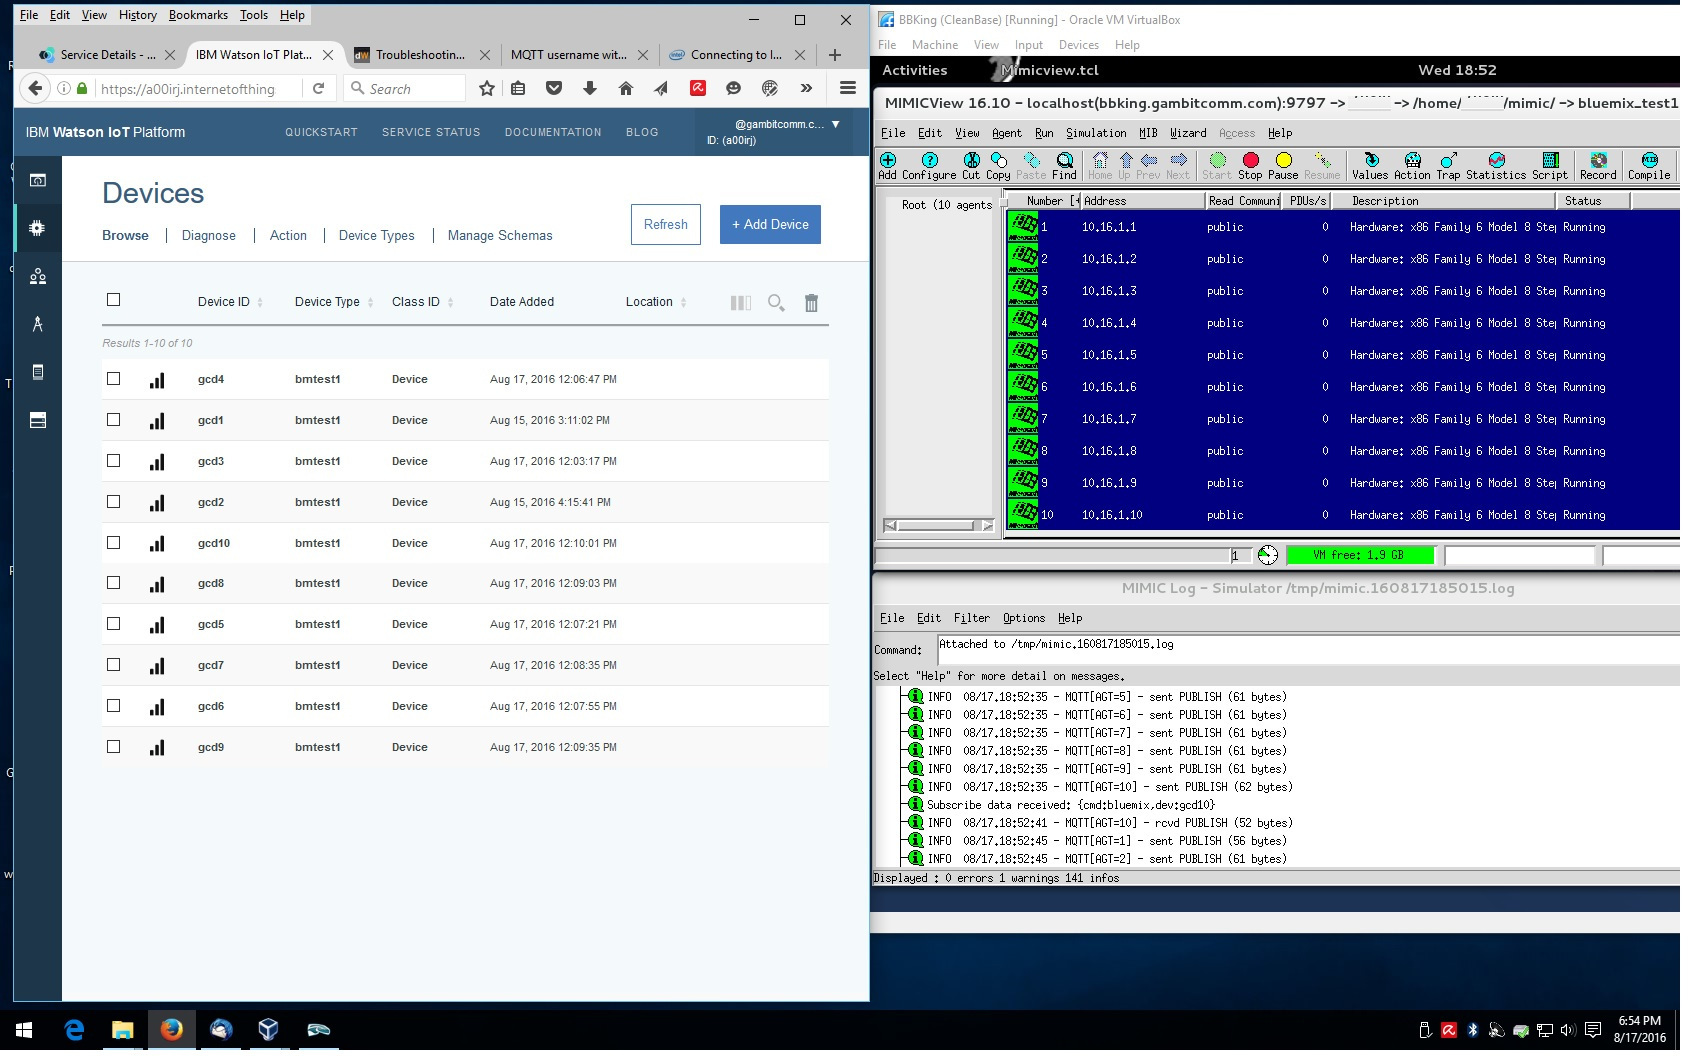
IBM Bluemix
We got MIMIC to interoperate with IBM Bluemix by following this article to create Bluemix IoT service and devices, and these troubleshooting tips for setting up Bluemix IoT MQTT connections. We also used these specifics on how to configure the API key for "application" MQTT connections.
If you are going to manage many devices, you will want to use the REST API .
-
Google IoT Core
You need to setup an account at Google IoT Core. Once logged into the Google IoT console, and a device has been created and registered according to their Quickstart, you are ready to configure your simulated MQTT sensor in MIMIC.
By examining their NODE-JS example, we determined that the password needs to be a JSON Web Token (JWT). The client ID and password are set via a delayed connect in a agent start action script. The topic needs to be /devices/$device_id/events regardless of the topic/subscription in the registry.

We created an anomaly detection scenario with a large number of sensors and posted our results on our blog.
Our MIMIC MQTT Lab uses MIMIC MQTT Simulator to implement a web-based Get Started lab for Google IoT.
Check out our Youtube video channel Google IoT playlist for more demo videos.
-
Siemens MindSphere
After setting up an account, we followed the MindConnect Getting Started training pages, and in particular the Integrating MQTT page to connect simulated sensors into MindSphere.
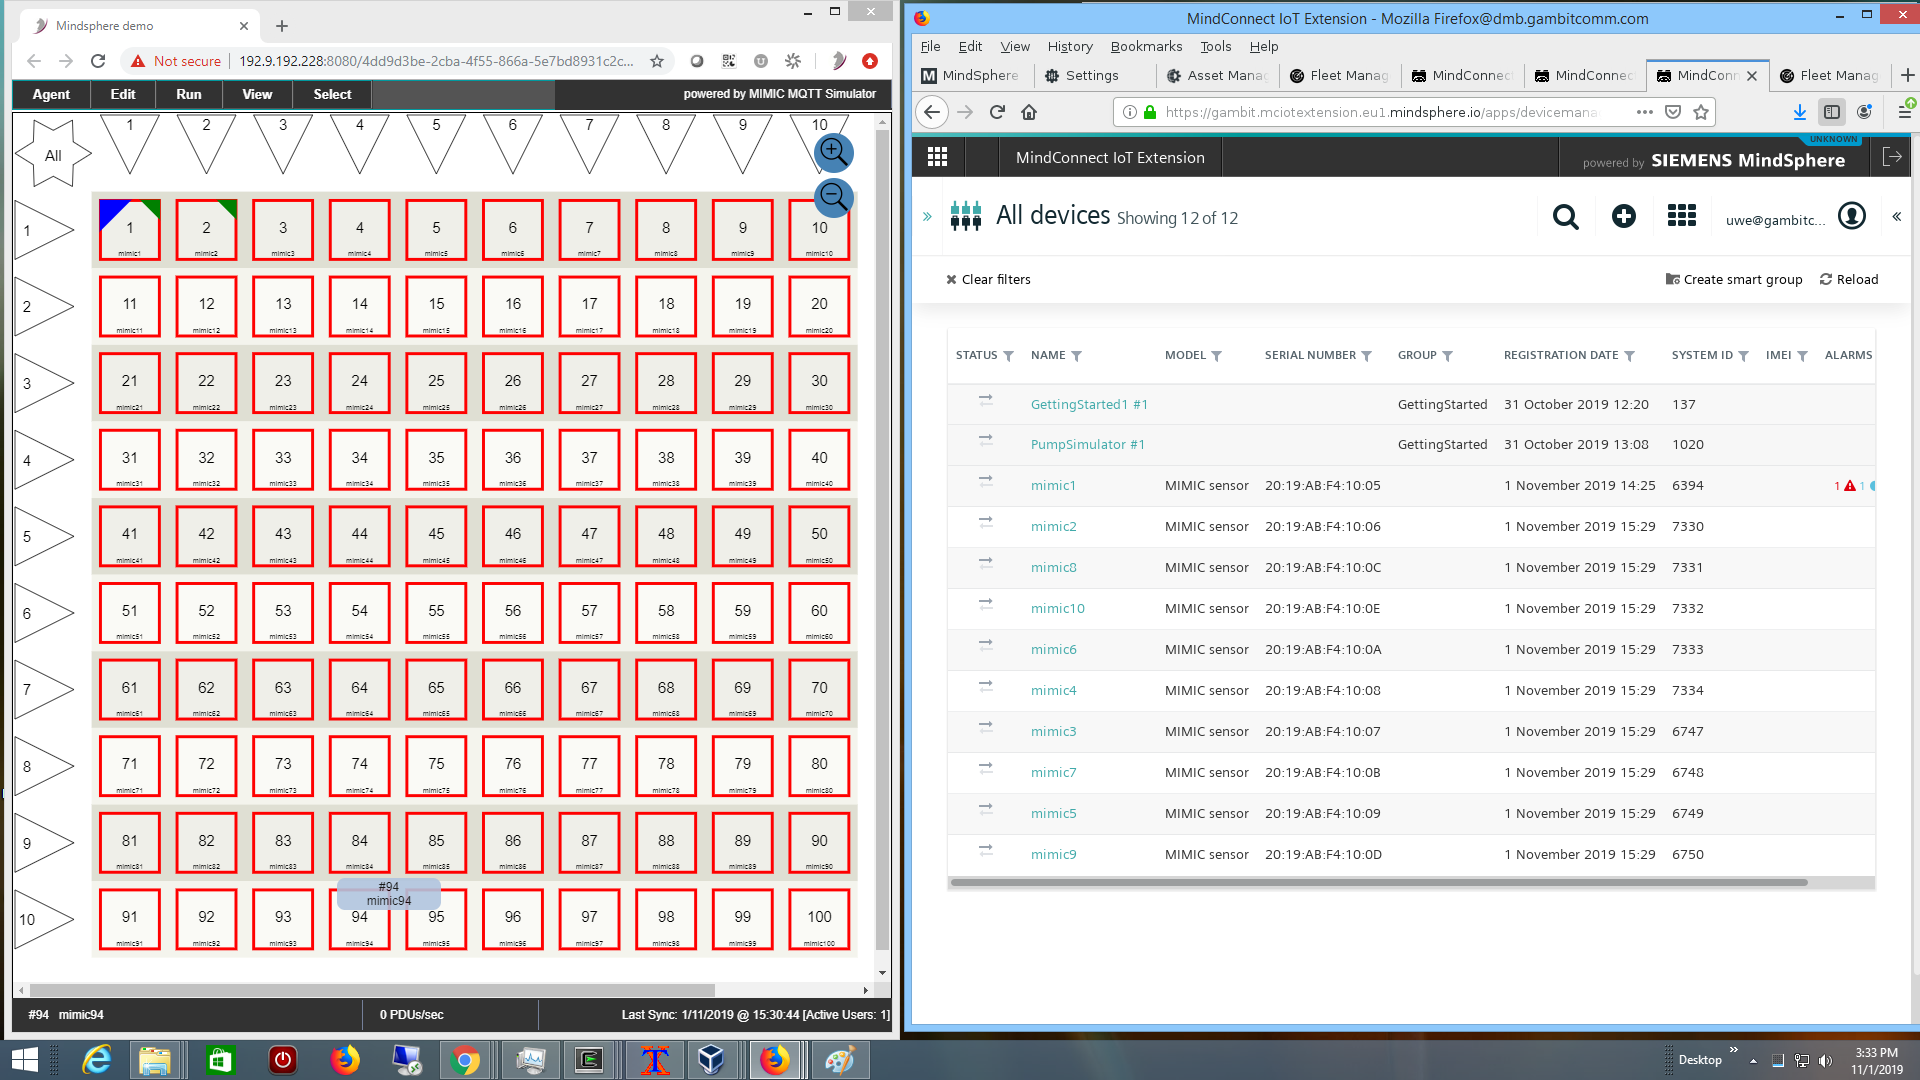
Our MIMIC MQTT Lab uses MIMIC MQTT Simulator to implement a web-based Get Started lab for Siemens Mindsphere.
Check out our Youtube video channel Mindsphere playlist for more demo videos.
-
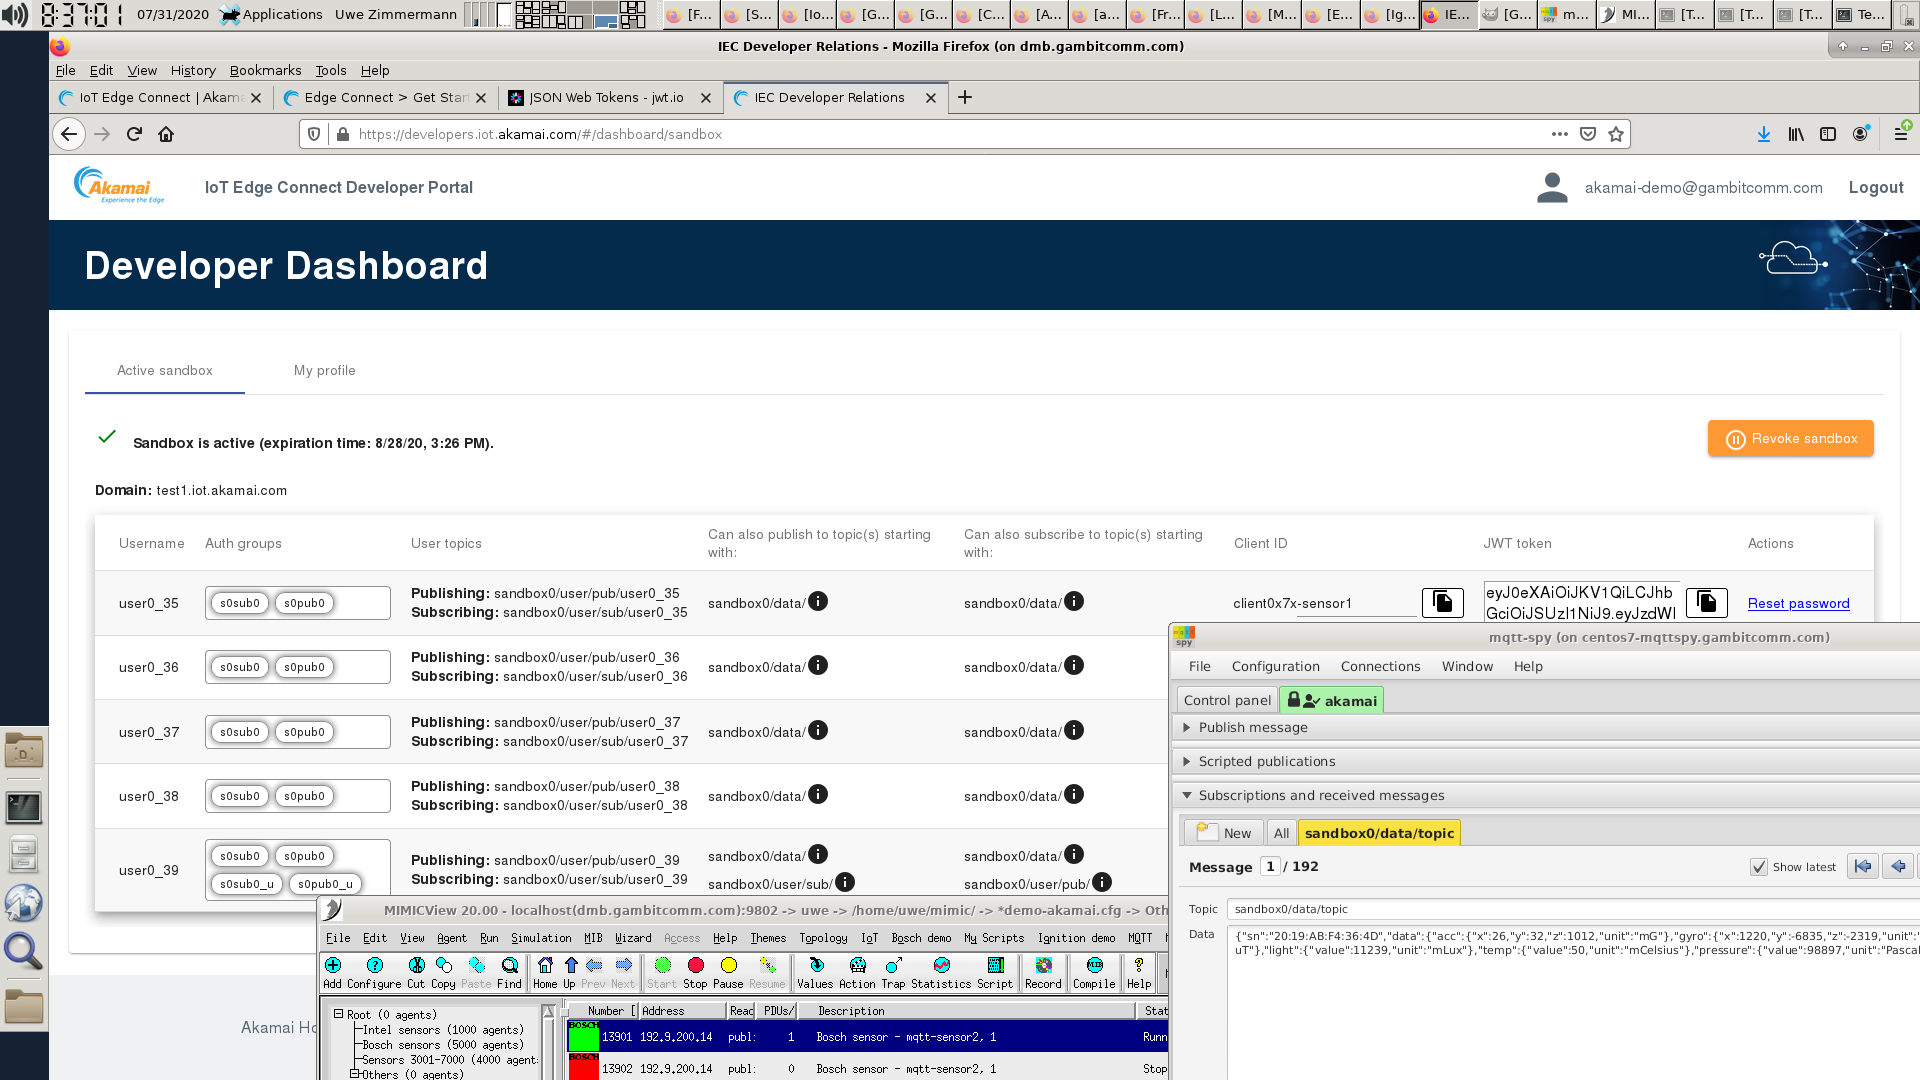
Akamai IoT Edge Connect
We followed their instructions to connect to a IEC sandbox. This Youtube video shows dynamic telemetry being received by MQTT-SPY.
-
Bosch IoT Hub
Once you have subscribed to the Bosch IoT Suite services, you can follow their Getting Started documentation to register a device, and run the sample Eclipse Hono subscriber client.
To connect the MQTT sensor, configure it as detailed at their documentation. After that you can send arbitrary telemetry as shown below.
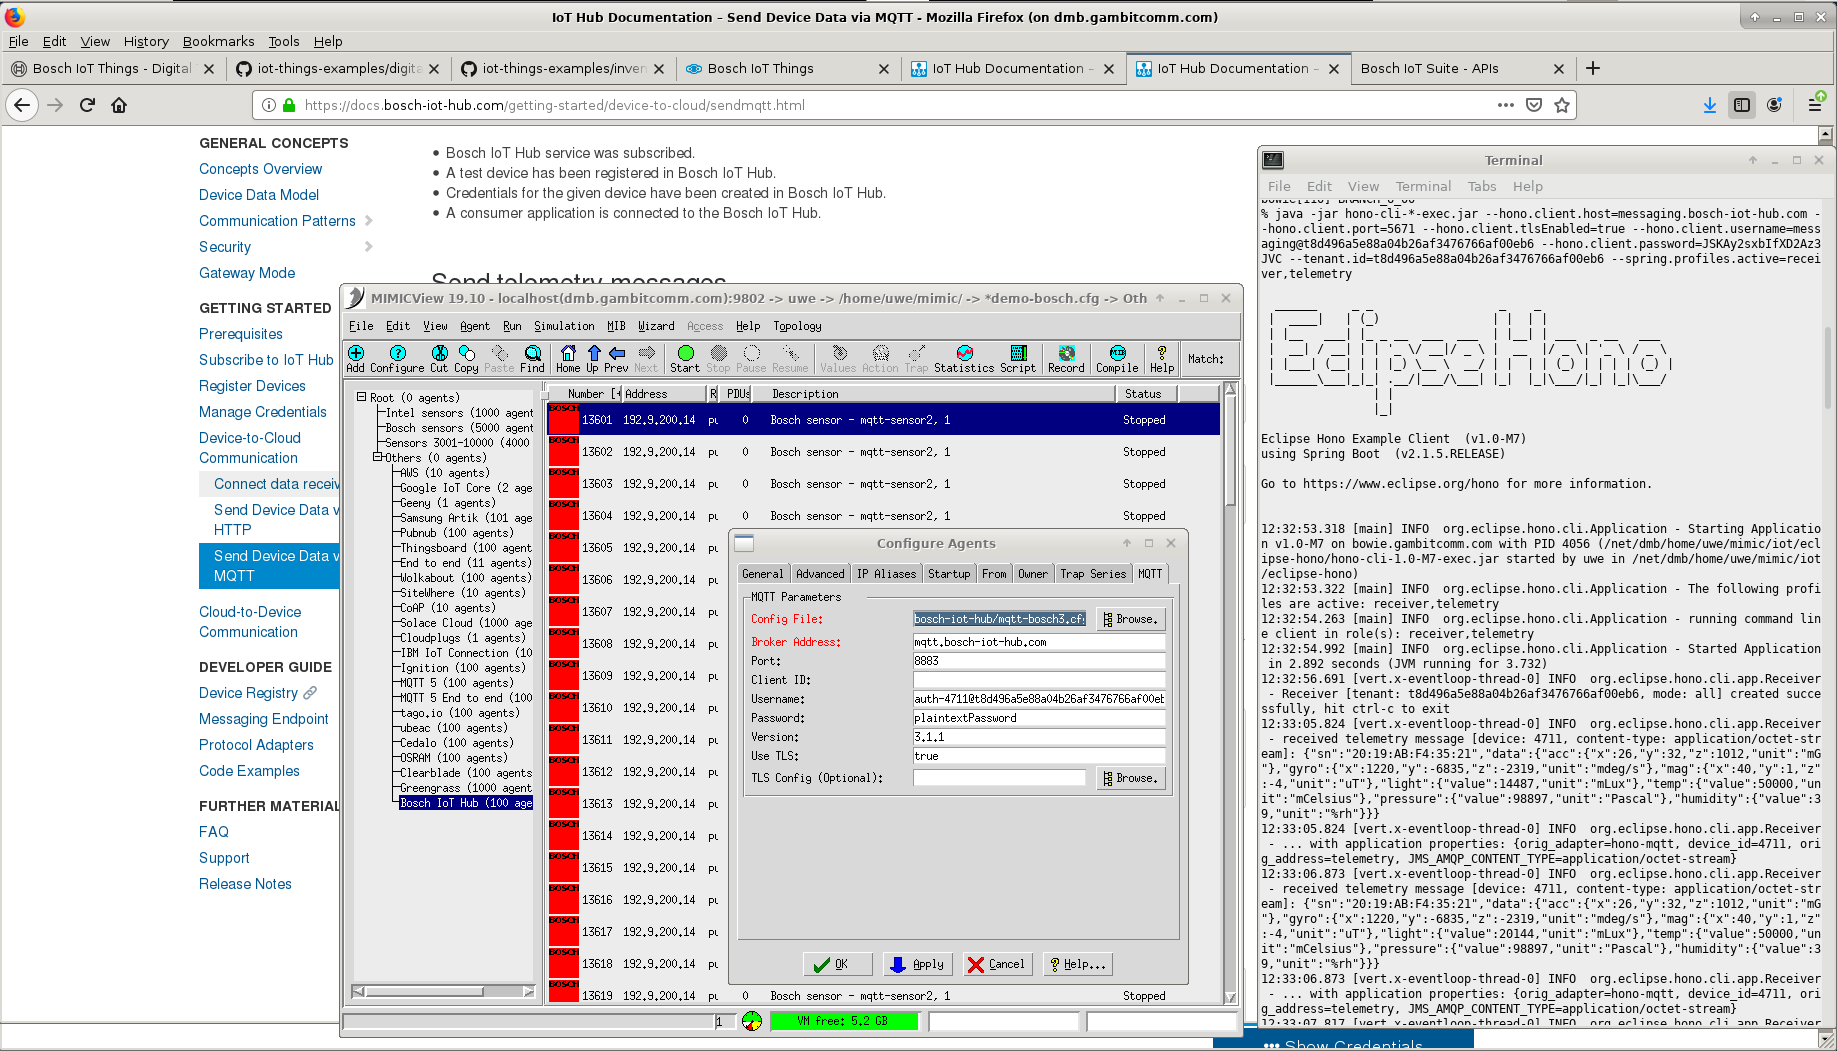
We also made our simulated sensors interoperate with Eclipse Vorto through the Bosch IoT Hub.
-
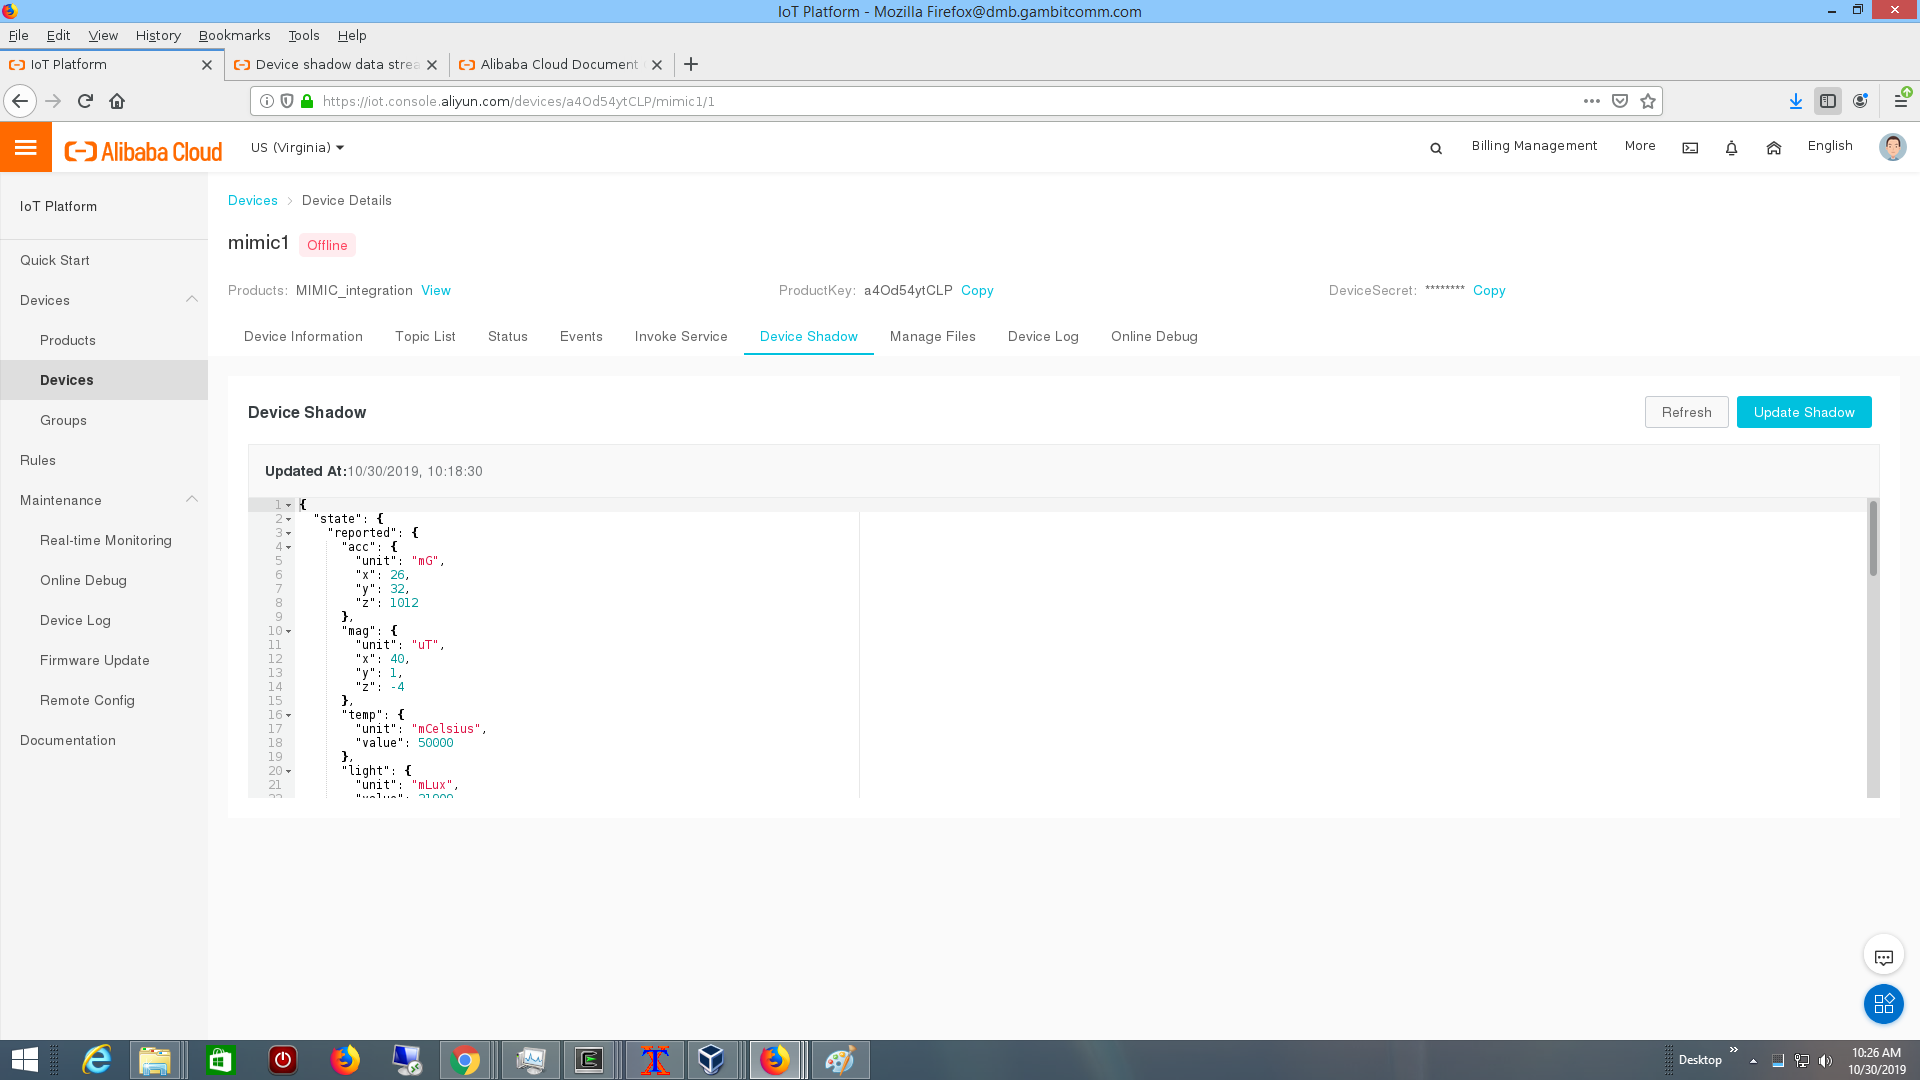
Alibaba IoT Platform
The Alibaba IoT Platform is part of the Alibaba Cloud offerings. Once logged into the console we followed their Quick Start to define a device.
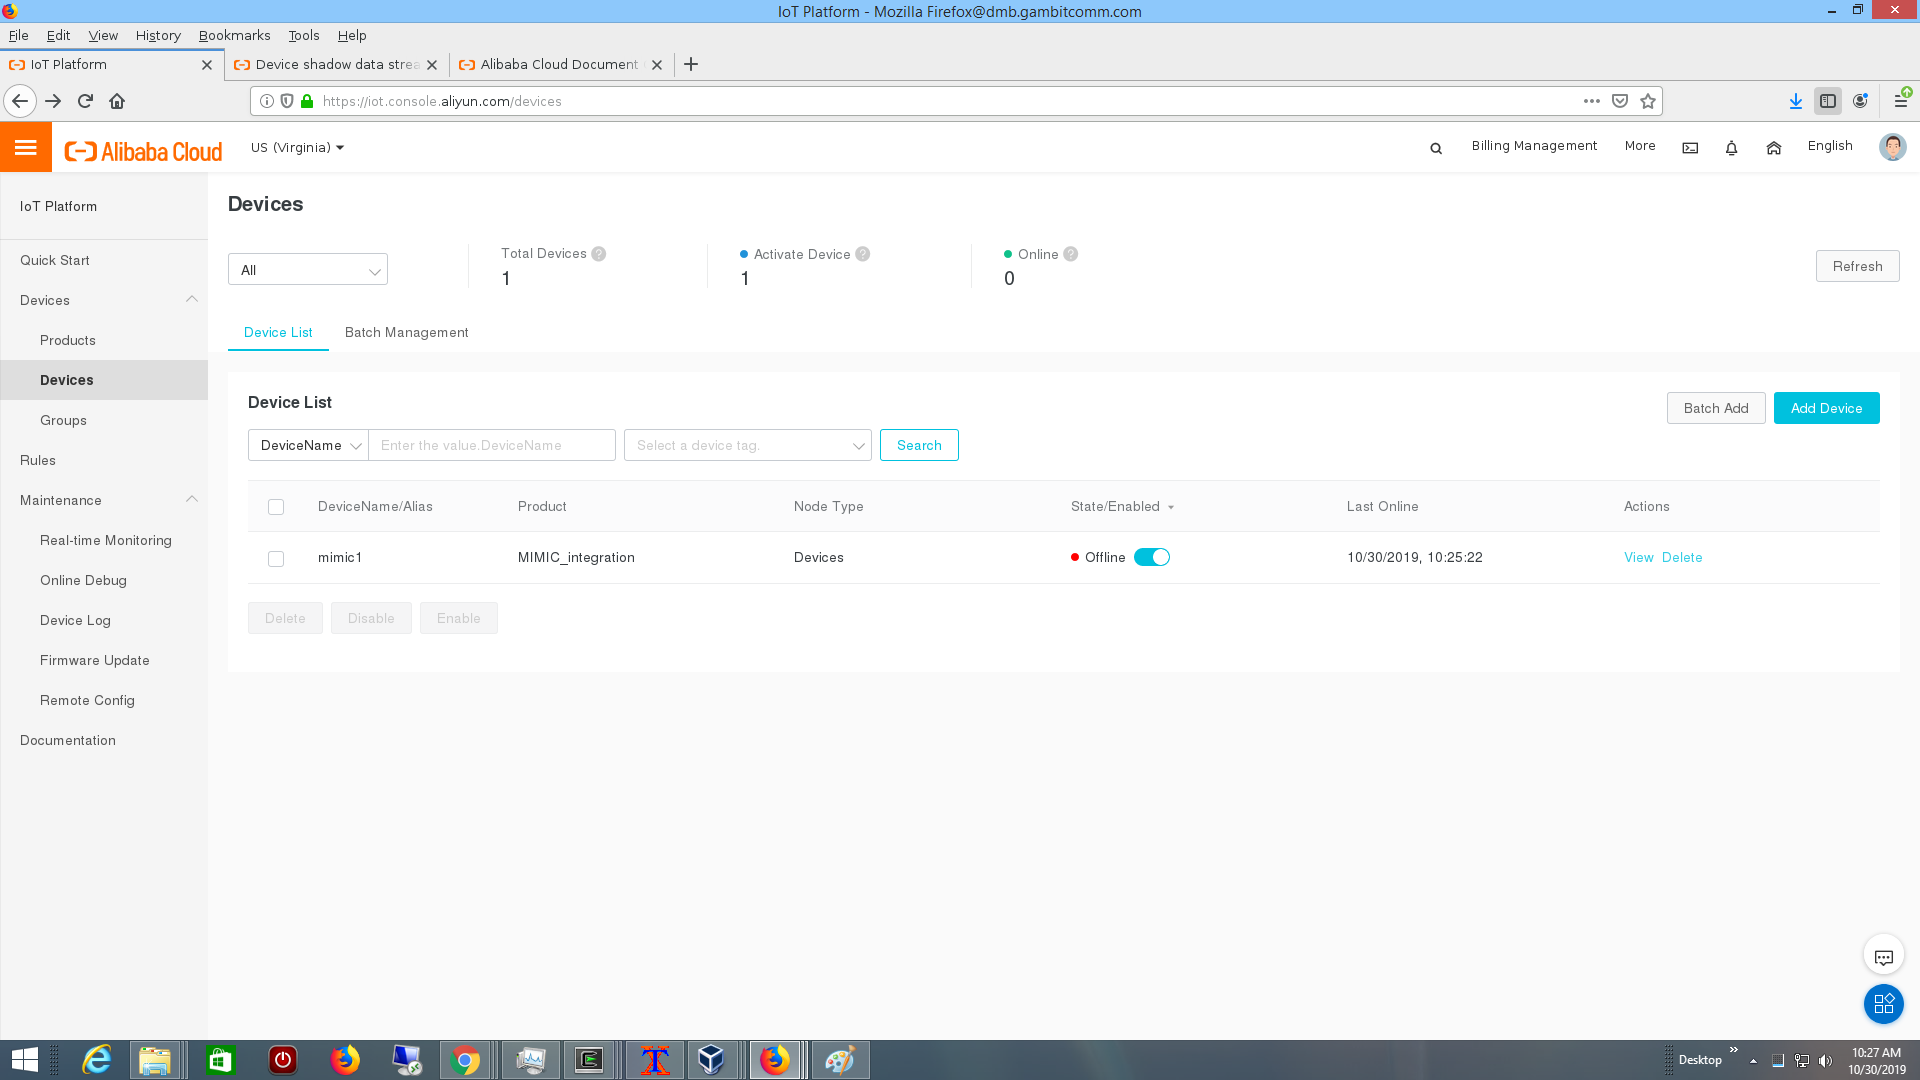
You can connect a MQTT sensor as detailed at their documentation, then follow their device shadow rules to update the shadow.
-
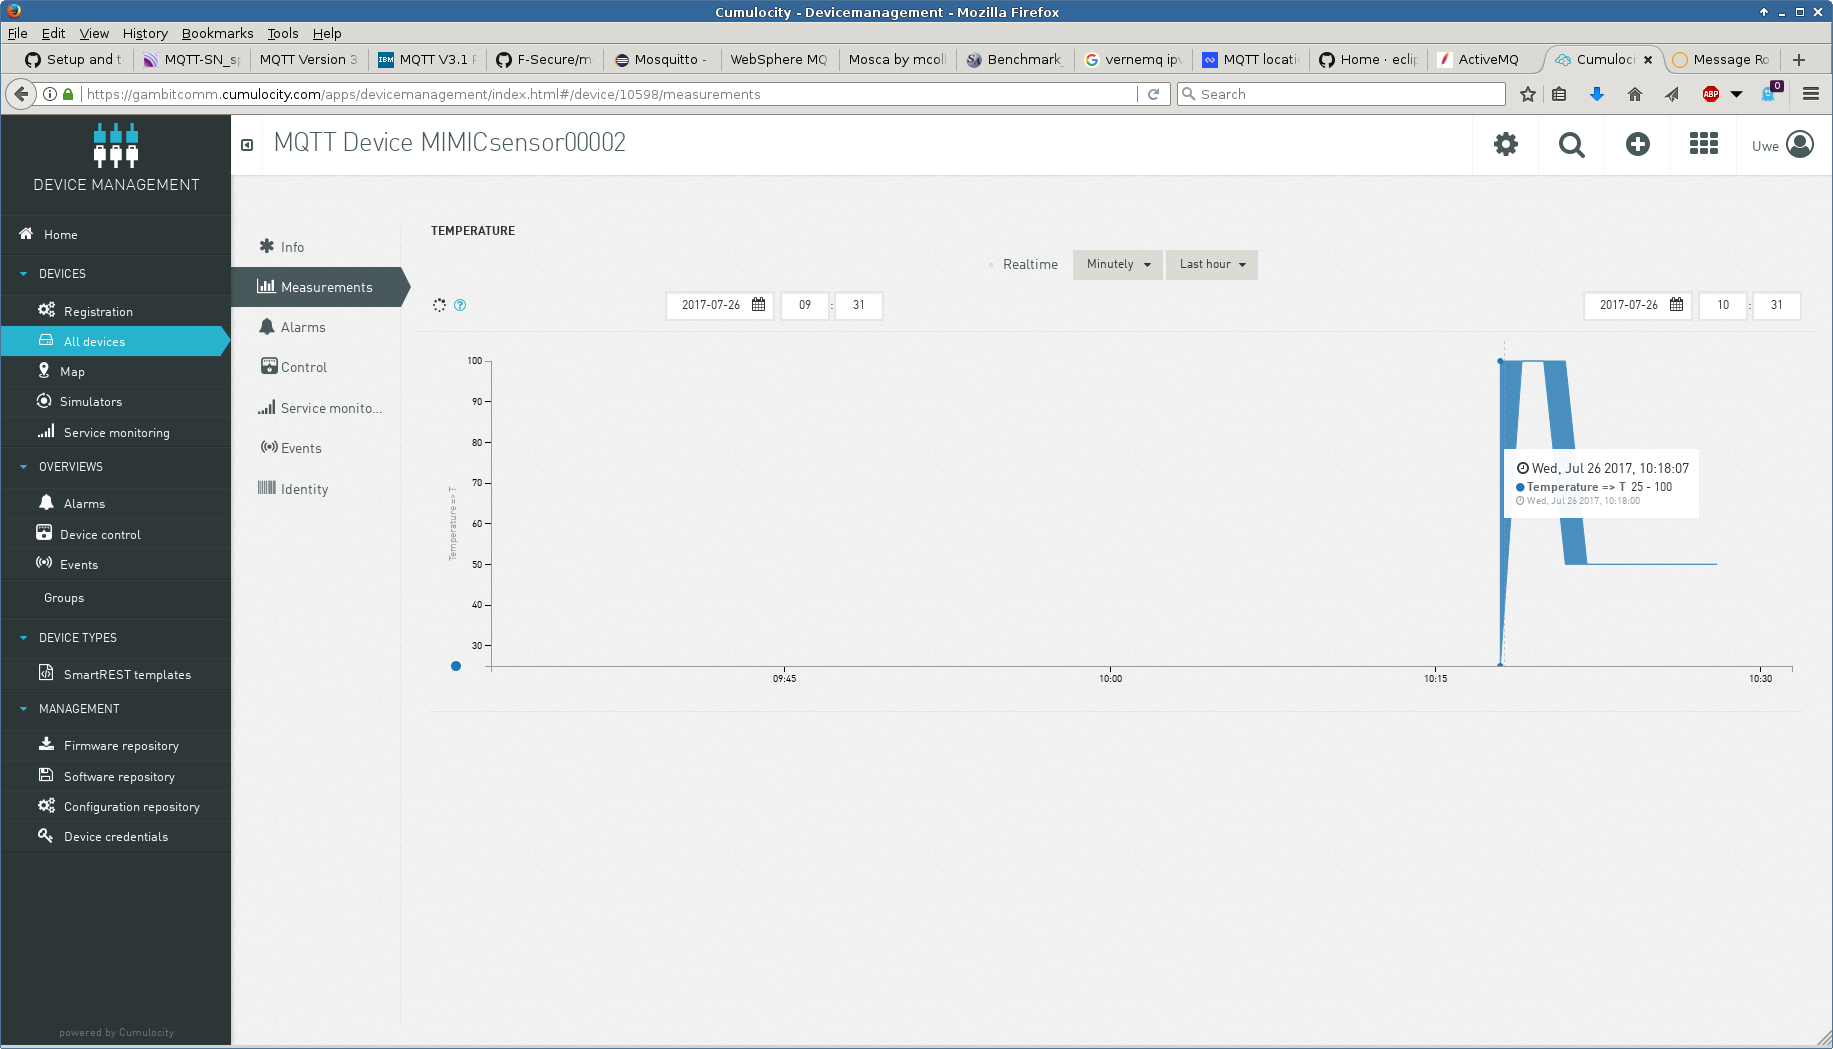
Cumulocity
Cumulocity publishes an API which we used to define 100 simulated sensors to publish measurements, events and alarms.
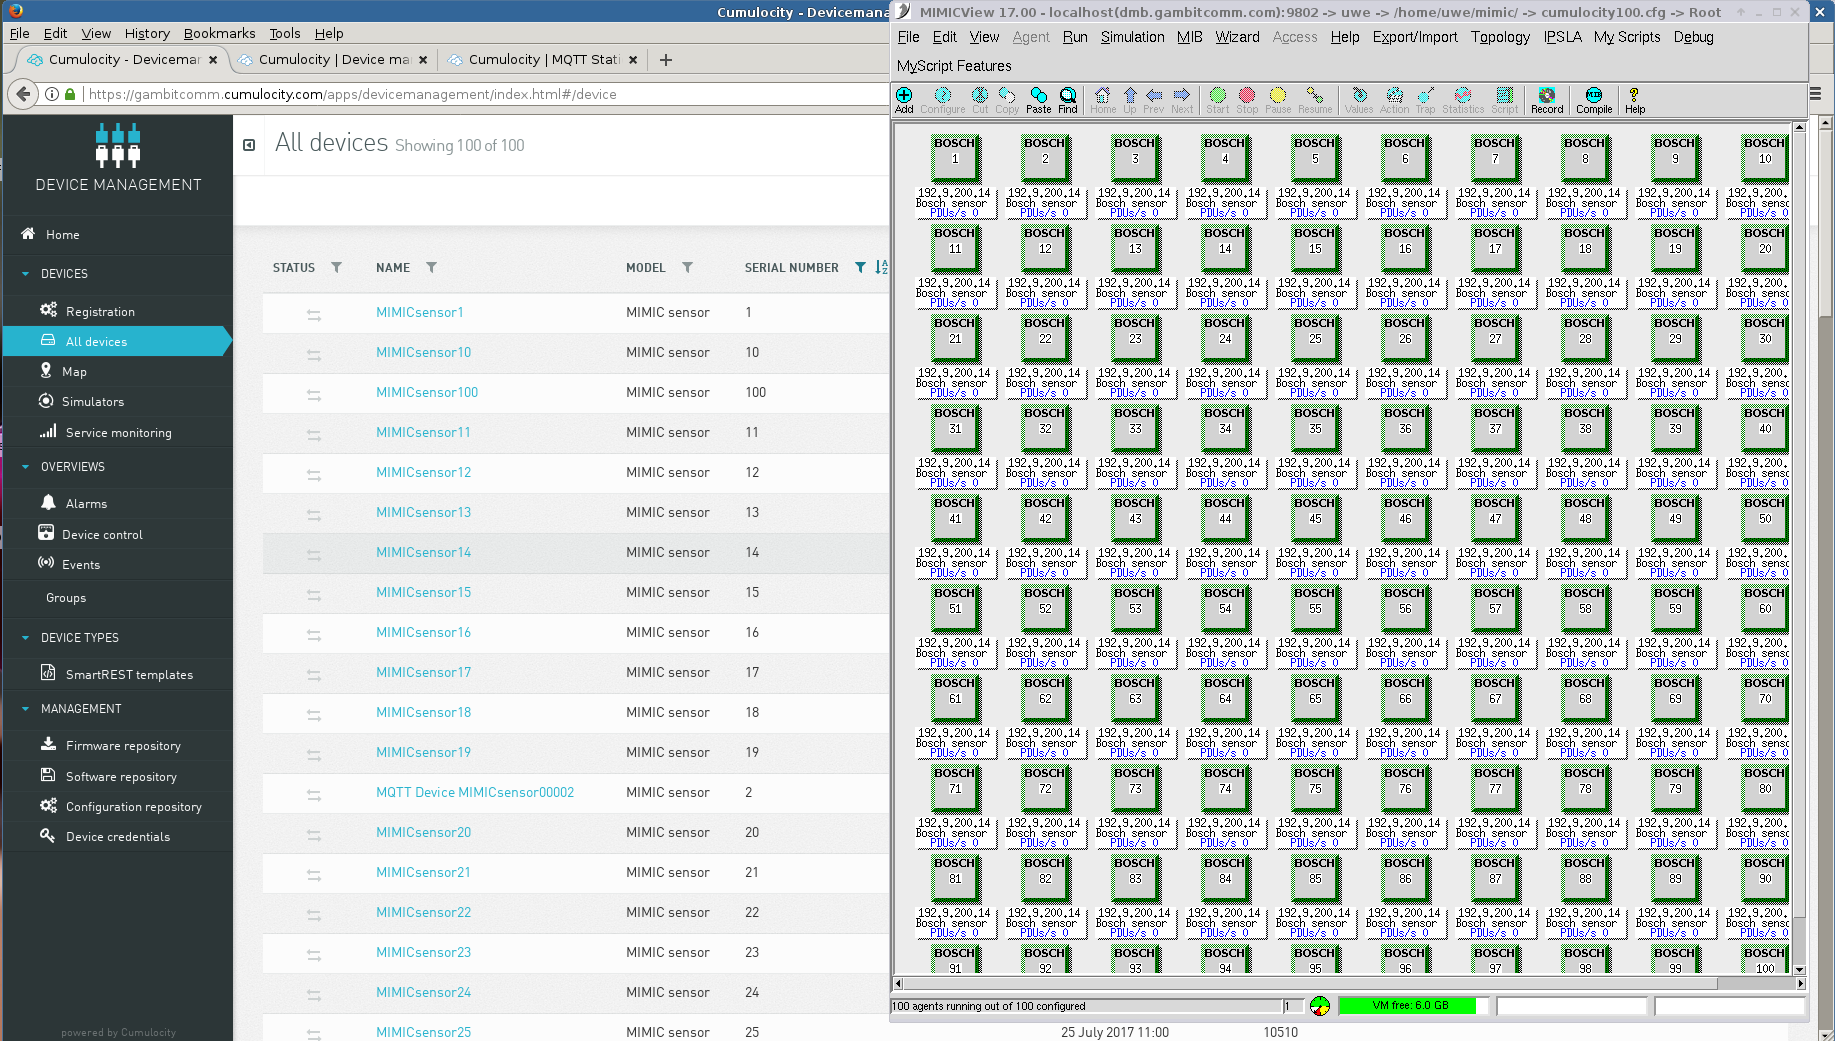
TLS connection works to the SSL Port with the default tls.cfg in MIMIC. TLS v1.3 has been tested with the Cumulocity broker.
See 10 sensors publishing real-time, dynamic, custom telemetry in this Youtube video.
Our MIMIC MQTT Lab uses MIMIC MQTT Simulator to implement a web-based Get Started lab for Cumulocity IoT.
Check out our Youtube video channel Cumulocity playlist for more demo videos.
-
Losant
The MQTT manual of the Losant documentation details the authentication rules for MQTT clients. We setup 5 vehicles travelling the Nashua-Boston corridor for a vehicle fleet management demo as shown in the dashboard
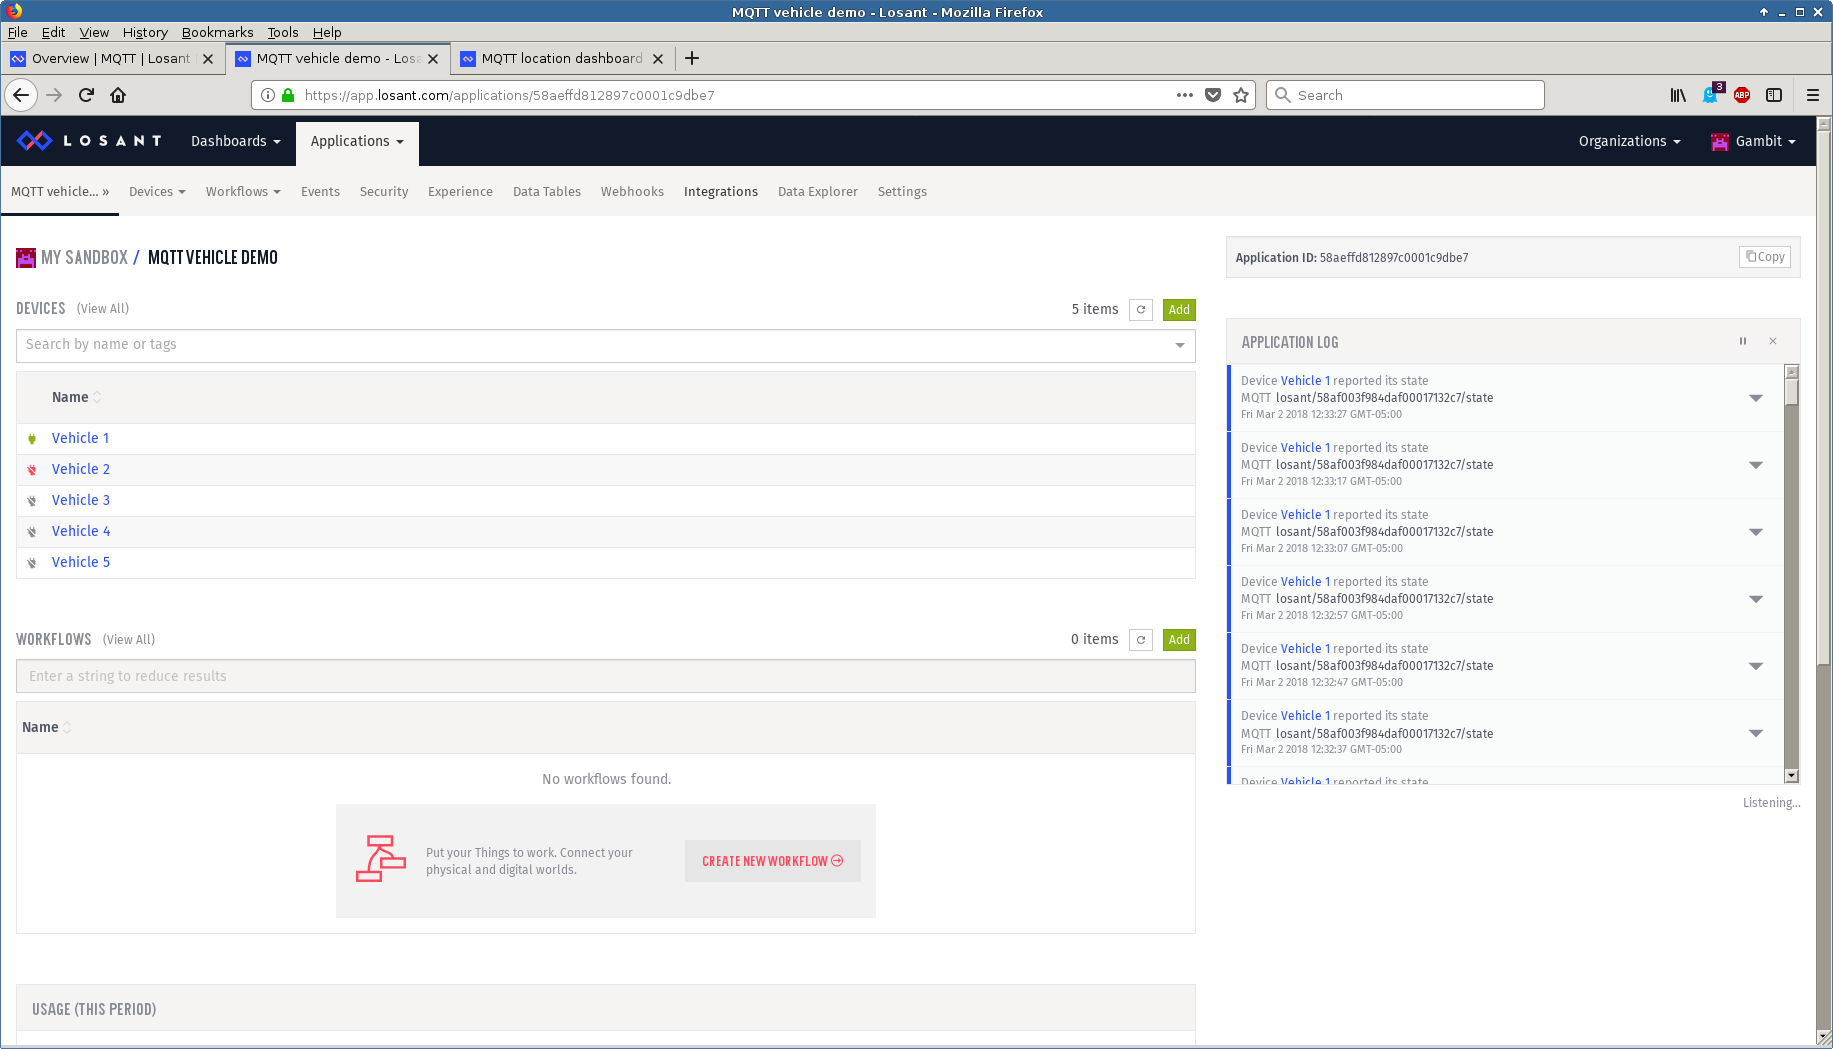
and this Youtube video.
We implemented our standard IoT Control System pattern with Losant as detailed in this blog post and extended it to handle our emergency shutoff scenario in this post.
TLS v1.3 has been tested with the Losant broker.
Check out our Youtube video channel Losant playlist for more demo videos.
-
TagoIO
It took us half an hour to configure and graph 2 devices publishing via MQTT temperature and light telemetry according to their instructions
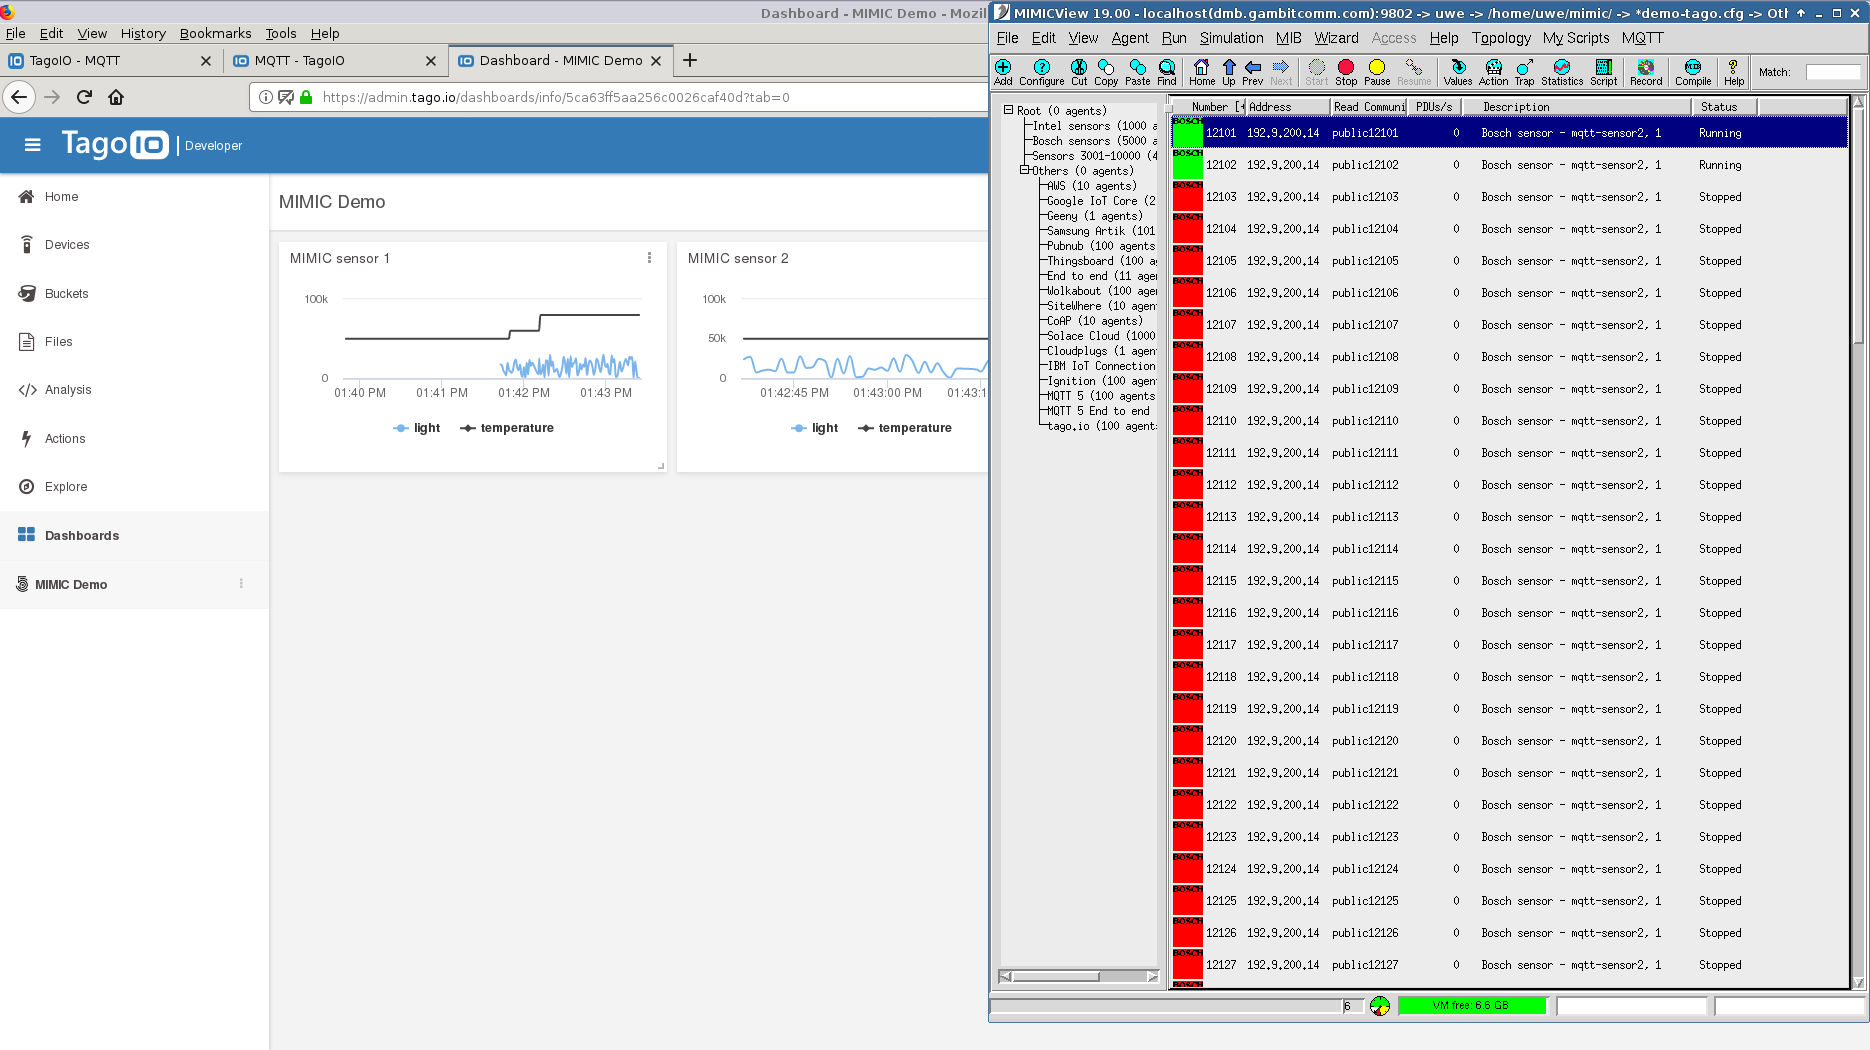
We have published a SaaS MIMIC MQTT Lab to get started with the TagoIO platform in minutes.
Check out our Youtube video channel TagoIO playlist for more demo videos.
-
Ubidots
Using the simplest default token authentication method it is easy to connect MIMIC devices to Ubidots
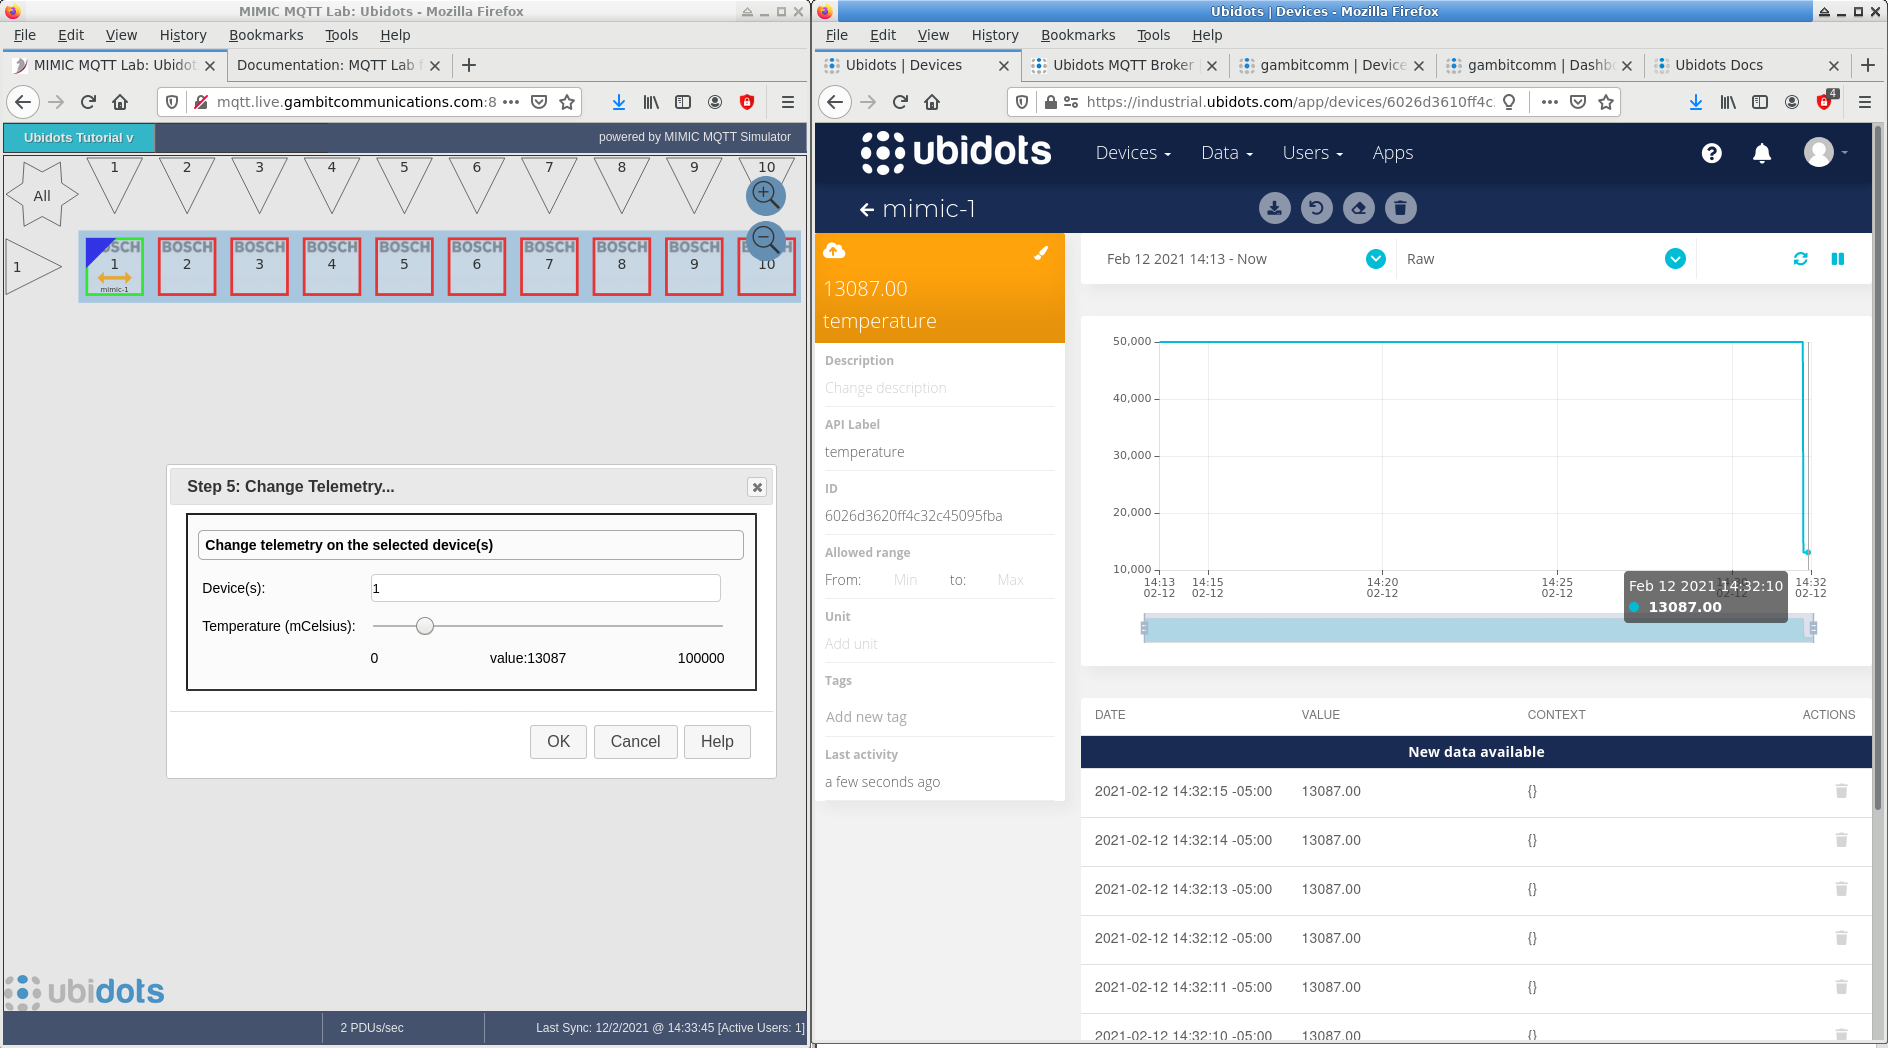
TLS v1.3 has been tested with the Ubidots broker.
We have published a SaaS MIMIC MQTT Lab to get started with the Ubidots platform in minutes.
Check out our Youtube video channel Ubidots playlist for more demo videos.
-
Qubitro
We followed the MQTT guide to setup integration with MIMIC.
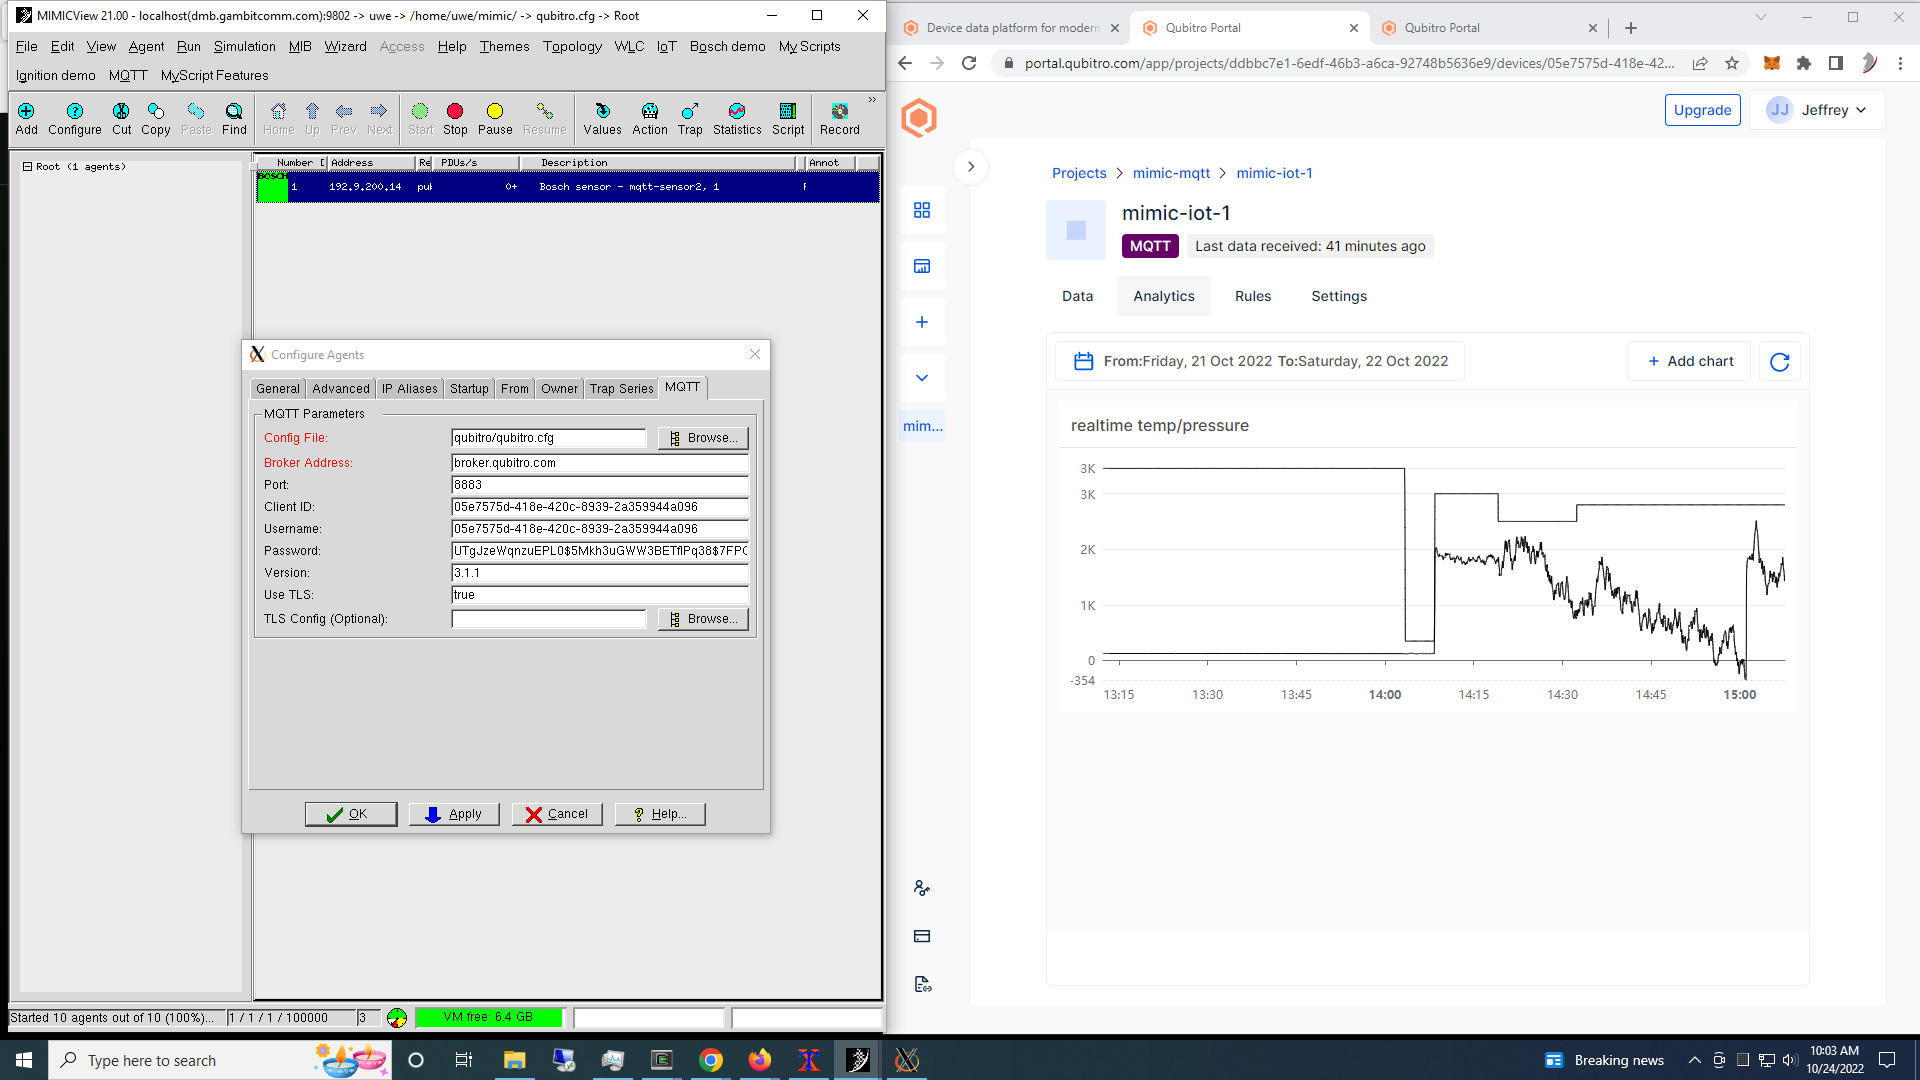
Check out this 2-minute Youtube video for it in action.
-
Cloud Studio
We followed their MQTT integration wiki to setup integration with MIMIC.
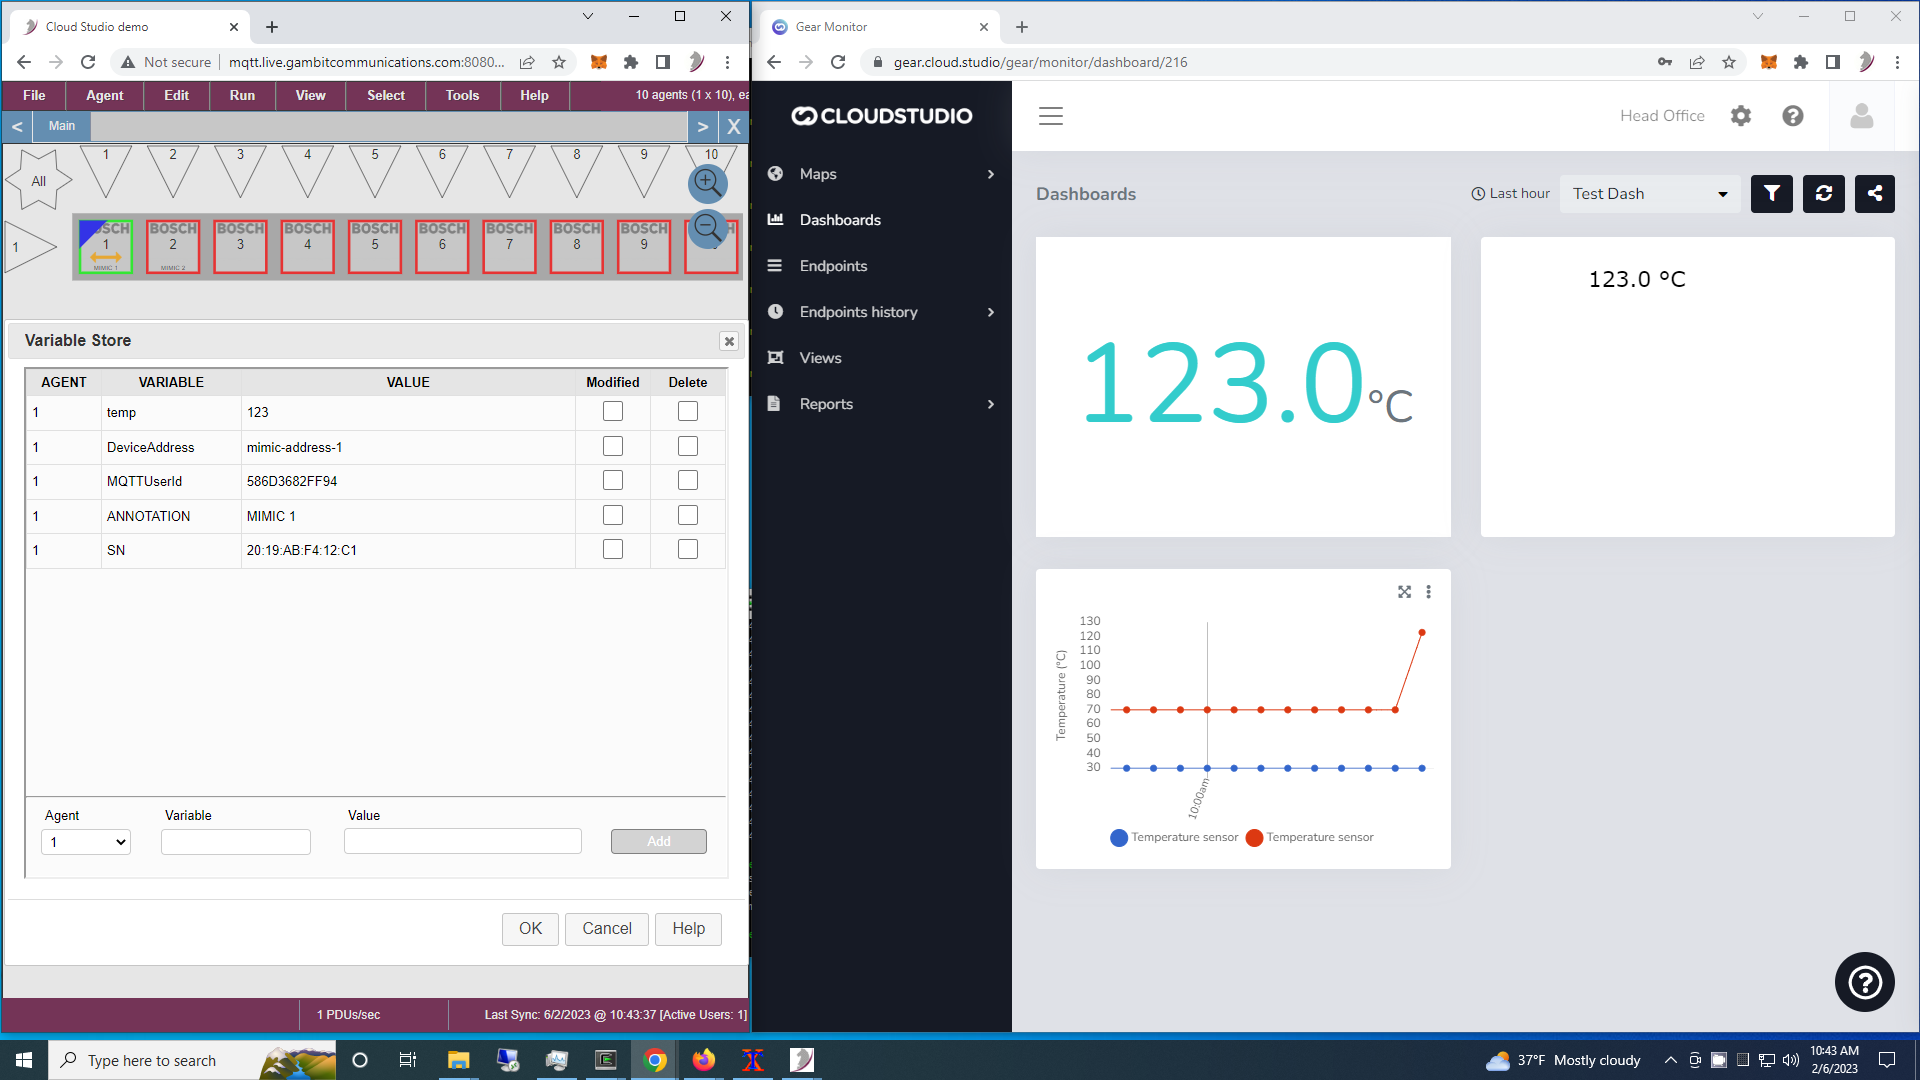
Check out this 2-minute Youtube video for it in action.
-
Telit
Telit's IoT Platform documents their MQTT interface and API to allow us to define simulations for predictable, programmable, customizable sensor simulations. This screenshot shows a single simulated sensor publishing run-time changeable temperature and random light telemetry.
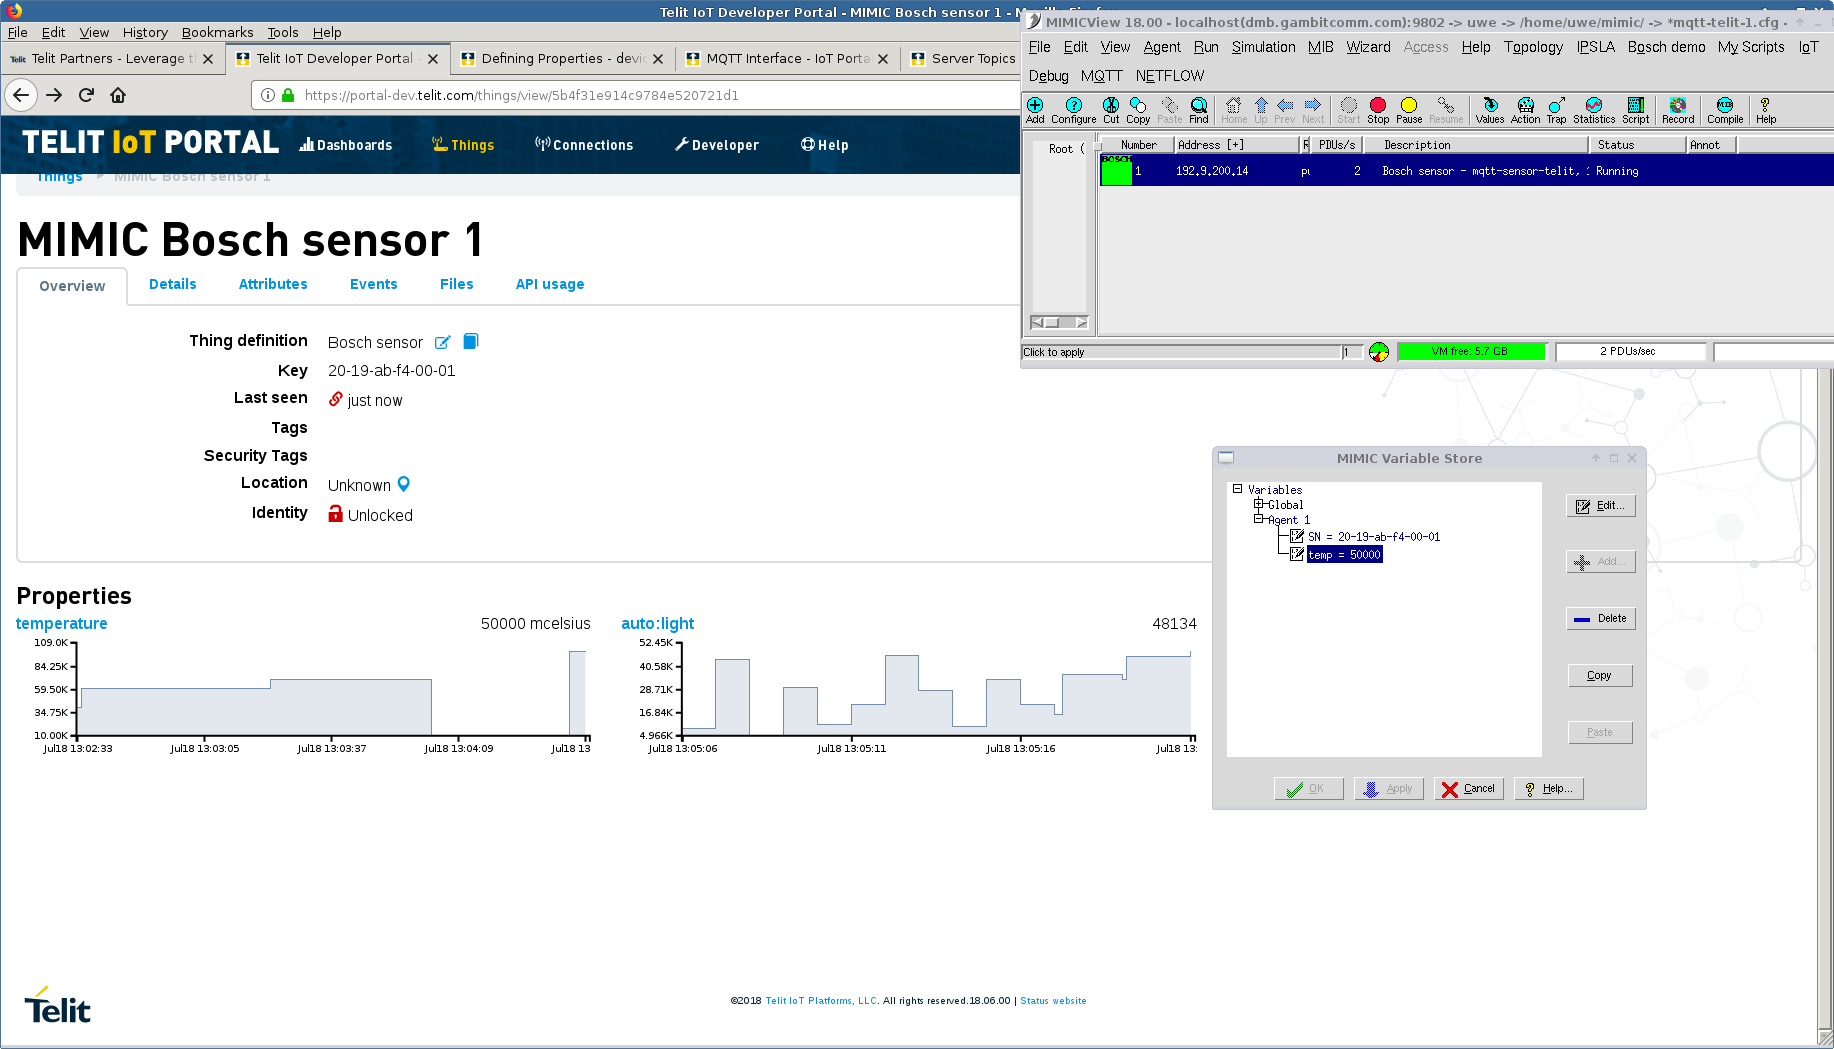
See also this blog post.
-
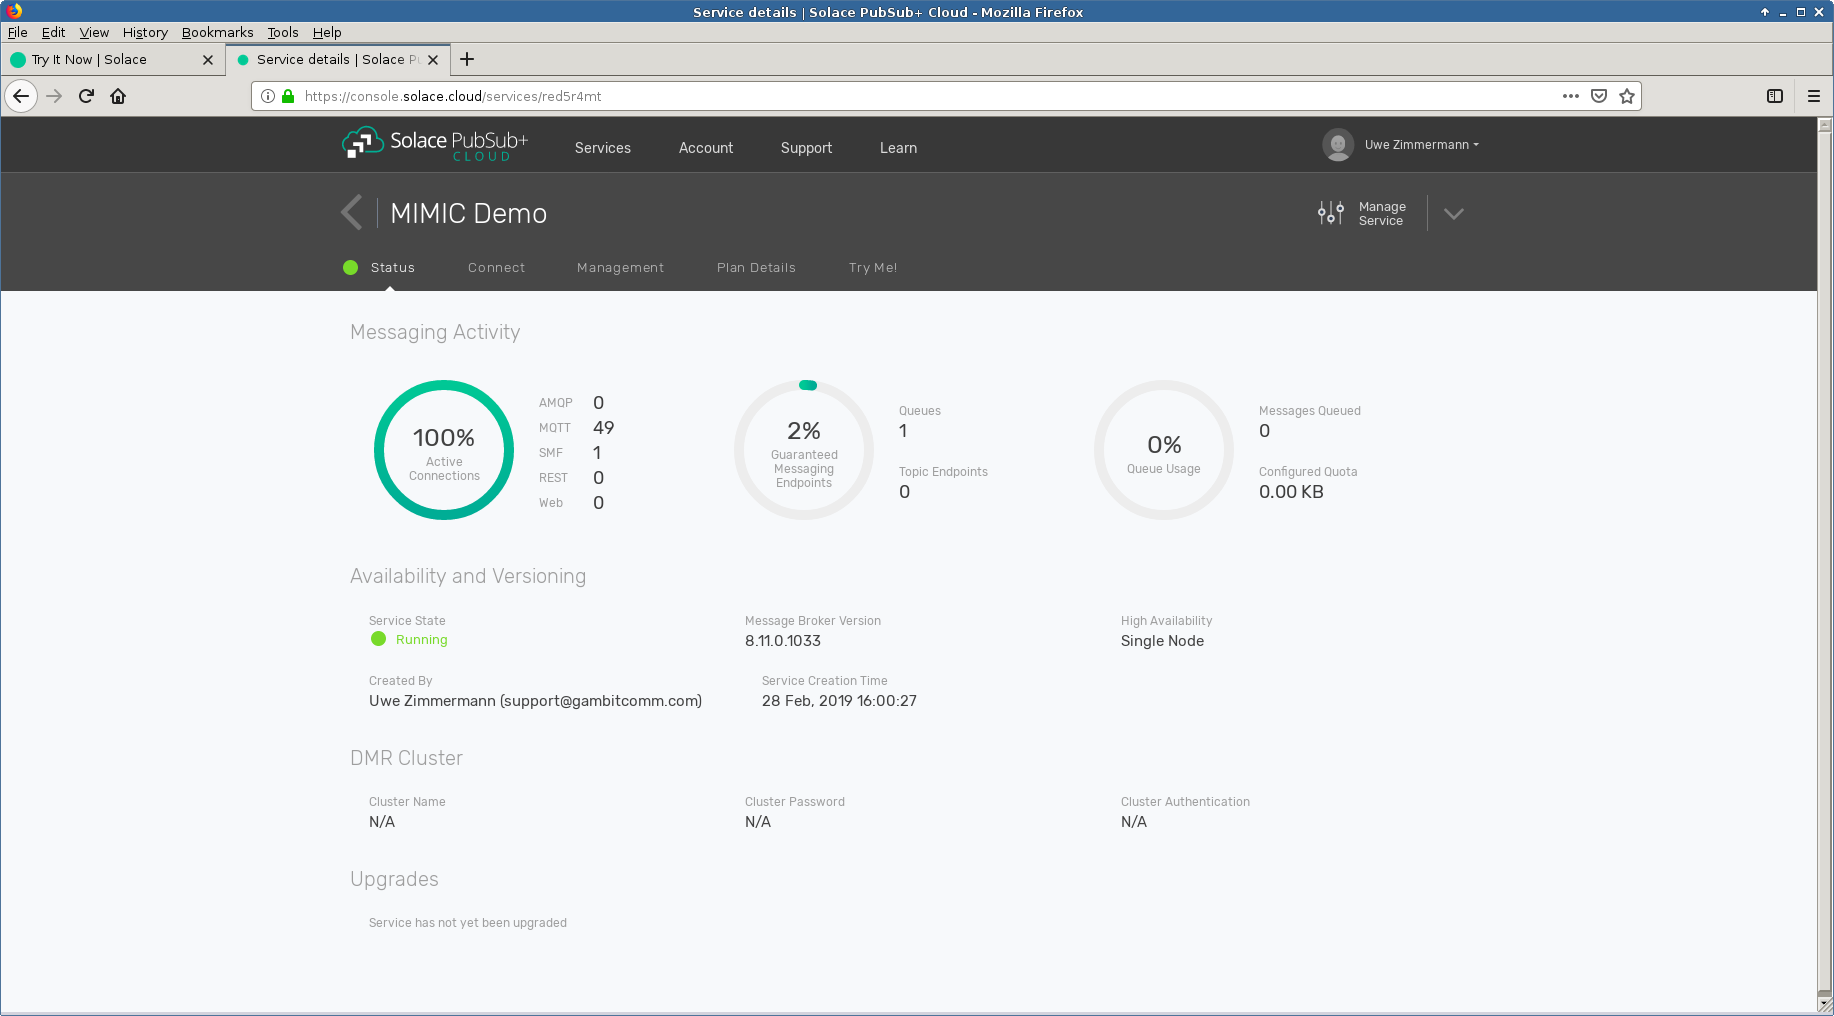
Solace Cloud
We instantiated an instance in their Solace PubSub+ Cloud and used the MQTT messaging parameters shown in their Connect tab to run the 50 sessions in our free tier account both as publishers and subscribers.
-
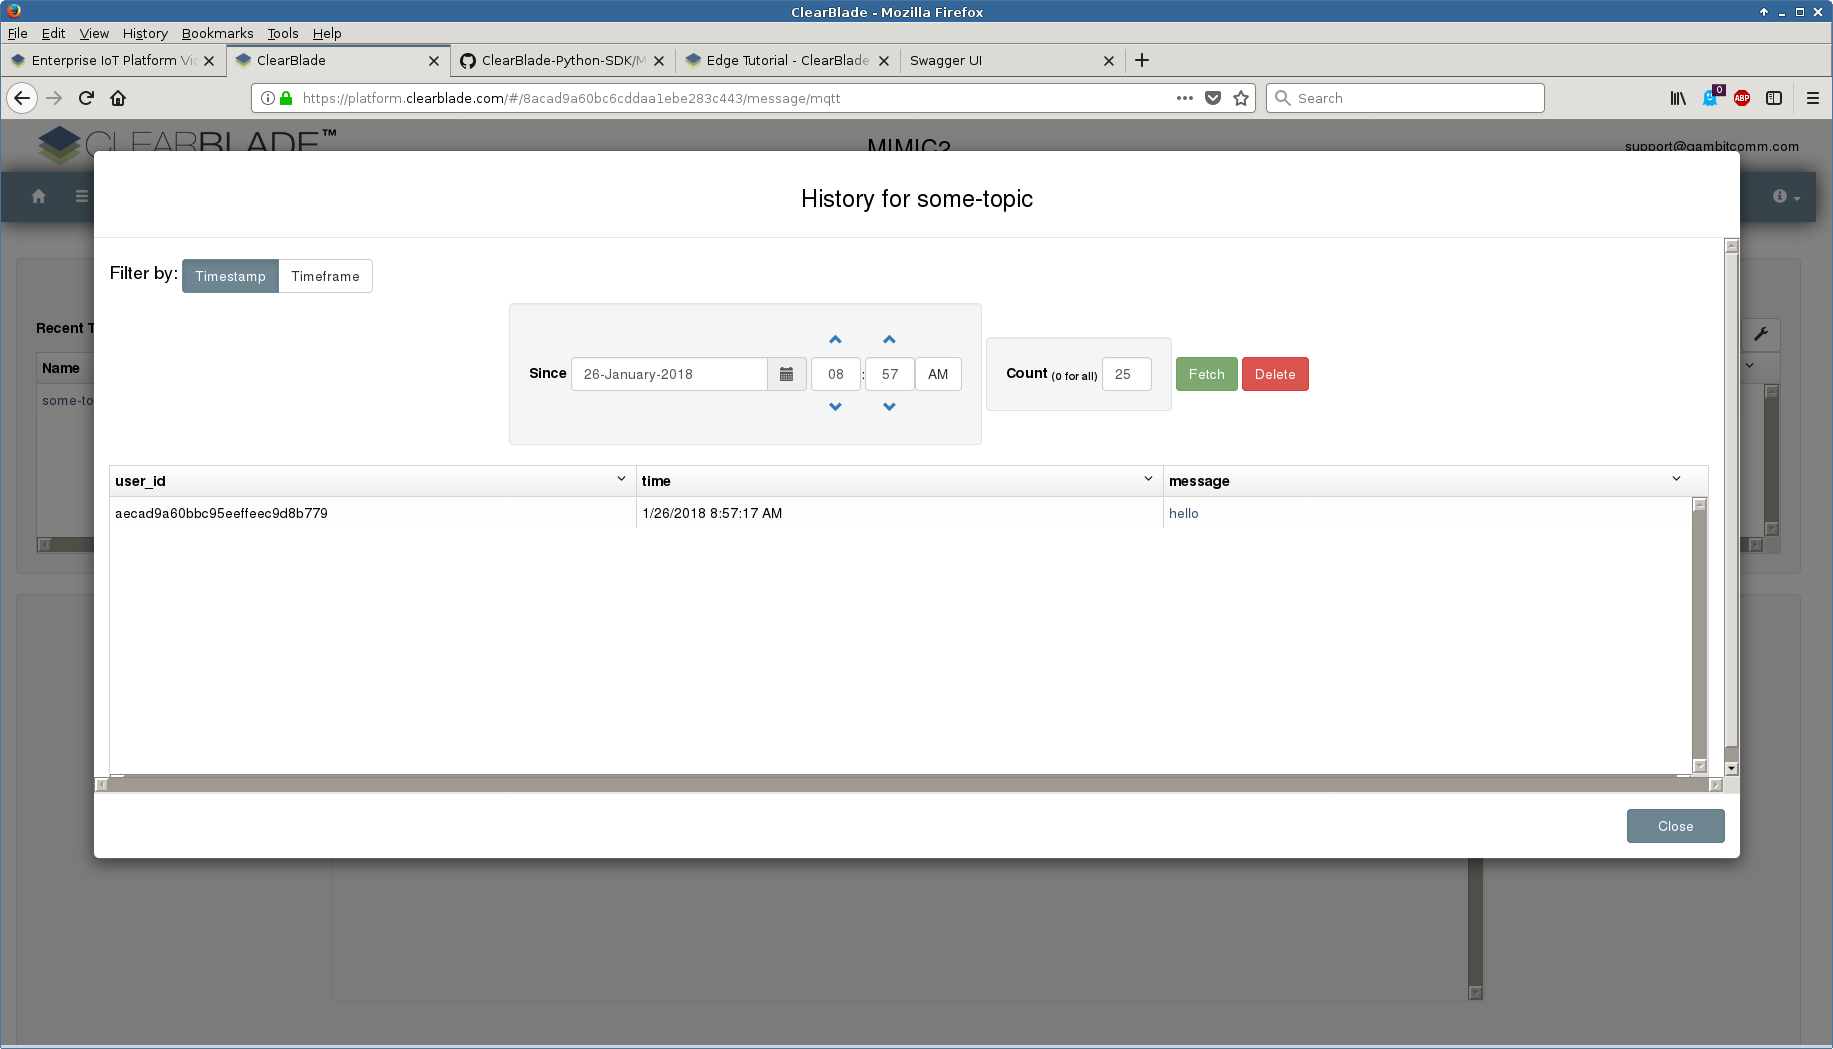
Clearblade
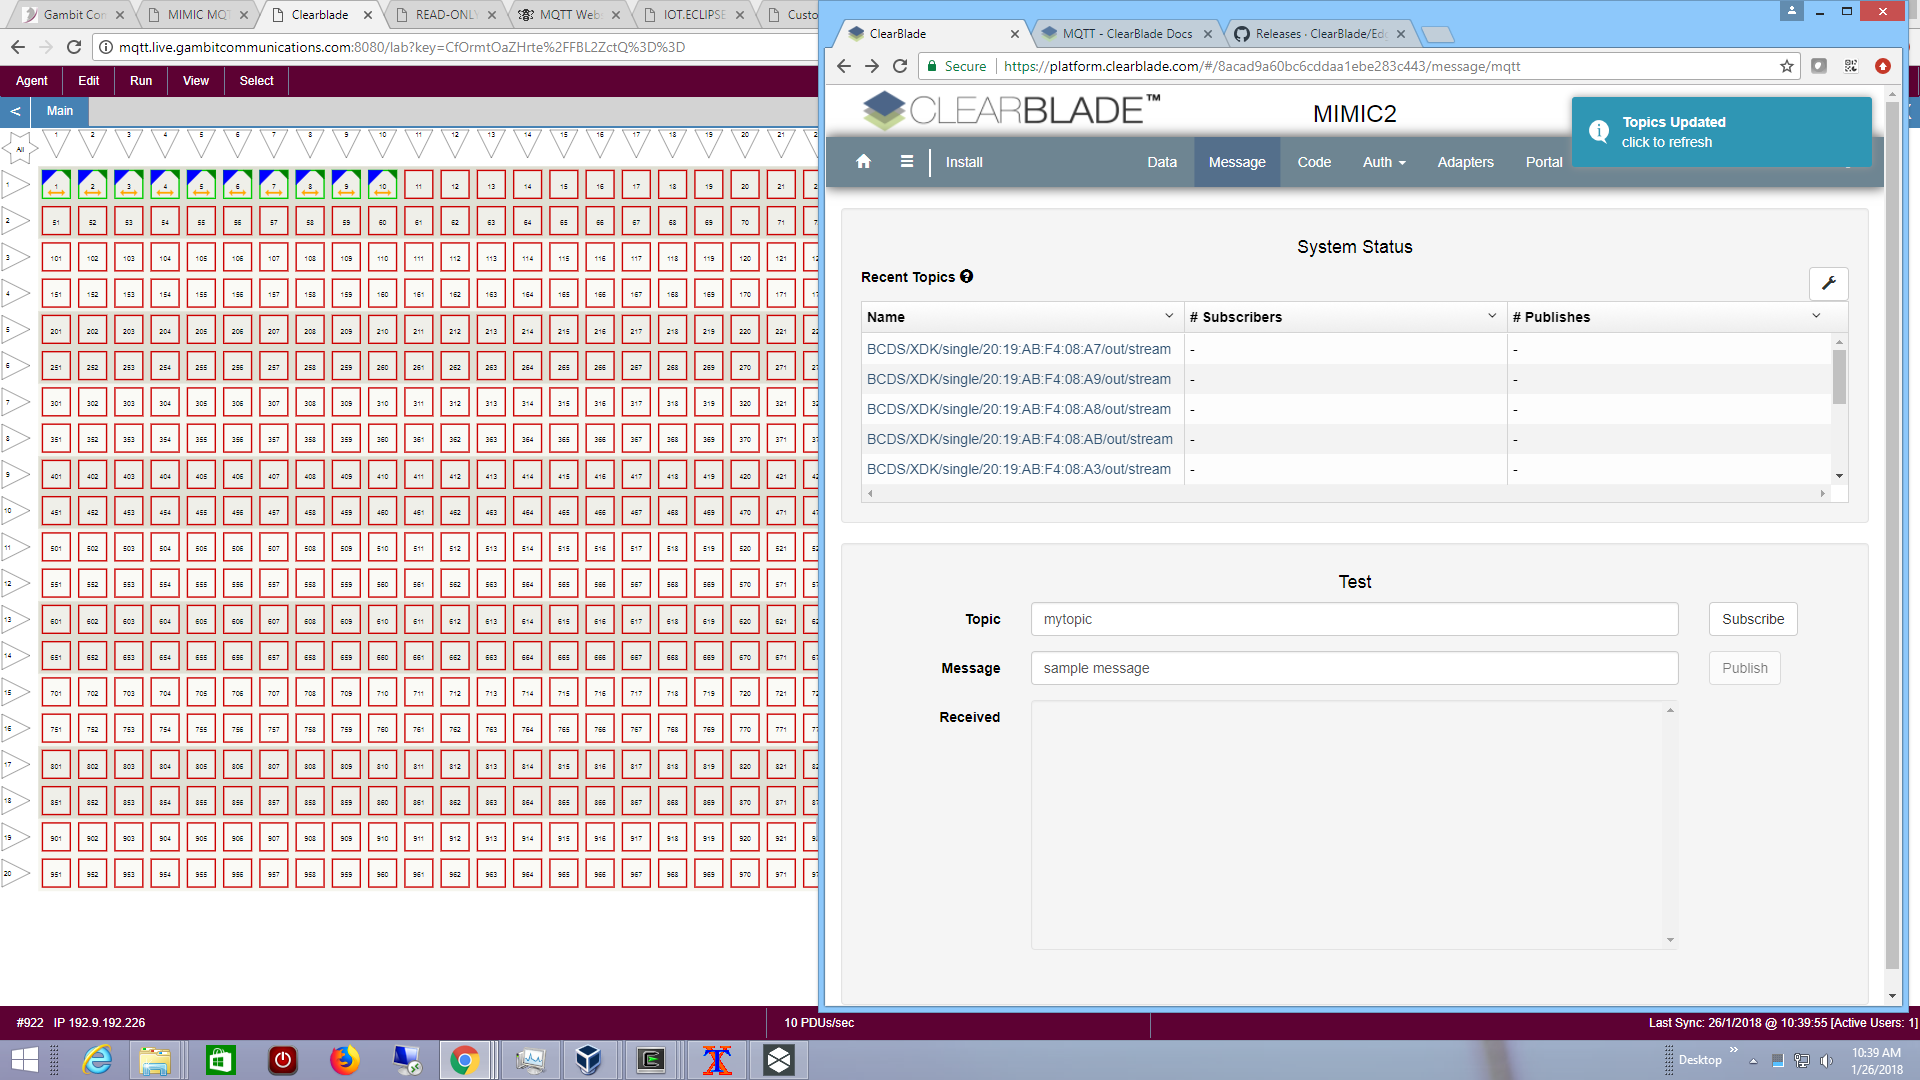
We used the Clearblade MQTT Docs to configure the Username and Password for the simulated sensors and connect them to the platform. Our sample simulation sent the Hello message to the topic and is shown in the platform:
We then configured 10 more standard Bosch sensors and they are recognized by the platform.
-
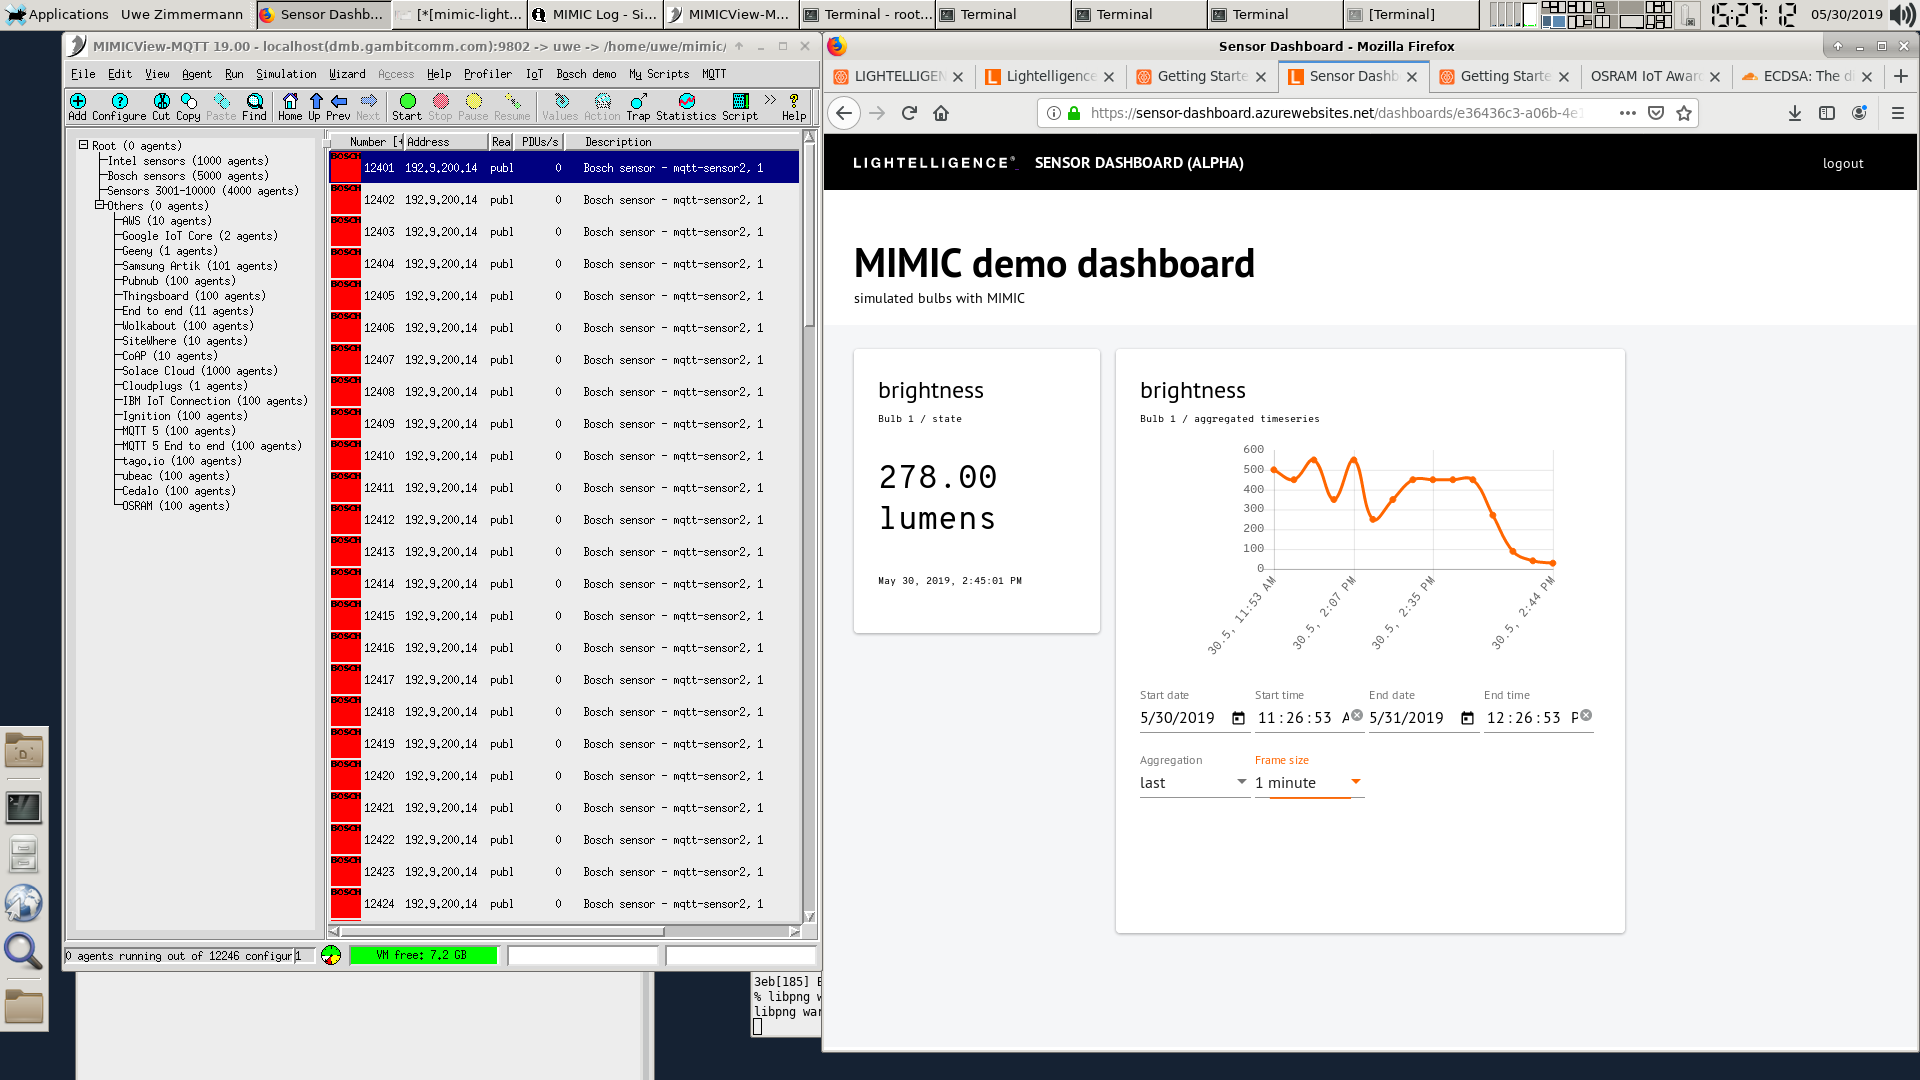
OSRAM Lightelligence
By following their Getting Started instructions we quickly create a simulated device to simulate a flickering light, as shown in this 1-minute video.
-
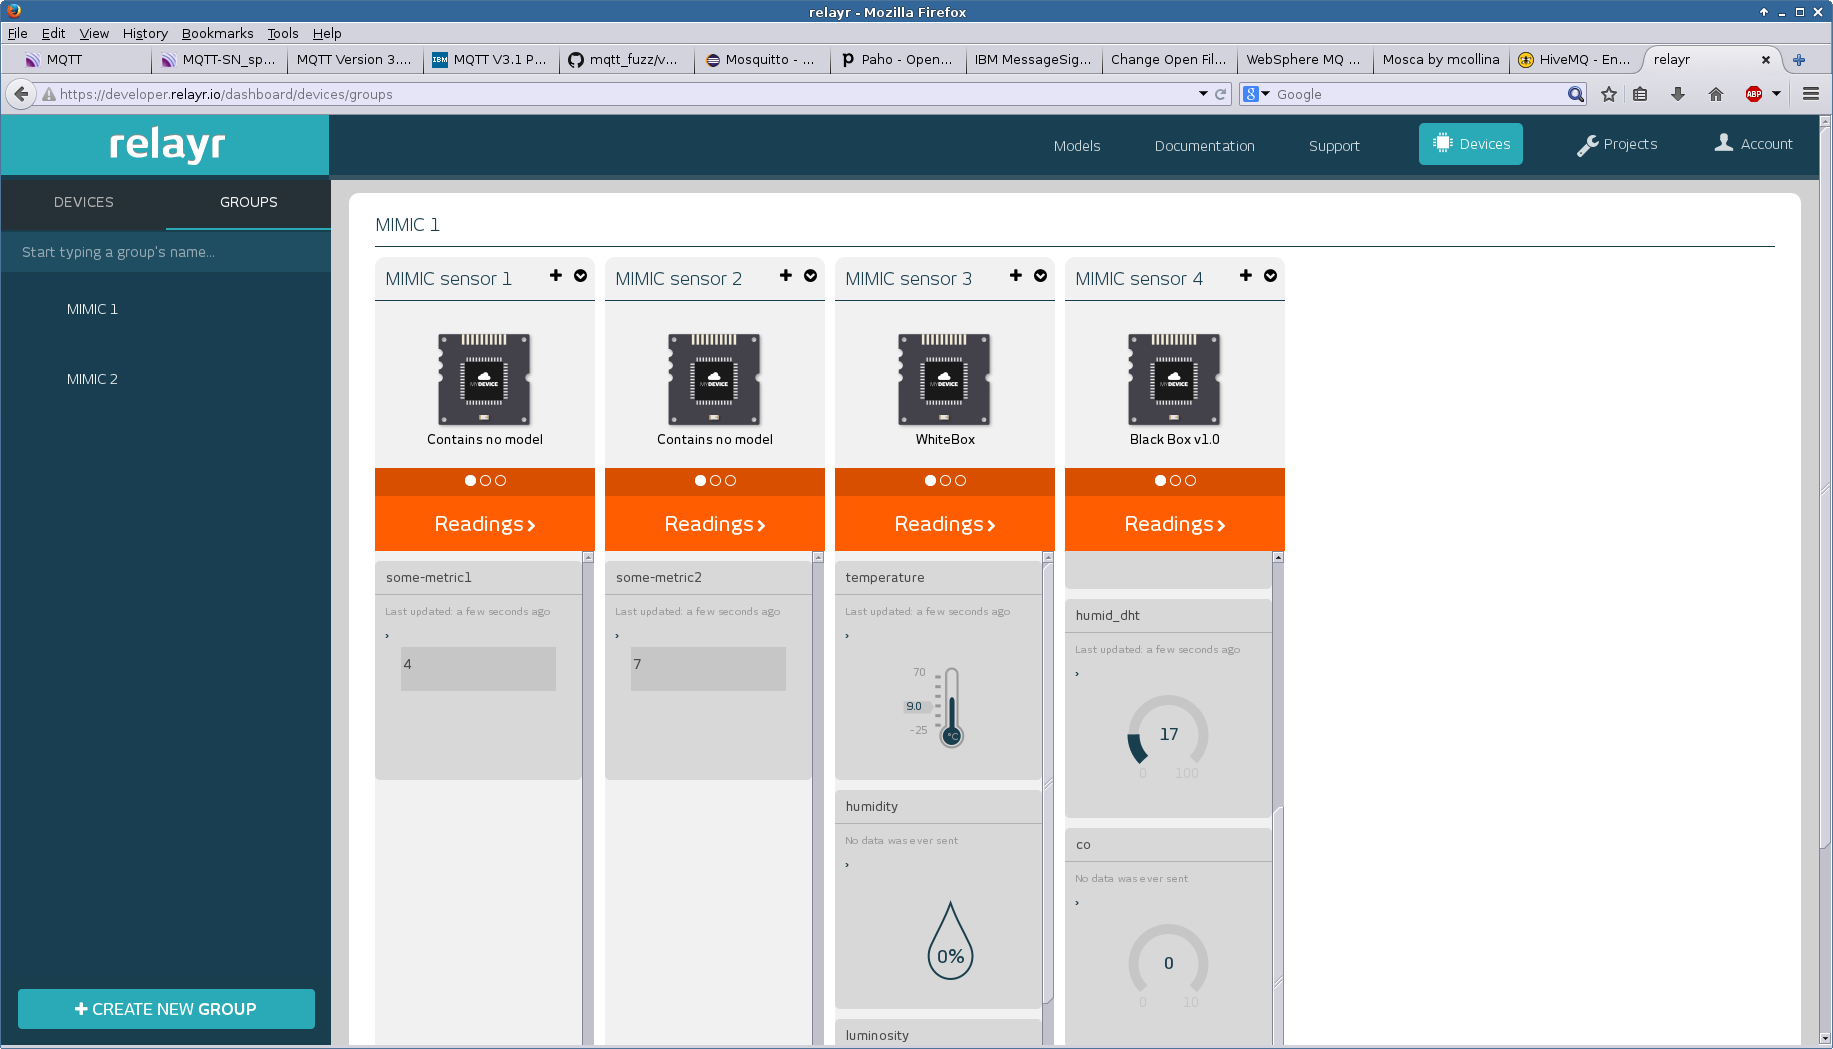
RelayR
Once you have logged into the developer portal at RelayR and have created a sensor device, you need to configure your simulated sensor with the clientId, username and password that RelayR provides, as detailed on their blog . This message configuration
message = {
	topic = action-relayr-topic.mtcl
	# in msec
	interval = 10000
	# count = 1
	# QOS default 0
	qos = 1
	data = {
		# payload is dynamically generated:
		action = action-relayr.mtcl
	}
}
with this action-relayr-topic.mtcl action scriptset config [mimic agent protocol msg MQTT get config] set myconf [lindex $config [lsearch -regexp $config username]] set username [lindex [split $myconf =] 1] #set username "MIMIC sensor [mimic agent assigned]" mimic diag 21 "username for agent [mimic agent assigned]: $username" return "/v1/$username/data"
will publish to the topic expected by RelayR, for example with the JSON payload defined by action-relayr.mtcl:# return a different metric for agents 1 through 4 set metrics [list "" "some-metric1" "some-metric2" "temperature" "humid_dht"] set metric [lindex $metrics $gCurrentAgent] return "{ \"meaning\": \"$metric\", \"value\": $::gSeq }"Since the MQTT broker is accessible over the Internet, your MIMIC machine must have access to the Internet, in particular, to the RelayR broker mqtt.relayr.io address as detailed in their instructions.
That address needs to be the Broker Address configurable of your agent's MQTT configuration. Also, any IP address you choose for your simulated sensors needs to be routable to the Internet. You can either setup your internet gateway to route the addresses that you choose, or if your Internet access is through a NAT gateway, you might as well just setup multiple agents with the same address as your MIMIC system, since the connections will appear to the broker to come from your NAT gateway IP address. If you do the latter, make sure to assign different SNMP ports to your agent, or use different community strings.
This screenshot shows 4 different types of simulated sensors talking to RelayR.
-
CloudMQTT
Once you have logged into the console at this URL you need to setup a user and ACL. You use the Server displayed in its Instance Info as the Broker in the MQTT in the agent configuration dialog . For unencrypted access use the Port, User, Password. The topic of the simulated sensor can be anything, and does not need to match that defined in the ACL section of CloudMQTT. We started 10 sensors publishing unique messages as displayed by the Mosquitto subscriber client.
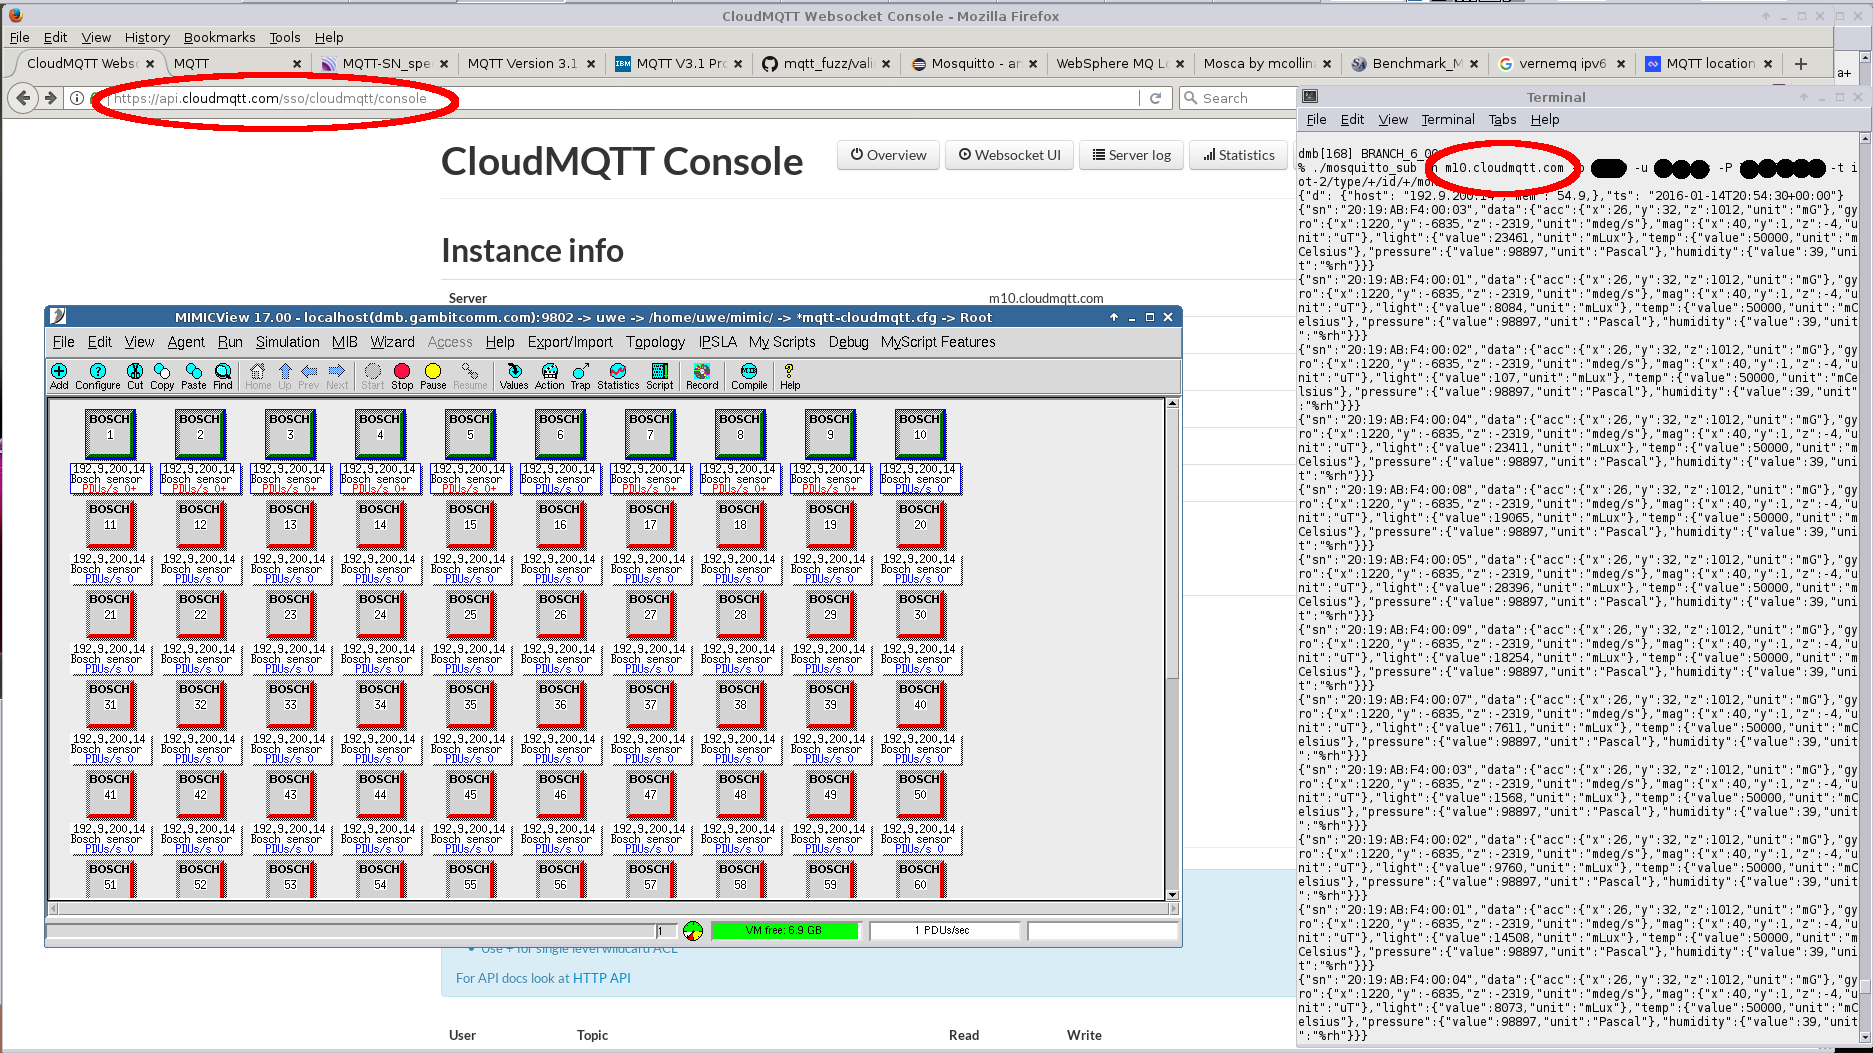
TLS connection works to the SSL Port with the default tls.cfg in MIMIC.
-
Pubnub
Pubnub has recently updated their MQTT support and we have verified that indeed it is easier to connect standards-based simulated MQTT sensors.
Following those directions we have configured our usual Bosch sensor simulation to publish changing temperature values and that is detected in a configured function as shown in the debug console.
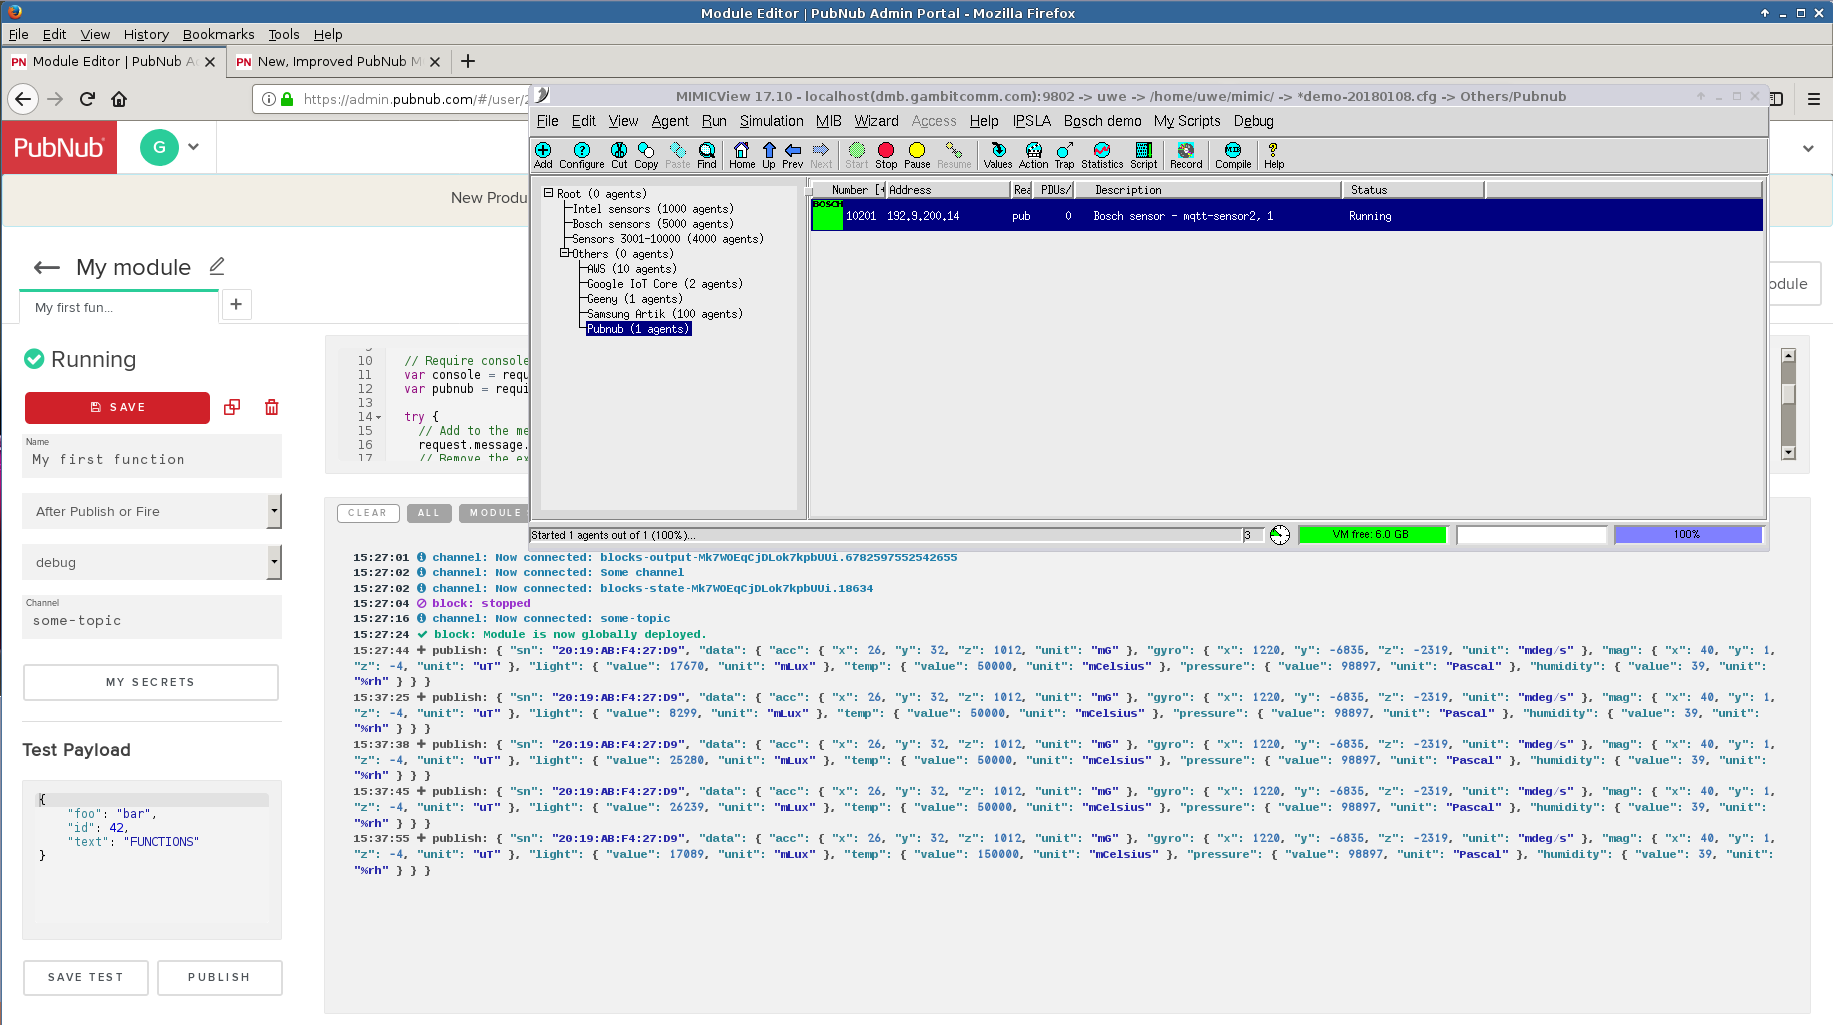
For more details, see their blog.
-
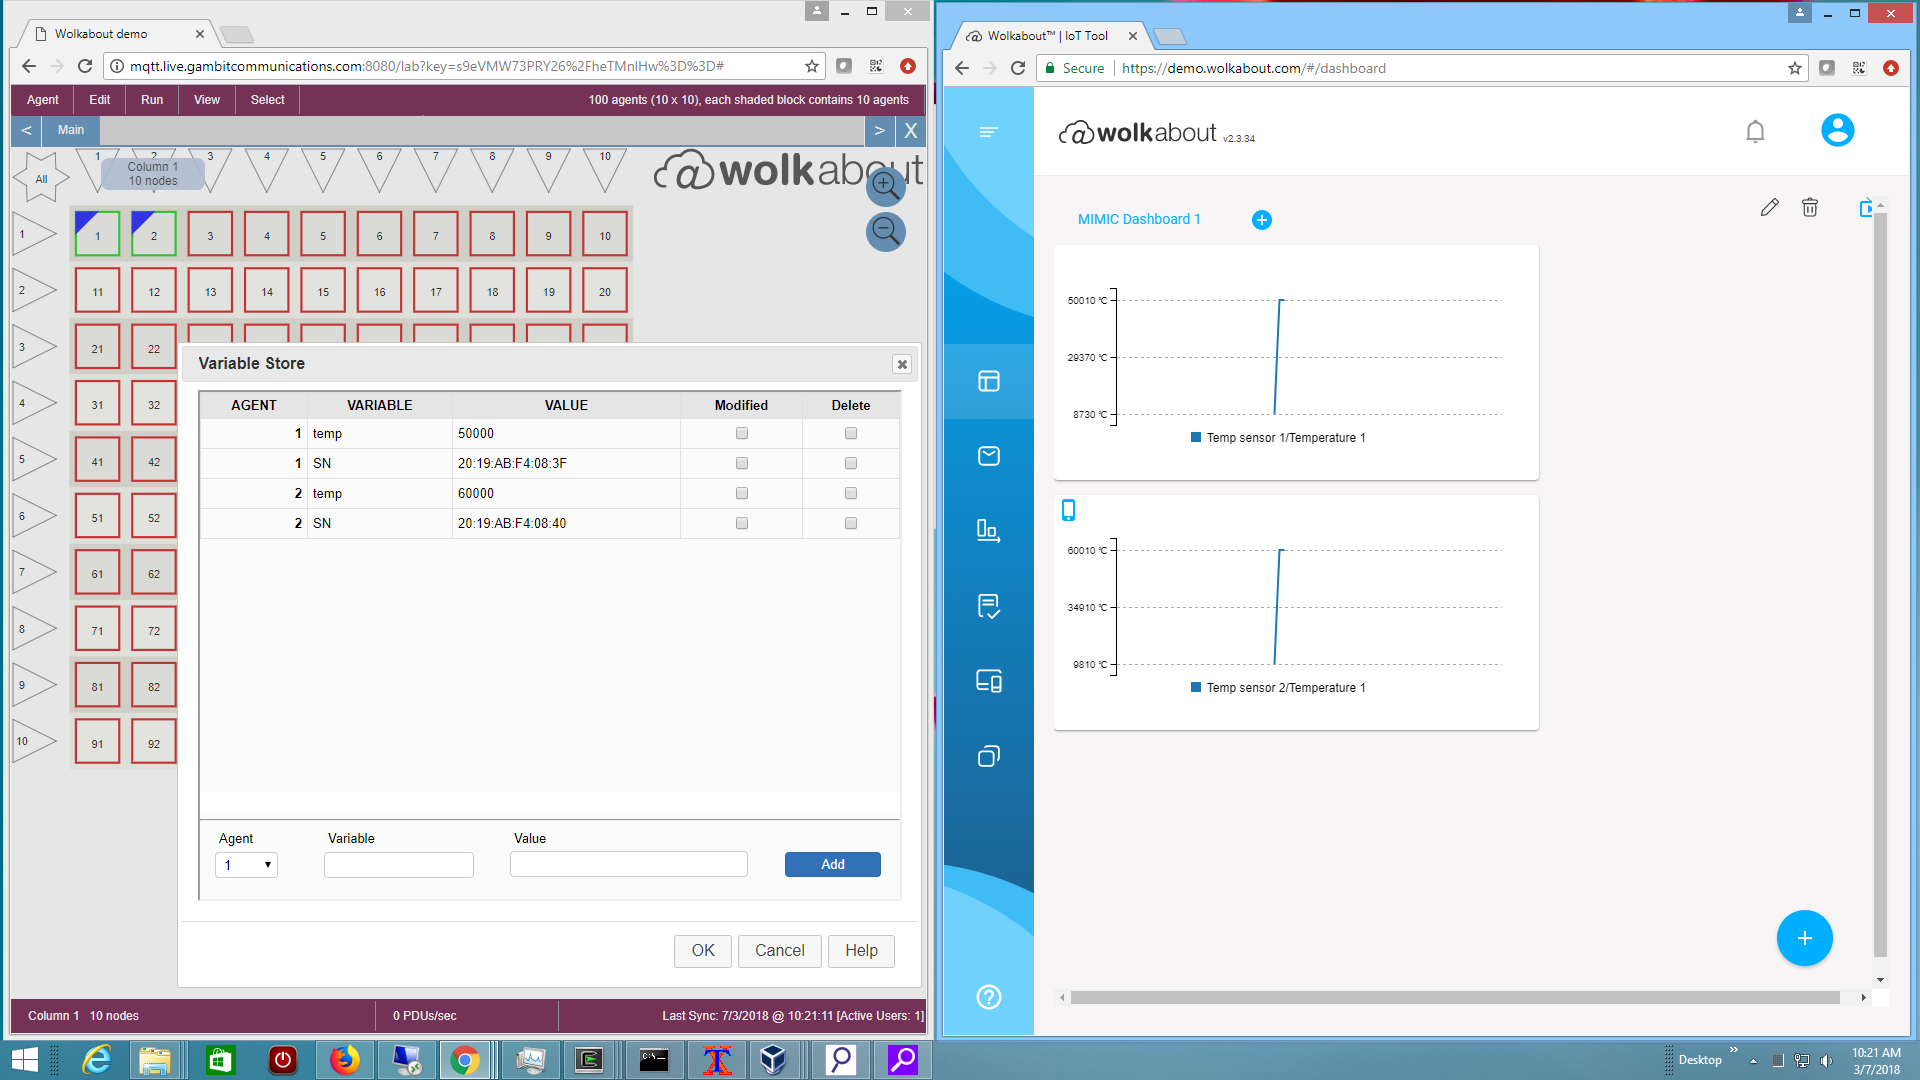
wolkabout
We used their MQTT API specifications to connect multiple sensors and display their temperature values.
-
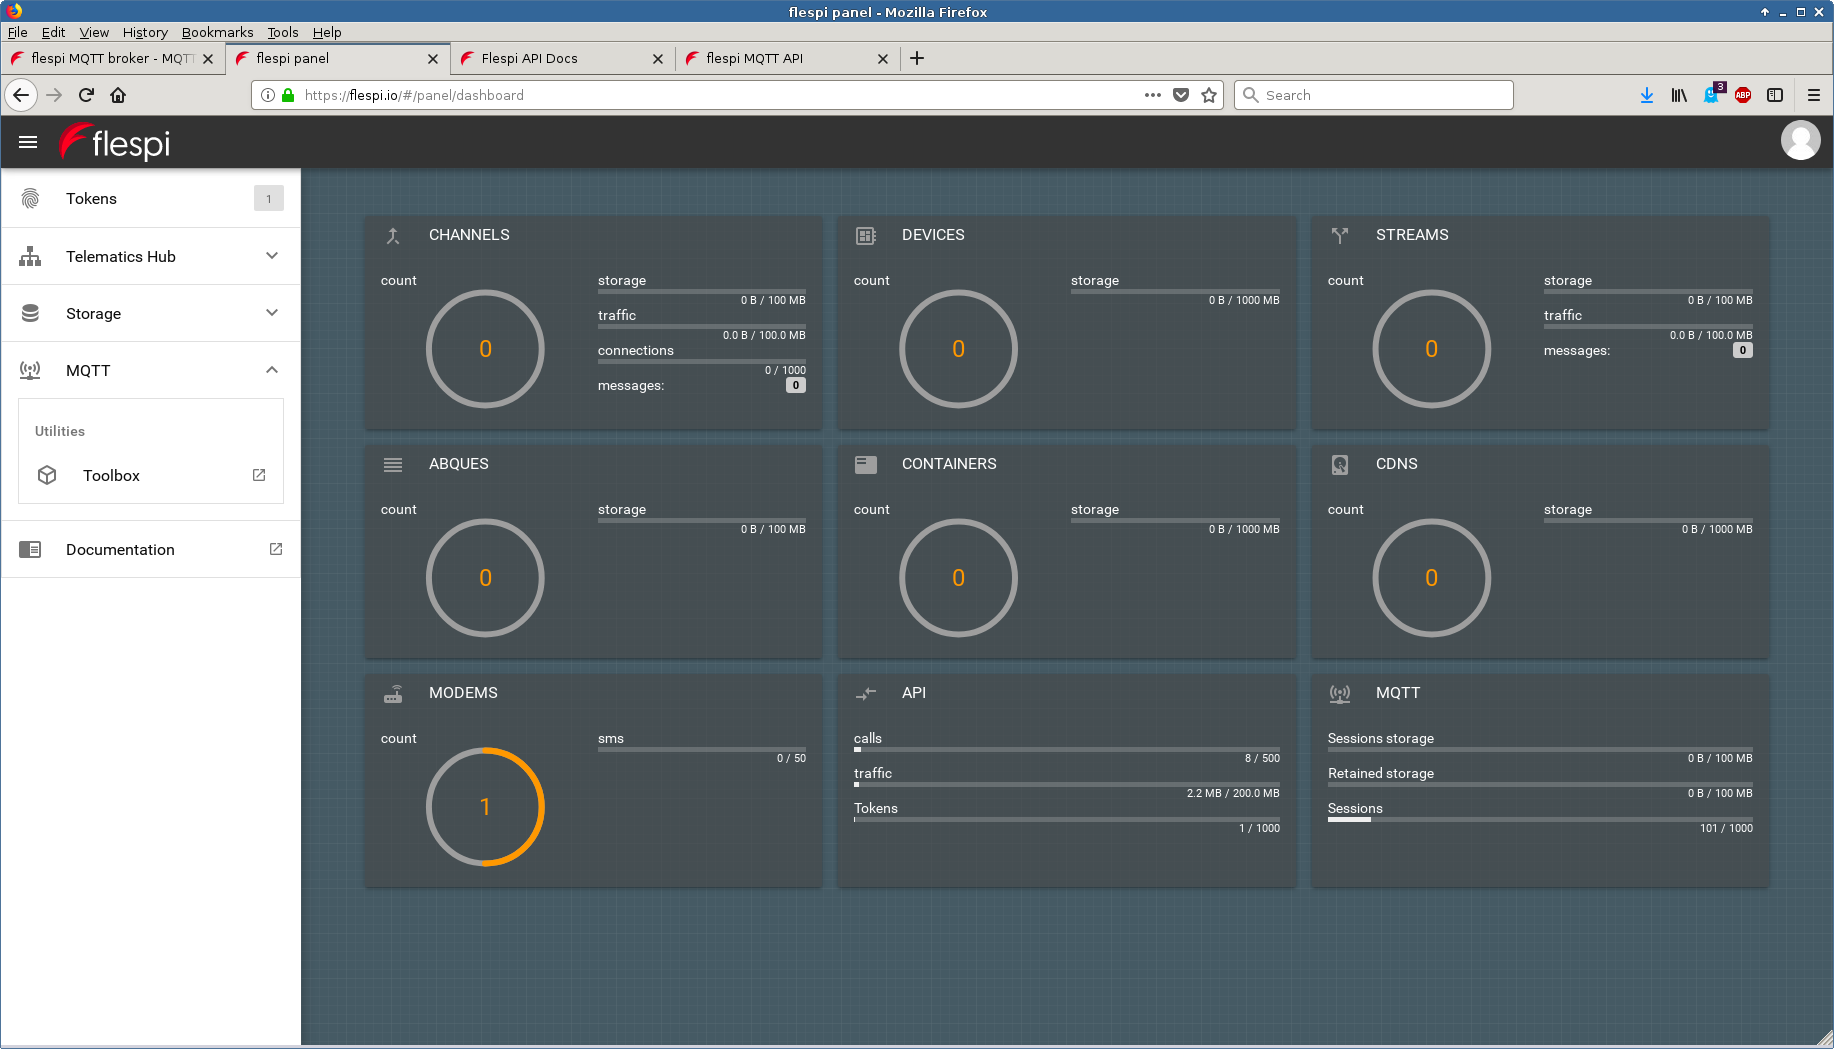
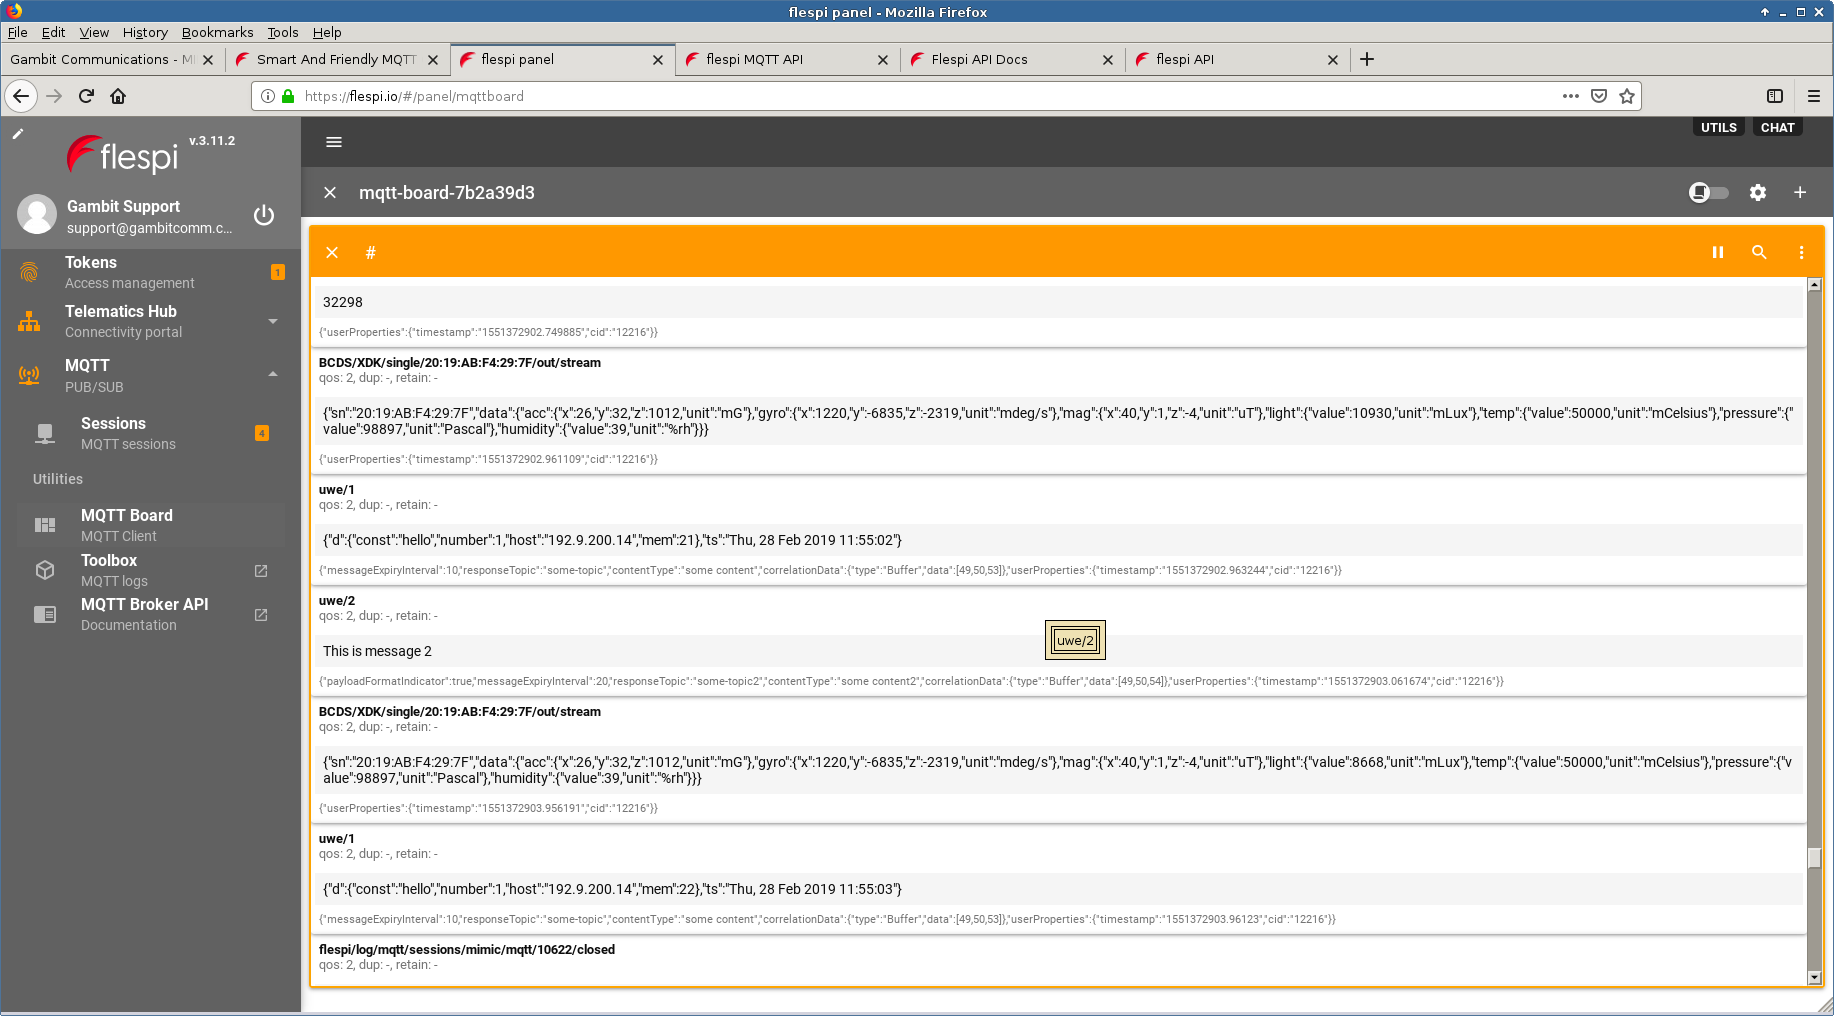
flespi
-
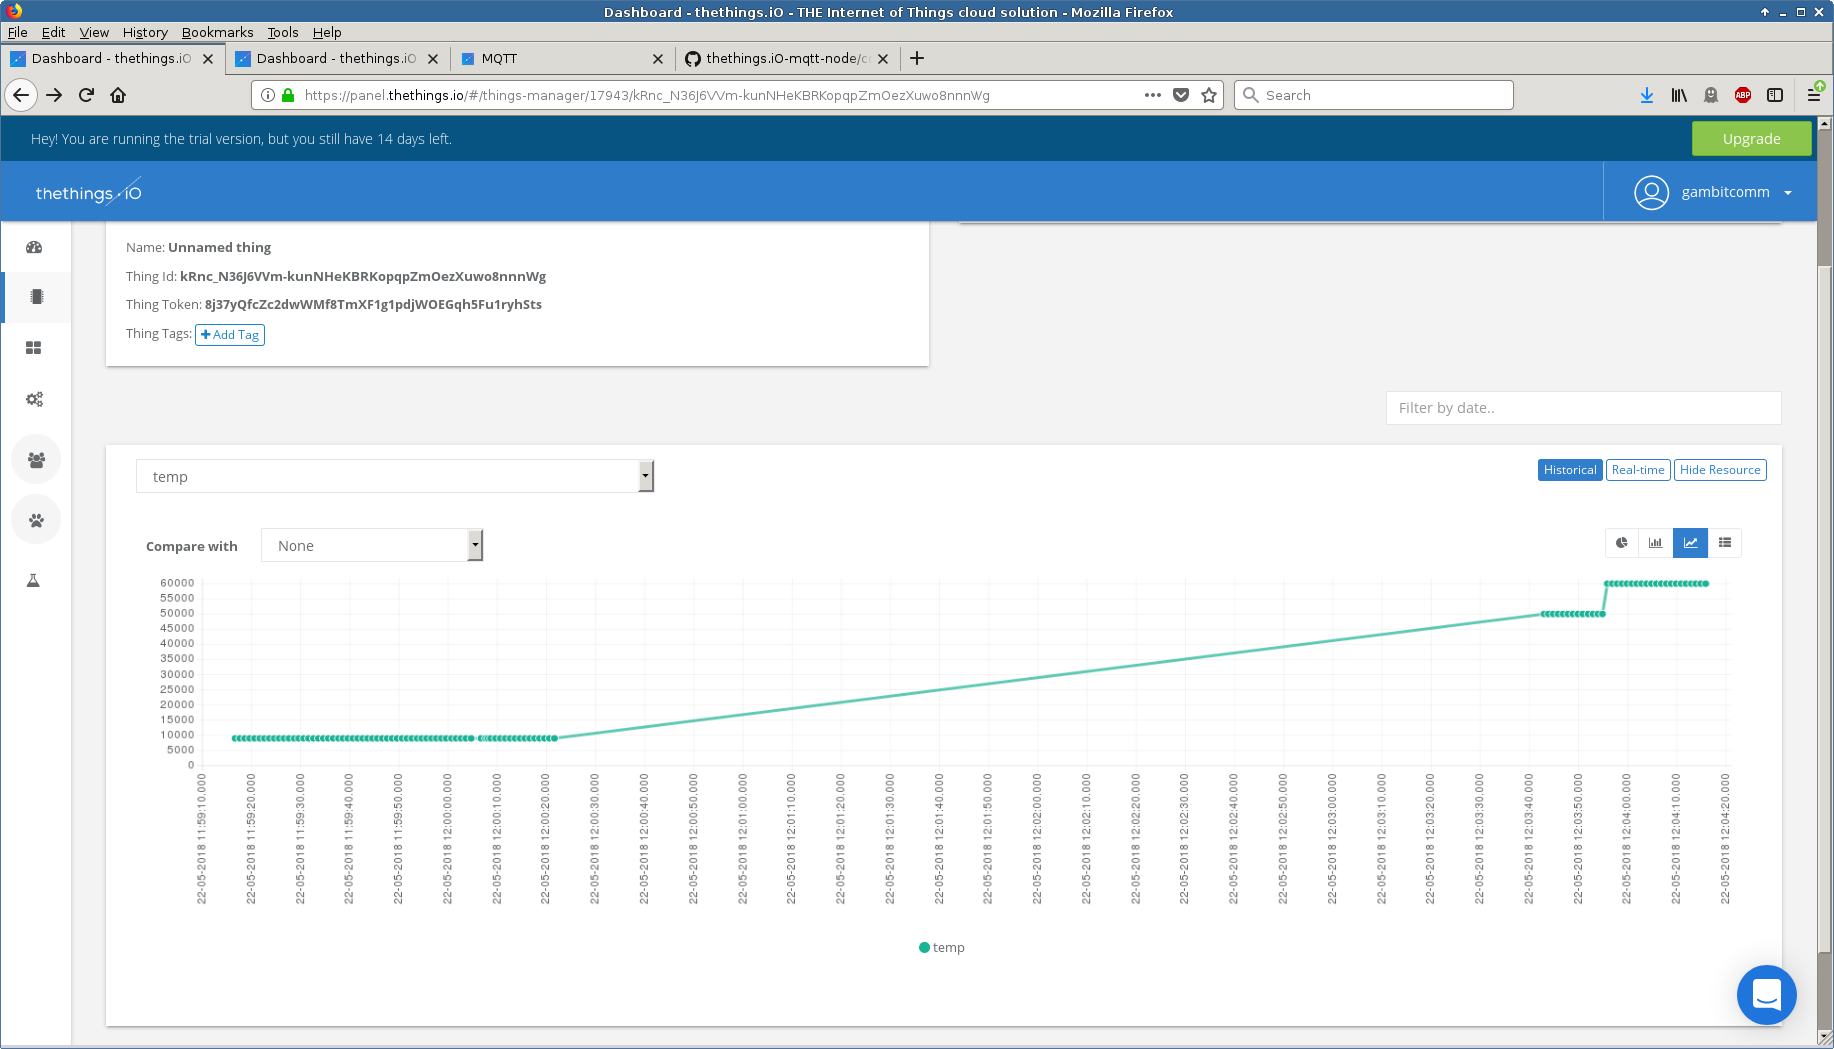
thethings.io
We used their MQTT Protocol guide to connect a simulated sensor to their broker to publish arbitrary temperature telemetry.
-
wia.io
Following their Getting Started guide took 15 minutes to connect a simulated sensor to their broker to publish arbitrary temperature telemetry as seen in this one-minute Youtube video.
-
EVRYTHNG
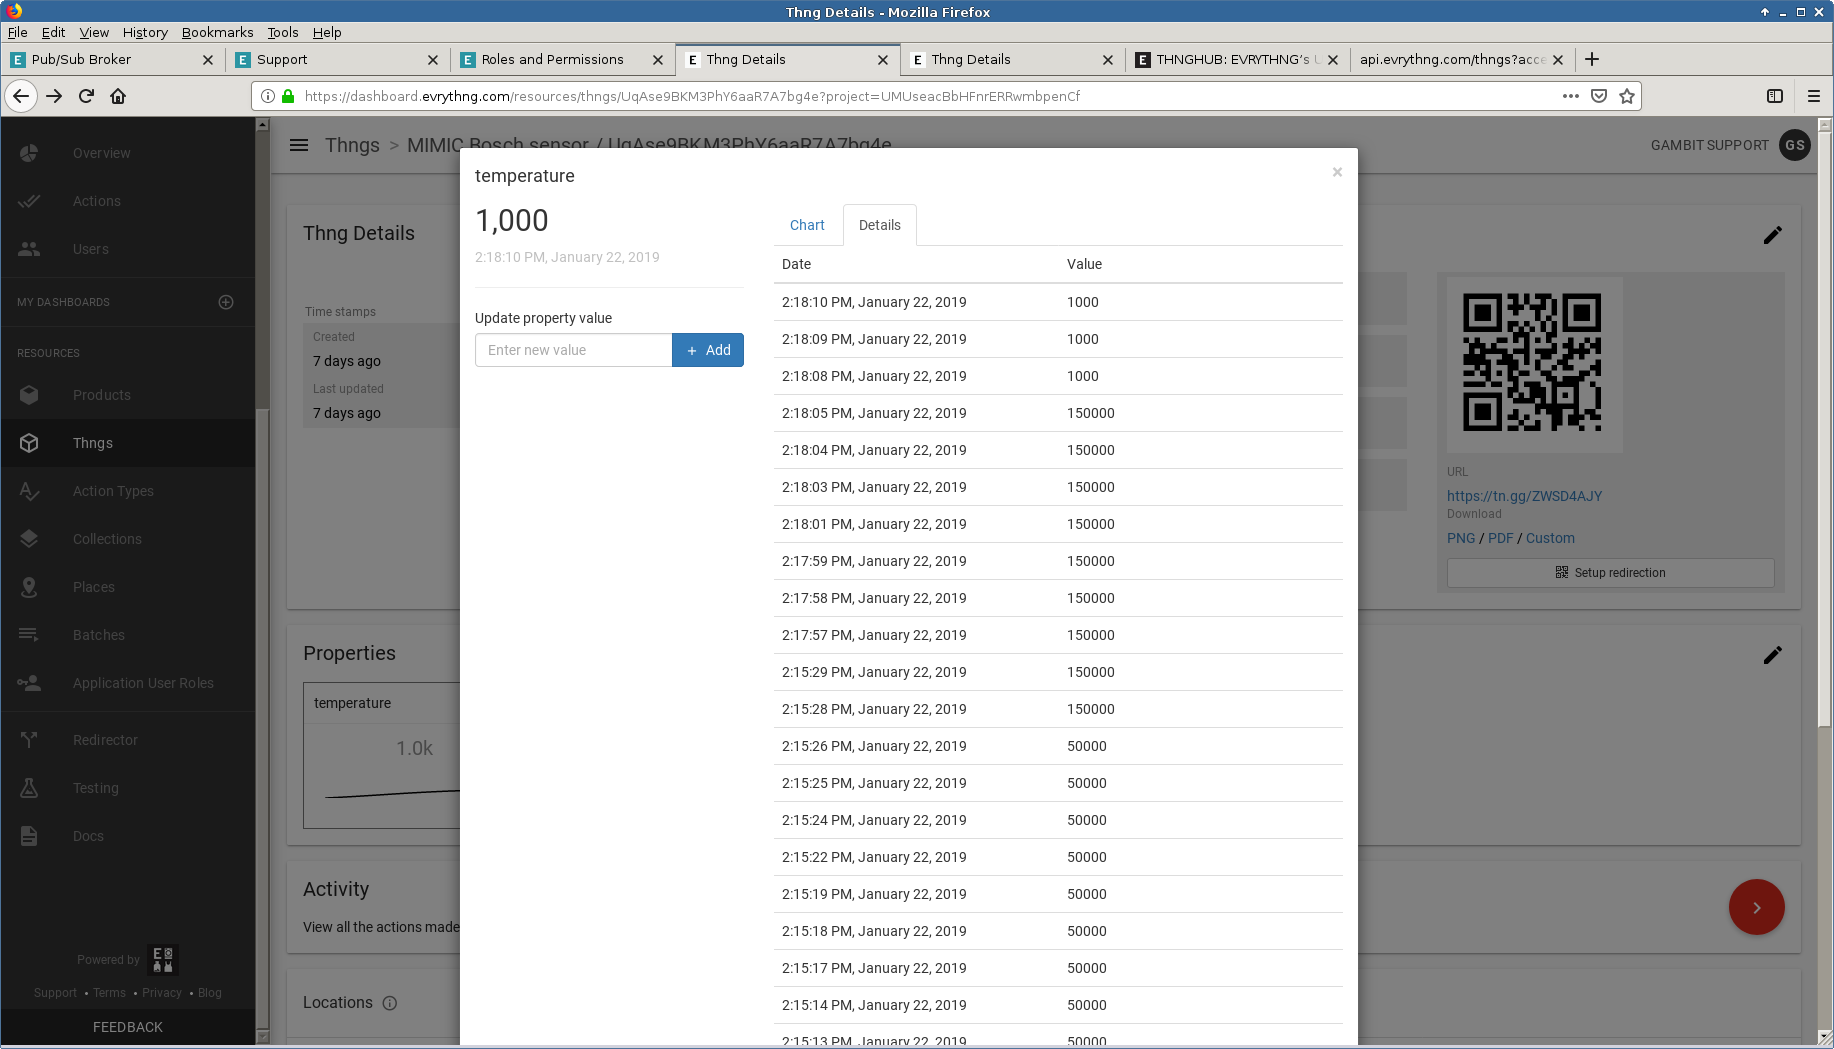
The EVRYTHNG platform details their broker rules in detail
We connected one of our simulated sensors and published temperature telemetry through their properties API. as shown here
-
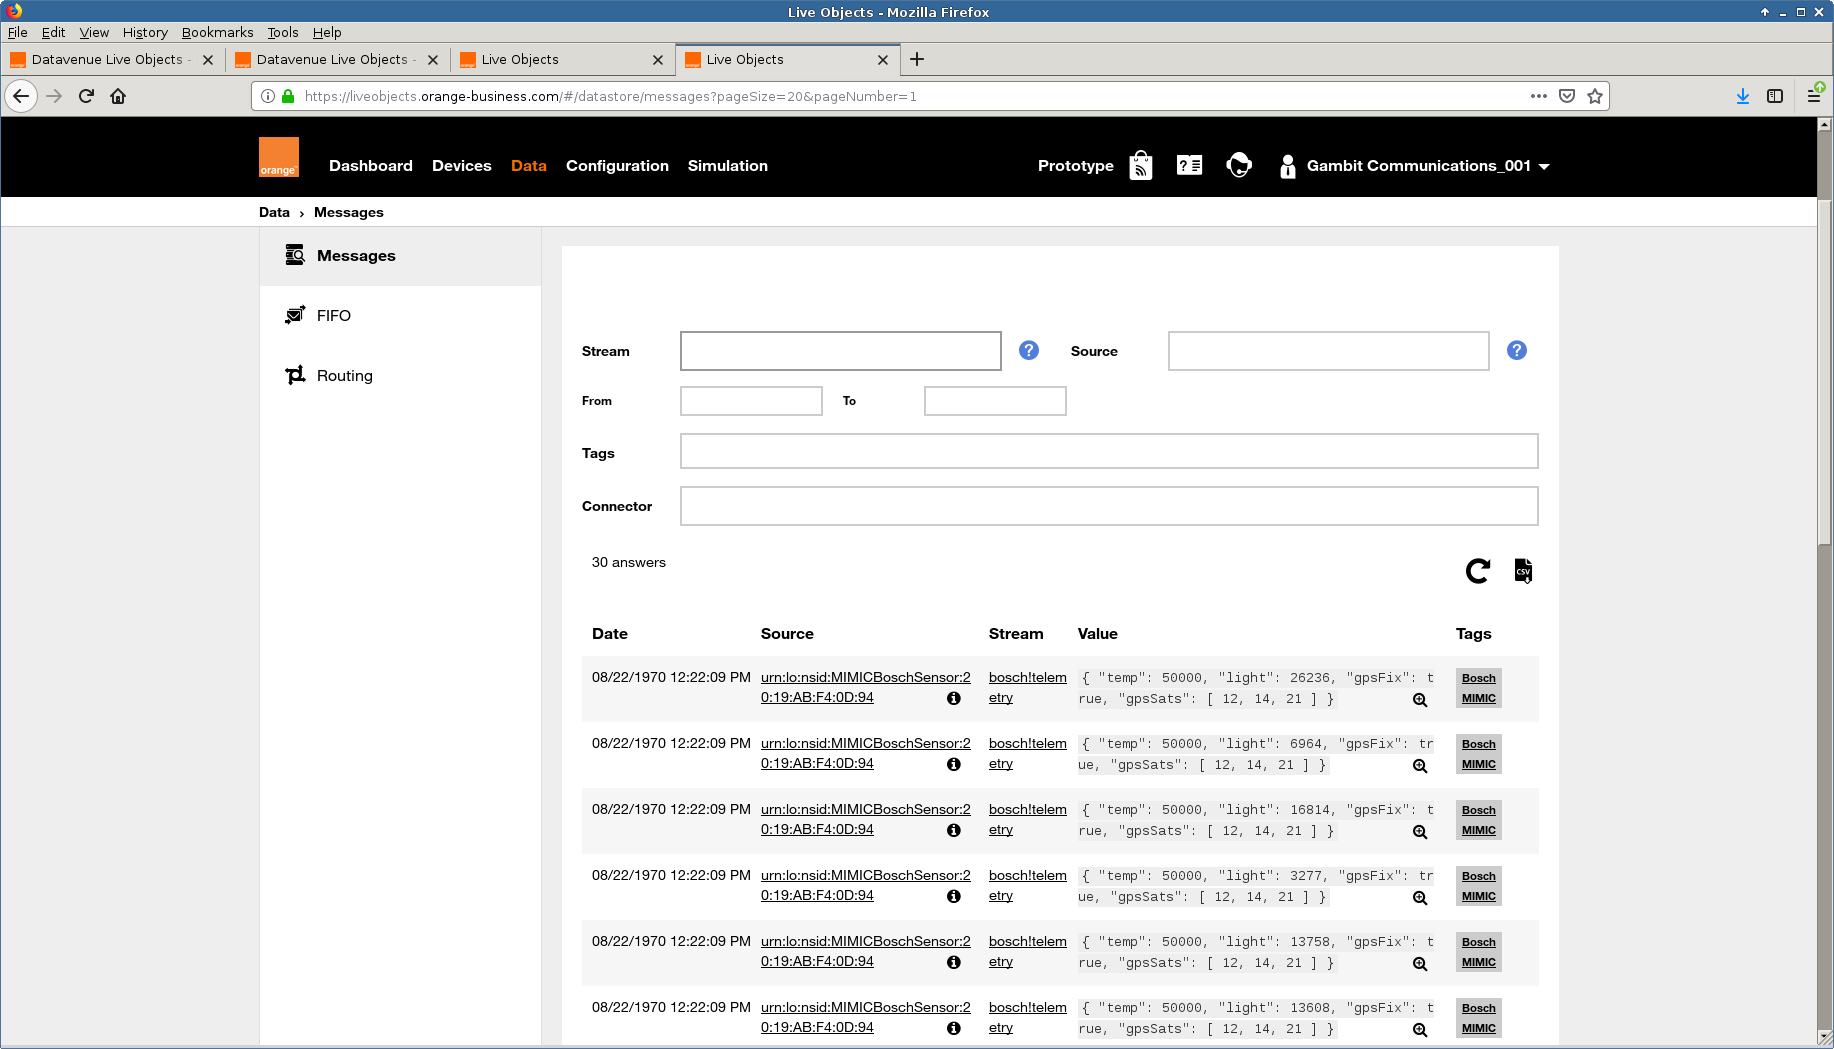
Orange Live Objects
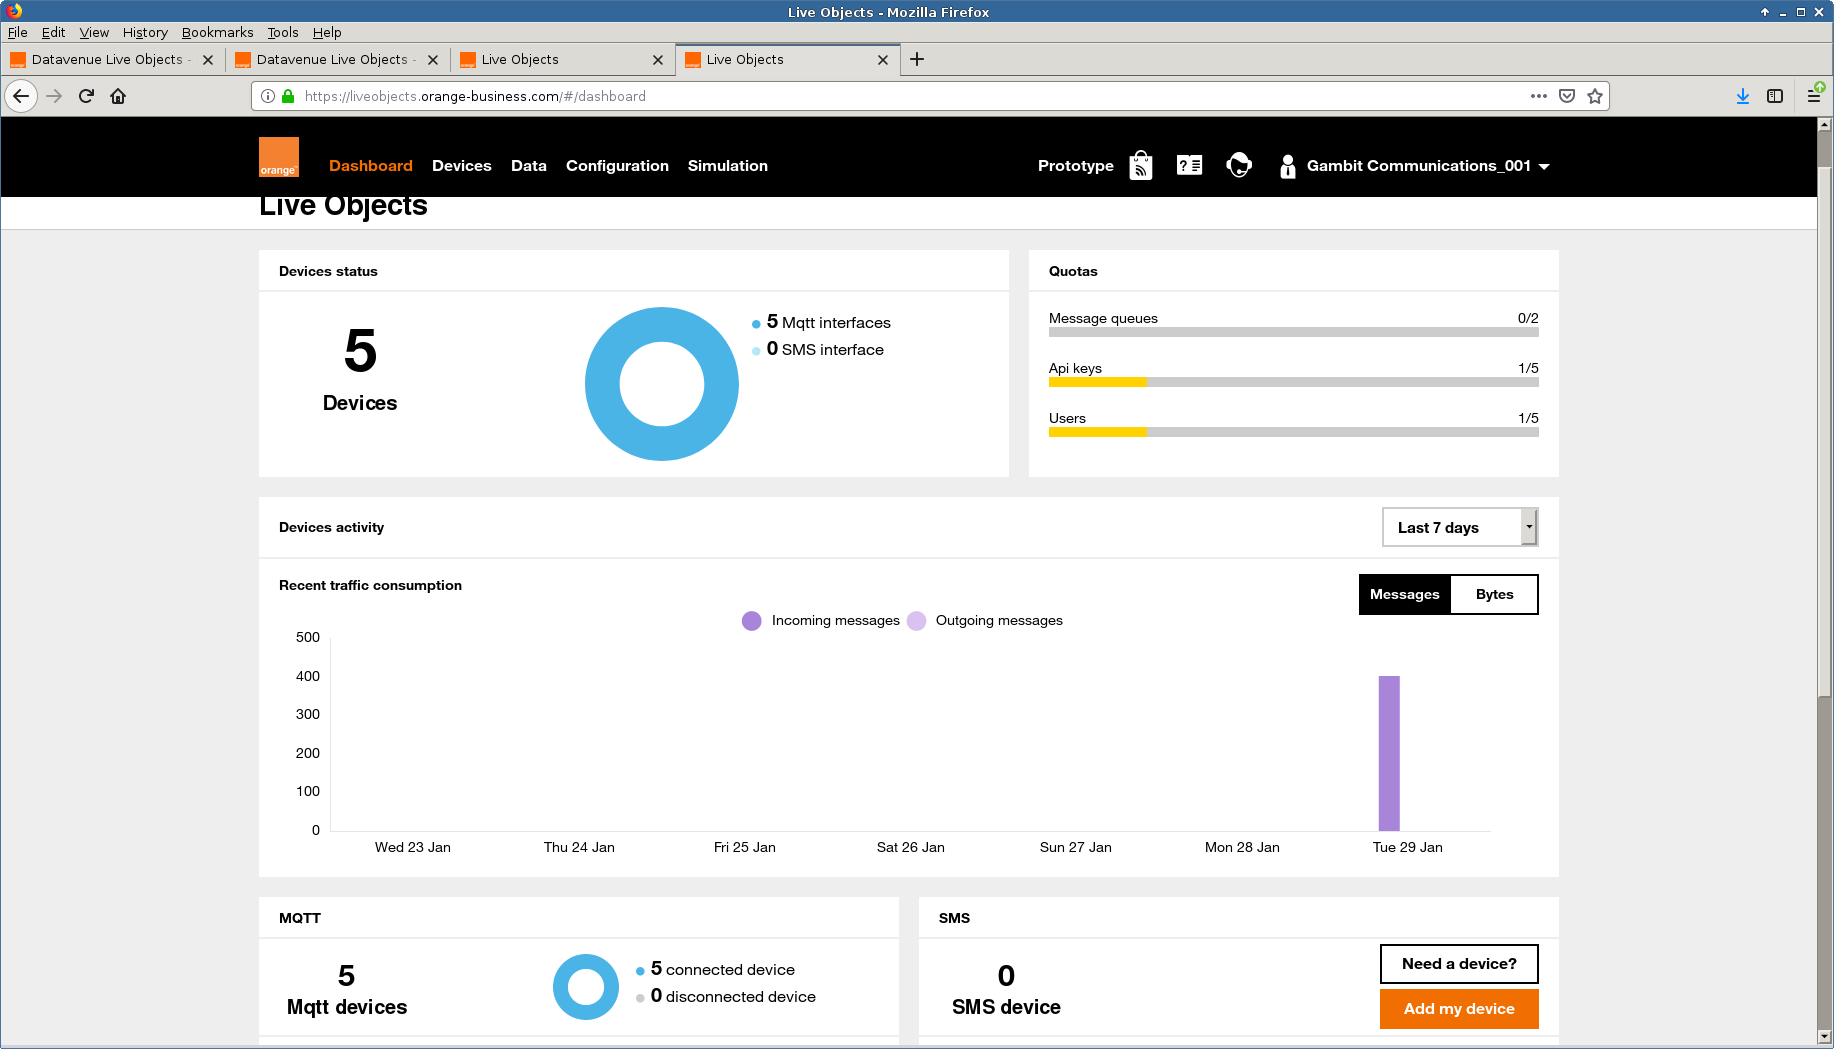
The Orange Live object platform details their broker rules in this page
With this specification we connected 5 simulated sensors and published various telemetry through their device mode as shown here
-
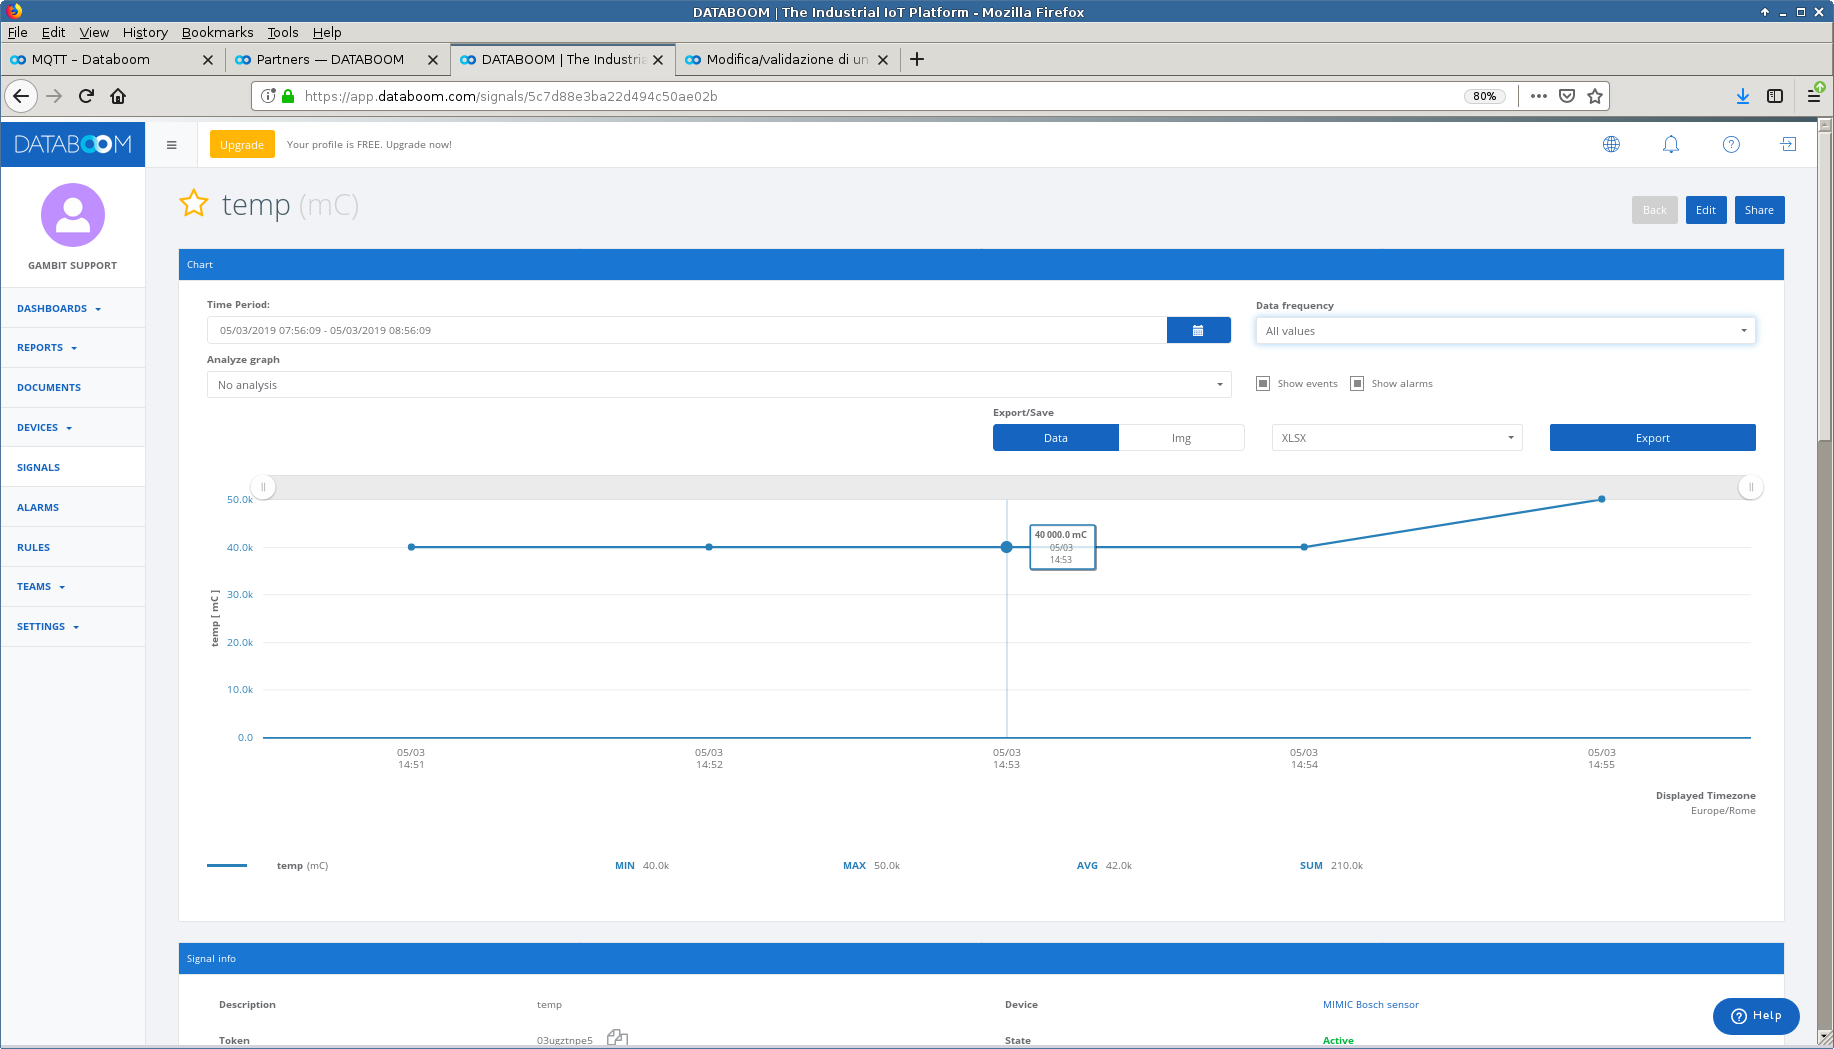
Databoom
We followed the MQTT instructions in Databoom's article to configure a sensor to publish temperature telemetry as shown.
-
Eclipse Hono
We followed the Getting Started page to connect to the cloud-connected Eclipse Hono Sandbox to create a tenant, register a device and setup in MIMIC.
We have setup a SaaS MQTT lab at our portal and this Youtube video shows how to get started in 5 minutes.
NOTE: as documented, you cannot remove any tenant or device from the sandbox. Thus, consider anything you add to the sandbox as throwaway. If you want to use it more seriously, you have to download and install it.
When we run their sample application , we get
bash-5.0$ java -jar hono-cli-*-exec.jar --hono.client.host=$AMQP_NETWORK_IP --hono.client.port=15672 --hono.client.username=consumer@HONO --hono.client.password=verysecret --spring.profiles.active=receiver --tenant.id=$MY_TENANT ______ _ _ _ _ | ____| | (_) | | | | | |__ ___| |_ _ __ ___ ___ | |__| | ___ _ __ ___ | __| / __| | | '_ \/ __|/ _ \ | __ |/ _ \| '_ \ / _ \ | |___| (__| | | |_) \__ \ __/ | | | | (_) | | | | (_) | |______\___|_|_| .__/|___/\___| |_| |_|\___/|_| |_|\___/ | | |_| Eclipse Hono Example Client (v1.0-M7) using Spring Boot (v2.1.5.RELEASE) Go to https://www.eclipse.org/hono for more information. ... 13:40:20.526 [vert.x-eventloop-thread-0] INFO org.eclipse.hono.cli.app.Receiver - received telemetry message [device: 3a43f07c-b404-4a2d-94f6-bfbeca52ccd3, content-type: application/octet-stream]: {"sn":"20:19:AB:F4:0F:7E", "data":{"acc":{"x":26,"y":32,"z":1012,"unit":"mG"}, "gyro":{"x":1220,"y":-6835,"z":-2319,"unit":"mdeg/s"}, "mag":{"x":40,"y":1,"z":-4,"unit":"uT"}, "light":{"value":4422,"unit":"mLux"}, "temp":{"value":50000,"unit":"mCelsius"}, "pressure":{"value":98897,"unit":"Pascal"}, "humidity":{"value":39,"unit":"%rh"}}} 13:40:20.526 [vert.x-eventloop-thread-0] INFO org.eclipse.hono.cli.app.Receiver - ... with application properties: {orig_adapter=hono-mqtt, device_id=3a43f07c-b404-4a2d-94f6-bfbeca52ccd3, orig_address=telemetry, JMS_AMQP_CONTENT_TYPE=application/octet-stream} 13:40:21.758 [vert.x-eventloop-thread-0] INFO org.eclipse.hono.cli.app.Receiver - received telemetry message [device: 3a43f07c-b404-4a2d-94f6-bfbeca52ccd3, content-type: application/octet-stream]: {"sn":"20:19:AB:F4:0F:7E", "data":{"acc":{"x":26,"y":32,"z":1012,"unit":"mG"}, "gyro":{"x":1220,"y":-6835,"z":-2319,"unit":"mdeg/s"}, "mag":{"x":40,"y":1,"z":-4,"unit":"uT"}, "light":{"value":17687,"unit":"mLux"}, "temp":{"value":50000,"unit":"mCelsius"}, "pressure":{"value":98897,"unit":"Pascal"}, "humidity":{"value":39,"unit":"%rh"}}} 13:40:21.758 [vert.x-eventloop-thread-0] INFO org.eclipse.hono.cli.app.Receiver - ... with application properties: {orig_adapter=hono-mqtt, device_id=3a43f07c-b404-4a2d-94f6-bfbeca52ccd3, orig_address=telemetry, JMS_AMQP_CONTENT_TYPE=application/octet-stream} ... -
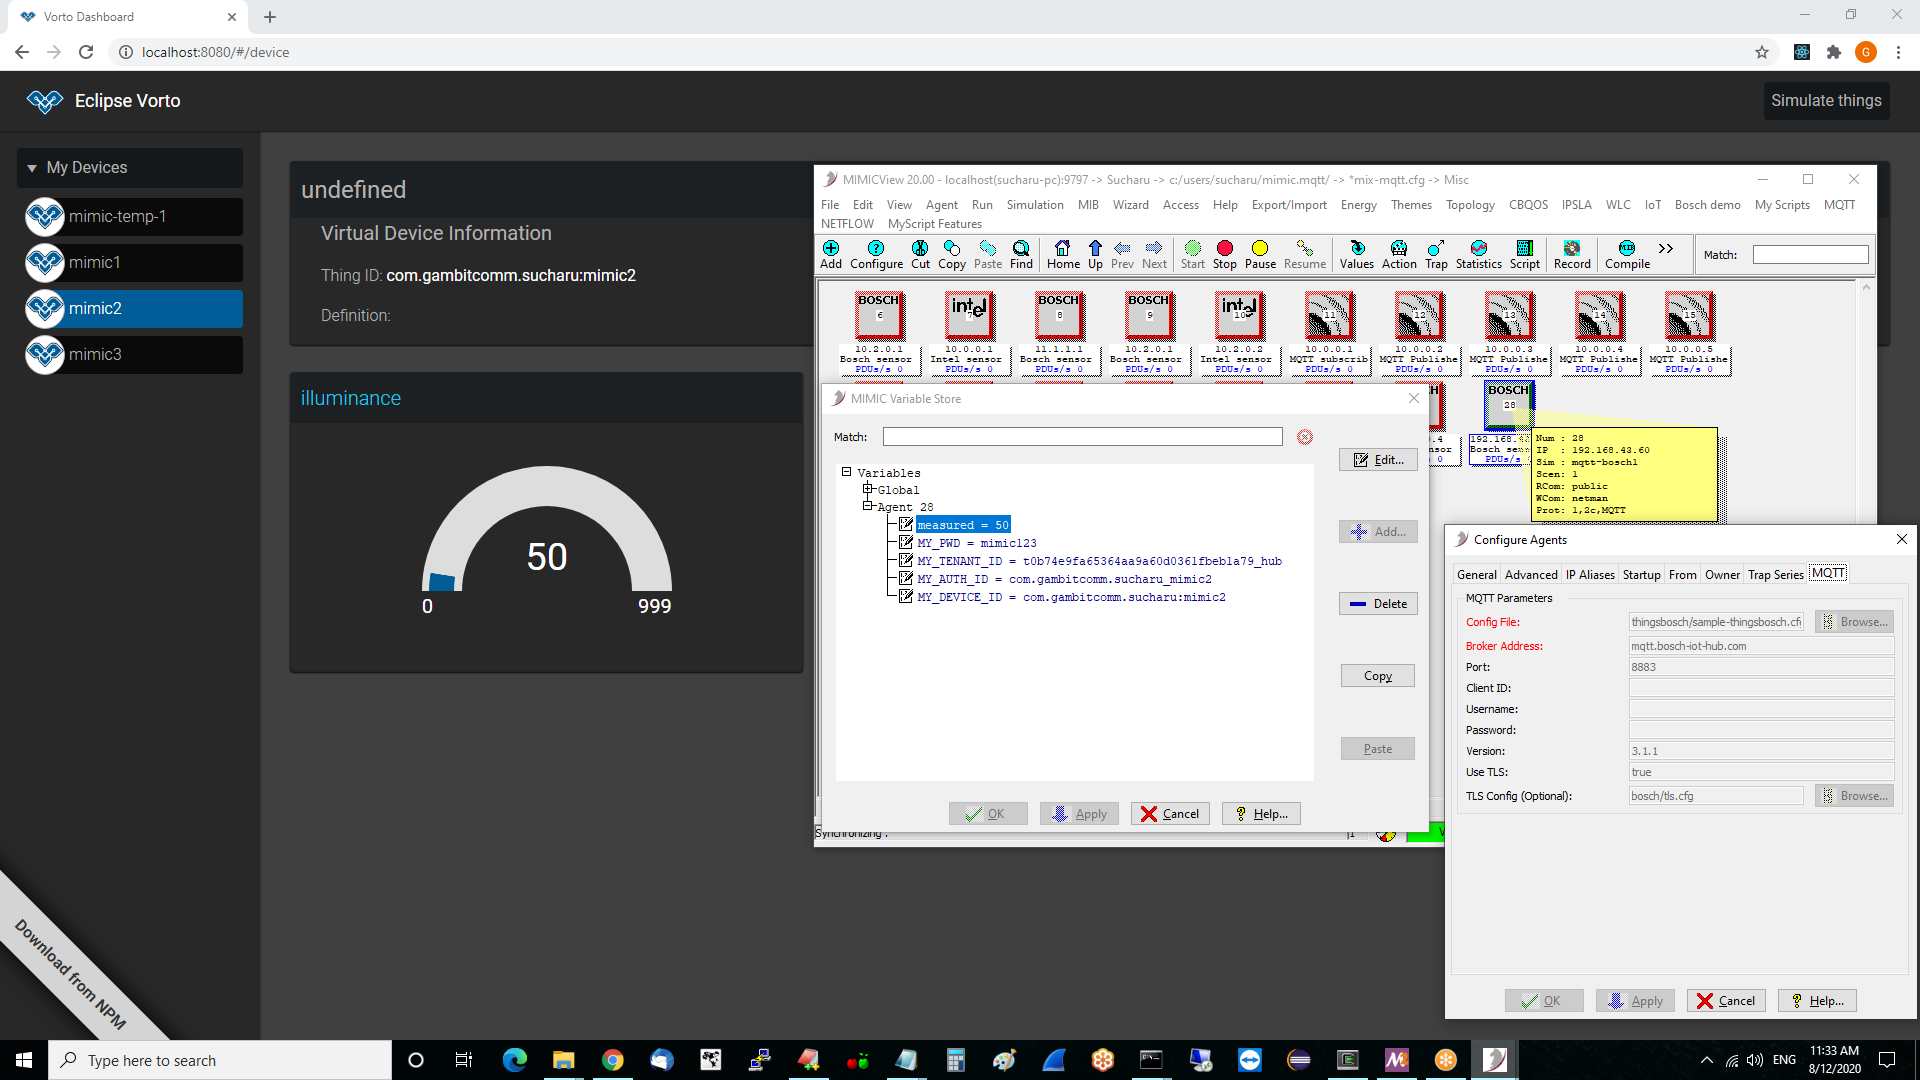
Eclipse Vorto
Following this onboarding page and this guide for the Bosch IoT Suite we were able to connect our simulated sensors to Bosch IoT Hub to display them in the Vorto dashboard.
-
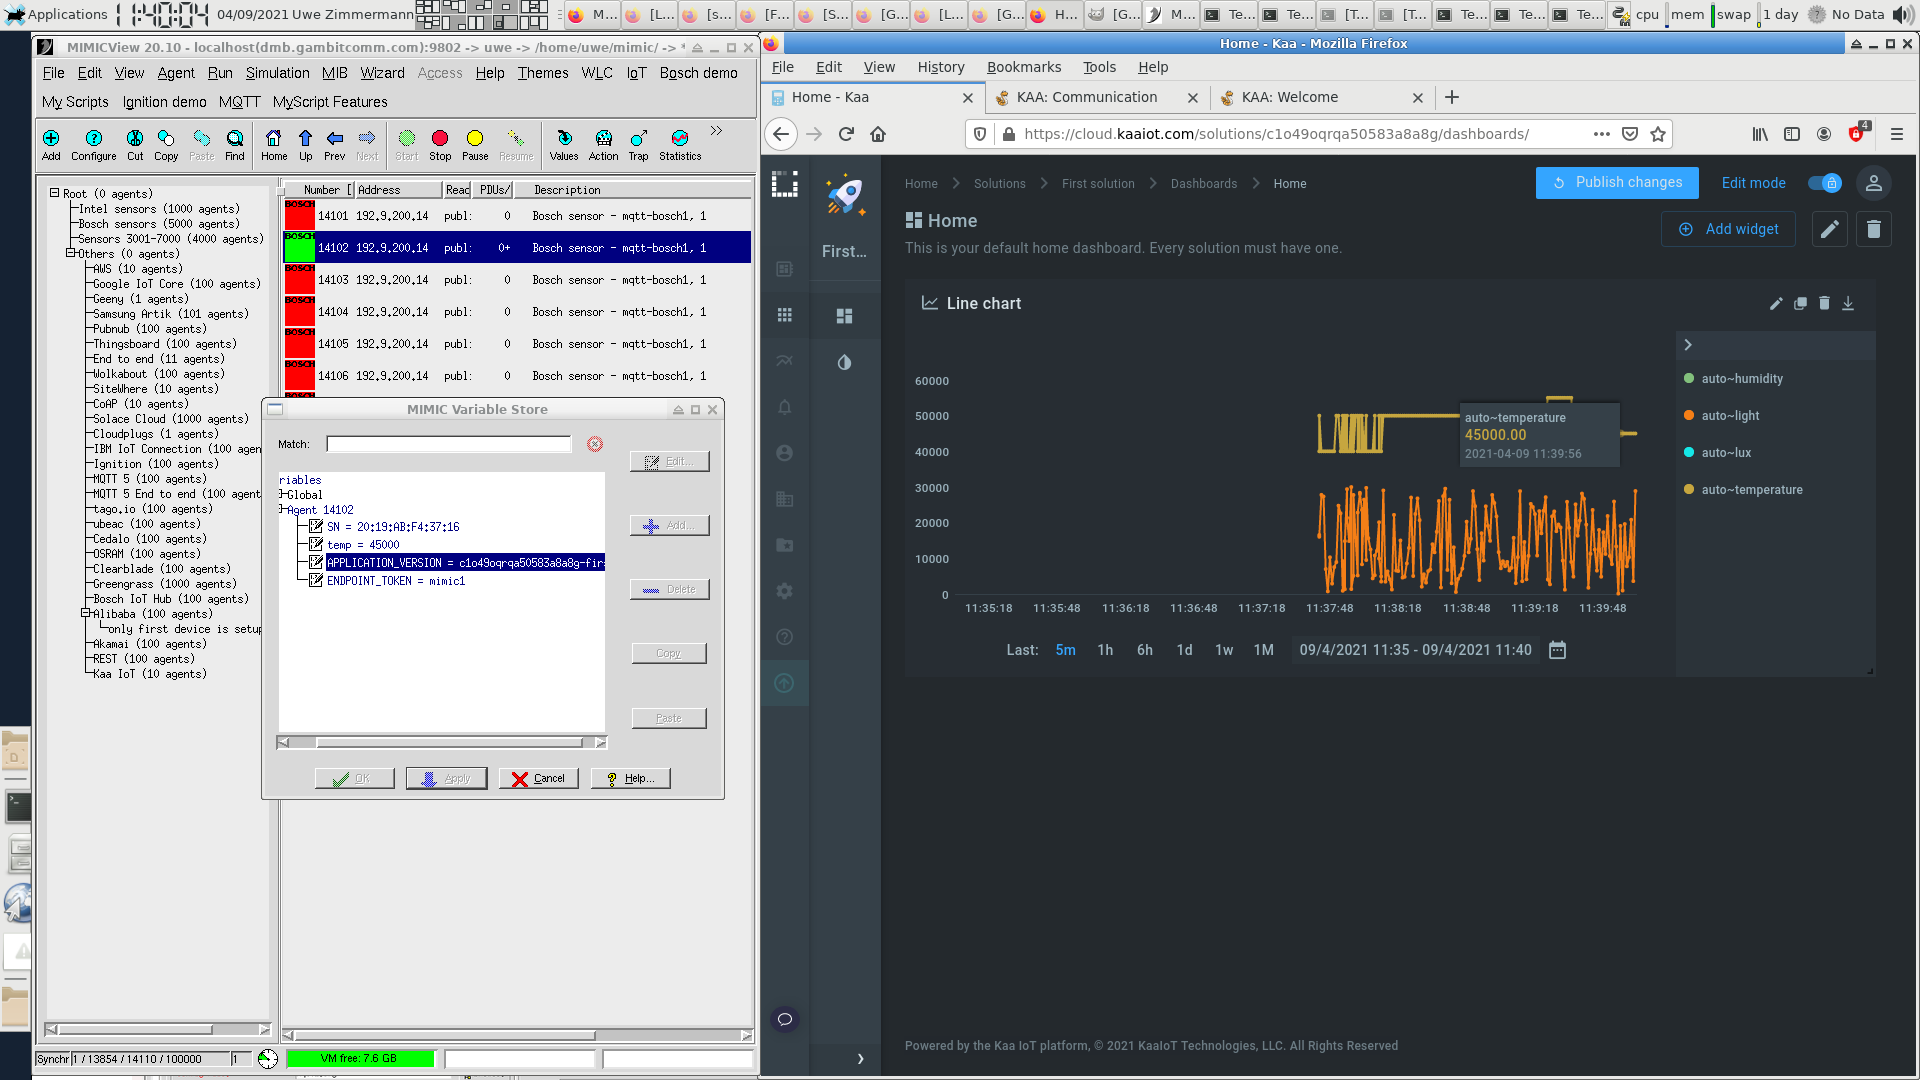
KaaIoT
KaaIoT has this Getting Started tutorial and this guide for connecting devices that allowed us to connect our simulated sensors to KaaIoT Cloud to display them in a application dashboard.
-
2smart
Following their blog post we configured a dynamic bulb simulation to be tracked in their tutorial mock-up.
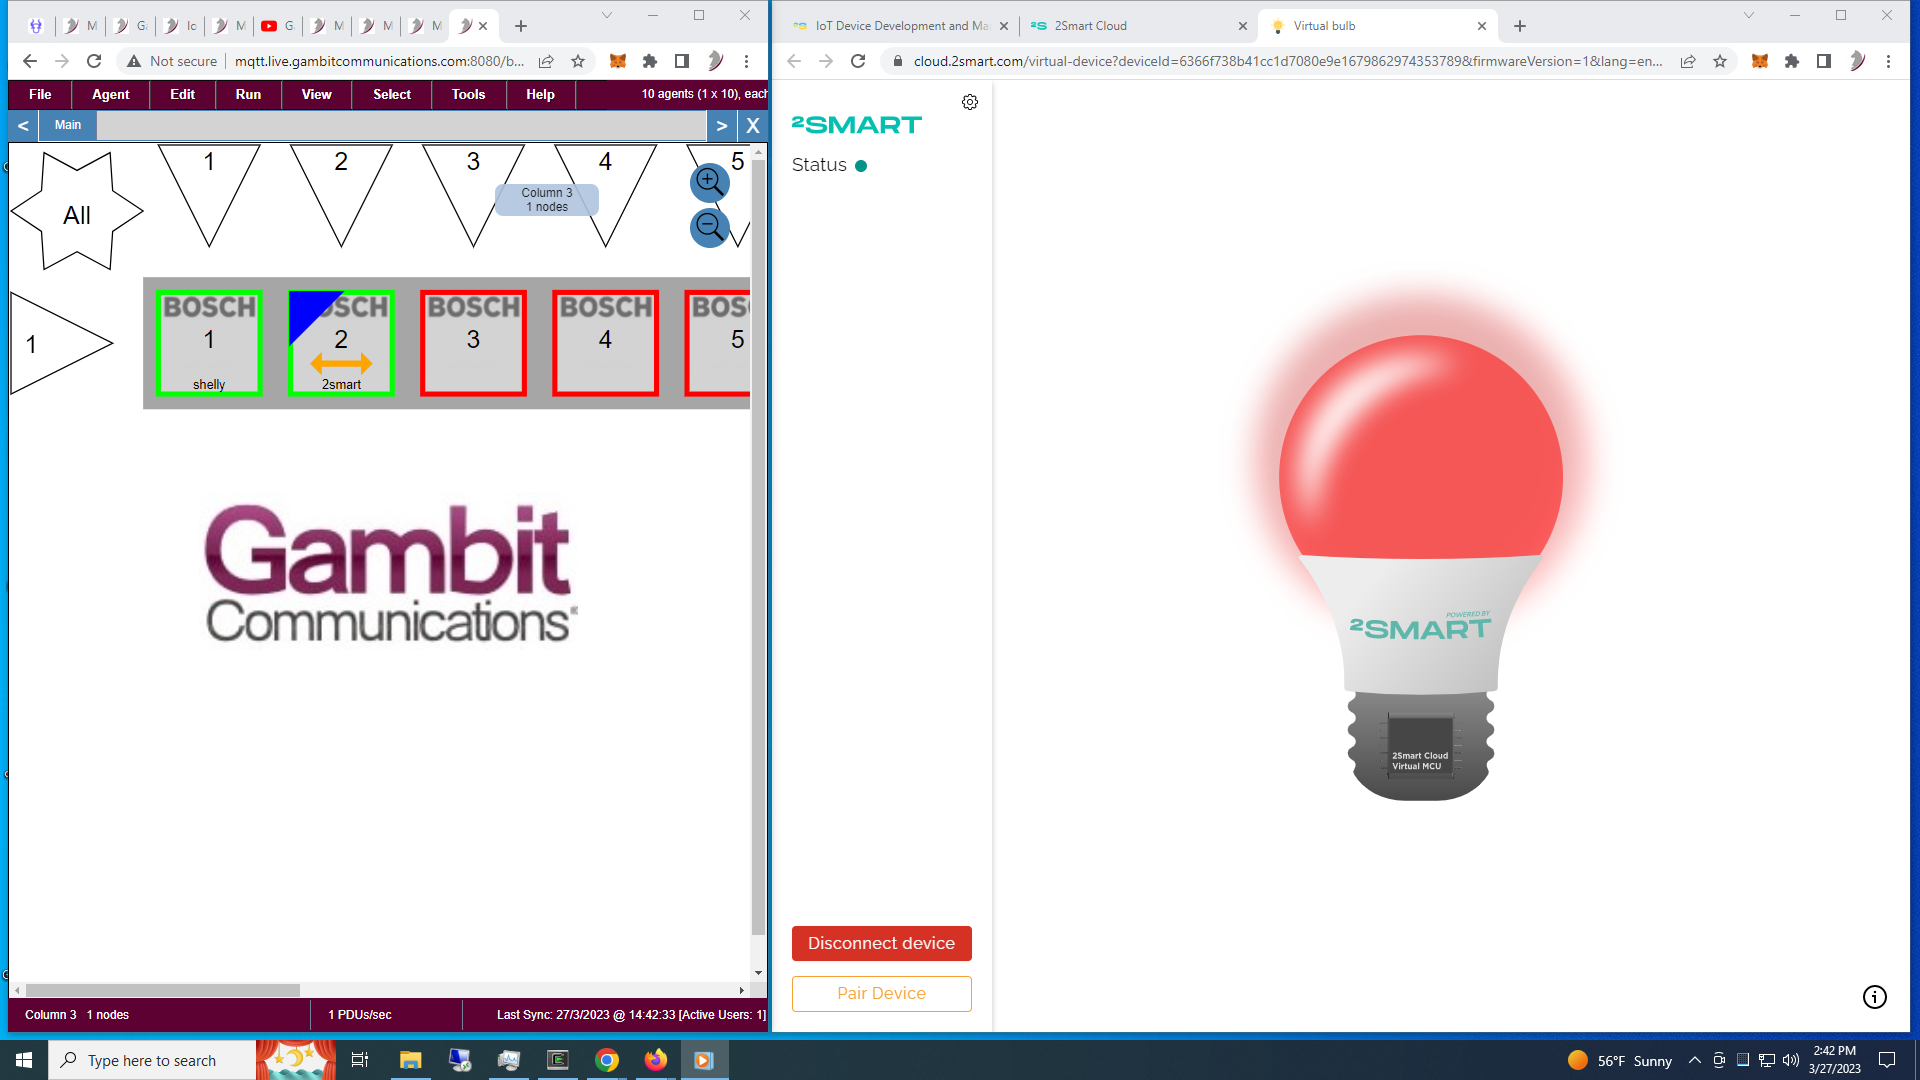
Check out the 2-minute Youtube video.
-
Adafruit
-
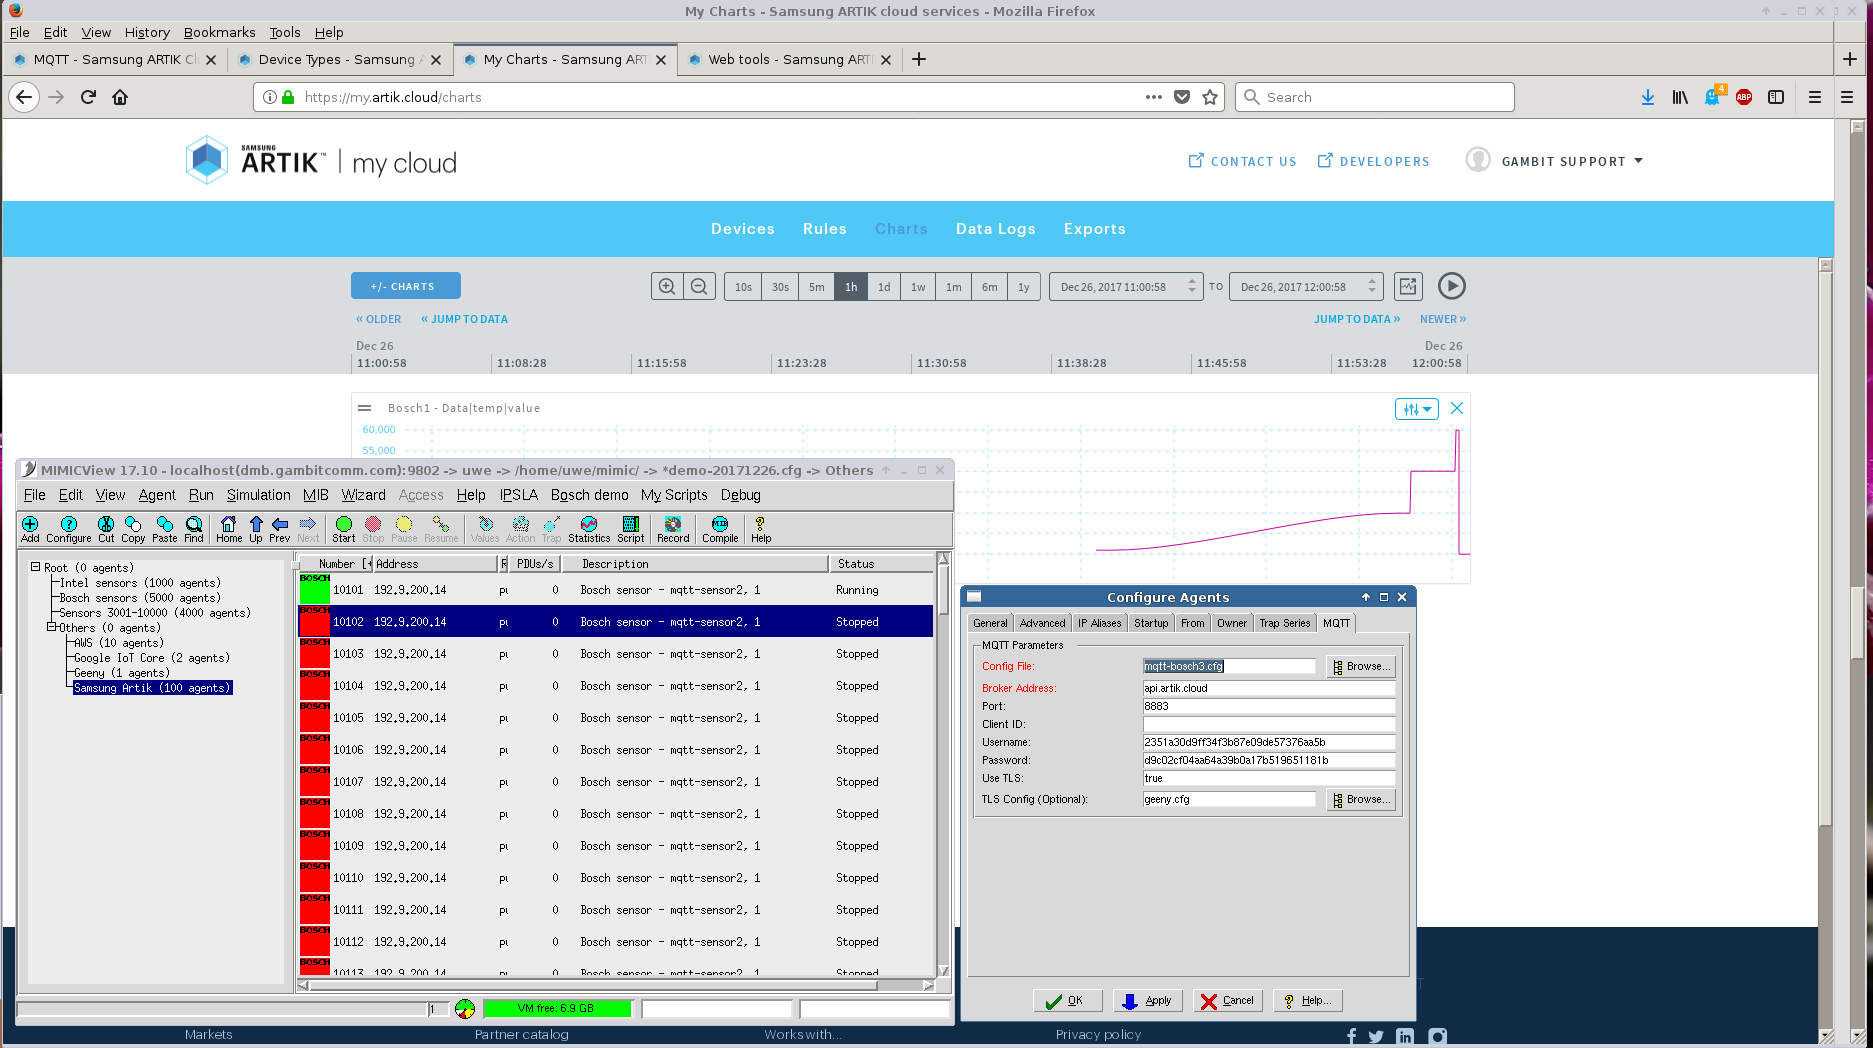
Samsung Artik
Follow the directions at their developer portal to setup credentials for a device ID. For the SSL configuration you can use any legal configuration, for example the mosquitto configuration above.
Once we defined a manifest for the minimal JSON data objects for the sample Bosch sensor simulation in our library, we were able to track and change the temperature value in real-time.
Use the Artik API console to get your userId, ie. the first method GET /users/self. From a command-line, use this curl invocation:
curl -X GET https://api.artik.cloud/v1.1/users/self \
-H "content-type: application/json" \
-H "authorization: Bearer YOUR-TOKEN"
where YOUR-TOKEN is the OAuth token used in that page.
Use the returned value of id for YOUR-USER-ID below.
Use GET /users/{userId}/devicetypes to get your device type IDs:
curl -X GET https://api.artik.cloud/v1.1/users/YOUR-USER-ID/devicetypes \
-H "content-type: application/json" \
-H "authorization: Bearer YOUR-TOKEN"
To register more devices for a particular device type, use either the Artik API console or issue REST commands in bulk, eg. to register 10 devices using curl in a c-shell for loop:
% set i=1
% while ( $i < = 10 )
while? echo $i
while? curl -X POST https://api.artik.cloud/v1.1/devices \
-H "content-type: application/json" \
-H "authorization: Bearer YOUR-TOKEN" \
-d '{ "uid": "YOUR-USER-ID", "dtid": "YOUR-DEVICE-TYPE-ID", \
"name": "bosch'$i'", "manifestVersion": -1, "manifestVersionPolicy": "LATEST" }'
while? set i = `expr $i + 1`
while? end
where YOUR-TOKEN, YOUR-USER-ID, YOUR-DEVICE-TYPE-ID are from your dashboard.
To get the devices registered for YOUR-USER-ID and each device type:
curl -X GET https://api.artik.cloud/v1.1/users/YOUR-USER-ID/devices?\
count=100&includeProperties=false&includeShareInfo=false \
-H "content-type: application/json" \
-H "authorization: Bearer YOUR-TOKEN"
You can use the returned information to configure each simulated sensor in MIMIC.
Alternatively, you can use the Node-RED graphical programming environment to interact with Artik to retrieve this information, as shown:
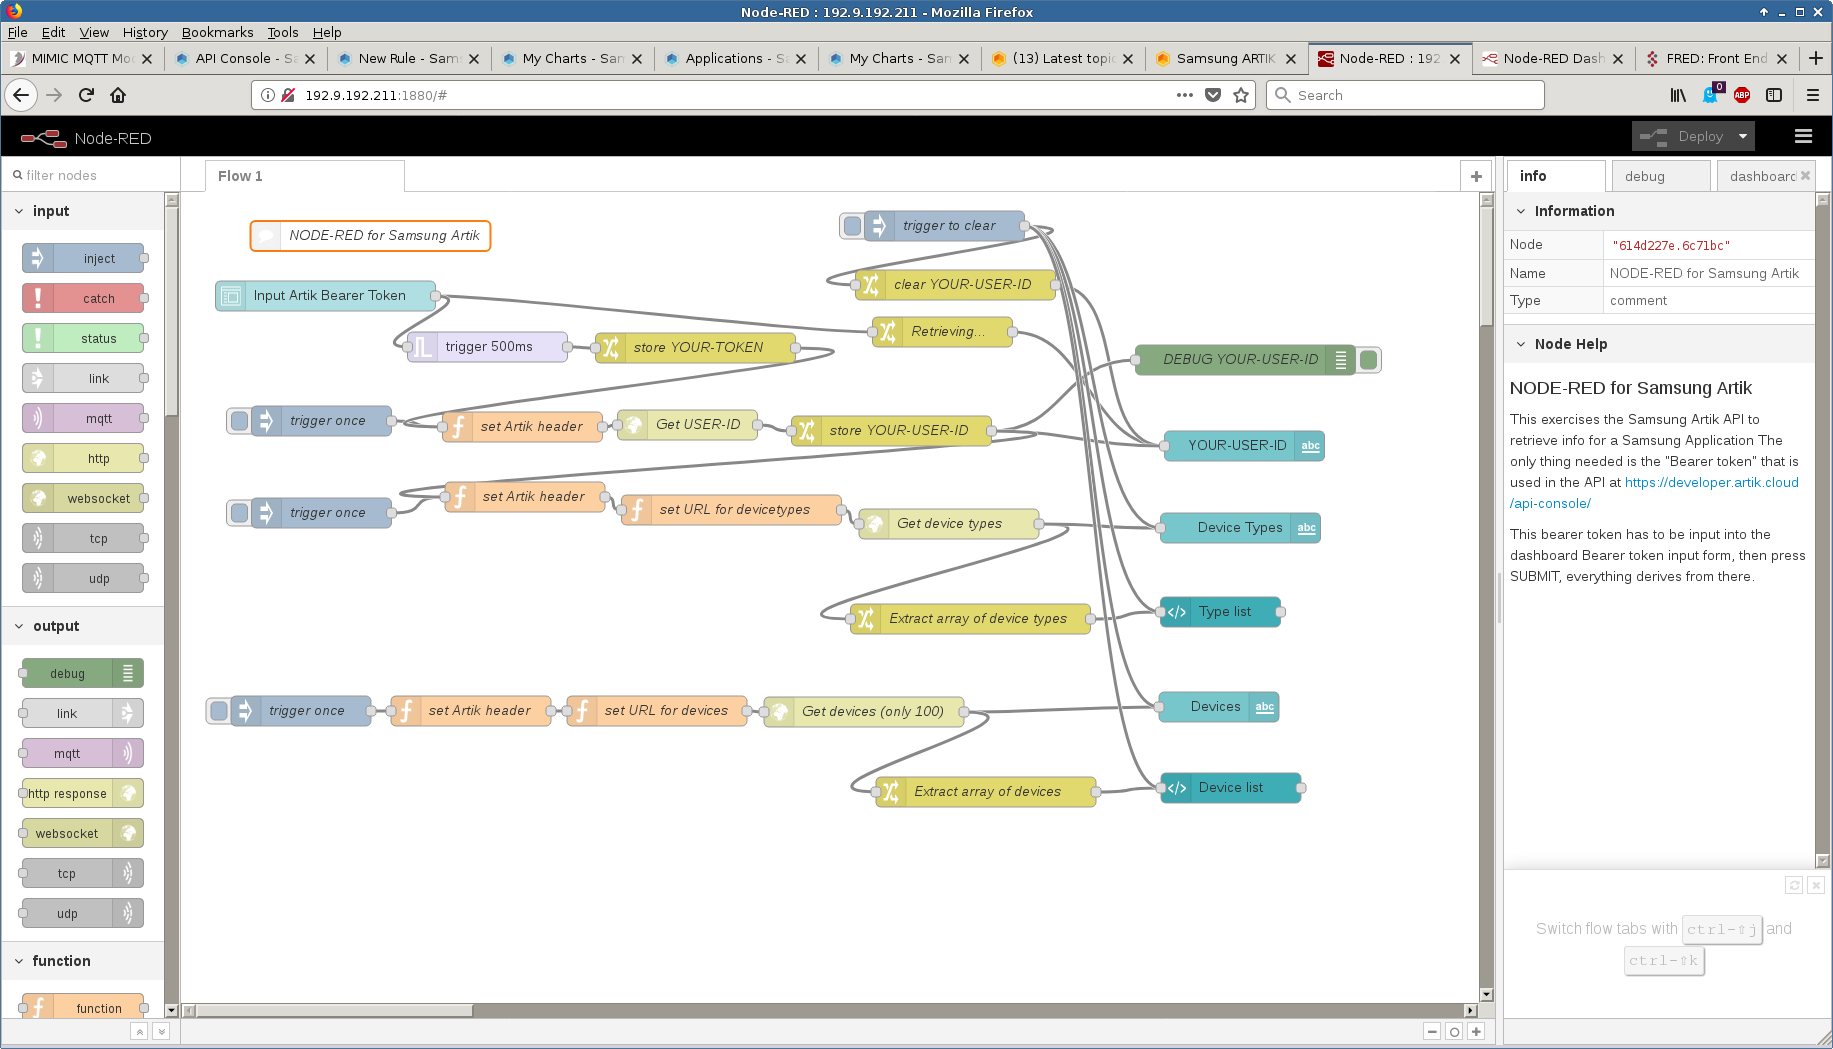

See also this blog post, and this one that points to a video.
-
Amazon Greengrass
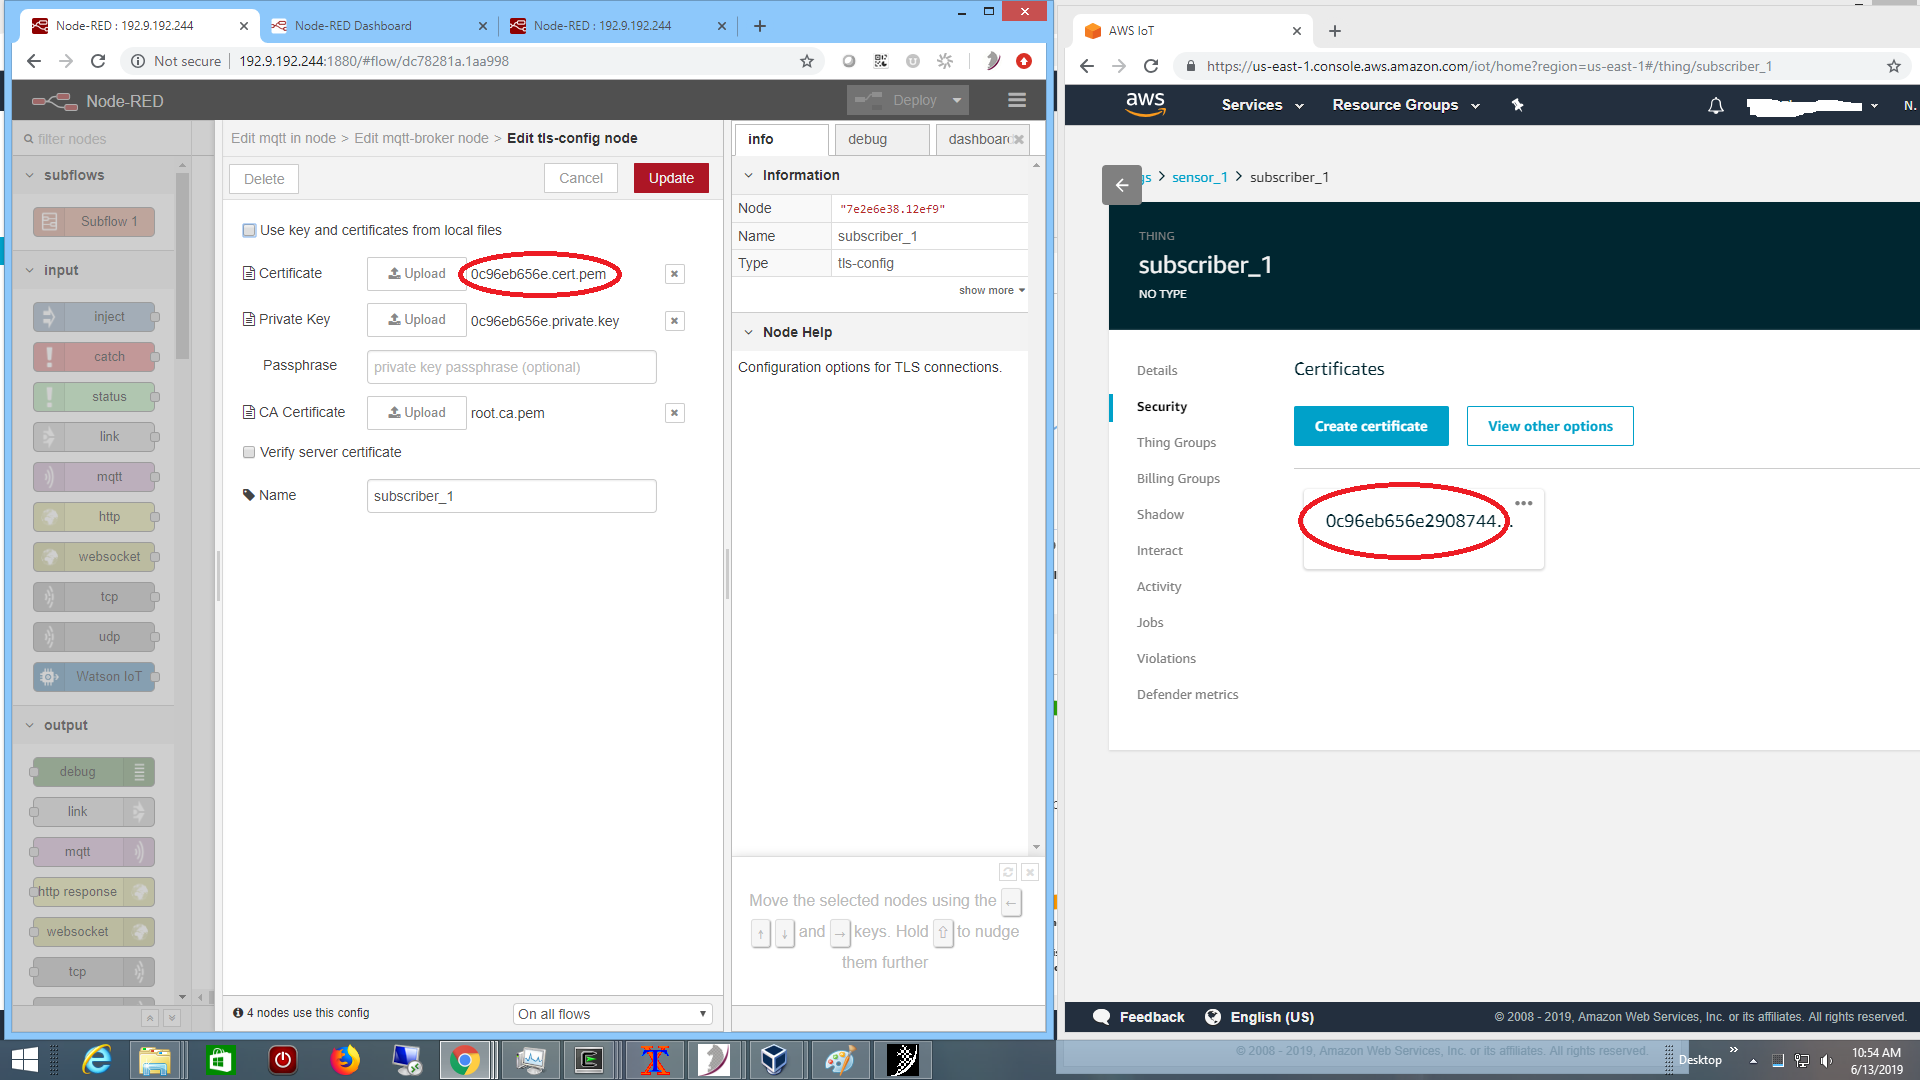
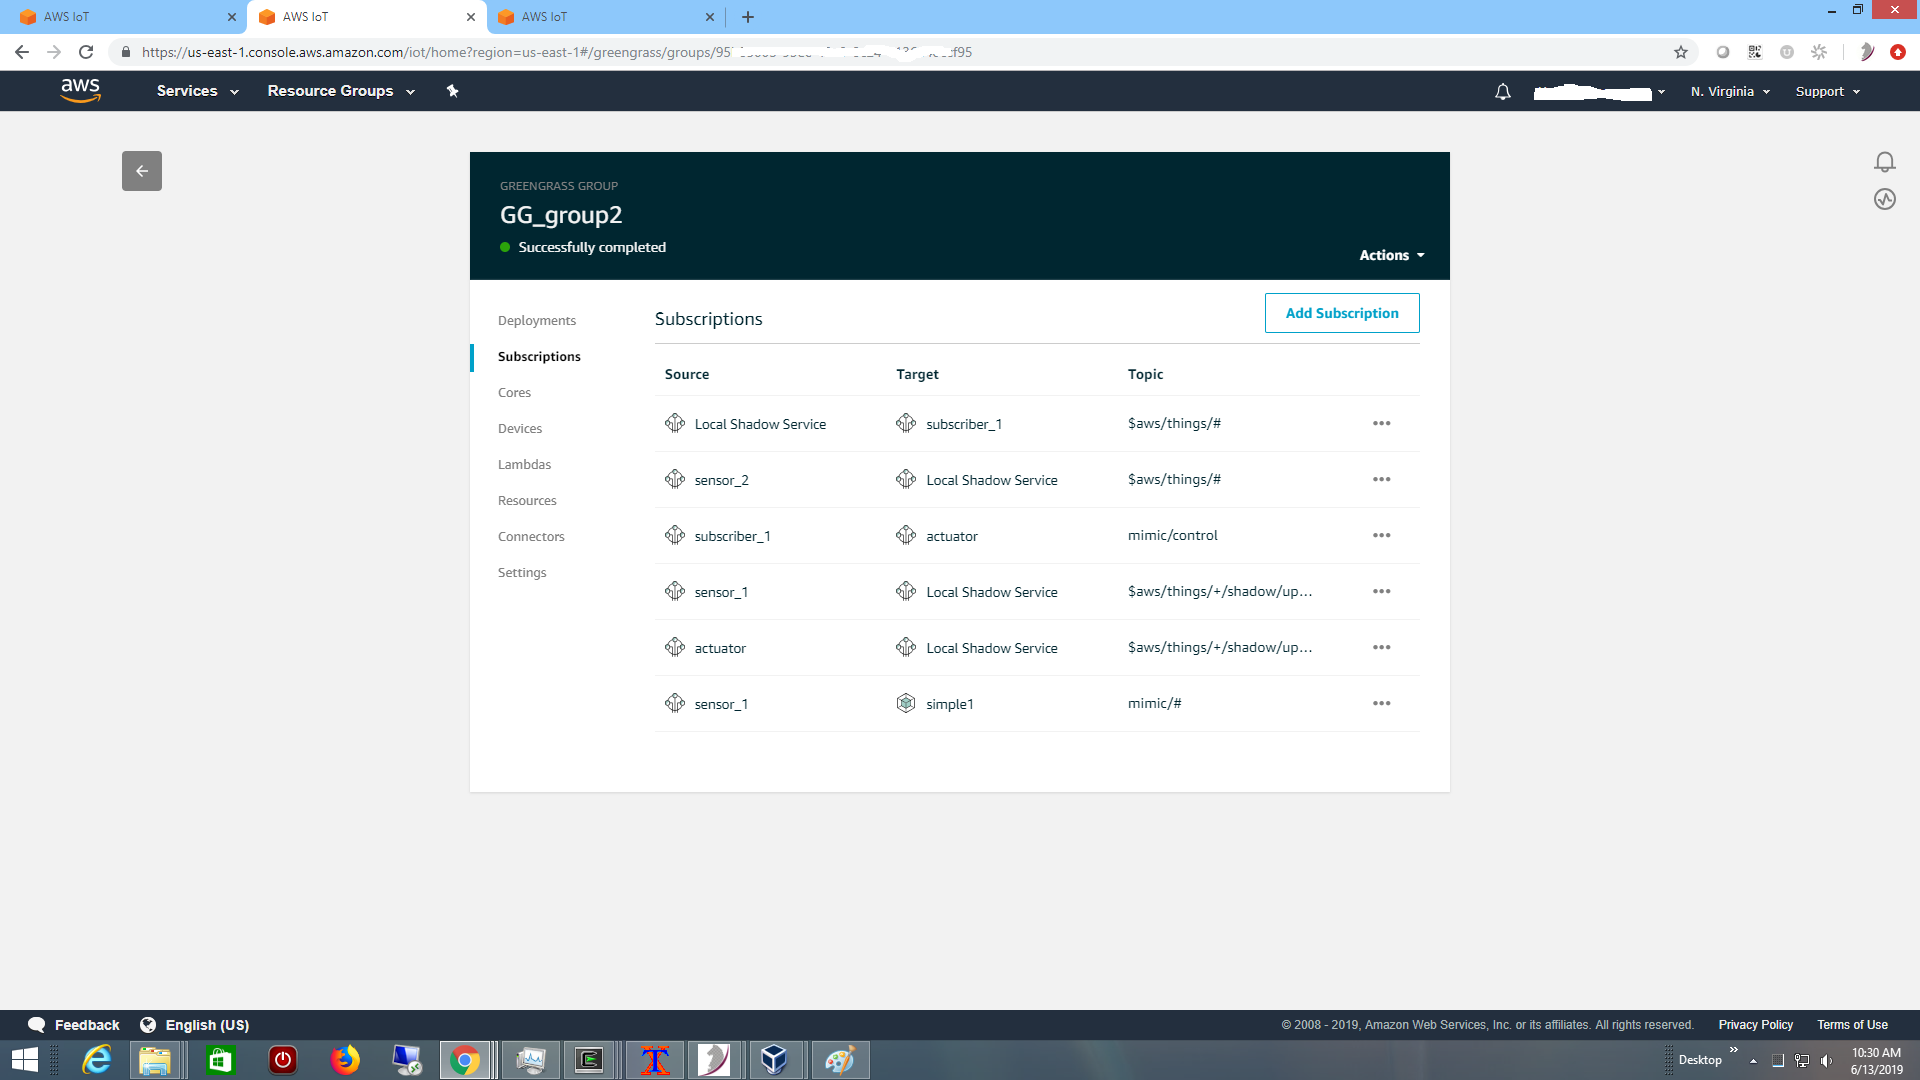
You need to setup an account at Amazon AWS IoT. Once logged into the AWS IoT console, and a Greengrass Group has been created according to their Getting Started manual. We setup a group called GG_group2 with a core GG_group2_Core.
Then we simulated our usual bi-directional simple control system at the edge, with these devices
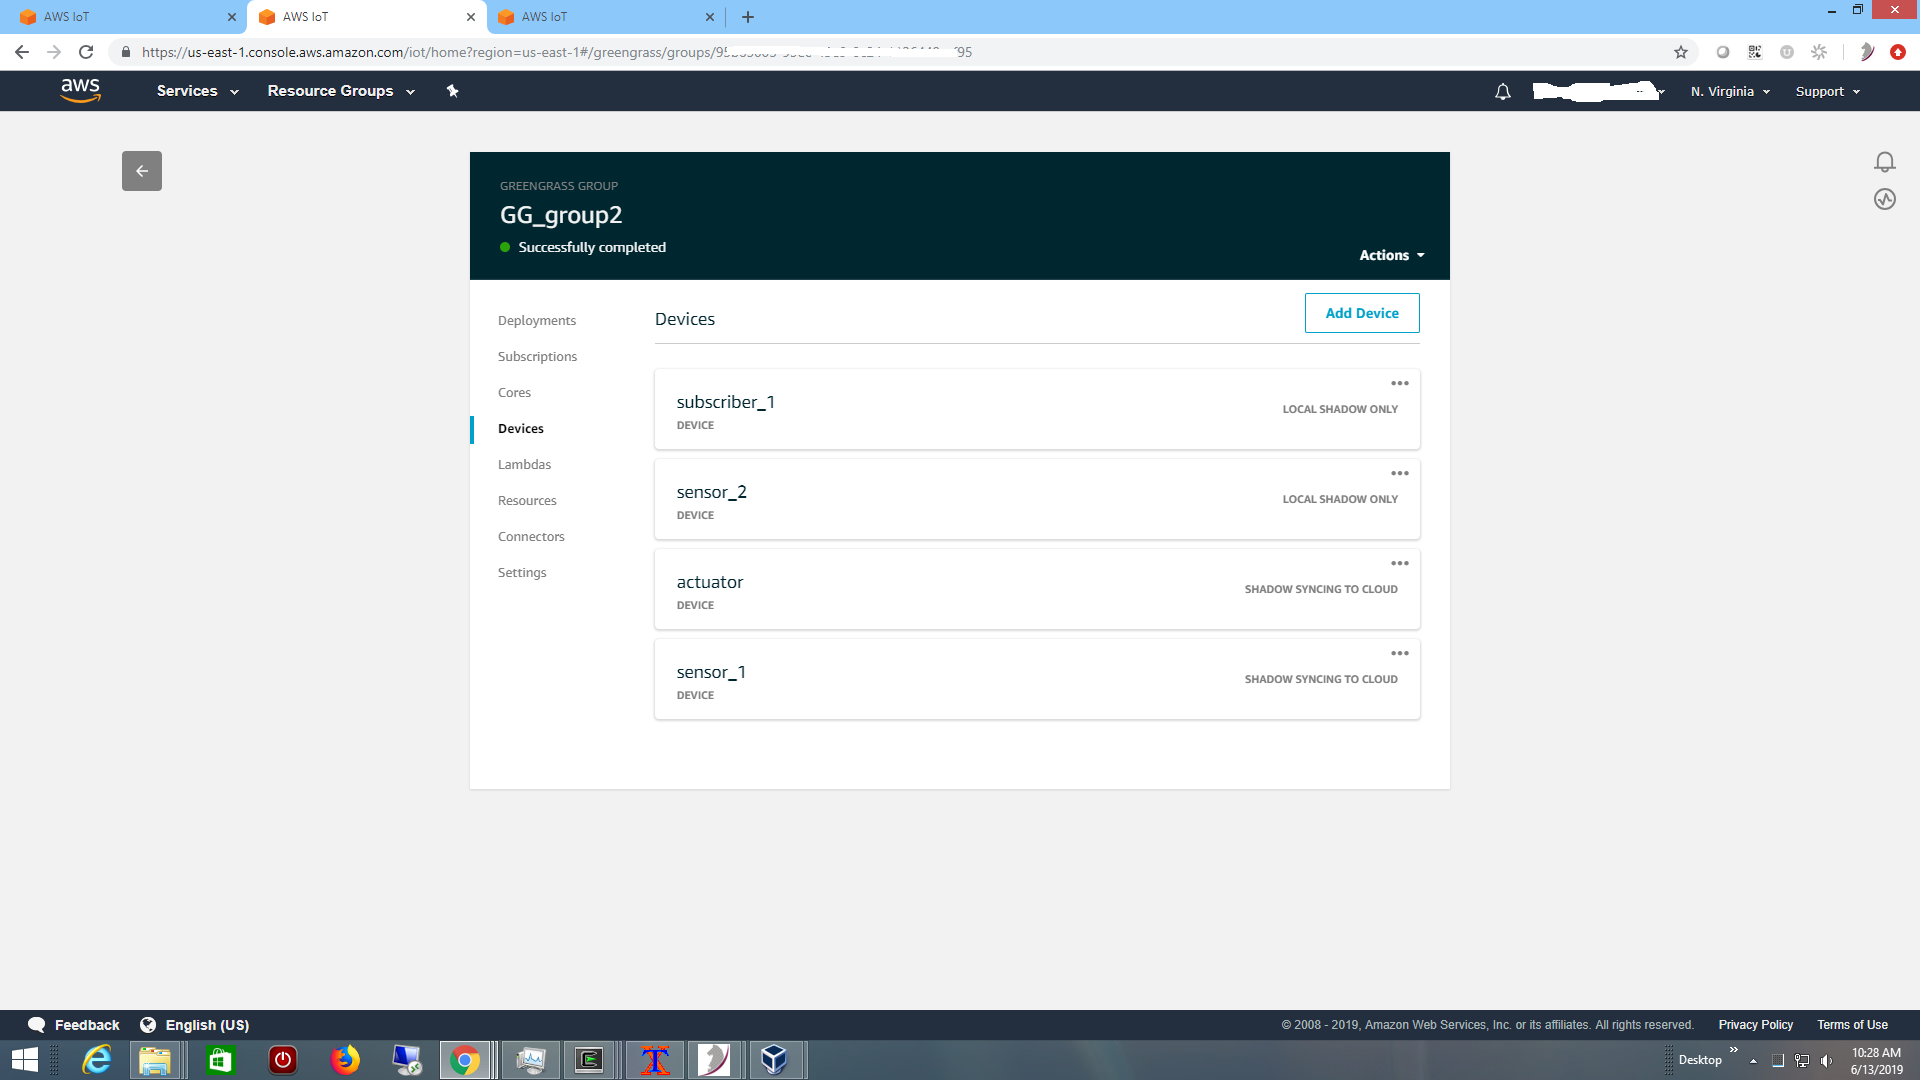
including a sensor sensor_1 reporting telemetry to Greengrass core,
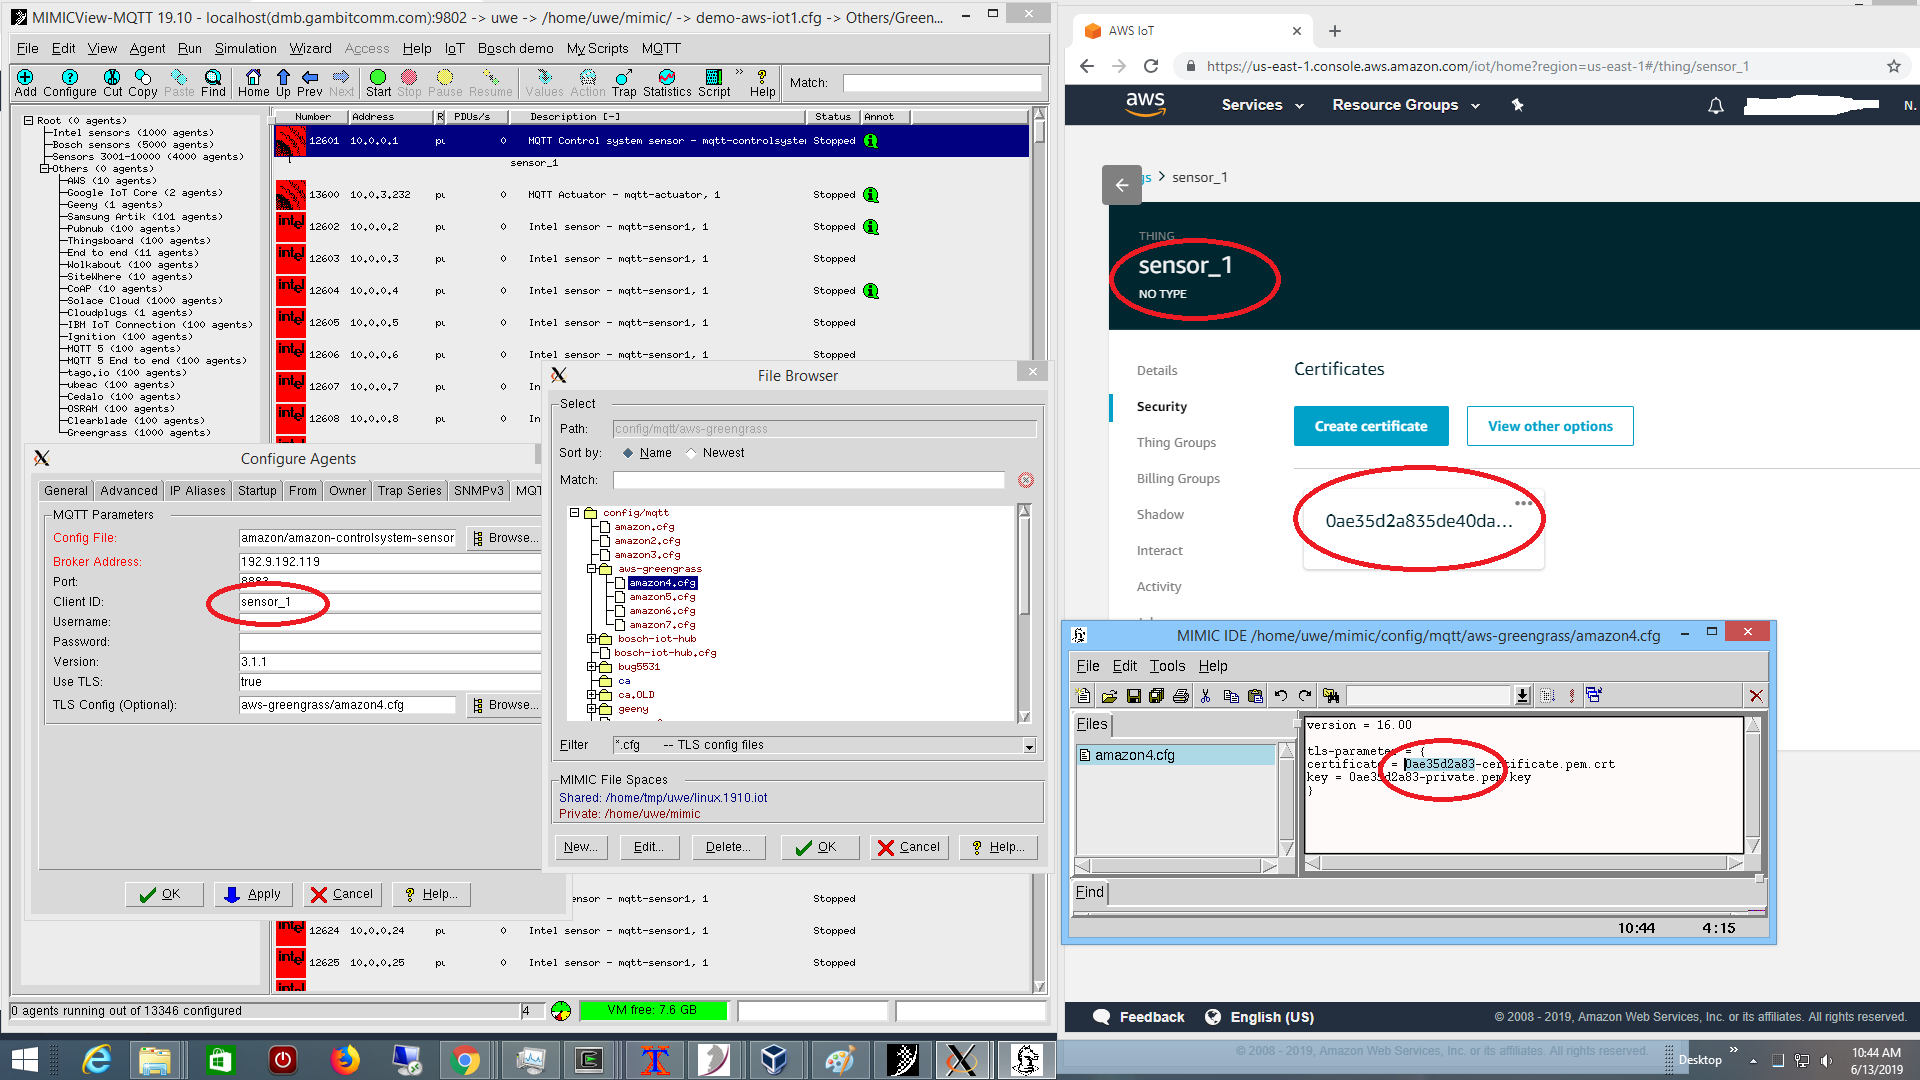
running in MIMIC as seen above on the left, with certificates as configured in AWS on the right.
When the actuator (eg. cooling system) in the control system is off, the sensor temperature heats, and when it is on, then it cools. We implemented the control system logic in a Node-RED flow,
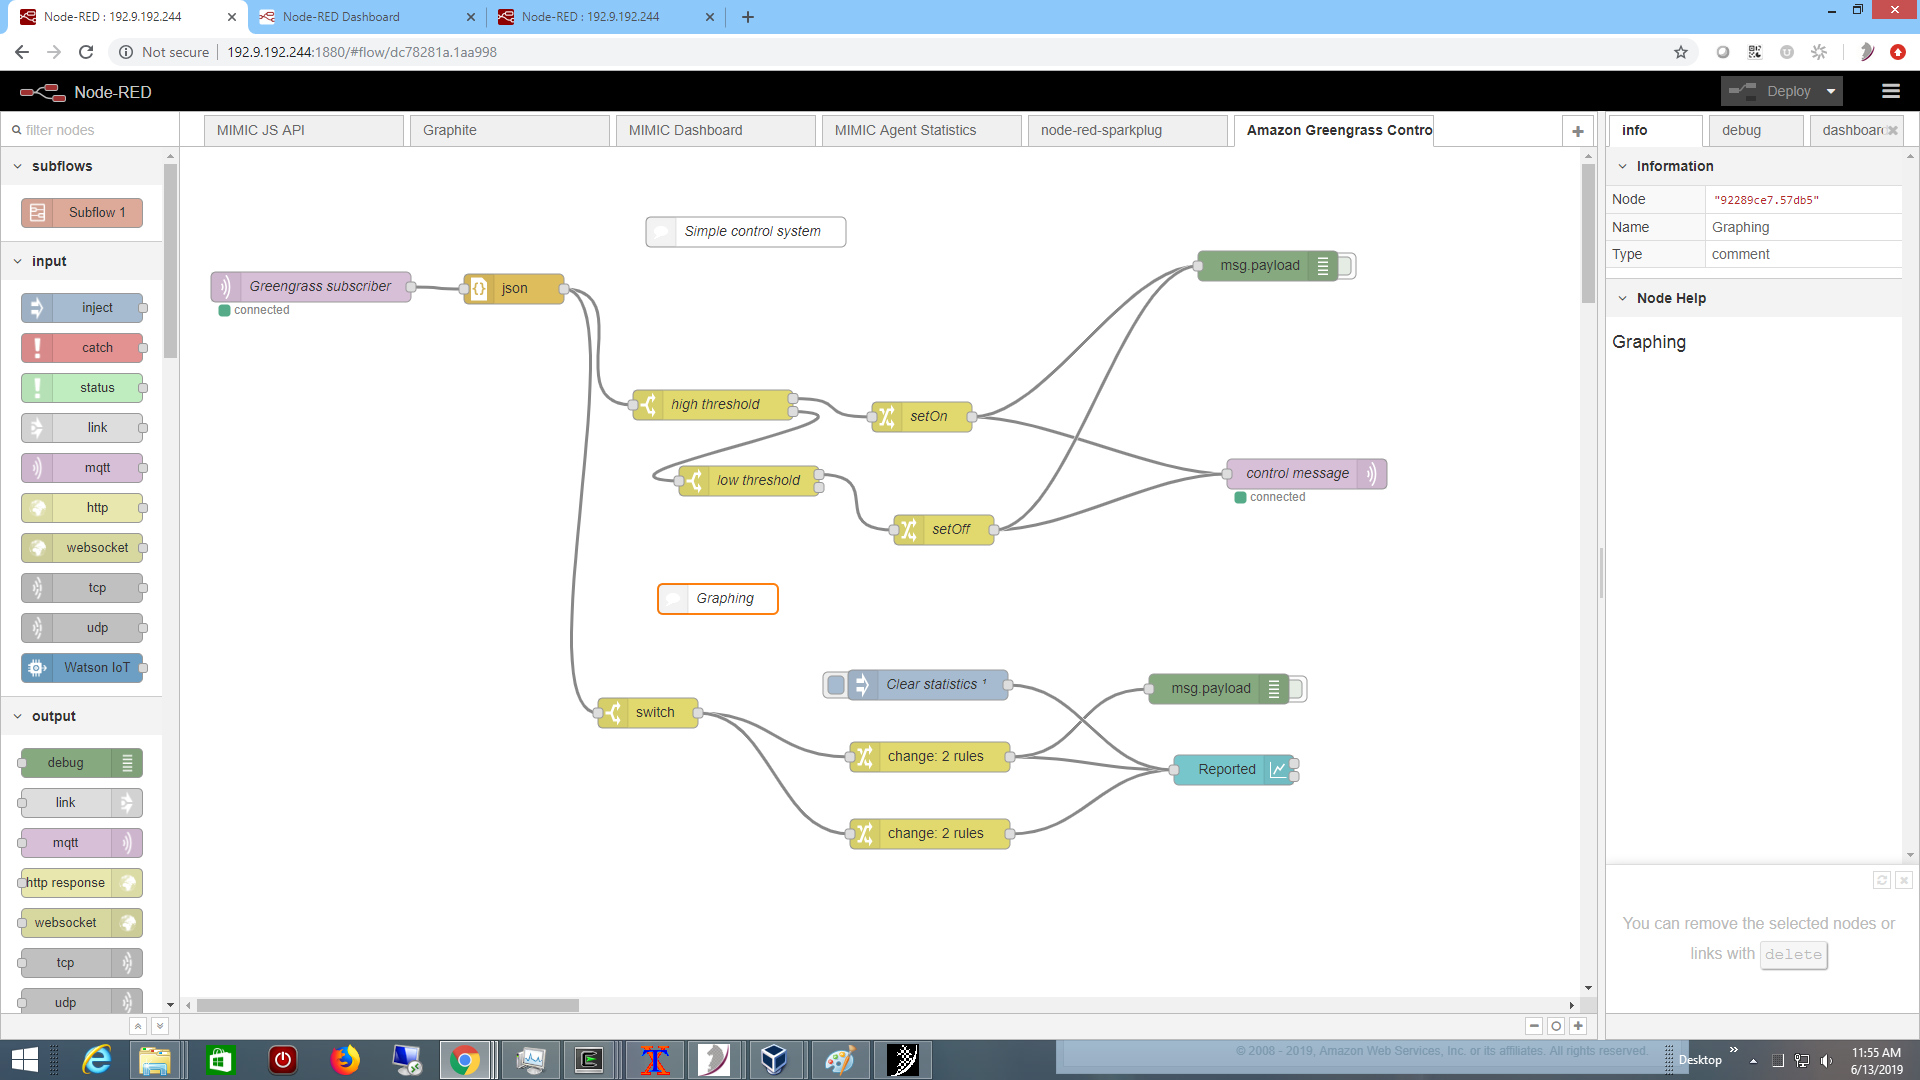
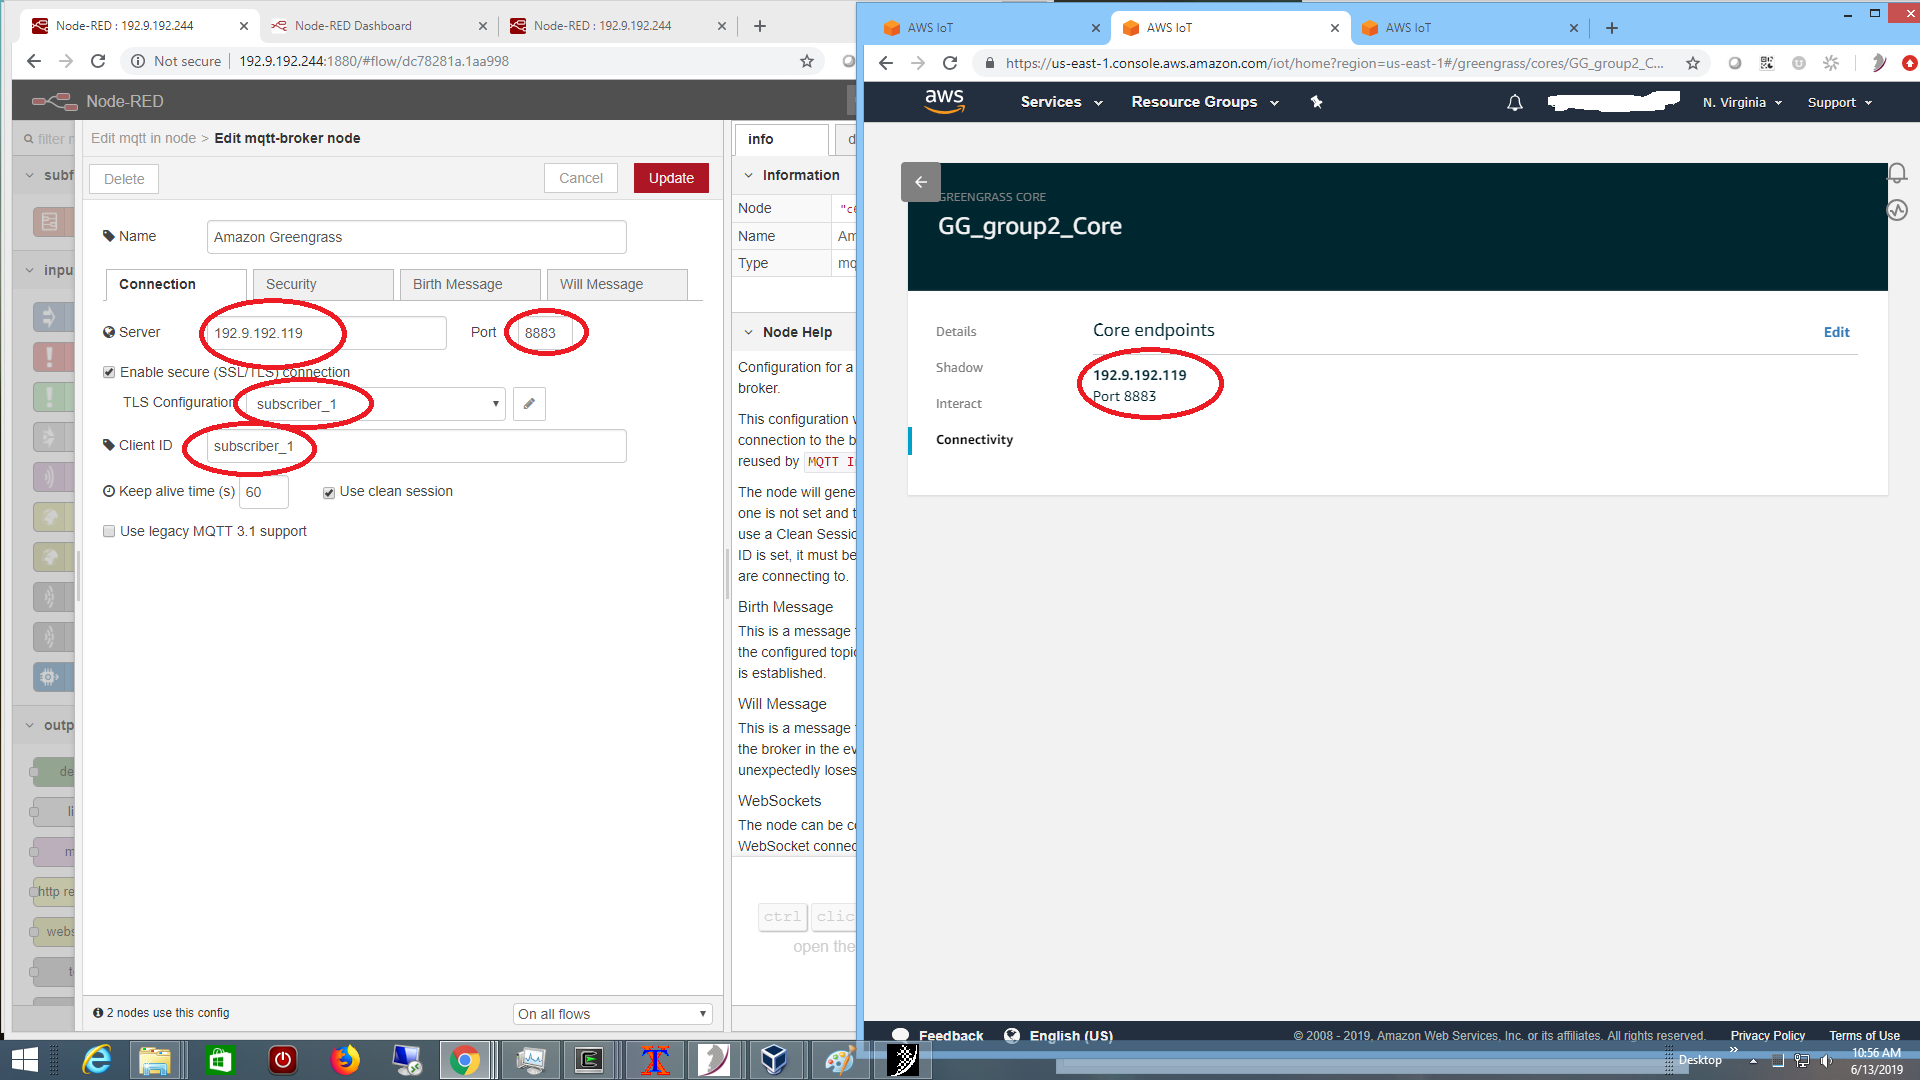
rather than in a Lambda function. It turns the actuator on if the temperature exceeds a high threshold, and turns it off if the temperature is cool enough. The connectivity to the core broker is setup as a subscriber to the shadow updates as shown below on the right:
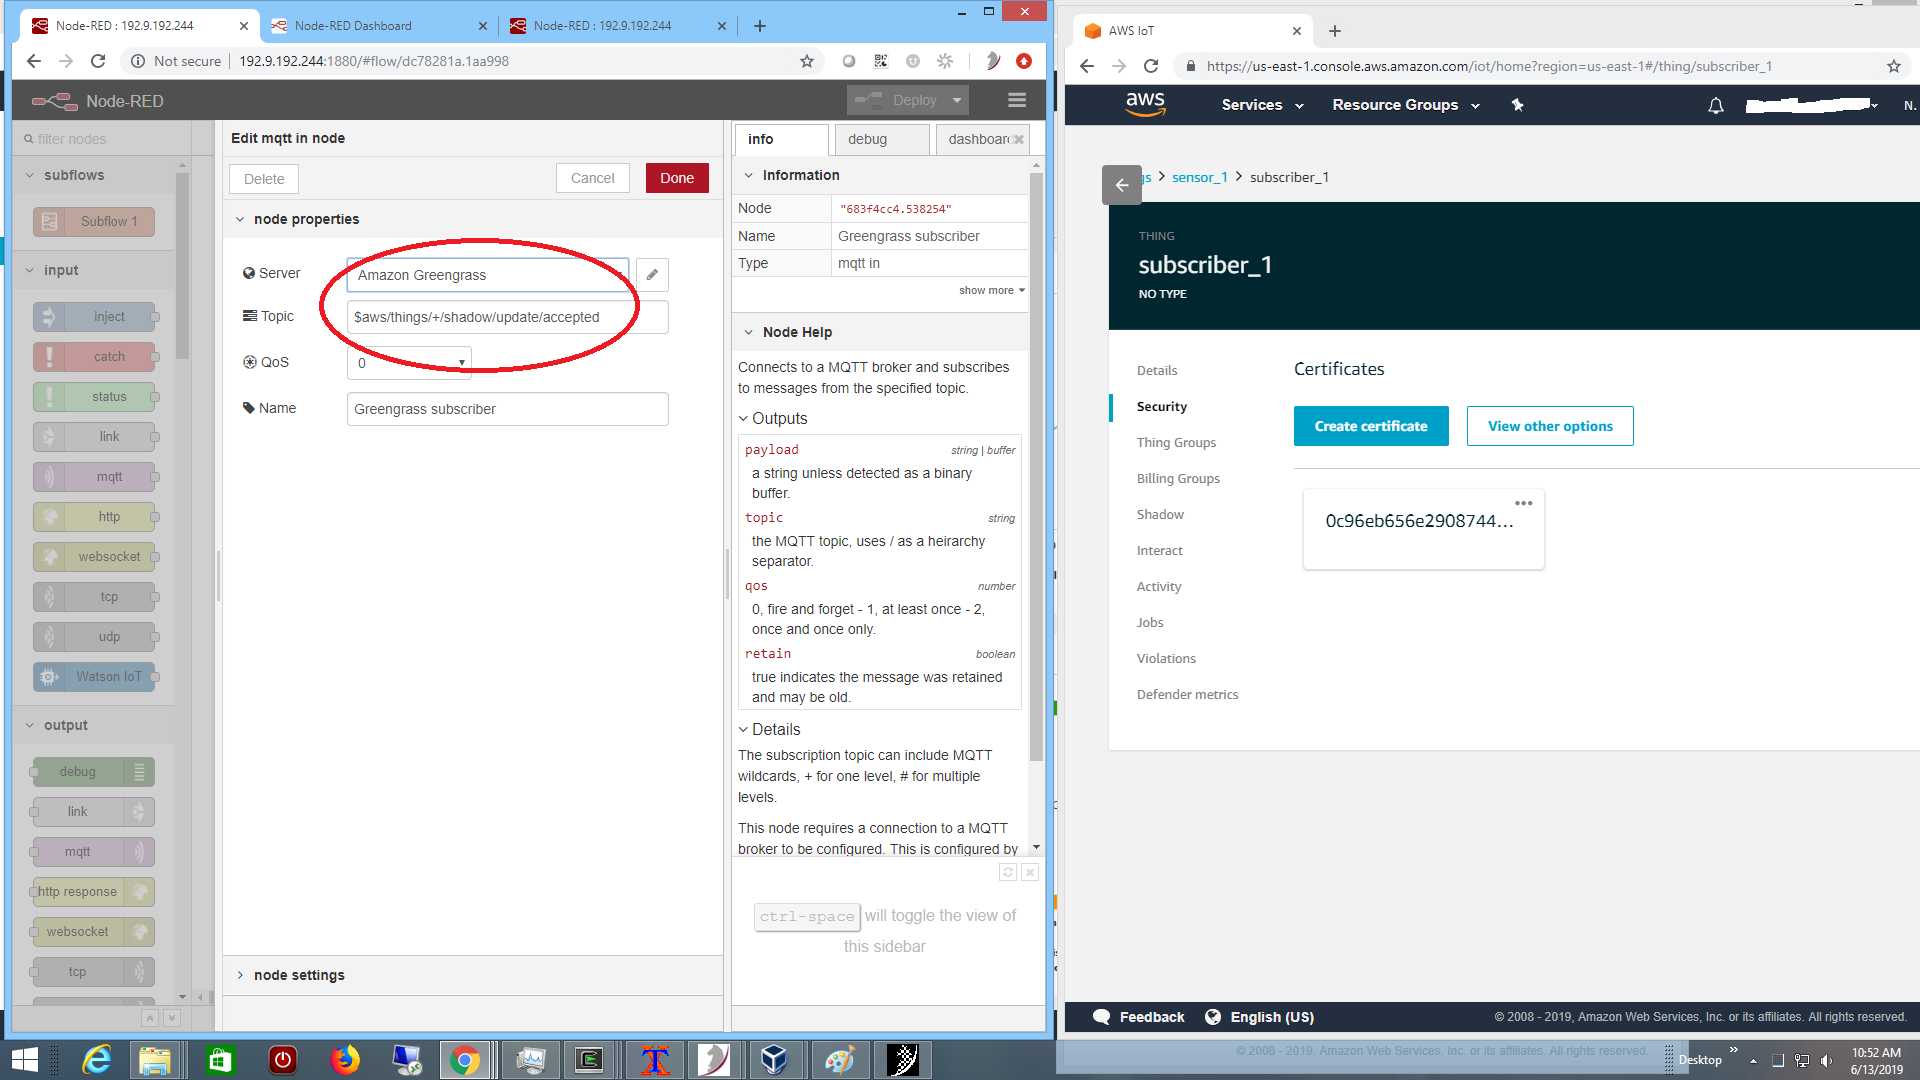
and the Node-RED subscriber is configured to connect to the broker.
with TLS certificates exported by AWS:
The parts of the system need permission to publish as defined in the Greengrass subscriptions:
Once everything is setup, the control system reaches a normal steady state at the edge, as visualized by the Node-RED graphing rules, as shown in this 2-minute Youtube video.
We have also setup scalable demos such as in this blog post.