User Guide
-
Table of Contents
-
Overview
MIMIC Virtual Lab is an easy-to-use, data-driven interface to MIMIC Simulator. It presents a simulated lab environment consisting of multiple simulated devices, which you can manage just like real devices.
Where other components of the MIMIC suite emphasize power and flexibility, MIMIC Virtual Lab strives to hide MIMIC from the user. This interface is thus ideal for users who need a transparent, ready-made virtual lab. The interface allows to start/stop the lab, or individual devices, and a handful of other useful functions to manipulate the lab.
-
User Reference
Startup
Invoke vlab from a shell command prompt with
vlab*
or in Windows from the MIMIC program group in the taskbar, or by double-clicking on the vlab*.bat icon in Windows Explorer.(*) the vlab will usually have a number, eg. vlab1.
The lab configuration file is read and the main panel displays the loaded topology.
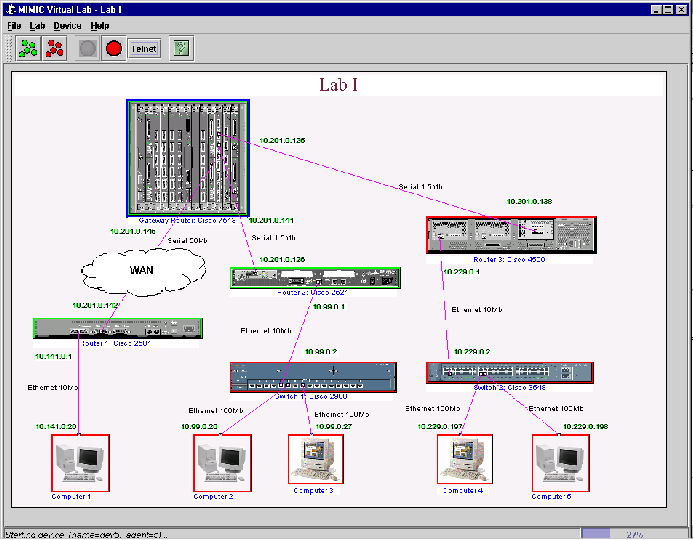
Figure 1 - MIMIC Virtual Lab Front Panel File Menu
File->Load...
Load a different lab configuration. This is only enabled for products that allow to load different lab configurations (such as Virtual Lab Enterprise).
File->Reset...
Reset any changes and cause a restart of all the devices, so that you can go back to the installed defaults. Notice that this does NOT cause a clearing of the device configuration, but the simulation data reverts to the state it was when first installed.
File->Exit
Exit the lab. You will be prompted to save any changed state for the next restart of the lab.
Lab Menu
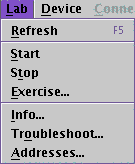
Lab->Refresh
Lab->Start
This menu item is equivalent to turning power on. Each device is powered up and ready to access. Notice that each device will take on an initial state, which may be different from just powering it on. For example:
-
the device may have been running for a while;
-
the device may have loaded a running configuration with the copy
IOS command;
- the device state may have been changed if you saved it from a previous run.
Lab->Stop
This menu item is equivalent to turning power off, but may do more. Each device is powered down so it is no longer accessible. If its state has changed, you will have the option of saving this state so that on the next start you can continue as if it had never been stopped. Notice:
-
on the next start, devices do not reconfigure with saved device configuration files, such as IOS startup-config files.
- to reload a device with a saved configuration file, you need to use the device's reloading procedure, such as running IOS reload command.
Lab->Exercise...
This dialog lets you run exercises in the virtual lab. An exercise consists of a number of steps which accomplish desired dynamic changes to the lab. The dialog shows an Exercises tree, with 2 top-level nodes Start and
 Active. In general, if a node has an icon in front of it or is
in bold text, you can find out more about it by placing your cursor on it.
A hint popup gives you more information.
Selecting one of the
 Eligible exercises under
Start followed by a click of the
  Start button will
activate that exercise for the selected device. Clicking the
 Continue
button a halted exercise under
  Active
will continue to the next step in that exercise.
You can check details for an exercise by opening its node (click the + icon in front of it). The Description node describes the exercise in general terms, the First Step, Next Step, Status and Completed items describe the state of the exercise.
You can double-click on the
 Help node in an exercise to display
its online documentation. When you finish with an exercise (you cannot
click
  Continue anymore), you have to double-click on
  Cleanup
to dismiss the exercise. You can double-click on the
  Abort node
to prematurely end an exercise. Double-clicking on
  Diagnostic Log
is only necessary in case of trouble-shooting, and displays a
Log window.
Once an eligible exercise is no longer interesting, you can hide it by double-clicking the
 Hide node. If hidden, it will continue to
appear under the
  Ineligible node, where you can restore it to
be eligible with the
  Unhide node.
Exercises can also be ineligible for other reasons. To determine why an
exercises is ineligible, open its Reason node. One reason could
be that you need to select a device to run the exercise on.
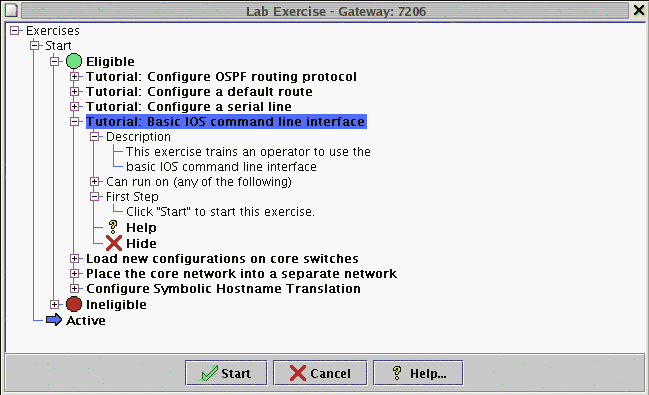
Figure 2 - Lab Exercise Dialog Lab->Info...
The General tab displays detailed information about all devices. The Traps tab allows to enter trap destinations. The Statistics tab displays detailed statistics for the devices present in the lab.
Lab->Troubleshoot...
To aid in troubleshooting, the log window captures the diagnostics output for MIMIC Virtual Lab. All informational and error messages are displayed and output to a file given in the title of the window. This log window or output file should be referred to whenever you have problems with MIMIC.
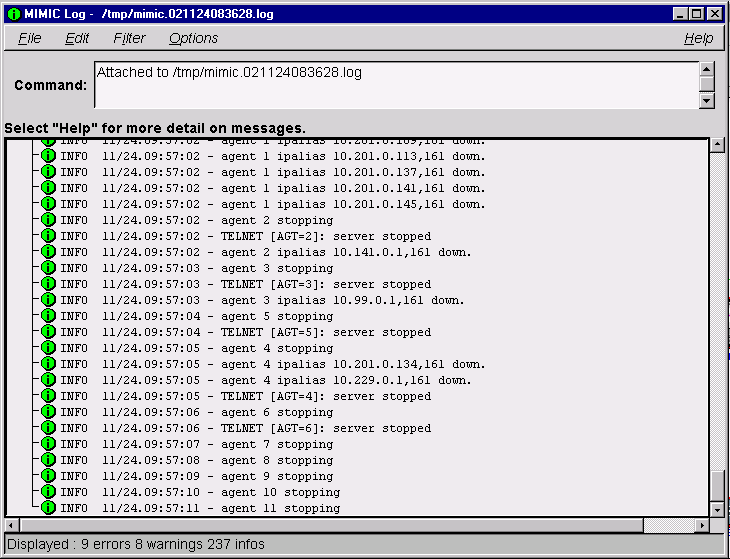
Figure 3 - MIMIC Log Window All log files are placed in /tmp/ and are ordered by date of invocation. The log file contains additional message details, which are filtered out in the log window for legibility.
In the log window, each diagnostic message is listed with the following severities:
-
 INFO - informational message (shows progress,
no impact on correctness of results)
-
 WARN - warning message (some impact on correctness
of results)
-
 ERROR - error message (more impact on correctness of results;
possibly fatal)
NOTE: Severities are subjective under most circumstances. In general, you can ignore warnings, unless your management application relies on correctness of the impacted part of the simulation. Error messages merit closer inspection.
Certain messages are multi-line because the underlying cause of the event is also logged. This leads to more accurate diagnosis of the problem. Multi-line messages are shown with a leading + sign. For legibility the log window shows only the first line of the diagnostic message. The causes of any error message can be expanded by clicking on the + or double-clicking on the message itself.
The log window will be displayed until you select File->Close.
A single selected message or a set of messages can be copied using Edit->Copy and then pasted into other applications. This makes it easy to e-mail related error message information to help Gambit support personnel diagnose your problem.
You can filter out existing messages from being displayed:
-
Filter->Message filters out the individual selected message(s).
-
Filter->Type filters out all messages of the same type as the
selected message(s).
-
Filter->Severity filters out all messages of the same severity
as the selected message(s).
- Filter->Off turns off filtering for selected messages and (re)displays them.
The Options menu lets you change the way the log window behaves. You can turn off the tracking of the end of the log (the "tail") by deselecting the Tail item, and you can turn on the expansion of nested messages with the Nested option.
The most common error messages are listed in Appendix C.
Lab->Addresses...
This menu item will invoke the dialogs to change IP addresses in your lab. This procedure is invoked the first time you run your lab, and should only be performed after that if the selected addresses clash with some part of your network.
Device Menu
Device->Start
This menu item starts the selected device simulation. One would think this is equivalent to powering it up, but it can vary from that:
-
the device may have been running for a while;
-
the device may have loaded a running configuration with the copy
IOS command;
- the device state may have been changed if you saved it from a previous run.
First the device icon border will turn cyan, indicating that the device simulation is starting. When the device icon shows green, the device is fully started and ready to be accessed.
Device->Stop
This menu item stops the selected device, which is equivalent to powering it down, but may do more. When the device icon shows red, the device is fully stopped and cannot be accessed. If its state has changed, you will have the option of saving this state so that on the next start you can continue as if it had never been stopped.
Device->Console...
You can use this menu item to conveniently log into the device. The console client window pops up and you can login to the device. The console client attempts to simulate as closely as possible the real-world behavior of the console port.
Device->Telnet...
You can use this menu item to conveniently telnet into the device. The telnet client window pops up and you can login to the device. Of course you can use any other telnet client to access the device.
Device->Info...
This menu item displays more information for the selected device, such as its interfaces in the General tab, the SNMP attributes (port and community strings) in the SNMP tab, and telnet attributes (user and password for the different IOS modes) in the Telnet tab.
Device->MIB...
This dialog visualizes the MIB of the selected device. It shows a MIB Browser on the left, which displays a tree diagram of the MIB object hierarchy. Each node in the tree is either a subtree or a leaf MIB object.
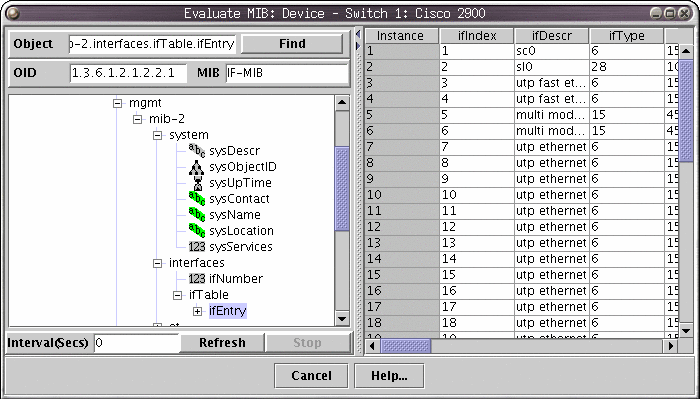
Figure 4 - Device MIB Dialog You can open subtrees in the hierarchy by double-clicking on branch nodes that are preceded by a plus (+) box, or by single-clicking on the plus box itself. You can close subtrees by single-clicking on the minus (-) box before a branch node.
MIB object leaf nodes contain information for the object. A symbol denotes the type of the MIB object. These are the currently displayed object types:
 - Integer
 - OctetString
 - Counter, Counter64
 - Gauge
 - IpAddress
 - OBJECT IDENTIFIER
 - TimeTicks
 - SNMPv1 Trap
 - SNMPv2 Trap
 - Address
 - BITSTRING
 - NetAddress
 - Opaque
In addition, the color indicates the access to the object:
- gray - read-only, not-accessible, accessible-for-notify
- green - read-write, write-only
- yellow - read-create
You select a MIB object by clicking on the leaf node in the tree.
You can type a object name in the Object field, and click the Find button to directly select it.
For example, for the outgoing octets counter of a network interface you would use ifOutOctets.
The right side contains a matrix, which displays all columns in a MIB table, or scalar objects underneath a branch. Clicking (Shift-left mouse button) on the top row expands or contracts the width of a row between 3 possible states: wide enough to display all values in the column, 10 characters wide, contracted. Clicking on a value has no effect - the edit mode is allowed to inspect the entire value.
To redisplay the value (eg. to monitor increasing Counter objects), just click on the object and the values will be updated.
Connection Menu
Connection->Disconnect
This menu item disconnects the link. This is analogous to unplugging a cable at either end, or physically cut it. The MIMIC Virtual Lab will attempt to simulate this condition just like in the real world. The link will be shown with a dashed line.
Connection->Connect
This menu item reconnects the disconnected link. This is analogous to plugging the cable in at both ends.
Connection->Remove
This menu item removes the selected link. This is analogous to removing the cable entirely. The difference between disconnecting and removing the cable is that the latter allows connecting a different cable to a different port to either end.
Connection->Add
Selecting an unused port (ie. no cable connected to it) and clicking this menu item highlights all the ports that this port can be connected to. Once you select the second end-point, a cable will be drawn to connect them. Initially the cable will be unplugged, but you can reconnect it to gain connectivity between the ports.
Help Menu
Help->Contents...
Help->Update...
This menu item invokes the Update Wizard.
-
Introduction
The Update Wizard makes it easier to update to newer versions of MIMIC over the Internet, or to install optional software from CD-ROM. It automatically notifies you of new software updates, and presents a friendly front-end to install them.MIMIC Virtual Lab will notify you of the availability of new updates of MIMIC. This occurs whenever you start MIMIC Virtual Lab, but at most once a day. MIMIC Virtual Lab will download the MIMIC update database, and check for applicable updates to your software.
If there are new updates, you will be notified with a dialog. This lets you either:
-
update immediately, by invoking the Update Wizard.
-
update later. You have to manually invoke the Update Wizard from
the Help->Update... menu.
- don't notify. This turns off the automatic update notification feature.
First you need to select the source of your update, either from the Gambit Web site, or from CD-ROM. Since the CD-ROM can be at a different directory path on each system, you will need to supply it's location in the Path field.
-
update immediately, by invoking the Update Wizard.
-
the device may have been running for a while;
-
Select Update
A log window similar to the one displayed by Lab->Troubleshoot is displayed which logs all steps taken in the update.
In this dialog, select the update you want to install for your version of MIMIC. If there are no applicable updates, you are done.
Pressing Next downloads the update.
-
Download Images
The update is downloaded from the Gambit Communications Web site. The download progress is displayed on the Status and Progress bars at the bottom.
If the update has already been downloaded, you are asked whether to download again.
If the extraction tools (gzip, tar) are not executable, they are also downloaded.
-
Prepare For Installation
Certain updates need extra preparation to complete the update. This is done here. You will be prompted for any extra steps.
-
Extract Files
Files are extracted from the update. The list of files is displayed for your information.
Pressing Next extracts the contents of the update, and moves files to the shared area. Any existing files are backed up.
-
Move Files
First, the contents of the update are extracted into a temporary directory. Then files are moved from the temporary directory to the shared area.
While files are being moved, the progress is displayed on the Status and Progress bars.
Help->About...
Speed Bar

The Speed Bar provides quick access to the most common commands. The action performed by each button will be displayed in a pop-up window under the Speed Bar when the cursor is positioned over the button.
 Start the
entire lab. This menu item is equivalent to turning on the power for all the
devices in the lab.
  Stop the entire
lab. This menu item is equivalent to turning off the power for all the devices
in the lab.
  Start the
selected device. This menu item is equivalent to turning on the power for
the selected device.
  Stop the
selected device. This menu item is equivalent to turning off the power for
the selected device.
  Telnet to the selected
device. This menu item will open a telnet client window in order to login
to the device.
  Display
values in MIB. This menu item will display a window with a MIB Browser on
the left and a matrix that displays all columns in the MIB table on the right.
 Display help contents. This menu
item displays the online help and revision information.
Display help contents. This menu
item displays the online help and revision information.Java Configuration
MIMIC needs to know about the Java Runtime Environment (JRE) installed on your machine. It attempts to detect it in the default paths, but you may have to point it to the correct location (bin/ subdirectory of the JRE install area).


