MIMIC® Online Documentation
MIMIC SNMP Agent Simulator Guide
-
Table of Contents
-
Overview
The MIMIC SNMP Agent Simulator can simulate up to 100,000 SNMP-manageable devices simultaneously. Each device is simulated by an agent instance.
Rules for the SNMP simulation are governed by RFCs 1157 , 1212 for SNMPv1, and RFCs 2578 , 2579 , 2580 , 3413 , 3415 , 3416 , 3417 , 3418 for SNMPv3.
Each agent instance is completely run-time customizable, both on an individual and collective basis. Since MIMIC responds to SNMP queries on any of its configured IP addresses, it looks to the network management application as if it is talking to actual devices.
Users can start the MIMIC SNMP Agent Simulator in two ways:
-
Command line:
In any command shell, start the MIMIC background daemon, e.g.,
mimicd >& /tmp/mimicd.log &Simulations can be controlled in batch mode via the command-line Tcl-based MIMICShell or via programs written in Java, C++, Perl, Python, or PHP .
-
MIMICView
Graphical User Interface (GUI) application:
MIMICView is the graphical front-end to the main three MIMIC tools: Simulator, Recorder and Compiler. It also contains integration for all supported protocols. When you start MIMICView, the MIMIC Simulator will be invoked automatically if it is not already running. A log window will pop up with the output of the MIMIC Simulator daemon mimicd. The daemon will run in the background until explicitly stopped.
The MIMIC SNMP Agent Simulator functions are accessible via the File, Edit, View, Agent and Run menus in MIMICView. The most common tasks are accessible via the icons on the speedbar located below the menubar. Wizards attempt to simplify the most complex tasks.
-
Command line:
-
MIMICView Reference
Startup

Invoke MIMICView from a shell command prompt with
mimicview
or in Windows from the MIMIC Simulator program group in the taskbar, or by double-clicking on the MimicView.bat icon in Windows Explorer.A splash screen will briefly display while MIMIC starts up. If the Simulator is not running, it is invoked and a log window for the Simulator will popup.
Title Bar
The MIMICView front panel will then appear. Its title indicates the host on which the Simulator is running, the user account name, the private directory, the current lab configuration for the user and the current agent map.
Canvas
The main canvas of MIMICView displays a representation of all agent instances currently running in MIMIC - the "running configuration". Each icon shows the type of agent (by image), the state of the agent (by color), its assigned IP address, an abbreviation of the device name it is simulating, and real-time statistics of SNMP PDUs handled per second.
Figure 1: MIMICView Front Panel
In general, the GUI follows the "object/action" paradigm: to accomplish an action, you first select the object you want to act upon, then select the action.
For agent instances, this means you first select the group of agent instances in the main canvas, by either left- clicking on individual icons, or rubber-banding a group of contiguous icons. You can add to your selection of icons with Shift left-click. That way you can select non-contiguous agents as well as contiguous ranges of agents. Icons of selected agent instances are shown with heavy blue borders.
The actions are accomplished by the menus above the main canvas titled File, Edit, View, Agent and Run.
Operations on a single agent can be accomplished by right-clicking directly on the agent icon, which pops up the Agent menu.
Maps
Agents shown in the canvas are contained in maps. By default, agents are placed in the Root map, as shown below.
If you have only a few agents, that will probably suffice, but when you have to control tens of thousands or even 100,000 agents, you will probably want to organize them in maps.
Maps are like the hierarchical folder structure you are probably familiar with. You can add maps with the Edit -> Add -> Map... dialog, and move agents to those maps. The View -> Up, Home, Next, Prev menu items allow you to quickly traverse the history of maps you have viewed.
The next figure shows the default lab configuration that ships with MIMIC of a 25-agent heterogeneous network .
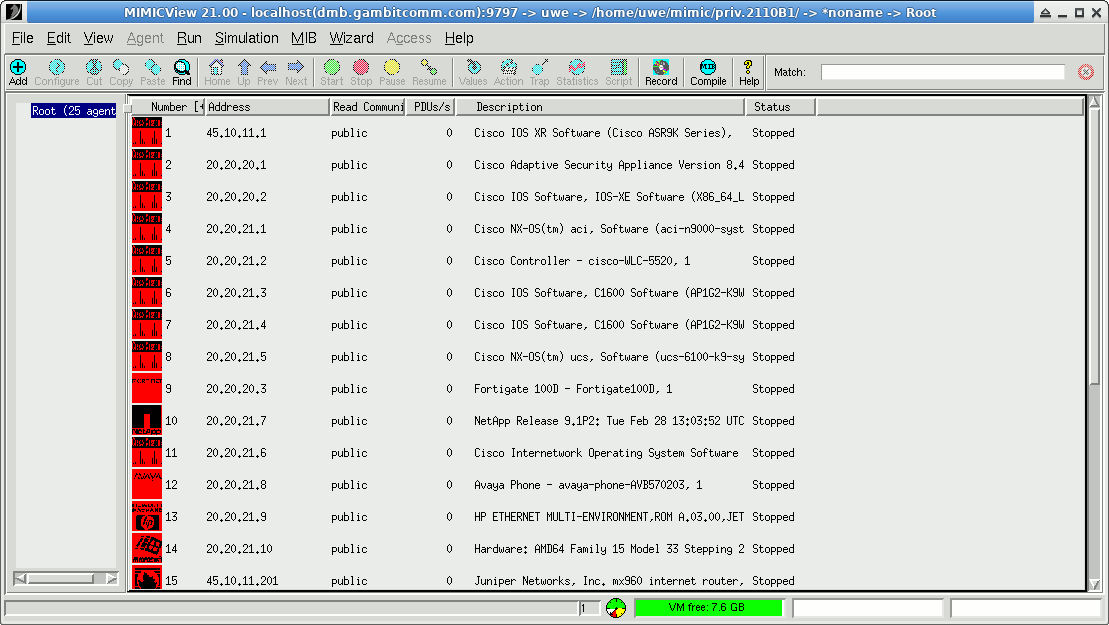
Figure 1b: MIMICView Root map
Status Bar
Underneath the main canvas is a dynamic status bar, with six components:
-
A message area to the left, showing current status messages
-
To its right, a text field showing the number of connected clients.
-
To its right, a dial showing current activity between the MIMIC daemon and any connected clients. This reflects the amount of work the daemon is performing on behalf of clients.
-
To its right, an meter tracking available virtual memory. It turns from green to yellow to red when virtual memory is exhausted. MIMIC will not run if there is not sufficient virtual memory. Consult the platform pages for setting up more swap space.
-
To its right, an activity meter, showing current total SNMP activity (i.e., PDUs / second) at a glance in a logarithmic-scale meter from 0 to 10,000 PDUs per second
-
A progress meter, showing current progress on tasks that take time to accomplish (such as adding lots of agents)
Log Window
A log window pops up whenever you invoke one of the MIMIC tools from MIMICView. The log window captures the diagnostics output for that tool. All informational and error messages are displayed and output to a file given in the title of the window. The log window is displayed automatically when you start MIMICView with a fresh simulator daemon ( see details), You can also display it anytime with File->Log->View. This log window or output file should be referred to whenever you have problems with MIMIC.
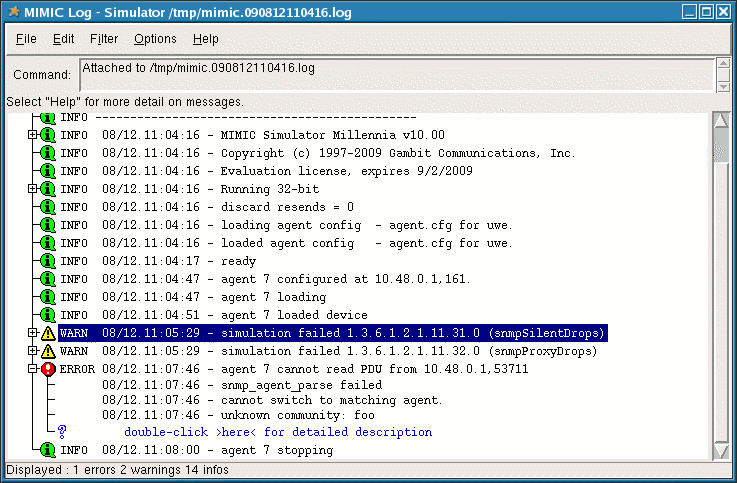
Figure 2: MIMICView Log Window
All log files are placed in /tmp/ and are ordered by date of invocation. The log file contains additional message details, which are filtered out in the log window for legibility.
In the log window, each diagnostic message is listed with the following severities:
-
 INFO - informational message (shows progress,
no impact on correctness of results)
INFO - informational message (shows progress,
no impact on correctness of results)
-
 WARN - warning message (some impact on correctness
of results)
WARN - warning message (some impact on correctness
of results)
-
 ERROR - error message (more impact on correctness of results;
possibly fatal)
ERROR - error message (more impact on correctness of results;
possibly fatal)
NOTE: Severities are subjective under most circumstances. In general, you can ignore warnings, unless your management application relies on correctness of the impacted part of the simulation. Error messages merit closer inspection.
If the log windows resulted from invoking one of the MIMIC tools, you can use File->Stop to stop the invoked tool.
The log window will be displayed until you select File->Close.
A single selected message or a group of messages can be copied using Edit->Copy and then pasted into other applications. This makes it easy to e-mail related error message information to help Gambit support personnel diagnose your problem.
Edit->Find finds the first (or next) occurrence of the specified string.
You can filter out existing messages from being displayed with the Filter menu:
-
Message filters out the individual selected message(s).
-
Type filters out all messages of the same type as the selected message(s).
-
Severity filters out all messages of the same severity as the selected message(s).
-
Off turns off filtering for selected messages and (re)displays them.
This on-line help section is displayed with Help->Contents....
The Options menu lets you change the way the log window behaves. You can turn off the tracking of the end of the log (the "tail") by deselecting the Tail menu item.
Certain messages are multi-line because the underlying cause of the event is also logged. This leads to more accurate diagnosis of the problem. Multi-line messages are shown with a leading + sign. For legibility the log window shows only the first line of the diagnostic message. The causes of any error message can be expanded by clicking on the + or double-clicking on the message itself.
You can turn on the automatic expansion of nested multi-line messages with the Expand submenu:
-
All - expands all messages
-
ERROR - expands only ERROR messages (default)
-
None - does not expand messages automatically, you can expand by clicking on the +
You can limit the number of lines displayed with the Lines... dialog. This is specially useful for large logs.
By default, the log viewer will raise itself to the top of the desktop if a
WARN or ERROR message is logged. This behavior can be changed with
the Raise submenu:
-
WARN if unchecked will not raise the log viewer when a WARN message is logged
-
ERROR if unchecked will not raise the log viewer when an ERROR message is logged
-
Deiconify if unchecked will not deiconify the log viewer when a selected message severity is logged
The most common error messages are listed in Appendix C. When you expand such messages in the Log Viewer, you'll be able to double-click on a hyperlink which will take you to the detailed description.
Menu Bar
File Menu
File->Open...
MIMIC allows you to maintain multiple lab configuration files. All lab configuration files are in the config/agents/ subdirectory. (The location config/agents/ is historical.)
By default, on startup MIMIC loads the last loaded lab configuration for the user into the running configuration.
To load a different lab configuration, use File->Open.... The Load Configuration dialog pops up, allowing you to specify the lab configuration file name. Alternatively, you can browse by clicking the Browse... button, opening the File Browser dialog.
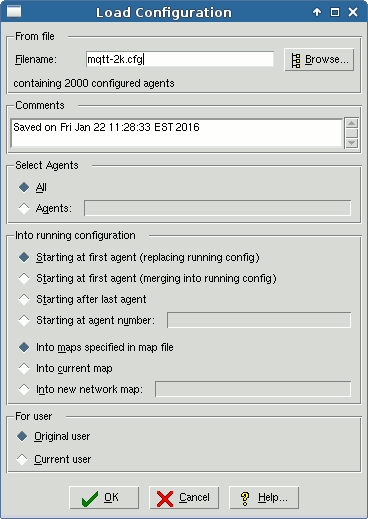
Figure 3a: Load Configuration dialog
The File Browser dialog lets you select a file by browsing through the file space. MIMIC supports two types of files: shared and private. Private files are any files you have changed, e.g., when you save a config file or when you import a MIB. Private files show up in red in the browser. Shared files are located in the installation area and show up in blue .
If you have many files to choose from, you can sort them by Newest modification time instead of Name to show the newest files first.
In addition, you can filter the filename with the Match field, which matches each filename against the regular expression you enter. For example, ^demo matches all files that start with demo.
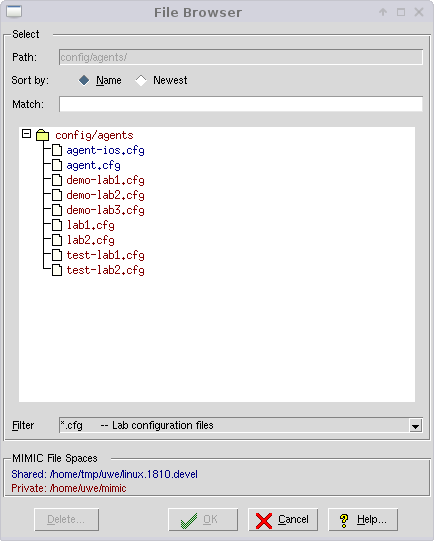
Figure 3b: File Browser
Once you have selected the Filename with the File Browser, the Select Agents field lets you load a specific set of agents from the file to load. By default, the All button is selected and it loads all the agents. Else, if you select the Agents button, the field accepts a comma-separated list of agent ranges, eg. to load agents 2 to 5 and 10 to 20 you would specify 2-5,10-20 .
The Comments field annotates the lab configuration, eg. tells you how and when it was created.
The Into running configuration fields specify different ways to add the agents in the configuration file into the running configuration. You can load agents at the beginning of the running configuration with Starting at first agent (replacing loaded configuration) by default. Thus, it will overwrite all agents that are configured with the agents in the file to be loaded.
The second option Starting at first agent (merging into loaded config) can be used to load agents into the current configuration, but merge in only the specified agents in the file. Empty agents in the file will not clear agents in the current running configuration. For example if you are running agents 1 through 10, and the file to be loaded specifies agents 11 through 20, then only those agents are merged in.
Or, you can add the new agents after the last configured agent with Starting after last agent. The Starting at agent number field allows you to load the new configuration at a specified agent number in the running configuration. To add at a certain spot in the running configuration, you would specify a different starting agent position. Agents are loaded starting at that position. For example, if you specify starting position 11, the first agent in the configuration file is loaded at position 11, then next agent at 12, etc. But NOTE: non-contiguous agent ranges are loaded into non-contiguous positions in the running config, eg. loading agent 2 and 4 starting at position 11 will load agent 2 into position 11, agent 4 into position 13.
By default, the Into maps specified in map file button is selected and the agents will be loaded and any map(s) previously saved with the lab configuration file will be loaded. If there is no map file, then all maps will be removed and the new agents will be loaded into the root map. You can load agents instead into the currently selected map with Into current map, or into a new submap in the current map with Into new network map.
The options under For user control who owns the agents that are loaded into the running configuration. The default, Original user, retains the ownership that was saved for the agent configuration. If you select Current user, then the agents that are loaded will be owned by you and their simulation data will be retrieved from your private data area.
File->New...
This menu item creates a new lab configuration, closing the current running configuration. The Agent field lets you clear only a selected set of agents, eg. 2-5,10-20 .
Running agents will not be cleared. You will be warned in that case, and can stop them with Agent->Stop or Run->Stop.
If you clear all agents, any maps defined in the running configuration are erased, too.
File->Save
Use this menu item to save the current lab configuration .
The Save old file option allows to do file versioning, saving the old version in a folder OLD/timestamp where timestamp is the current time. That way you can always go back to old lab configurations.
Old versioned lab configuration files can be loaded with File->Open the only limitation being that when you save it again, it will not overwrite the old file, instead being saved in the lab configuration folder config/agents/ just as all other lab configuration files.
File->Save As...
This menu item allows you to save all or part of the current agent configuration as a different filename.
The Save Configuration dialog pops up, allowing you to specify the lab configuration file name. Alternatively, you can browse by clicking Browse....
Under Select Agents, if you pick All (the default), then all the agents are saved. This will guarantee that you can load this exact configuration with File->Open.
Alternatively, the Agent field lets you save only a selected set of agents, eg. 2-5,10-20 .
All configured maps are saved in a map file (with the same root as the configuration file, but with .map suffix). For example, if the lab configuration file is test.cfg, then the map file is test.map.
If you select Current map, then only the agents in the current map are saved (as well as in the map file).
You can annotate the configuration in the Comments text input.
File->Log
The File->Log->View menu item lets you view the current simulator log.
In order to manage large log files, you can use File->Log->Save to switch log files. This is also done automatically around every midnight.
The File->Log->Reset Suppressions menu item allows you to reset message suppression in the simulator log. When the MIMICD sees 100 errors of a particular type, it stops reporting them to prevent overwhelming the log with errors. If so, I reports in the log
saw this message 100 times, skipping future occurrences...
When the Log Viewer sees this, it marks it with Suppressions: 1 in the status bar.
You can disable message suppression with the File->Log->Disable Suppressions menu item.
File->Connect...
By default, MIMICView connects to the MIMIC simulator running on the local system. With this menu item you can connect to and control MIMIC simulators running on other systems.
File->Exit
Exiting MIMICView does not stop MIMIC from running. The mimicd daemon will continue running until explicitly stopped, allowing you to continue running a simulation when no GUI interface is needed or desired.
File->Terminate
This menu item terminates MIMIC. All running agent instances are stopped, and the mimicd daemon stops.
If there are any active agents, you should stop them before terminating in order to save any changes to their MIB data.
If there are any other clients connected to the simulator daemon, you should stop them before terminating in order to exit gracefully.
Edit Menu
Edit->Add->Agent...
To add new agent instances, use Edit->Add->Agent....
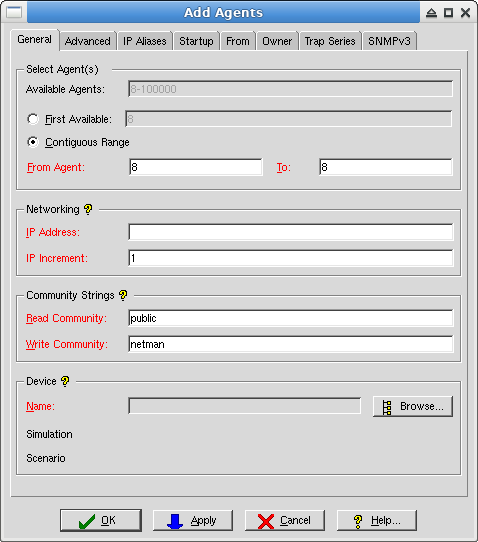
Figure 4: Dialog for Adding Agents
The Add Agents dialog pops up, with the following General configurable parameters (mandatory fields are in red):
-
To select the agents to add you have 2 choices: the first available, or a contiguous range:
From Agent - To -- The range of agent instances to add. By default it is set to the next available agent instance. If you select an incorrect ID, you will get an error dialog such as
Bad value for agent ID: 2 (expected: 1 <= ID <= 1)
This usually means your license does not allow adding more agents. You will have to re-configure an existing agent.
-
IP Address -- This specifies the agent IPv4 address in "dot-value" notation (e.g., 192.9.200.1). Both IPv4 and IPv6 addresses are allowed as the main address of the agent, as well as IP aliases for the agent.
-
IP Increment -- If configuring more than one agent, subsequent agent instances will be assigned an IP address with an offset specified by this number. For example, if the starting address is 192.9.200.1, and the increment is 2, the second instance will be assigned address 192.9.200.3, the third will be 191.9.200.5, and so on. When reaching the end for a IP address field, the least-significant field wraps, and the next higher field is incremented. For example, if the starting address is 192.9.200.254, and the increment is 1, then the next address is 192.9.201.1 (the broadcast address is not assigned).
NOTE: It may be dangerous to assign addresses that are already used by existing devices in your network. This can potentially cause network outage. Make doubly sure that the IP addresses you give to MIMIC agent instances are unique within the network on which MIMIC is running. If you are unsure, please talk to your network administrator first.
NOTE: resolving increments with clashing network and broadcast addresses is non-obvious. The rule is that only addresses at the specified increment are considered, if they are not a network or broadcast address for the given Network Mask parameter. For example, if the starting address is 192.9.200.1, the increment 255, and 3 agents are configured, then only addresses 192.9.200.1, 192.9.202.254 and 192.9.203.253 are used, since addresses 192.9.201.0 and 192.9.201.255 are not valid host addresses.
-
Read Community -- This is the SNMP v1/2c access control parameter for read access to the MIB on the agent. SNMP PDUs of type GET and GETNEXT will only be accepted with this community string. A group of acceptable community strings is separated by "," (comma). Eg. if the agent is configured with public1,public2, it will accept requests with either public1 or public2. A special case is the community string * (i.e., containing a single star character) which will accept any request. By default, agents use the string public.
-
Write Community -- This is the SNMP v1/2c access control parameter for write access to the MIB on the agent. SNMP PDUs of type SET will only be accepted with this community string. By default, agents use the string netman.
-
Device Name -- Browse... -- This button pops up a dialog to select the Device Type of the agent instance, i.e., the MIBs it exports. This dialog is explained in the following section. The Name, Simulation and Scenario are filled in from the device definition you select.
The Advanced page lets you select the advanced parameters of the agent instance:
-
Interface -- On machines with multiple network interfaces, you can select the network interface adapter for the agent instance. An empty field will match the first active NIC on your system (default). The interface name depends on the OS platform:
-
On Solaris, it is the device name as displayed with the ifconfig command. For example, hme0 and hme1 can be used on the machine below:
# ifconfig -a lo0: flags=849
-
On Windows NT, the interfaces can be listed with the ifdiag utility supplied with MIMIC. For example, the adapters RTL80291 and RTL80292 can be used on the machine below:
C:\MIMIC\BIN> ifdiag
$print
System has 2 adapters
--------------------
Adapter [RTL80291] details
  Addresses (1001) :
    [0] - 192.9.200.50,255.255.255.0
    Rest (1000) Mimic Addresses.

  Gateways (1) :
    - 192.9.200.11
Adapter [RTL80292] details
  Addresses (261) :
    [0] - 192.9.201.50,255.255.255.0
    Rest (260) Mimic Addresses.

  Gateways (1) :
    - 192.9.200.11
$quit
Goodbye!
NOTE: on Windows, MIMIC will allow a partial, case-insensitive match. Eg. if your NIC has the name NDIS 4.0 driver, then you can use ndis in the Interface field to match it.
-
-
Port Number -- This field specifies the port at which the agent instance listens for SNMP requests.
-
Network Mask -- The network mask allows you to do subnet masking.
-
Max. PDU Size -- This field specifies the maximum PDU size accepted and sent. PDUs which exceed this size are discarded. The limit for this configurable is 65536, the default is 4500.
-
Protocol -- You can enable a set of protocols for an agent instance. For multi-lingual agents, check off multiple buttons. The currently supported SNMP protocols are:
- SNMPv1
- SNMPv2c
- SNMPv2
- SNMPv3
The default is v1 and v2c.
When you select a protocol, a new tab may be added to the configuration dialog which lets you configure additional protocol-specific parameters. The SNMPv2 tab and SNMPv3 tab are detailed below.
-
Delay -- This parameter specifies the one-way transit delay in msec, to simulate distant nodes. The round-trip delay is twice this value. The minimum granularity is 10 msec.
-
Drop Rate -- You can configure an artificial drop rate (every N-th PDU) to simulate faulty network paths to nodes. The default is no drops.
-
Relative Start Time -- You can have agents starting up as if they had been running for a while. This parameter specifies the time that the agent has been running at startup.
The IP Aliases page lets you add additional IP addresses for the agent instance. The agent will respond to requests on the IP aliases. Each IP alias is an IPv4 or IPv6 address, optionally followed by a port number (default 161), optionally followed by a network mask, optionally followed by the network interface. Each of these parameters is described above, and is separated by a comma. Eg. 192.9.201.6,161
The Startup page lets you customize the agent instance at startup. This is useful if multiple agent instances are running the same simulation. Rather than returning the same values, the startup customization changes each agent to return unique information.
You can select any of the pre-configured startup scripts in the list. Select an entry if you want to run the script at agent startup, deselect if not. If you double-click on any entry, an editor window will open with the source code of the script, allowing you to further customize the startup script. If you do this, be aware that other agent instances may share this startup script. If you require further customization then the scripts provided here, it is advised to use Agent->Action->Start... instead.
Some scripts require one or more optional protocol modules for the agent. If the agent is not running the protocol, then the entry will be disabled and shown in grey.
The From page configures source-address-indexing for an agent instance. Source-address-indexing in effect creates disjoint virtual networks in the simulation from the perspective of different management stations.
It lets you add one or more from entries for the agent. These entries identify a source-address from which the agent will accept requests for processing. Each entry will be composed of an IP address/hostname and/or port number of the source entity (eg. a management application). The IP address can be empty or '0.0.0.0' both of which implies a wildcard ('any') address. Similarly an empty port or '0' both imply a wildcard ('any') port. Both address and port cannot be wildcards. If there are 'from' entries on two agents with identical IP address, port and community/context-engine-id, then the agents will be deemed unique as long as there is at least one 'from' entry on each of these agents and none of the 'from' entries are the same. See also this Frequently Asked Question.
The Owner page lets you review the ownership parameters of the agent instance:
-
Owner -- Displays the user who configured the agent instance. When multiple users are using the same MIMIC daemon, their agents will have different ownership information.
-
Private Directory -- Shows the path to the private area directory for the data of the agent instance.
The Trap Series page configures the trap series configured with the Trap Wizard. You can have the traps generated automatically when the agent starts, or control the trap generation with the Agent -> Trap Series... dialog.
The SNMPv2 page configures SNMPv2-specific parameters for the agent instance. This tab is only visible if you have enabled SNMPv2 for the agent in the Advanced tab.
-
Party Database -- specifies a file containing the party definitions, as detailed in RFC 1445 and 1446.
-
Context Database -- specifies a file containing the context definitions, as detailed in RFC 1445 and 1446.
-
Access Control Database -- specifies a file containing the access control definitions, as detailed in RFC 1445 and 1446.
-
View Database -- specifies a file containing the view definitions, as detailed in RFC 1445 and 1446.
These files are self-documented and editable.
The SNMPv3 page configures SNMPv3-specific parameters for the agent instance. This tab is only visible if you have enabled SNMPv3 for the agent in the Advanced tab.
-
Engine ID -- specifies the snmpEngineID for the agent. It is in ASCII format by default, or hexadecimal format if it starts with \x. If left empty, it defaults to a proprietary engine ID which by default is the same for all agents.
-
Context Engine ID -- specifies the contextEngineID for the agent. It is in ASCII format by default, or hexadecimal format if it starts with \x. If left empty, it defaults to the same value as the Engine ID.
-
USM Database -- specifies a file containing the User-Based Security Model definitions, as detailed in RFC 2574 , then 3414 , then 5590 .
-
VACM Control Database -- specifies a file containing the View-based Access Control Model definitions, as detailed in RFC 2575 , then 3415 .
These files are self-documented and editable.
Device Selection
The Devices dialog lets you assign a device simulation to an agent instance. The dialog lists all the devices that your copy of MIMIC knows about. These include the devices that were preconfigured with the distribution of MIMIC you received, and any devices you have recorded with the MIMIC Recorder or created manually.
Device Catalog
The list of known device simulations is configurable with Simulation->Manage Devices.... In the resulting Edit Devices dialog, you can
-
categorize your devices into any of the categories in the left-hand list;
-
add/delete categories and subcategories;
-
assign labels to device simulations;
-
control the list of simulations, MIBs and scenarios that get loaded for a specific device simulation; and
-
add descriptive notes to the simulation.
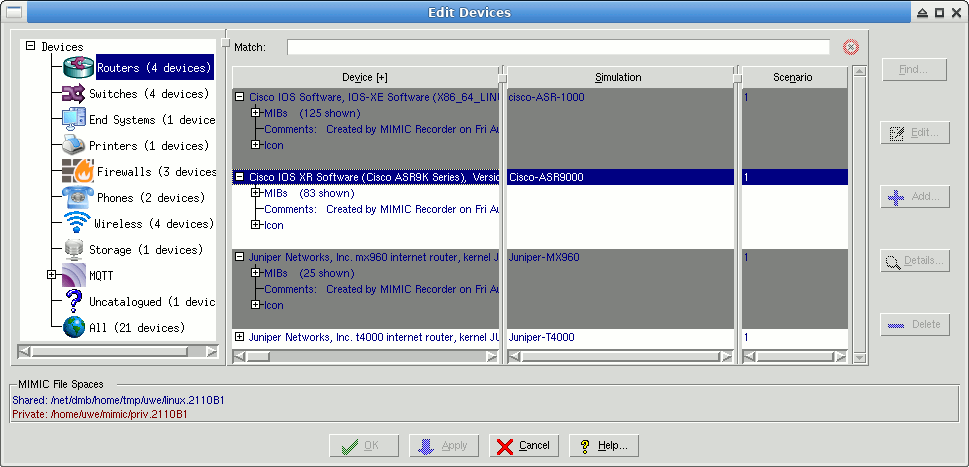
Figure 4-2: Manage Devices
The hierarchical list in the left-hand pane shows the catalog of device categories. If you have many devices, this allows a way of organizing them, so that you can easily find them. We have categorized the sample devices that ship with MIMIC by device type, ie. Routers, Switches, etc. But, you can create any classification you want. For example, you could add a Favorites category, and classify in there the devices you work with most. Or, if you want to classify devices by manufacturer, you can create a By Vendor category, and under it create a category for each of the manufacturers. Or, you could organize by project that you are working on, and create a By Project tree.
All unclassified devices are listed in a category called Uncatalogued. Initially, your newly created devices will be in here, until you classify them. To move a device to a different category, select it under Uncatalogued, right-click then Cut, select the category you want to move it to, then right-click and Paste.
The All category contains a list of all the devices, whether they are classified or not. This allows you to find a device in the global list, if you don't remember where you put it.
The devices that ship with MIMIC are shown in blue, while the devices that you create are shown in red. This is due to the difference between the shared and private data areas. You can only modify a device in your private data area, ie, if it is shown in red.
To add/remove categories, use the right mouse-button click in the categories pane, and use the Add... or Delete menu items of the popup menu. This allows you to customize the categories to your taste. To move a device to a category, select it under Uncatalogued, and right-click Cut it. Then right-click Paste it in the desired category.
The list of device simulations is shown on the right with these fields:
-
The Device columns has first the name that determines the user-friendly label that is shown in the MIMICView main canvas. This is only a convenience for the user, and is not used internally by the simulator. Underneath is a MIBs node that can be opened to display the MIBs simulated in this device as detailed below.
-
The Simulation and Scenario fields are used by the Simulator to find the simulation data.
-
The MIBs selection list determines the set of MIBs in the simulation. You can remove unwanted MIBs from the simulation with the Delete button. If you add a MIB with the Add... button, you need to make sure to provide simulation data for this MIB. To view the selected MIB source code, use the Details... button.
-
The Comments field lets you add comments to the simulation. The MIMIC Recorder places a default comment.
To change a simulation, select it from the selection list. Click the Edit... button to modify the simulation attributes for the selected device. Click Delete to delete the simulation. All changes are applied when you click the OK or Apply button.
The devconf utility allows command-line queries of the device configurations.
Edit->Add->Map...
To add new submaps in the current map, use Edit->Add->Map....
The Identifier field displays the next available map number.
You can select a name for the map in the Description field.
Edit->Configure
Edit->Configure->All...
To re-configure existing agent instances or maps, use Edit-> Configure->All... on the selected agent instance or map icons.
This displays essentially the same dialog as Edit->Add->Agent... or Edit->Add->Map....
NOTE: Currently only the first agent will be modified. There are too many non-obvious side-effects of allowing this dialog on multiple agents.
Edit->Configure->General
Edit->Configure->Advanced
Edit->Configure->Startup...
Edit->Configure->PROTOCOL
The dialogs in these menus configure just one of the configurables for agents from Edit->Configure->All....
The improvement of these dialogs over Edit->Configure->All.... is that they can be invoked on multiple agents.
NOTE: These dialogs can be invoked for any group of selected agents, including non-contiguous agent ranges.
The Agents text entry field by default contains the selected agent(s), but can be changed to any agent range(s). This is specially useful for large groups of agents, eg. 1-100000.
Edit->Delete
This menu item lets you delete the selected agent instances or maps.
NOTE: Only stopped instances will be deleted.
Edit->Cut
You can easily move an existing agent instance or map with this menu item. Use Edit->Paste to paste the cut item into a different map.
Edit->Copy
You can easily duplicate an existing agent instance with this menu item. Use Edit->Paste to create the duplicate. Notice that only the persistent (on disk) simulation data is duplicated. In MIMIC, any changes to a running agent are individual for that agent.
Edit->Paste
Pastes an agent instance or map based on a previous Edit->Cut or Edit->Copy.
If the paste is from an Edit->Cut, then the items are pasted immediately.
If the paste is from an Edit->Copy, then all attributes except IP address are copied. A Paste Agent dialog appears, which works like the Add Agent dialog.
Edit->Find...
This menu item finds agent instances by searching for the specified expression in their configured data.
Only agents in the current map are searched, starting with the first agent in the map. Successively pressing Next or Prev adds the found agent to the selection, so that afterwards something can be done with all the selected agents. When no more agents are found, the Next or Prev button is disabled.
If In Variable Store is selected, then it searches the variables for each agent and their value, too.
Edit->Select
This submenu lets you select different subsets of the configured agent instances in the current map, eg. by range, running status. This is useful if the subset is large, preventing interactive selection on the main canvas . Notice, that the subsets (except for None) are additive, ie. the subset will be added to the already selected agents. If you want to replace the current selection, you have to first clear it with None, then select your desired subset(s). To make this clear, the dialogs will prompt whether you want to clear the selection first.
Edit->Invert Selection
This menu item inverts the selection of agent instances. This easily lets you manipulate all the agents that you have not yet manipulated.
Edit->Trap Destinations...
The Edit->Trap Destinations... dialog lets you configure the global trap destinations. Any traps generated by an agent instance, which does not have its own per-agent trap destination , will be sent to all the global trap destinations.
Each entry is a comma-separated IP address and port number. The default trap port number is 162. A trap destination should specify the host running a management application prepared to receive traps.
Edit->Variable Store...
The MIMIC Variable Store dialog allows you to edit variables in the Variable Store.
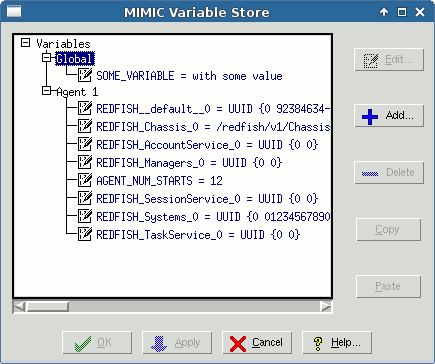
Figure 4-3: Variable Store
View Menu
View->Type
To change the view mode use View->Type. You can change between the Classic, Explorer and 10000-foot view types. The Classic view (Figure 1) presents an icon per agent, just like many large-scale network management applications. Alternatively there is an Explorer view (Figure 5), which presents the information in a format similar to the Windows Explorer. By default, MIMICView will use the Explorer view.
NOTE: For large configurations, eg. between 100 and 1000 agents and more, the Classic view performs substantially better than the Explorer view.
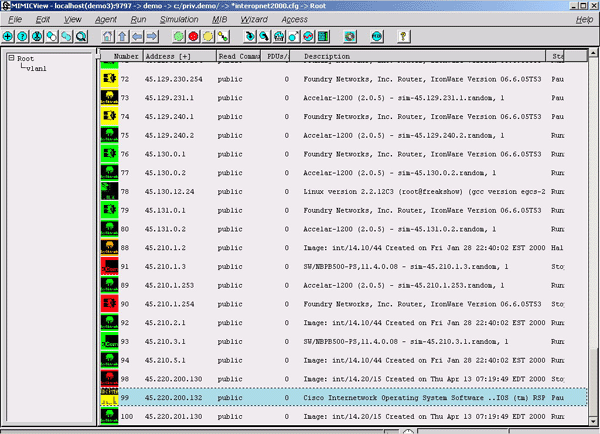
Figure 5: MIMICView Front Panel (Explorer view)
While these 2 views are adequate for simulations up to 1000 agents, a new experimental "10000-foot" view is designed for large-scale simulations, up to 10000 agents visible on a common display. This view will visualize activity patterns on your agents, allowing you to focus your attention on the agents that are being accessed by your management app.
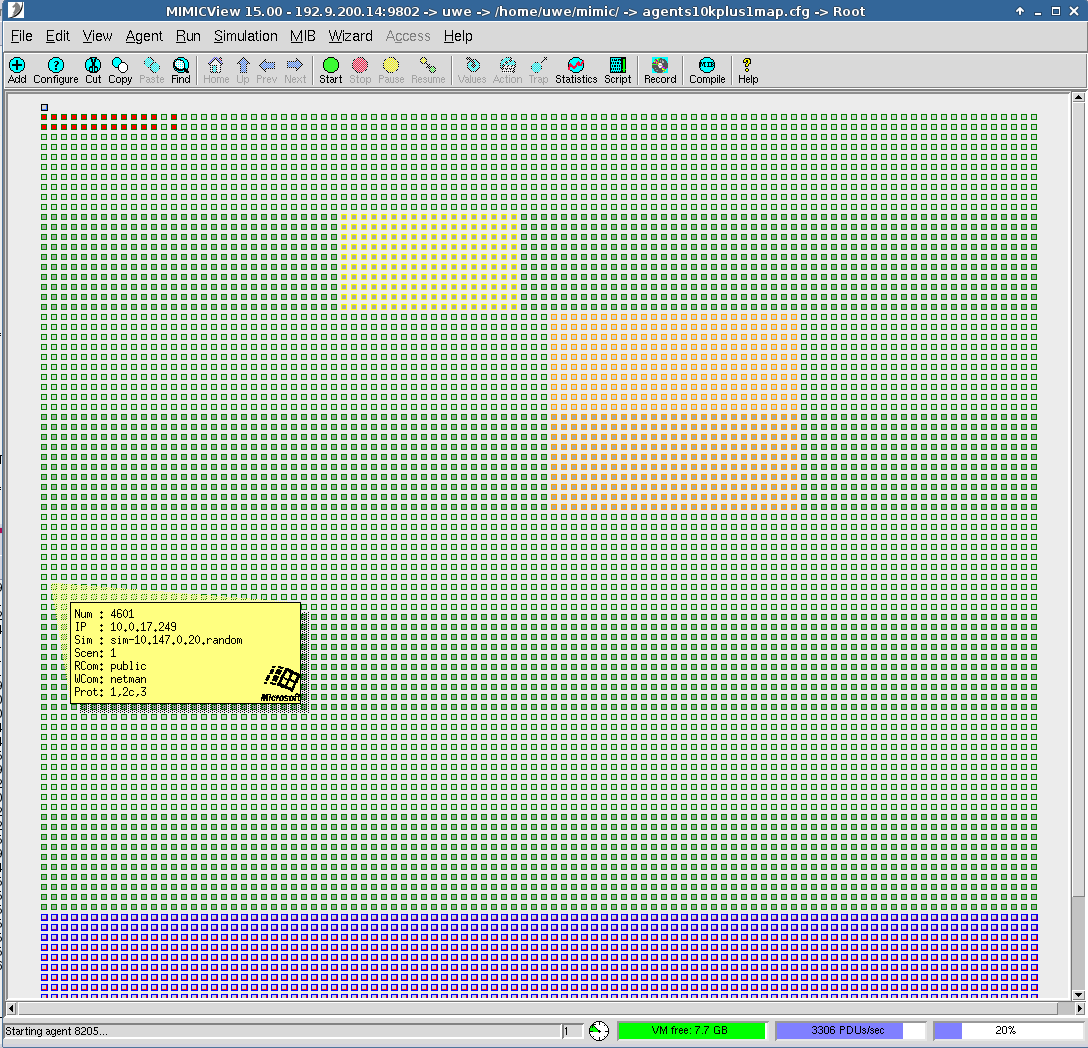
Figure 5-2: MIMICView Front Panel (10000 ft view)
View->Map->Up
MIMIC maintains hierarchical maps of agent instances, which you can traverse by double-clicking on the map icon. To go back to the parent map, use View->Map->Up.
View->Map->Home
View->Map->Previous
MIMICVIew maintains a history of the traversed maps, which you can navigate with View->Map->Previous and View->Map->Next
View->Map->Next
MIMICVIew maintains a history of the traversed maps, which you can navigate with View->Map->Previous and View->Map->Next
View->Map->Goto
You can use this dialog to find an agent by number in any of your maps. It also finds submaps of the current map with the specified name.
View->Refresh
The View->Refresh menu item refreshes the view. Agent icons are drawn in numeric order in the Classic view, and in sort order in the Explorer view.
Agent Menu
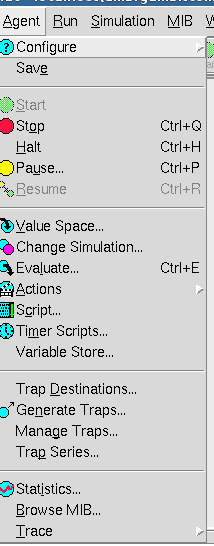
Individual or groups of agent instances can be manipulated with the menu items in the Agent menu. This menu also appears when you right-click on one or more selected agent instances.
Agent->Configure
Agent->Save
This menu item saves the simulation values for the selected agent(s). Any MIB object variables are saved for the simulations running on the selected agent(s). This is different from the File->Save menu item, which saves the current lab configuration .
Agent->Start, Agent->Stop
To start or stop agent instances, first select the desired instances in the main canvas. Then select the Start or Stop menu items. The icons for the agent instances change color as follows:
-
Purple for instances in the process of starting or stopping
-
Green if started successfully
-
Red if stopped
Agent instances that are not selected are unaffected.
You can do certain things, for example, configuration, only on stopped agent instances.
When an agent is started, the simulator runs it's configured agent start action scripts in the STARTED state, after it has done all its configuration (IP addresses, etc), but just before accepting messages to the agent. These scripts are named start.mtcl and start+*.mtcl and reside in the agent's simulation directory. They are executed in alphabetical order (start.mtcl first).
When an agent is stopped, the simulator runs it's configured agent stop action scripts in the STARTED state, just before unconfiguring the agent. These scripts are named stop.mtcl and stop+*.mtcl and reside in the agent's simulation directory. They are executed in alphabetical order (stop.mtcl first). Since the stop action script runs in a critical region, one limitation is that the stop action script must not wait on other agents to stop, because deadlock will occur.
Agent->Halt
Use Agent->Halt to temporarily halt the simulation of the selected agent instances -- they will not respond to any requests, and the simulation will be stopped while the agent is halted. The icon in the main canvas turns orange, to show that the instance is halted.
This is useful if you are investigating a situation with specific agent instances and want to disable others so that they don't interfere. For example, if you are simulating subagents on a device, you can halt some while still running others.
This can also simulate failure of PDU processing of agents, eg. if the agent software is down.
Note that TRAP generation suspends for halted agents.
Halted agents can be restarted with Agent->Resume. The simulation will resume at the point in time at which the agent was halted.
Agent->Pause...
Once an agent instance is running, you may want to investigate certain behavior of a management application at a specific point in time, that is, as if time had stopped. MIMIC allows this by pausing the simulation running on an agent instance. This lets you compare values relative to each other, or even to values retrieved in prior sessions.
To pause agent instance(s), use Agent->Pause... for the selected icon. Pausing an agent freezes time, i.e., sysUpTime does not advance. The Agent Pause dialog pops up, with the following configurable parameters:
-
Now --
Selecting this radio button immediately pauses the agent when you press the
OK or Apply button.
-
Set sysUpTime --
Selecting this radio button allows you to specify the effective time to be
set for the paused agent, i.e., sysUpTime is set to the specified time. This
parameter lets you manipulate time, either into the future or into
the past.
- Days Hours Mins Secs -- This input fields lets you set the effective time for the paused agent. For example, if you set Days to 1, and the rest of the fields to 0, the agent instance will be paused as if it had been running exactly one day.
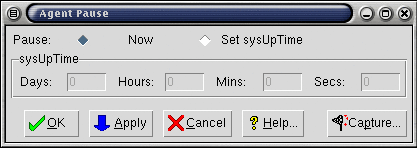
Figure 6: Agent Pause dialog Click OK or Apply to pause the selected agent instance(s). The icon of each paused agent turns yellow to show that it is paused. Paused agents can be resumed with Agent->Resume. The simulation will resume at the point in time at which the agent was paused.
Agent->Value Space...

MIMIC allows you to customize a running basic simulation by manipulating values returned by objects in the Value Space.
You can inspect and change values in the Value Space via Agent->Value Space... for the selected agent icon. A dialog with the title Value Browser pops up with 3 main components detailed below:
- MIB Browser on left
- value matrix on right
- Favorites on bottom
It shows a MIB Browser in the left MIB Object pane, which displays a tree diagram of the MIB object hierarchy. Each node in the tree is either a subtree or a leaf MIB object. The Find button lets you find the object name you typed in the Name field. The Details... button will be enabled if the MIB source file for the currently selected object is available, and lets you inspect the MIB definition for this object.
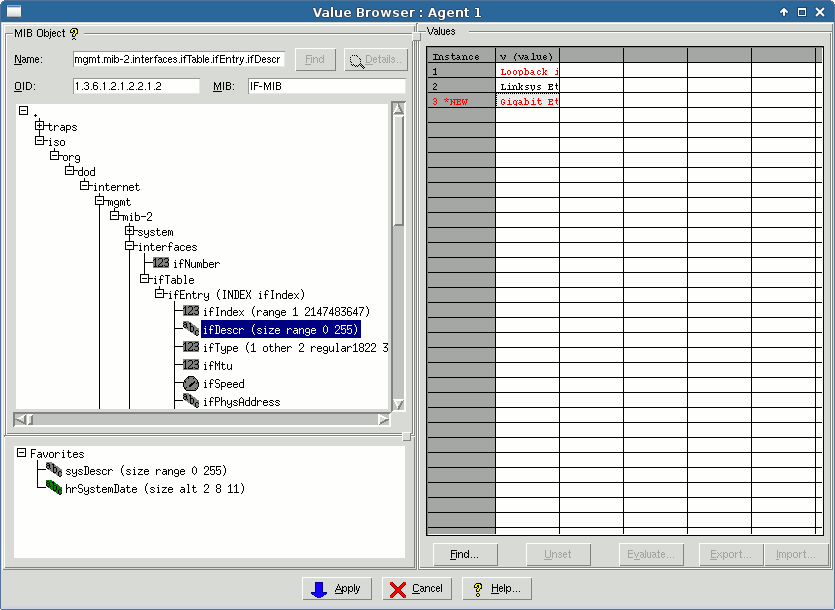
Figure 7: Value Browser
You can open subtrees in the hierarchy by double-clicking on branch nodes that are preceded by a plus (+) box, or by single-clicking on the plus box itself. You can close subtrees by single-clicking on the minus (-) box before a branch node.
MIB object leaf nodes contain information for the object. A symbol denotes the type of the MIB object. These are the currently displayed object types:
-
 - Integer
-
 - OctetString
-
 - Counter, Counter64
-
 - Gauge
-
 - IpAddress
-
 - OBJECT IDENTIFIER
-
 - TimeTicks
-
 - SNMPv1 Trap
-
 - SNMPv2 Trap
-
 - Address
-
 - BITSTRING
-
 - NetAddress
-
 - Opaque
In addition, the color indicates the access to the object:
-
gray - read-only, not-accessible, accessible-for-notify
-
green - read-write, write-only
-
yellow - read-create
You select a MIB object by clicking on the leaf node in the tree.
You can type a object name in the Object field, and click the Find button to directly select it.
For example, for the outgoing octets counter of a network interface you would use ifOutOctets.
The right side displays a value matrix with all instances of an object as rows. The columns list the variables in the Value Space with their value. You can expand and contract columns with Shift left-button-click on the top row. The simulation expression for an object can use any number of variable names, but the basic MIMIC simulation expressions generated by the MIMIC Recorder use some simple conventions:
-
for all MIB objects which are not of type Counter the only variable used in the expression is v (for value).
-
For all objects of type Counter, the variables used in the expression are r (for rate) and tu (for timeunit).
-
For TRAP objects, the variables used in the expression are r (for rate), tu (for timeunit), c (for cutoff-time) and the names of any MIB objects to be sent in the trap.
To change a variable, just select (click) its cell and type the desired value. Use CTL-C to copy the selected text, and CTL-V to paste it. Press RETURN or click another cell to change the value. The value will become red to show its pending status.
As soon as you click Apply the value of the variable will be committed to the Value Space. Subsequent SNMP queries for this MIB object instance will return simulations using the new value.
This is useful to set the status of network interfaces via the ifStatus object, or to change rates of Counter objects in real time.
You can also add and remove MIB table entries for the selected agent. In the Instance column you can specify a MIB object instance index to be added to the table, by typing a value in the row after the last displayed row. Its value will show * NEW and will become red to show its pending status. To delete a row, clear its index number in the Instance column. Its value will show * DEL and will become red to show its pending status.
As soon as you click Apply the changes to the rows will be committed to the Value Space. Subsequent SNMP queries for this MIB table will return simulations using the new instances.
The Unset button unsets the previously set value of the currently selected cell.
The Find... button lets you find instances / values in the grid. Type the search string in the Instance/value field, then press Next or Previous to find the next or previous cell.
For counter objects, the Evaluate... button is a convenience to display the Agent->Evaluate... dialog to show the current simulation values that will be retrieved from the agent.
The Export... button lets you export a table (instances vs. variables) for an object as a comma-separated-value (CSV) file, which can be loaded into any popular spreadsheet programs. This allows you to do more advanced editing, specially for large tables. The Import... button imports the CSV file back into this table.
The Favorites pane underneath the MIB tree allows you to add shortcuts to your favorite MIB objects. To add a favorite, right-click on the MIB object and select Add to Favorites. A left-click on a favorite item will show the values in the value matrix for that object, without moving the position in the MIB tree. A double-click on the favorite item will position the MIB tree at the selected object. Thus you can quickly access your favorite MIB objects.
Agent->Change Simulation...
This menu item allows you to change the running simulation from basic to a pre-configured group of advanced simulations. The advanced simulations are implemented in plug-in scripts that automate the steps you used to do manually to accomplish the same effects.
You can change the simulation of the MIB Objects with Agent->Change Simulation... for the selected agent icon. A dialog with the title Change Simulation pops up. It shows the same MIB Browser on the left as the Value Space dialog above. The MIB Browser allows you to select the MIB object for which to change the simulation.
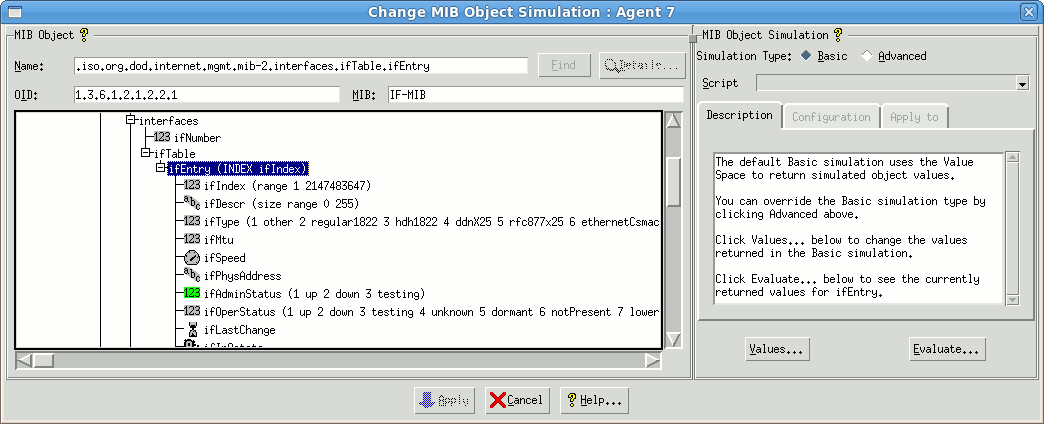
Figure 8: Change Simulation
Once a MIB object is selected, the MIB Object Simulation pane on the right shows the currently configured simulation. By default, this is the basic simulation which returns values directly based on the MIMIC Value Space.
You can change this to an Advanced simulation, which lets you pick from a list of preconfigured advanced simulations for this object from the Script selection list.
The Description tab will describe the currently selected choice, and will guide you through the steps. If the simulation is configurable, the Configuration tab will let you pick the configurable values. The Apply To tab will allow you to deploy this simulation to either
- the selected object
- all the objects of the same type in this object group
- or all objects of the same type in the MIB
The Source tab lets you inspect the source code of the advanced simulation, either to make changes you need or to create new plug-ins.
Agent->Evaluate...
This dialog evaluates the simulations for MIB Object instances for an agent just as if they were returned via SNMP.
The MIB Browser behaves just as for Agent->Value Space....
The right side contains the familiar matrix, which displays all columns in a MIB table, or scalar objects underneath a branch. Shift left-button-click on the top row expands or contracts the width of a row between 3 possible states: wide enough to display all values in the column, 10 characters wide, contracted. Clicking on a value has no effect - the edit mode is allowed only to inspect the entire value.
To redisplay the value (eg. to monitor increasing Counter objects), just click on the object and the values will be updated.
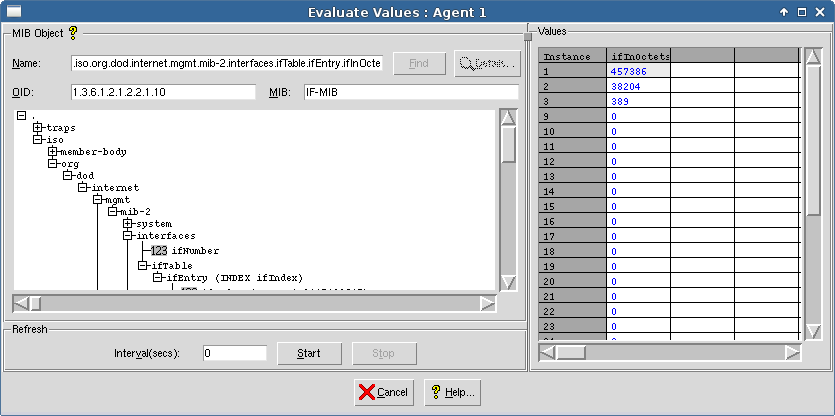
Figure 8-2: Evaluate Values
Agent->Actions
The Agent->Actions menu allows you to setup various action scripts for an agent instance.
Agent->Actions->On GET/SET...
The Agent->Actions->On GET/SET... dialog lets you configure SNMP request action scripts for a MIB object on an agent instance.
An action script is a MIMICShell script file or C++ dynamically loaded library that is executed in the Simulator on certain events. This menu item lets you configure actions to be executed when a MIB object instance is accessed through SNMP requests. A GET action will be executed on GET, GETNEXT or GETBULK requests; a SET action will be executed on SET requests. The exact rules for actions are defined at the end of this section.
-
Agent ID -- Displays the ID of the selected agent.
-
Object -- This field specifies the MIB object to which you want to assign an action. You can either type the MIB object name in the Object field, or browse with the MIB Browser dialog by clicking on Browse....
For example, to assign a SET action to the RMON2 Higher-Level Matrix Control Table RowStatus object, you would use hlMatrixControlStatus.
-
Get script -- Specifies the filename of the GET action script. If you click Browse..., you can browse for the file. The File Browser dialog also lets you create a new script and edit it. To clear the action, clear the text entry field.
-
Set script -- Specifies the filename of the SET action script. If you click Browse..., you can browse for the file. The File Browser dialog also lets you create a new script and edit it. To clear the action, clear the text entry field.
When you click Apply or OK, the action script is associated with this object.
NOTE: The MIMICShell script is cached by the MIMIC daemon. In order to force a reload of the script, you must click Apply or OK after changing it in the editor.
SNMP Request Actions
The action script is executed when an SNMP PDU is processed.
-
For GET* requests, the action script is run after looking up the Value Space, from which the current value is passed into the script. The script has the option of modifying the returned value in the response.
-
For SET requests, the action script is run, then the returned value is stored in the Value Space.
-
For both types of scripts, an error return from the script execution will result in an error response PDU.
Data is exchanged by the MIMIC daemon with the action scripts using a predefined set of global variables, detailed below :
-
gCurrentAgent (IN): This variable is used to pass the number of the agent for which the script is being executed. The first agent is 1.
-
gCurrentRequest (IN): This variable is used to indicate what kind of SNMP request triggered this script. Possible values are SET, GET, GETNEXT, GETBULK and UNKNOWN.
-
gCurrentObject (IN): This variable indicates the MIB object for which the script was invoked. This is a user-friendly name like sysDescr, ifIndex etc.
-
gCurrentInstance (IN): This variable gives the instance for which the script was invoked. This will be 0 for scalar variables and the index value for table variables.
-
gCurrentValue (IN/OUT): This variable is used to pass the current valuespace content for a GET operation and the value to be set for a SET operation. The user can override the value of this variable. For the GET operation, the new user-specified value is sent back, while in case of the SET operation, the new user-specified value is the one that is set.
-
gSharedDir (IN): This variable specifies the shared directory.
-
gPrivateDir (IN): This variable specifies the private directory for the current agent.
-
gOwner (IN): This variable specifies the owner for the current agent.
-
gPduInfo (IN): This variable is used to pass additional PDU information for this action. Currently, this is only a single boolean (0 or 1) which indicates whether this variable is the last in the PDU. This can be used to do special PDU processing for the last variable in a PDU (ie. to approximate multi-stage SET processing).
-
gError (IN/OUT): This variable is primarily used to indicate any SNMP error from the script. When passed in it is always 0 which means no-error. If modified to any other number, this translates to an error condition. The following table lists all error values that the script can return:
SNMP v1/v2/v3
-------------
noError                 0
tooBig                  1
noSuchName              2
badValue                3
readOnly                4
genError                5

SNMP v2/v3
----------
noAccess                6
wrongType               7
wrongLength             8
wrongEncoding           9
wrongValue              10
noCreation              11
inconsistentValue       12
resourceAvailable       13
commitFailed            14
undoFailed              15
authorizationFailed     16
notWritable             17
inconsistentName        18

MIMIC specific
--------------
drop PDU                -1
jump to different OID   -2
set varbind value to
   noSuchObject         -3
   noSuchInstance       -4
All Tcl commands (but no other Tcl extensions) are supported inside a MIMICShell action script. To exit the script, use the return statement instead of exit. The exit statement has no effects for embedded interpreters. In addition to this, a subset of the MIMICShell commands is also available to the user. The following is the list of the commands that can be used from an action script:
mimic get
mimic agent assigned
mimic agent assign
mimic agent start
mimic agent stop

NOTE: the mimic agent stop command will not work in a start action
script since the agent is not running yet when the action script
executes.

mimic agent pause
mimic agent halt
mimic agent resume
mimic agent get
mimic agent mget
mimic agent set
mimic agent mset
mimic agent save
mimic agent ipalias list
mimic agent ipalias add
mimic agent ipalias delete
mimic agent ipalias start
mimic agent ipalias stop
mimic agent store
mimic store
mimic value get
mimic value set
mimic value mget
mimic value mset
mimic value unset
mimic value munset
mimic value eval
mimic value meval
mimic value add
mimic value remove
mimic value pos
mimic value oid
mimic value name
mimic value mib
mimic value info
mimic value list
mimic value instances
mimic value variables
mimic value split
mimic timer script list
mimic timer script add
mimic timer script delete
mimic trap config list
mimic trap config add
mimic trap config delete
gci expr
In addtion, the following MIMICShell commands can ONLY be used in an action script:
-
mimic action version
Returns the SNMP version number. One of 1, 2c, 2 or 3.
-
mimic action auth
Returns the authentication information for the request, for SNMPv1 and SNMPv2c that is the community string, for SNMPv3 that is the user name.
-
mimic action varbinds
List the variable bindings in this PDU. This is provided to be able to process other variable bindings in the same PDU, eg. for semantic checking of other table columns.
-
mimic action reqid
Retrieve the request ID in this PDU.
-
mimic action from
Retrieve the source address in this PDU.
-
mimic action to
Retrieve the destination address in this PDU. This is useful if an agent has IP aliases, and you want to behave differently for each.
-
mimic action jump OID
Jump to a different OID while doing GETNEXT processing. The action script must return -2 in the gError variable. This is a way to violate lexicographic ordering of MIB objects. For example, this script will cause the OID processing to jump to sysName:
mimic action jump 1.3.6.1.2.1.1.4
set gError -2
return
For example, the following script can be associated with a rowStatus variable of a table. When a manager creates a row it initially sets the rowStatus to 2 (createRequest), upon which the agent creates the row and sets it to 1 (valid). Also when the manager sets the rowStatus for a row to 4 (invalid), the agent deletes that row. This can be simulated using the following script
# This action implements generic SNMPv2 RowStatus semantics # minus the error checking. Our assumption is that the # management application works correctly. # value checking if { $gCurrentValue < 1 || $gCurrentValue > 6} { # bad value set gError 3 return } # createAndGo if { $gCurrentValue == 4 } { # set rowStatus to "active" set gCurrentValue 1 return } # destroy if { $gCurrentValue == 6 } { # position at the xxxTable point in the table mimic value pos $gCurrentObject mimic value pos .. mimic value pos .. set entry_name [mimic value list] # delete the row mimic value remove $entry_name $gCurrentInstance return } returnAgent->Actions->Start...
The Agent->Actions->Start... dialog lets you configure startup action scripts for an agent instance. The script will be run at agent startup.
The In Simulation field lets you browse the existing scripts in the agent simulation. The From Template field lets you copy one of the templates from the scripts/ folder.
Agent->Actions->Stop...
The Agent->Actions->Stop... dialog lets you configure stop action scripts for an agent instance. The script will be run at agent stop.
The In Simulation field lets you browse the existing scripts in the agent simulation. The From Template field lets you copy one of the templates from the scripts/ folder.
Agent->Script...
You can run a batch-mode script on the selected agent instance with this menu item. The Agent Script dialog lets you select the script to run, either Tcl-based in a MIMICShell, Perl-based, or Python-based. This script could have been previously generated with the MIMICView script generator.
All Tcl scripts must reside in the scripts/ directory, Perl scripts must reside in the perl/ directory, and Python in the python/ directory. These, and scripts in the other supported languages can be invoked directly from the command line or any other system-supported service (crontab, etc).
A log window will pop up with the output of the MIMICShell scripting tool, mimicsh, mimicsh-perl or python. The script will run in the background until it finishes or is explicitly stopped.
The Arguments field passes optional arguments to the script parser (via the command line option --args).
Agent->Timer Script...
The Agent Timer Scripts dialog schedules per-agent timer-based scripts. The script file has to exist in the simulation directory of the agent, the interval is in msec.
The In Simulation field lets you browse the existing scripts in the agent simulation. The From Template field lets you copy one of the templates from the scripts/ folder.
For more details, see the Timer Scripts section.
Agent->Variable Store...
This is the same dialog as Edit->Variable Store... but it also lets you edit variables of the selected agent(s).
Agent->Trap Destinations...
The Agent->Trap Destinations... dialog lets you configure the trap destinations for an agent instance. Any traps generated by the agent instance will be sent to all its configured trap destinations. This overrides any configured global trap destinations (see Edit->Trap Destinations...).
Each entry is a comma-separated IP address and port number. The default trap port number is 162. A trap destination should specify the host running a management application prepared to receive traps.
Agent->Generate Traps...
The Agent->Generate Traps... dialog lets you generate traps for an agent instance. Any traps generated by the agent instance will be sent to all configured trap destinations in the same address domain (ie. only the subset of IPv4 trap destinations for an IPv4 source agent address, or only the subset of IPv6 trap destinations for an IPv6 source agent address).
-
In the General tab you can specify the:
-
Agent ID for which to generate the traps.
-
Object -- This field specifies the trap object. You can either type the MIB object name in the Object field, or browse with the MIB Browser dialog by clicking on Browse....
For example, for the trap generated when a network interface becomes active you would use linkUp.
-
Rate -- This parameters specifies the number of traps to generate per time unit. For example, if you want to generate 3 traps every 10 seconds, the Rate field should contain 3.
-
Time Unit -- This parameters specifies the frequency with which to generate traps at the specified rate. For example, if you want to generate 3 traps every 10 seconds, the Time Unit field should contain 10.
-
Cutoff Time --
This parameters specifies the time duration for the trap generation. For example, if you want to generate traps for the next 20 seconds, the Cutoff Time field should contain 20.
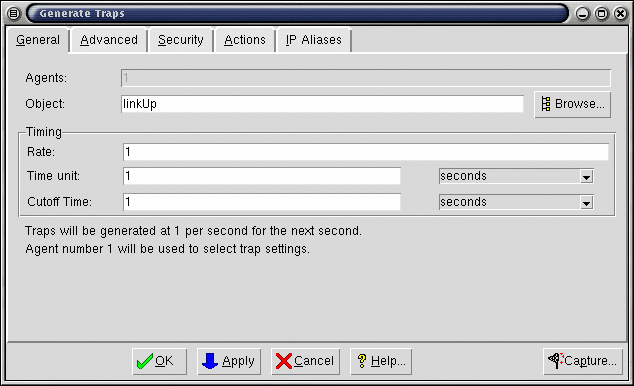
Figure 9: Generate Traps dialog
-
-
In the Advanced tab you can specify the values of any variables to be sent with the trap.
Once you select a variable, you can enter an instance in the Instance (if the variable binding is to be sent with an instance). Then set its value in the Value field, and click Modify to modify its value. Alternatively, if you click Evaluate..., it will invoke the Agent->Evaluate... dialog where you can pick the instance and value. When you dismiss that dialog, those are entered in this dialog.
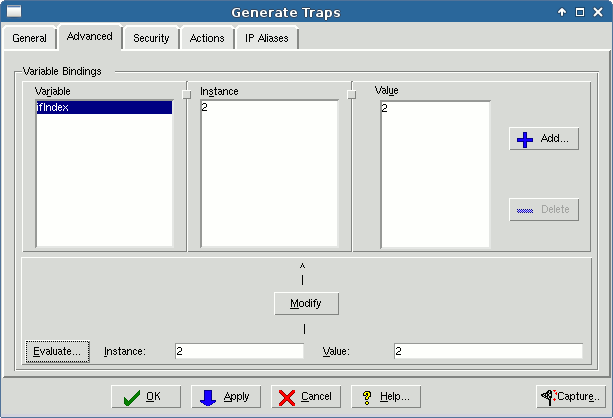
Figure 10: Generate Traps Advanced tab
-
In the Security tab you can specify the SNMP version of the trap PDU and associated security information for the generated trap.
Choose the appropriate SNMP version using the radiobuttons. The security information for different SNMP versions is as follows:
-
For SNMPv1, this is the community string (if specified empty, the read community of the agent), enterprise OID (if empty, the snmpOID or sysObjectID of the agent), and optionally the agent address.
-
For SNMPv2c, this is the community string (by default, the read community string of the agent).
-
For SNMPv2, this is the source and destination party, and the context (no default).
-
For SNMPv3, this is the user name and context (no default).
You can choose to send this trap as a TRAP or INFORM.
-
-
In the Action tab you can specify an action script to be invoked before packaging and sending each TRAP or INFORM request, as well as on response or timeout of an INFORM. This action script could increment a counter, set a variable to a dynamic value (eg. current time, or the value of a counter), etc.
In addition to the global variables
- gCurrentAgent
- gCurrentRequest
- gCurrentObject
- gSharedDir
- gOwner
- gPrivateDir
documented for SNMP Request actions, trap action scripts receive these variables:
-
gStatus (IN): This variable is used to pass the status of the TRAP or INFORM, ie. whether it is before sending the notification (value 0), or on INFORM response (1) or timeout (2).
-
gReqId (IN): This variable is used to pass the request ID of the notification. This can be used to match up INFORM requests and responses.
-
gReportType (IN): For a report, it indicates the type of report with these possible values:
1 == usmStatsUnsupportedSecLevels 2 == usmStatsNotInTimeWindows 3 == usmStatsUnknownUserNames 4 == usmStatsUnknownEngineIDs 5 == usmStatsWrongDigests 6 == usmStatsDecryptionErrors -
gMsgAuthoritativeEngineID (IN): engine id reported by the manager
-
gMsgAuthoritativeEngineTime (IN): engine time reported by the manager
-
gMsgAuthoritativeEngineBoots (IN): engine boots reported by the manager
For example, the inform_action.mtcl script in the scripts/ directory shows an INFORM action script, or the following script increments a global counter, which is sent as someVariable with the myTrap TRAP:
global my_global if { [info exists my_global] } { incr my_global } else { set my_global 1 } mimic value set myTrap 0 someVariable $my_global -
In the IP Aliases tab you can select which of the IP Aliases configured for the agent instance is to send the trap(s).
Click OK or Apply to start trap generation.
There is advanced functionality which is accessible only from the MIMICShell.
Agent->Manage Traps...
The Agent->Manage Traps... dialog allows you to manage the currently active traps, ie. traps that are being generated. Inactive traps which were generated in the past, ie. the cutoff time has expired, will not show up in this dialog.
The list of active traps for the selected agent instance(s) is shown in a hierarchical tree. All relevant information is shown for each trap, such as it's current rate, duration and variables that are sent.
This dialog also lets you cancel any of the active traps.
Agent->Trap Series...
The Agent->Trap Series... dialog controls a trap series configured with the Trap Wizard for an agent.
Figure 10-2: Agent Trap Series
You can click Run to run the sequence of traps at any time. Click Step to send a single selected trap. While a series is generating, click Pause to pause the sequence at the currently selected trap. Click Stop to stop the series.
Agent->Save
If an agent simulation changes during the session, either via SNMP SET requests or through the Value Space dialog, you will be able to save the changed simulation values when you stop the agent. The Agent Stop dialog pops up for every changed agent instance to be stopped, allowing you to save the changes. The Yes to all button lets you save all changed agents, the No to all button lets you ignore all changes. The Cancel button cancels the operation.
The Agent->Save menu item lets you save the changed agent value space data at any time.
Agent->Statistics...
This menu item displays detailed statistics for the currently selected agent instances. This allows quantitative diagnosis of a simulation running on an agent instance. The following SNMP statistics are shown:
-
Total PDUs -- The total number of PDUs processed at the agent instance. This is a sum of the other statistic values.
-
Error PDUs -- The number of PDUs returned with an error indication.
-
Discarded PDUs -- The number of PDUs discarded due to error or retransmit.
-
GET PDUs -- The number of GET PDUs processed.
-
GETNEXT PDUs -- The number of GETNEXT PDUs processed.
-
SET PDUs -- The number of SET PDUs processed.
-
GETBULK PDUs -- The number of GETBULK PDUs processed.
-
TRAP PDUs -- The number of TRAP PDUs generated.
-
GET variables received -- The number of GET variables received.
-
GETNEXT variables received -- The number of GETNEXT variables received.
-
SET variables sent -- The number of SET variables sent.
-
GETBULK variables received -- The number of GETBULK variables received.
-
INFORM PDUs sent -- The number of INFORM PDUs sent.
-
INFORM PDUs resent -- The number of INFORM PDUs that had to be resent.
-
INFORM PDUs timed out -- The number of INFORM PDUs that timed out.
-
INFORM PDUs acked -- The number of INFORM PDUs that were acknowledged.
-
INFORM Report PDUs received -- The number of INFORM Report PDUs received.
In addition, each optional protocol module has its own statistics in a separate tab.
The statistics are refreshed every 5 seconds.
Besides built-in graphing of the selected statistics fields via the Graph... button in the Plot widget, you can graph to Graphite or Grafana by changing the Graph configuraton in Configuration Wizard.
Agent->Trace
The Agent->Trace menu lets you enable or disable tracing on an agent for the supported protocols (SNMP, DHCP, TFTP, TOD). The trace output will appear in the Log Window.
Run Menu
The Run menu allows starting and stopping of the SNMP Agent Simulator, and scheduling of global timer-based scripts.
-
The Start menu item starts all agent instances.
-
The Script... menu item allows you to run a client script, either Tcl-based in a MIMICShell, Perl-based, or Python-based.
All Tcl scripts must reside in the scripts/ directory, Perl scripts must reside in the perl/ directory, and Python in the python/ directory. These, and scripts in the other supported languages can be invoked directly from the command line or any other system-supported service (crontab, etc).
A log window will pop up with the output of the MIMICShell scripting tool, mimicsh, mimicsh-perl or python. The script will run in the background until it finishes or is explicitly stopped.
The Arguments field passes optional arguments to the script parser (via the command line option --args).
-
The Timer Scripts... menu item schedules global timer-based scripts. The script file has to exist in the scripts/ directory, the interval is in msec.
Timer scripts provide an alternative to MIMICShell based poll scripts (which sit in a loop, sleeping and waking up periodically). Typically these are required when the user needs to repeat a task at various time intervals (eg. change various interface utilizations based on the time of the day). Another application of timer scripts is an action that is performed some fixed time after an event.
Since timer scripts run within the simulator, unlike MIMICShell scripts, they execute much faster. Also there is no limit on the number of timer scripts that can be configured at the same time (altough a large number of timer scripts will degrade the performance of the simulations). For more details, see the MIMICShell timer script command.
-
The Script Generator menu item creates a batch script in the desired MIMIC API language, either a Tcl-based MIMICShell script, Perl script, Python script, Java program, or C++ program. The script is generated from the dialogs you use in MIMICView. These scripts can be saved, further customized, and later be used in batch mode in the MIMICShell.
To start the scripting, press the Capture button. To stop it, press the Stop button. To clear the script, press Reset and to save it, press Save....
The following is a current list of dialogs/menu items that can generate scripts:
- Run->Start
- Run->Stop
- Agent->Start
- Agent->Stop
- Agent->Pause
- Agent->Halt
- Agent->Resume
- Agent->Generate Traps
- Edit->Delete
In general, a dialog that can be scripted will contain a Capture... button in the bottom button bar. This button is a shortcut to launch the Script Generator, if it is not already invoked.
Simulation Menu
The Simulation menu provides access to the simulations.
-
The Record Live... menu item creates a simulation by recording a device with the MIMIC Recorder.

Figure 11: Record Live
-
The Record File... menu item lets you create a simulation by recording from a file with the MIMIC Recorder.
-
The Record Traps... menu item invokes the Trap Recorder trapper to capture traps sent from a device. The output of the Trap Recorder will give you the traps in the order they were received, with timestamps (so that you can correctly space the trap generation), and the variables included in the trap PDU.
In the General tab specify the trap port, if different from the standard port 162.
In the Filters tab enter any IP addresses which you want to receive traps from or ignore.
The Trap Wizard supports more advanced ways of recording traps and generating trap playback.
-
The Copy... menu item allows you to copy a device simulation to a new simulation. This in effect duplicates the device. You can then experiment on the new device without affecting the original.
Type the existing simulation name in From or select with Browse.... Type the new simulation name in To, or you can create a new name within the file browser with Browse..., then New....
-
The Manage Devices... menu item lets you review and modify the Device Configuration.
-
The Edit menu item lets you edit a simulation source file. For details see the section on creating a simulation.
-
The Compile... menu item compiles a simulation source file.
-
The Wizards submenu is a shortcut into related wizards in the Wizard menu.
MIB Menu
The MIB menu provides access to loading, compiling and editing of MIB source files. For an overview, see MIB Compilation Process.
-
The Import... menu item imports a MIB source file as detailed in the Compiler Guide.
-
The Compile... menu item compiles a MIB source file as detailed in the Compiler Guide.
-
The Edit... menu item lets you edit a MIB source file as detailed in the Compiler Guide.
-
The Manage MIBs... menu item allows to edit the MIB Directory as detailed in the next section.
-
The Lookup... menu item lets you lookup MIB object information, as detailed in the section on Oid Info. The Details... button will be enabled if the MIB source is available. The MIB source for all pre-compiled MIBs is downloadable via the Update Wizard.
-
The Wizard... menu item is a shortcut into the Wizard->MIB... menu item to invoke the MIB Wizard.
MIB Directory
The Edit MIB Directory dialog is an advanced feature which allows modification of the MIMIC MIB Directory. The MIB Directory is a database (stored in data/mibs/mimic.dir), which maps OIDs to MIBs. This is the database that lets MIMIC decide for example that the OID 1.3.6.1.2.1.1 is in RFC1213-MIB. The MIB Directory is built by compiling MIB source files using the MIMIC Compiler. MIMIC does not know about a MIB until it is compiled with the MIMIC Compiler into the MIB Directory.
You would use this dialog to remove unwanted MIBs or change the order of compiled MIBs for object resolution. We recommend you do this after consultation with Gambit Technical Support.
On the left side you can manipulate the list of MIBs. The MIB directory lists the MIBs in order of compilation. The MIBs that come pre-compiled with MIMIC are shown in blue, while the MIBs that you compiled are shown in red. Your compiled MIBs in the private data area show first. This is due to the difference between the shared and private data areas. You can only modify MIBs in your private data area, ie, if it is shown in red.
As a convenience, you can find MIBs by name with the Find... button. In the Find MIBs by name dialog enter parts of the MIB name, and press Next or Previous to search forwards or backwards. If the MIB is found, the found MIB is selected.
The Up or Down buttons in the left pane reorder the selected MIB in the list. The Delete button removes the selected MIB from the directory. The Modify button modifies the MIB with the changes in the right pane.
The right side of the dialog lists the details about the selected MIB. The interesting part is the list of "TOPOIDS", which are the "top" trees of the MIB. MIMIC can quickly map an OID to a MIB by checking which "top" trees they are under. The MIMIC Compiler stores these automatically when a MIB is compiled, but in rare circumstances you can add top OIDs, remove them or reorder them.
Wizard Menu
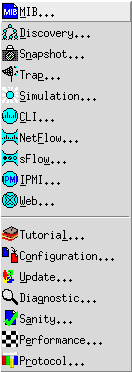
The Wizard menu provides access to the MIMIC Wizards detailed in the MIMIC Wizards Guide.
-
The MIB... menu item invokes the MIB Wizard.
-
The Discovery... menu item invokes the Discovery Wizard.
-
The Snapshot... menu item invokes the Snapshot Wizard.
-
The Trap... menu item invokes the Trap Wizard.
-
The Simulation... menu item invokes the Simulation Wizard.
-
The CLI... menu item invokes the CLI Wizard.
-
The NetFlow... menu item invokes the NetFlow Wizard.
-
The sFlow... menu item invokes the sFlow Wizard.
-
The IPMI... menu item invokes the IPMI Wizard.
-
The Web... menu item invokes the Web Wizard.
-
The Configuration... menu item invokes the Configuration Wizard.
-
The Update... menu item invokes the Update Wizard.
-
The Diagnostic... menu item invokes the Diagnostic Wizard.
-
The Sanity... menu item invokes the Sanity Wizard.
-
The Performance... menu item invokes the Performance Wizard.
-
The Protocol... menu item invokes the Protocol Wizard.
Access Menu
 The Access menu allows the MIMIC administrator to configure
agent access control.
It is disabled for all other users.
The Access menu allows the MIMIC administrator to configure
agent access control.
It is disabled for all other users.
-
The Load... menu item allows to load a different access control configuration at run-time. This is useful, if your agent access control needs change over time. For example, the development team may have most of the agents in the morning, while the QA team has most of them in the afternoon.
-
The Edit... menu item allows to edit the currently loaded access control parameters.
-
The Save and Save As... menu items allow to save the currently loaded access control configuration.
Speed Bar

The most common actions have been included on the Speed Bar. The action to be performed by each button will be displayed as a hint in the status bar message area when the cursor is positioned over the button.
 Add Agent Instances...
Opens the Add Agents dialog box, which allows you to add and set
the parameters of one or several new agent instances
(shortcut to
Edit->Add->Agent...
).
Add Agent Instances...
Opens the Add Agents dialog box, which allows you to add and set
the parameters of one or several new agent instances
(shortcut to
Edit->Add->Agent...
). Configure Agent Instances...
Opens the Configure Agents dialog box, which allows you to change
the parameters of the selected agent instance(s)
(shortcut to
Edit->Configure...
).
Configure Agent Instances...
Opens the Configure Agents dialog box, which allows you to change
the parameters of the selected agent instance(s)
(shortcut to
Edit->Configure...
). Cut Agent Instances...
Moves the selected agent instance or map
(shortcut to
Edit->Cut
).
Cut Agent Instances...
Moves the selected agent instance or map
(shortcut to
Edit->Cut
). Copy Agent Instances...
Duplicates the selected agent instance or map
(shortcut to
Edit->Copy
).
Copy Agent Instances...
Duplicates the selected agent instance or map
(shortcut to
Edit->Copy
). Paste Agent Instances...
Pastes an agent instance or map based on a previous Cut or Copy
(shortcut to
Edit->Paste
).
Paste Agent Instances...
Pastes an agent instance or map based on a previous Cut or Copy
(shortcut to
Edit->Paste
). Find Agent Instances...
Finds an agent instance based on a specified
expression in its configured data
(shortcut to
Edit->Find
).
Find Agent Instances...
Finds an agent instance based on a specified
expression in its configured data
(shortcut to
Edit->Find
). Go Home...
Brings you to the top-most home map
(shortcut to
View->Home
).
Go Home...
Brings you to the top-most home map
(shortcut to
View->Home
). Go to the Parent Map...
MIMIC maintains hierarchical maps of agent
instances. This button will bring you to the parent map
(shortcut to
View->Up
).
Go to the Parent Map...
MIMIC maintains hierarchical maps of agent
instances. This button will bring you to the parent map
(shortcut to
View->Up
). Back in Map history...
MIMIC maintains a history of the traversed
maps. This button will bring you to the previous map in the history
(shortcut to
View->Previous
).
Back in Map history...
MIMIC maintains a history of the traversed
maps. This button will bring you to the previous map in the history
(shortcut to
View->Previous
). Forward in Map history...
MIMIC maintains a history of the traversed
maps. This button will bring you to the next map in the history
(shortcut to
View->Next
).
Forward in Map history...
MIMIC maintains a history of the traversed
maps. This button will bring you to the next map in the history
(shortcut to
View->Next
). Start Agent Instances...
Starts the selected agent instance(s)
(shortcut to
Agent->Start
).
Start Agent Instances...
Starts the selected agent instance(s)
(shortcut to
Agent->Start
). Stop Agent Instances...
Stops the selected agent instance(s)
(shortcut to
Agent->Stop
).
Stop Agent Instances...
Stops the selected agent instance(s)
(shortcut to
Agent->Stop
). Pause Agent Instances...
Pauses the selected agent instance(s)
(shortcut to
Agent->Pause...
).
Pause Agent Instances...
Pauses the selected agent instance(s)
(shortcut to
Agent->Pause...
). Resume Agent Instances...
Resumes the paused/halted agent instance(s) that you have selected
(shortcut to
Agent->Resume...
).
Resume Agent Instances...
Resumes the paused/halted agent instance(s) that you have selected
(shortcut to
Agent->Resume...
). Browse Value Space...
Opens the Value Browser to change the
Value Space
of the selected agent instance(s)
(shortcut to
Agent->Value Space...
).
Browse Value Space...
Opens the Value Browser to change the
Value Space
of the selected agent instance(s)
(shortcut to
Agent->Value Space...
). Evaluate Values...
Opens the Evaluate Values window, which evaluates the simulations for MIB
Object instances for an agent just as if they were returned via SNMP
(shortcut to
Agent->Evaluate...
).
Evaluate Values...
Opens the Evaluate Values window, which evaluates the simulations for MIB
Object instances for an agent just as if they were returned via SNMP
(shortcut to
Agent->Evaluate...
). Actions...
Opens a dialog box, which lets you configure SNMP
request action scripts for a MIB object on the selected agent instance(s)
(shortcut to
Agent->Actions->On GET/SET...
).
Actions...
Opens a dialog box, which lets you configure SNMP
request action scripts for a MIB object on the selected agent instance(s)
(shortcut to
Agent->Actions->On GET/SET...
). Generate Traps...
Opens a dialog box, which lets you generate traps
for the selected agent instance(s).
(shortcut to
Agent->Generate Traps...
).
Generate Traps...
Opens a dialog box, which lets you generate traps
for the selected agent instance(s).
(shortcut to
Agent->Generate Traps...
). Agent Statistics...
Displays detailed statistics for the selected agent instances
(shortcut to
Agent->Statistics...
).
Agent Statistics...
Displays detailed statistics for the selected agent instances
(shortcut to
Agent->Statistics...
). Agent Script...
Opens a dialog box, which allows you to select a batch-mode
script to run on the selected agent instance
(shortcut to
Agent->Script...
).
Agent Script...
Opens a dialog box, which allows you to select a batch-mode
script to run on the selected agent instance
(shortcut to
Agent->Script...
). Record Live Device...
Creates a simulation by
recording a device
with MIMIC Recorder
(shortcut to
Simulation->Record Live...
).
Record Live Device...
Creates a simulation by
recording a device
with MIMIC Recorder
(shortcut to
Simulation->Record Live...
). Compile MIB...
Compiles a MIB source file
(shortcut to
MIB->Compile...
).
Compile MIB...
Compiles a MIB source file
(shortcut to
MIB->Compile...
). Online Help...
Provides access to fully searchable and indexed online help.
Online Help...
Provides access to fully searchable and indexed online help.The Match: field lets you filter the agents in the current map by a regular expression. This is useful if you want to operate on a small subset of the agents. All future selection is done on the matched agents only.
MIMICShell Reference
The MIMIC TCL-based extensions provide an environment for programmatic and batch-oriented control over MIMIC simulations. There are 2 ways to use Tcl-based control over MIMIC:
-
as a MIMIC client from the MIMICShell utility or from another Tcl-based interpreter and the MIMIC package.
The simplest form of programmatic control of MIMIC is through MIMICShell. MIMICShell is a ready-made TCL/Tk-based shell that is invoked from a shell command prompt with
mimicshAll commands in TCL, Tk, TclX, and Tix are supported, as well as the command set to control MIMIC. Just like any other Tcl-based shell, you can dynamically load additional packages (for example, the expect package).
The MIMIC package can be loaded into any TCL-based shell, such as tclsh, wish, wishx, expect, etc. It works with any other TCL extension package, such as itcl, otcl, etc. This way you have even more customization of your scripting environment. The MIMIC package encapsulates the MIMIC command set.
-
as MIMIC actions which are run within the simulator based on a pre-defined set of events.
The MIMIC command set is invoked in either environment with the mimic command.
MIMICShell Hello, World!
The equivalent to the Hello, World! program for MIMIC is to
-
clear the current lab configuration,
equivalent to
File->New,
-
load a new configuration like
File->Open.
, and
- start the first agent.
NOTE: this exercise will clear your lab configuration, so if you have any changes you want to keep, do a File->Save first.
You can accomplish this with these commands typed into the mimicsh:
mimicsh> mimic clear

mimicsh> mimic load agent.cfg

mimicsh> mimic agent assign 1

mimicsh> mimic agent start
While you are doing this, notice how your MIMICview reacts to each command - it synchronizes with the simulator to keep up with the latest state. When the first agent turns green, it has synchronized to your state. You have seen that you can control MIMIC from any number of clients. using the MIMIC API.
You can also do this non-interactively by saving these 4 commands into a file, and running mimicsh with the --script option (the ^D stands for CTL-D):
% cat > hello.mtcl
mimic clear
mimic load agent.cfg
mimic agent assign 1
mimic agent start
^D

% ./mimicsh --nogui --script hello.mtcl
The rest of this section details all the possible options and commands.
MIMICShell Command Line Options
-
--host hostname
Open a session to the MIMIC daemon on the specified host. This is equivalent to the mimic session open command.
-
--agent agent-number
Use specified agent-number as current agent. This agent-number can later be changed with the mimic agent assign command.
-
--script filename
-
--args arguments
Pass the specified arguments to the script. They will be available in the global variables argc and argv. Multiple arguments need to be passed as a list, ie. in curly braces. Eg. --args {arg1 arg2 arg3} . You may have to escape the curly braces in certain shells, such as with single quotes in csh.
The script needs to define argc and argv as globals, such as
global argc
global argv
-
--nosession
Run without opening a session to the MIMIC Simulator daemon. This is useful if you want to open multiple sessions to multiple daemons.
-
--nogui
On Unix, run without requiring an X display. This disables the graphical (Tk) functionality of the MIMICShell.
Interactive Command Line Editing
The MIMICShell on Windows already has command line editing built-in like the DOS command shell. On Unix, you can achieve the equivalent behavior with the rlwrap utility, which on Linux is installable as an extra.
MIMIC Package
In addition to the supplied MIMICShell utility, you can extend any TCL-based shell with the MIMIC extensions. To load the MIMIC package into a shell, do the following:
% set auto_path [linsert $auto_path 0 path-to-MIMIC-installation/lib]
% set auto_path [linsert $auto_path 0 path-to-MIMIC-installation/packages]
% package require Mimic
3.0
# from now on, the MIMIC command set is available, e.g.,
% mimic help
Usage: mimic
        where  is one of
	help
	get
	value
	agent
	trap
	timer
	diag
	session
The following MIMIC command set is implemented:
Global Commands
-
mimic get info
Get information about MIMIC, where info is one of the following:
-
max -- The maximum number of agent instances. See Examples.
-
last -- The last configured agent instance. See Examples.
-
version -- The version of the MIMIC command interface.
-
clients -- The number of clients currently connected to the daemon.
-
cfgfile -- The currently loaded lab configuration file for the particular user. In the case of multi-user access this command returns a different configuration file loaded for each user.
-
cfgfile_changed -- This predicate indicates if the currently loaded lab configuration file has changed since the last time this predicate was queried. This allows for a client to detect lab configuration changes and to synchronize those changes from the MIMIC daemon.
-
return -- The return mode. MIMICShell can operate in two modes: nocatch, where error returns from MIMIC operations return error conditions as a return value; or catch, where the TCL catch semantics are used (these are similar to C++ exceptions). See Examples.
-
configured_list -- The list of {agentnum} that are currently configured. This list is guaranteed to be sorted into increasing order.
-
active_list -- The list of {agentnum} that are currently active (running or paused). This list is guaranteed to be sorted into increasing order.
-
active_data_list -- The list of {agentnum {statistics}} for agents that are currently active and whose statistics have changed since the last invocation of this command. This list is guaranteed to be sorted into increasing order.
-
changed_config_list -- The list of {agentnum} for which a configurable parameter changed. This list contains at most 5000 agent(s), and is guaranteed to be sorted into increasing order.
-
changed_state_list -- The list of {agentnum state} for which the state changed. This list contains at most 5000 agent(s), and is guaranteed to be sorted into increasing order.
-
log -- The current log file for the Simulator.
-
protocols -- The set of protocols supported by the Simulator.
-
interfaces -- The set of network interfaces that can be used for simulations.
-
product -- The product number that is licensed.
-
netaddr -- The network address of the host where the MIMIC simulator is running.
-
netdev -- The default network device to be used for agent addresses if the interface is not explicitly specified for an agent.
-
licensing -- Get MIMIC licensing information.
-
threads -- Get MIMIC threads information.
-
-
mimic mget info+
-
mimic set info value
Set global MIMIC information, where info is:
-
return mode -- The return mode. mode is one of the following: nocatch, where error returns from MIMIC operations return error conditions as a return value; or catch, where the TCL catch semantics are used (these are similar to C++ exceptions). See Examples.
-
log file -- the log file. This changes the current log file for the Simulator. This allows to control the size of the log file by periodically changing it, so that older logs can be manipulated differently from newer logs. For example, a batch job can periodically backup and/or remove log files older than a certain age. By default, the MIMICView GUI changes the log file every day at midnight.
-
netdev device -- The default network device to be used for agent addresses if the interface is not explicitly specified for an agent. This is persistent, ie. it will apply across restarts of the daemon.
-
persistent -- This operation flushes all global objects which need to be made persistent to disk. The MIMIC daemon caches persistent objects and their changes, and writes them to disk at program termination. If it were to crash, these changes would be lost. This operation allows to checkpoint the cache, ie. write changes to persistent objects to disk. To save the lab configuration with per-agent persistent information the mimic save operation needs to be used.
-
-
mimic load file [agent-range] [starting-agent] [merge]
Load the lab configuration file file. Same as File->Open...
The agent-range specifies the agents to load from the file. By default, or if "all" is specified, all agents are loaded.
The starting-agent specifies the relative agent position of the first agent to load in the file. Combined with the agent range, it lets you load any agent in the file at any position. Thus, to load the 6th through 9th agent in the file agent.cfg to the running configuration starting at agent number 100 would be
mimic load agent.cfg 6-9 100
By default, loading starts at agent 1 in the running config.
NOTE: loading a file is remembered persistently, but only if the file is loaded at starting agent position 1. Any other load operation at other relative positions is considered a non-persistent configuration change. Thus, if you want to preserve it you need to explicitely save the changed configuration after loading a config to a starting position other than 1.
The merge indicator specifies what to do with undefined agents in the file to be loaded. If 0 (the default), then agents are cleared in the running config for undefined agents in the file, else if 1 the agent in the running config is untouched.
-
mimic clear [agent-range]
-
mimic saveas file [agent-range]
-
mimic save [agent-range]
-
mimic start
-
mimic stop
-
mimic terminate
Session Commands
-
mimic session open [server-host] [server-port]
Open a session to a MIMIC daemon. All subsequent MIMIC commands control the simulation running on the specified target server-host. If server-host is not supplied, the local host is used. If server-port is not supplied, the default port is used.
-
mimic session close [session-number]
Close a session to a MIMIC daemon. If no session-number is specified, the current session is closed.
-
mimic session assign session-number
Select a session to a MIMIC daemon. The session-number has to be one of the currently open sessions. All subsequent MIMIC commands go to the selected session. This way, multiple sessions can be controlled simultaneously.
-
mimic session assigned
-
mimic session list
-
mimic session properties
Agent Commands
-
mimic agent assign agent-number
-
mimic agent assigned
Return the number of the currently assigned agent. This is the same as the number passed to the --agent option to mimicsh or to the most recent mimic agent assign command. For example:
# do something with agent specified by "new"
proc do_something {new} {
set old [mimic agent assigned]
mimic agent assign $new
# do something with the new agent
#...
# then restore the old agent
mimic agent assign $old
}
-
mimic agent add address triplets
-
mimic agent start
Start the current agent. Same as Agent->Start For speed, this operation will complete asynchronously. A successful return from this command means the starting of the agent is in progress. If you need to rely on the agent to have completed startup, you should wait for it's state to become RUNNING. For example, this code to reliably start agents numbered between START_I and END_I
	for {set agenti $START_I} {$agenti <= $END_I} {incr agenti} {
		mimic agent assign $agenti
		mimic agent start
	}
	for {set agenti $START_I} {$agenti <= $END_I} {incr agenti} {
		mimic agent assign $agenti
		while { [mimic agent get state] != $MimicData::AGENT_RUNNING } {
			sleep 1
		}
	}
for a large number of agents is much faster than this loop
	for {set agenti $START_I} {$agenti <= $END_I} {incr agenti} {
		mimic agent assign $agenti
		mimic agent start
		while { [mimic agent get state] != $MimicData::AGENT_RUNNING } {
			sleep 1
		}
	}
because agent startup happens in parallel in the former case, whereas it is serialized in the latter.
-
mimic agent stop
Stop the current agent. Same as Agent->Stop For speed, this operation will complete asynchronously. The same synchronization considerations apply as in mimic agent start.
-
mimic agent remove
Remove the current agent. Same as Edit->Delete For speed, this operation will complete asynchronously. The same synchronization considerations apply as in mimic agent start.
-
mimic agent pause [when]
Pause the current agent. Same as Agent->Pause If the when argument is supplied, the agent is paused at the specified time (in seconds). For example, if 300 is specified, the agent is paused at 5 minutes.
-
mimic agent halt
-
mimic agent reload
Reload the current agent. This only works for halted agents. The net effect is the same as restarting an agent (ie. stop, start, halt), but without disconnecting the network (and thus existing connections).
-
mimic agent resume
-
mimic agent get info
Get information about the current agent, where info is one of the following:
-
interface -- network interface card for the agent. Same as Edit->Configure.
-
host -- host address of the agent. Currently, only IPv4 addresses are allowed as the main address of the agent, but both IPv4 and IPv6 addresses are allowed as IP aliases for the agent. See Examples.
-
mask -- subnet mask of the agent. Same as Edit->Configure.
-
port -- port number
-
protocol -- protocols supported by agent as a comma-separated list
-
read -- read community string
-
write -- write community string
-
delay -- one-way transit delay in msec. The minimum granularity is 10 msec.
-
start -- relative start time
-
mibs -- set of MIBs, simulations and scenarios
-
sim -- first simulation name
-
scen -- first scenario name
-
state -- current running state of the agent:
0 Unknown
1 Running
2 Stopped
3 Halted
4 Paused
5 Deleted
6 StoppingSee Examples.
-
statistics -- current statistics of the agent instance
The statistics are returned as 64-bit decimal numbers for the following statistics:
-
total PDUs
-
discarded PDUs
-
error PDUs
-
GET PDUs
-
GETNEXT PDUs
-
SET PDUs
-
GETBULK PDUs
-
trap PDUs
-
GET variables
-
GETNEXT variables
-
SET variables
-
GETBULK variables
-
INFORM PDUs sent
-
INFORM PDUs re-sent
-
INFORM PDUs timed out
-
INFORM PDUs acked
-
INFORM REPORT PDUs
The variable binding statistics are meaningful to keep track of the average number of variable bindings per PDU.
See Examples.
-
-
changed -- has the agent value space changed?
-
config_changed -- has the lab configuration changed?
-
state_changed -- has the agent state changed?
-
trace -- SNMP PDU tracing
-
pdusize -- maximum PDU size. The limit for this configurable is 65536.
-
drops -- drop rate (every N-th PDU). 0 means no drops.
-
owner -- owner of the agent.
-
privdir -- private directory of the agent.
-
oiddir -- MIB directory of the agent.
-
validate -- SNMP SET validation policy. Is a bitmask in which with the following bits (from LSB) check for
- type
- length
- range
- access
A default value of 65535 does all validation checking. For examples, see the Frequently Asked Questions.
-
inform_timeout -- timeout in seconds for retransmitting INFORM PDUs. The agent will retransmit INFORM PDUs at this interval until it has received a reply from the manager.
-
inform_retries -- number of retries for retransmitting INFORM PDUs. The agent will retransmit at most this many INFORM PDUs or until it has received a reply from the manager.
-
num_starts -- number of starts for the agent. This count is incremented each time an agent starts. It affects the SNMPv3 EngineBoots parameter.
-
mimic agent mget info agent+
Get information about the specified agents. info has the same choices as the mimic agent get command.
mimic agent set info value
Set information for the current agent. info has the same choices as the mimic agent get command.
mimic agent mset info agent1 value1 ... agentN valueN
Set information for the specified agents. info has the same choices as the mimic agent get command.
mimic agent save
mimic agent ipalias list
Lists all the additional ipaliases configured for the agent. The agent host address (set with mimic agent set host) is not in this list, since it is already accessible separately with mimic agent get host.
mimic agent ipalias add ipaddress[,port[,mask[,interface]]]
Adds a new ipalias for the agent. port defaults to 161 if not specified. mask defaults to the class-based network mask for the address. interface defaults to the default network interface.
If port is set to 0, the system will automatically select a port number. This is useful for client-mode protocols, such as TFTP or TOD. Upon start of an IP alias with a 0 (auto-assigned) port number, its port will change to contain the value of the selected system port.
mimic agent ipalias delete ipaddress[,port]
mimic agent ipalias start ipaddress[,port]
mimic agent ipalias stop ipaddress[,port]
mimic agent ipalias status ipaddress[,port]
Returns the status (0=down, 1=up) of an existing ipalias for the agent. port defaults to 161 if not specified.
mimic agent trap config list
List the set of trap destinations for this agent instance.
Each trap destination is identified with an IP address and a port number. The default port number is the standard SNMP trap port 162. See Agent->Trap Destinations....
mimic agent trap config add destination port
mimic agent trap config delete destination port
mimic agent trap list
List the outstanding asynchronous traps for this agent instance.
mimic agent from list
List the source addresses that the agent will accept messages from. This in effect implements source-address-indexing, where 2 agents with the same address can be configured, each accepting messages from different management stations.
mimic agent from add [ipaddress][,port]
mimic agent from delete [ipaddress][,port]Add/delete a source address that the agent will accept messages from. An empty ipaddress or 0.0.0.0 both imply any address. Similarly an empty port or 0 both imply any port. For agents with source-address-indexing enabled, messages which do not match any source address will be discarded with an ERROR message, similar to community string mismatches.
See Edit->Add->Agent....
Value Space Commands
-
mimic value pos object
Enable MIB browsing of the MIB on the current agent. Set the current MIB position within the MIB hiearchy on the agent. The specified object can be any within the MIB being simulated on the agent instance. This command is similar to the cd or chdir operating system commands to traverse filesystem hierarchies. See Examples.
-
mimic value list
Enable MIB browsing of the MIB on the current agent. Display the MIB objects below the current position (set by the previous command). This command is similar to the ls or dir operating system commands to list filesystem directories. See Examples.
-
mimic value oid object
-
mimic value name oid
-
mimic value mib object
Return the MIB that defines the specified object. This will only return a MIB name if the object is unmistakeably defined in a MIB. See Examples.
-
mimic value info object
Return the syntactical information for the specified object, such as type, size, range, enumerations, and ACCESS. See Examples.
-
mimic value minfo object+
Return the syntactical information for the specified objects, such as type, size, range, enumerations, and ACCESS. This is a performance optimization over mimic value info when information about a number of objects is requested. See Examples.
-
mimic value instances object
Display the MIB object instances for the specified object. This enables MIB browsing of the MIB on the current agent. See Examples.
-
mimic value eval object instance
Evaluate the value of the specified instance instance for the specified MIB object object and return it as it would through SNMP requests. See Examples.
-
mimic value meval [object instance]+
Evaluate the values of the specified instance instance for each specified MIB object object and return it as it would through SNMP requests. See Examples.
-
mimic value variables object instance
Display the variables for the specified instance instance for the specified MIB object object. This enables variable browsing of the MIB on the current agent. See Examples.
-
mimic value split object.instance
Split the numerical OID into the object OID and instance OID. This is useful if you have an OID which is a combination of object and instance. See Examples.
-
mimic value get object instance variable
-
mimic value set object instance variable value
Set a variable in the Value Space. Same as Agent->Value Space.... See Examples.
NOTE: to set a binary string value, specify a string starting with \\x followed by pairs of hexadecimal digits, eg. "\\x 01 23 45".
This command also assigns SNMP PDU action scripts for GET* and SET requests on a MIB object. The instance parameter must be 0. The following variables enable actions:
-
g
The specified TCL script will be run on GET or GETNEXT requests. It has to exist under the simulation directory.
-
s
The specified script will be run on SET requests. It has to exist under the simulation directory.
This command also controls advanced trap generation functionality. The following variables control trap generation:
-
r, tu, c
These variables together represent the rate settings for the trap. r and tu is the actual per second rate and c represents the total duration in seconds for which the trap is sent. As soon as the c variable is set, the trap generation begins, for this reason it should be the last variable set for a particular trap.
e.g : The code below implies 3 traps per 10 seconds for 60 seconds.
    set trap_oid "linkUp"
    mimic value set $trap_oid 0 r 3
    mimic value set $trap_oid 0 tu 10
    mimic value set $trap_oid 0 c 60
The default generation of traps is "asynchronous": you schedule traps at a specific rate for a specific period, and they happen in the background, asynchronously. MIMIC also allows generation of "synchronous" traps, ie. individual traps to be sent immediately. This is accomplished by setting the c variable to contain the letter s. The other 2 variables are ignored in this case, and can be set to anything. The client can verify to make sure the trap got sent by polling the c variable for the value 0.
e.g : The code below sends a single synchronous linkUp trap and does not continue until it is actually sent:
    set trap_oid "linkUp"
    mimic value set $trap_oid 0 r 1
    mimic value set $trap_oid 0 tu 1
    mimic value set $trap_oid 0 c s
    # wait until it is actually sent
    while {[mimic value get $trap_oid 0 c] != "0"} {
    	after 10
    }
The following variables have to be set before setting the c variable to modify the behavior of the generated trap(s).
-
OBJECT
An object name when used as a variable is looked up during the trap send and the value of that variable is included in the PDU.
e.g : The command below will associate '5' as value of IfIndex to be sent in the linkUp trap PDU generated.
mimic value set linkUp 0 ifIndex 5 -
OBJECT.i
This type of variable will be used to assign an optional instance for the specified object in the traps varbind. The value of this variable identifies the index. e.g. The commands below will send ifIndex.2 with a value of 5 in the linkUp trap PDU.
mimic value set linkUp 0 ifIndex 5 mimic value set linkUp 0 ifIndex.i 2 -
i
This variable is used to specify any extra version specific information to the trap generation code. Here is what it can be used to represent for various SNMP versions :
SNMPv1 : [community_string][,[enterprise][,agent_addr]]
SNMPv2c : community_string
SNMPv2 : source_party,destination_party,context
SNMPv3 : user_name,contexte.g. The command below will associate "mycommunity" as community and "1.3.6.1.4.1.1000.1" as the enterprise
mimic value set linkUp 0 i "mycommunity,1.3.6.1.4.1.1000.1" -
v
This variable lets the user override the version of the PDU being generated. The possible values are - "1", "2c", "2" and "3".
e.g. The command below forces the linkUp trap to be generated as a v2c.
mimic value set linkUp 0 v 2c -
o
This variable is used for traps that need extra variables to be added to the PDU along with the ones defined in the MIB as its variables. This lets the user force extra objects (along with instances if needed). All variables to be sent need to be assigned to the o variable.
E.g. the commands below force an ifDescr object with the linkUp trap being sent out with instance as 7 and value as "MyInterface".
    mimic value set linkUp 0 o "ifDescr"
    mimic value set linkUp 0 ifDescr "MyInterface"
    mimic value set linkUp 0 ifDescr.i 7
The commands below force the ifDescr object as above and the ifType object with instance 7 and value "6".
    mimic value set linkUp 0 o "ifDescr ifType"
    mimic value set linkUp 0 ifDescr "MyInterface"
    mimic value set linkUp 0 ifDescr.i 7
    mimic value set linkUp 0 ifType "6"
    mimic value set linkUp 0 ifType.i 7
NOTE: if multiple additional varbinds referring to the same object need to return different instances and values, they have to be specified in the form [INDEX]OBJECT, where INDEX is a small integer, and OBJECT is the name or OID of the object. Eg. the commands below send 3 additional varbinds for the ifAdminStatus object with the linkDown trap:
set linkDown 1.3.6.1.6.3.1.1.5.3 1.3.6.1.6.3.1.1.5.3 mimic value set $linkDown 0 o {[1]ifAdminStatus [2]ifAdminStatus [3]ifAdminStatus} mimic value set $linkDown 0 {[1]ifAdminStatus.i} 11 mimic value set $linkDown 0 {[1]ifAdminStatus} 1 mimic value set $linkDown 0 {[2]ifAdminStatus.i} 12 mimic value set $linkDown 0 {[2]ifAdminStatus} 2 mimic value set $linkDown 0 {[3]ifAdminStatus.i} 13 mimic value set $linkDown 0 {[3]ifAdminStatus} 3 -
O
To omit any variables which are defined in the MIB you can use the O (capital o) variable. This needs to be set to the list of OIDs of the variable bindings in the order defined in the MIB.
E.g. the commands below omit the ifIndex object from the linkUp trap.
mimic value set linkUp 0 O "1.3.6.1.2.1.2.2.1.1" -
ip
The variable ip is used for generating the trap from the N-th IP alias address.
E.g. the command below generates the linkUp trap from the 2-nd IP alias.
mimic value set linkUp 0 ip 2 -
a
This variable associates an action script to the trap or INFORM request. The action script specified in the value of this variable has to exist in the simulation directory. It will be executed before each instance of the trap is sent out.
e.g. The command below causes the linkUp.mtcl action script to be executed for each linkUp trap being sent out.
mimic value set linkUp 0 a "linkUp.mtcl" -
I
This optional variable controls the generation of INFORM PDUs. An INFORM is sent only if the variable is non-zero, else a TRAP is generated.
e.g. The command below causes the linkUp even to be sent as an INFORM.
mimic value set linkUp 0 I 1 -
R, T, E
This variable associates an action script to the INFORM request. The action script specified in the value of this variable has to exist in the simulation directory. The action script associated with the R variable will be executed on receiving a INFORM RESPONSE, the one associated with the T variable on a timeout (ie. no response), the one associated with the E variable on a report PDU.
e.g. The command below causes the linkUp-response.mtcl action script to be executed for each linkUp INFORM RESPONSE received.
mimic value set linkUp 0 R "linkUp-response.mtcl" -
eid.IP-ADDRESS.PORT
control variable allows to configure message authoritative engine id for the destination specified by IP-ADDRESS and optionally by PORT.
e.g. to setup the engine ID for destination 10.10.1.1, you would use
mimic value set linkUp 0 eid.10.10.1.1 "\\x80 00 00 00 20 40 ab cd ef"or if you had multiple trap receivers at that IP address, and you wanted to further discriminate by port
mimic value set linkUp 0 eid.10.10.1.1.9999 "\\x50 FF 20 40 ab cd ef" -
eb.IP-ADDRESS.PORT
control variable allows to configure message authoritative engine boots.
-
et.IP-ADDRESS.PORT
control variable allows to configure message authoritative engine time.
-
g
-
mimic value mget [object instance variable]+
Get multiple variables in the Value Space. This is a performance optimization of the mimic value get command, to be used when many variables are requested.
-
mimic value mset [object instance variable value]+
Set multiple variables in the Value Space. This is a performance optimization of the mimic value set command, to be used when many variables are to be set.
-
mimic value unset object instance variable
Unset a variable in the Value Space in order to free its memory. Only variables that have previously been set can be unset.
-
mimic value munset [object instance variable]+
Unset multiple variables in the Value Space. This is a performance optimization of the mimic value unset command, to be used when many variables are to be unset.
-
mimic value add object instance+
Add an entry to a table. The object needs to specify the MIB object with the INDEX clause, usually an object whose name ends with Entry. See Examples.
-
mimic value remove object instance+
Remove an entry from a table. The object needs to specify the MIB object with the INDEX clause, usually an object whose name ends with Entry. See Examples.
-
mimic value state get object
mimic value state set object 0 | 1Get/set the state of a MIB object object. To disable traversal into a MIB object and any subtree underneath, set the state to 0, else set the state to 1. By default, traversal is enabled into all MIB objects. See Examples.
Variable Store Commands
The Variable Store sits in the middle of the MIMIC storage hierarchy. Whereas the fast Value Space is directly related to simulations and MIB objects, and only accessible while agents are running; and whereas slower files can be used for larger storage, the Variable Store can efficiently store/retrieve variables, either global or per-agent. It can be used at any time that MIMIC is running. The variables in the Variable Store are analogous to "environment variables" in shells. Global variable store variables are accessible everywhere, but per-agent variables are only accessible for the currently assigned agent (see mimic agent assign).
Variables can be either persistent or non-persistent. Non-persistent variables are forgotten on simulator termination. Persistent variables are stored across invocations of the simulator, ie. they are persistent even after termination of the simulator. Global persistent variables are automatically stored upon simulator termination, but the lab configuration has to be saved in order to store per-agent persistent variables.
-
mimic [agent] store set var value [persist]
mimic [agent] store append var value [persist]These commands allow the creation of a new variable, or changing an existing value. The append sub-command will append the value to an existing variable, or create a new one. The set sub-command will overwrite an existing variable, or create a new one. The optional persist flag can be used to indicate if the variable is to be persistent as described above. By default a value of '0' will be implied for the persist flag. To avoid mistakes, for existing variables the persist flag can only be set. If you want to reset it, you first need to unset the variable. See Examples.
-
mimic [agent] store lreplace var index value
mimic [agent] store mlreplace [var index value]+These commands treat the variable as a list, and allow to replace an entry in the list at the specified index with the specified value. The variable has to already exist. See Examples.
-
mimic [agent] store unset var
Deletes a variable which is currently defined. This will cleanup persistent variables if needed. See Examples.
-
mimic [agent] store get var
Fetches the value associated with a variable. The value will be returned as a string (like all Tcl values). See Examples.
-
mimic [agent] store mget [var]+
Fetches the value associated with a list of variables. The value will be returned as a list of strings (like all Tcl values). See Examples.
-
mimic [agent] store exists var
This command can be used as a predicate to ascertain the existence of a given variable. It returns "1" if the variable exists, else "0". See Examples.
-
mimic [agent] store persists var
This command can be used as a predicate to ascertain the persistence of a given variable. It returns "1" if the variable is persistent, else "0". See Examples.
-
mimic [agent] store list
This command will return the list of variables in the said scope. The list will be a Tcl format list with curly braces "{}" around each list element. These elements in turn are space separated. See Examples.
-
mimic agent store copy other
Timer Script Configuration Commands
Timer scripts provide an alternative to MIMICShell based poll scripts (which sit in a loop, sleeping and waking up periodically). Typically these are required when the user needs to repeat a task at various time intervals (eg. change various interface utilizations based on the time of the day). Another application of timer scripts is an action that is performed some fixed time after an event.
Conceptually, rather than doing a busy-wait loop like
	while { 1 } {
		# STEP 1: do some periodic task

		# STEP 2: optionally re-adjust the period, eg. $milliseconds

		# if done, break
		if { $milliseconds == -1 } {
			break
		}

		# delay for specific milliseconds, eg. $milliseconds
		after $milliseconds
	}
you would schedule a timer script that does STEP 1 and STEP 2. Notice that the busy-wait loop performs the task immediately, then periodically thereafter, and timer scripts are designed to do exactly this.
Since timer scripts run within the simulator, unlike MIMICShell scripts, they execute much faster. Also there is no limit on the number of timer scripts that can be configured at the same time (altough a large number of timer scripts will degrade the performance of the simulations).
A global timer script can be added using either the mimic timer script add command or by adding an entry to timerscripts.cfg in the config directory before starting the MIMIC daemon. Per- agent timer scripts can be manipulated with the equivalent mimic agent timer script commands.
When a new timerscript is added the user can associate a timer-interval with it (in msec). This is the default interval after which the script will be invoked. (NOTE: Only one timer script is executed at a given point of time so scripts that take a long time to complete will hinder the execution of other scripts).
All timer scripts are invoked immediately, and periodically thereafter. You can use state variables (a global variable, MIMIC store variable, etc) to determine first immediate invocation vs. successive invocations. The sample timer scripts in the scripts/ folder illustrate this.
If the timer interval is -1 then the script gets invoked only once. This interval can be changed from within the script itself when it is being executed. The current value of interval is passed to the script as a global variable gNextInterval. The script can change this variable to some other interval. If it is set to -1 then the script is not executed again. The script can also be stopped by deleting it using the mimic timer script delete command.
In addition to the global variables
- gCurrentAgent
- gSharedDir
- gOwner
- gPrivateDir
documented for SNMP Request actions, timer scripts receive these variables:
-
gNextInterval (IN/OUT): This variable contains the time interval (in msec) that the script will be executed next. If the script sets it to -1, then this timer script will be deleted upon completion.
-
gArguments (IN): any optional arguments to this timer script invocation.
NOTE: timer scripts have the following limitations:
-
timer scripts run in a limited number of threads in the MIMICD daemon.
Each thread handles expired timer scripts in round-robin fashion.
Thus, if a timer script is slow, then all other scripts may be affected
(slowed down). Thus, your timer script should be efficient. In particular,
you should never sleep in your timer script. Also, polling loops
are discouraged. User interaction is not possible.
- although you can exec other programs from timer scripts, the execution of external programs slows down the script. Find a way to use alternatives without the use of exec.
The timer script commands are
-
mimic [agent] timer script list
List the timer scripts currently running along with the their intervals. The command mimic timer script list lists global timer scripts, the command mimic agent timer script list is the per-agent equivalent.
NOTE: Global timer scripts run globally but within them you can address individual agents using 'mimic agent assign'. To schedule timerscripts for an individual agent, use mimic agent timer script.
Each timer script is identified with the script name and an interval at which the timer script is to be invoked. The timer scripts are expected to be located in the scripts directory. See Run->Timer Scripts....
-
mimic [agent] timer script add script interval [arg]
Add a new timer script to be executed at specified interval (in msec) with the specified argument.
-
mimic [agent] timer script delete script [interval] [arg]
Remove a timer script from the execution list. The first scheduled script that matches the script name, and optionally the interval and argument will be deleted.
Trap Configuration Commands
-
mimic trap config list
List the global set of trap destinations effective for any agent instances which do not have their own trap destinations.
Each trap destination is identified with an IP address and a port number. The default port number is the standard SNMP trap port 162. See Edit->Trap Destinations....
-
mimic trap config add destination port
-
mimic trap config delete destination port
SNMPv3 Configuration Commands
The following SNMPv3 command set is available to the user allowing the manipulation of security settings and access to the engine configuration.
-
SNMPv3 Configuration
mimic agent protocol msg snmpv3 get config
Returns the SNMPv3 configuration. Eg.
mimicsh> mimic agent protocol msg snmpv3 get config {engine_id=} {context_engine_id=} {usm_db=v3usm.conf} {vacm_db=v3vacm.conf}mimic agent protocol msg snmpv3 set config [config]
Changes the SNMPv3 configuration. Eg.
mimicsh> mimic agent protocol msg snmpv3 get config {engine_id=} {context_engine_id=} {usm_db=v3usm.conf} {vacm_db=v3vacm.conf} mimicsh> mimic agent protocol msg snmpv3 set config engine_id=12345678 mimicsh> mimic agent protocol msg snmpv3 get config {engine_id=12345678} {context_engine_id=} {usm_db=v3usm.conf} {vacm_db=v3vacm.conf} -
Engine Parameters
mimic agent protocol msg snmpv3 get engineid
For started agents, retrieves the current engineID in use by the snmpv3 module. For stopped agents, this operation is meaningless. If not explicitly set by the user then the autogenerated engineID is returned. The format of the engineID is in the familiar hex format, eg. \x01 23 45 67 89...
mimic agent protocol msg snmpv3 get engineboots
mimic agent protocol msg snmpv3 get enginetime
mimic agent protocol msg snmpv3 get context_engineid
-
User Configuration
mimic agent protocol msg snmpv3 user list
mimic agent protocol msg snmpv3 user add userName securityName authProtocol authKey privProtocol privKey
mimic agent protocol msg snmpv3 user del userName
mimic agent protocol msg snmpv3 user clear
-
Group Configuration
mimic agent protocol msg snmpv3 group list
mimic agent protocol msg snmpv3 group add groupName securityModel securityName
mimic agent protocol msg snmpv3 group del groupName
mimic agent protocol msg snmpv3 group clear
-
SNMPv3 Access Configuration
mimic agent protocol msg snmpv3 access list
mimic agent protocol msg snmpv3 access add groupName prefix securityModel securityLevel contextMatch readView writeView notifyView
mimic agent protocol msg snmpv3 access del groupName prefix
mimic agent protocol msg snmpv3 access clear
-
View Configuration
mimic agent protocol msg snmpv3 view list
mimic agent protocol msg snmpv3 view add viewName viewType subtree mask
mimic agent protocol msg snmpv3 view del viewName
mimic agent protocol msg snmpv3 view clear
-
USM Configuration File
mimic agent protocol msg snmpv3 usm save
mimic agent protocol msg snmpv3 usm saveas filename
-
VACM Configuration File
mimic agent protocol msg snmpv3 vacm save
mimic agent protocol msg snmpv3 vacm saveas filename
Access Control Commands
The following access control command set is available to the administrator to configure agent access control.
-
mimic access get adminuser
Returns the current administrator. If nothing is specified in admin/settings.cfg then returns "".
-
mimic access get admindir
Returns the current admin directory. If nothing is specified in admin/settings.cfg then returns "". If no admin directory is specified then the shared area will be used where needed (e.g. for persistent info, access control data files etc. )
-
mimic access get acldb
Returns the current access control database in use. If nothing is specified then this returns "".
-
mimic access get enabled
Returns the state of access control checking. 0 indicates that it is disabled, 1 indicates it is enabled.
-
mimic access set acldb
Allows setting the name of the current access control database. This will be used for subsequent load and save operations.
-
mimic access set enabled
Allows the user to enable/disable the access control check. 0 indicates disabled, 1 indicates enabled.
-
mimic access load [file]
Loads the specified file for access control data. If filename is not specified then the currently set 'acldb' parameter is used.
-
mimic access save [file]
Saves current access control data in specified file. If filename is not specified then the currently set 'acldb' parameter is used.
-
mimic access list
Returns a Tcl list of lists. Each entry consists of user, agents (in minimal range representation) and access mask (not used currently).
-
mimic access add user agents [mask]
-
mimic access del user
Clears a users entry from access control database. Using '*' for user clears all the users.
Arithmetic commands
This is an extension of the Tcl expr command to perform unsigned long and 64-bit arithmetic.
-
gci expr unsigned expression
-
gci expr 64bit expression
where expression is of the form
operand1 operator operand2
where operand1 and operand2 are numbers and operator is one of
- +
- -
- *
- /
- ==
- !=
- >
- >=
- <
- <=
Examples
This section lists a sample session. The comment lines begin with puts and can be omitted when you try the examples yourself.
% mimicsh mimicsh> puts "------- COMMENT: global commands --------------" ------- COMMENT: global commands -------------- mimicsh> puts "COMMENT: we are running MIMIC Enterprise" COMMENT: we are running MIMIC Enterprise mimicsh> mimic get max 1000 mimicsh> set info [mimic mget max last version clients] {1000} {841} {10.20} {3} mimicsh> set maxagt [lindex $info 0] 1000 mimicsh> set lastagt [lindex $info 1] 841 mimicsh> set myversion [lindex $info 2] 10.20 mimicsh> set numclient [lindex $info 3] 3 mimicsh> puts "COMMENT: we are running $lastagt agents out of $maxagt on MIMIC $myversion and $numclient clients are connected" COMMENT: we are running 841 agents out of 1000 on MIMIC 10.20 and 3 clients are connected mimicsh> puts "------- COMMENT: agent commands --------------" ------- COMMENT: agent commands -------------- mimicsh> set max_agents [mimic get max] 1000 mimicsh> puts $max_agents 1000 mimicsh> puts "COMMENT: but only 5 agents configured" COMMENT: but only 5 agents configured mimicsh> set last_agent [mimic get last] 5 mimicsh> for {set i 1} {$i <= $last_agent} {incr i} { mimic agent assign $i; puts "Agent $i: [mimic agent get host]"} Agent 1: 192.9.201.133 Agent 2: 192.9.201.150 Agent 3: 192.9.201.180 Agent 4: 192.9.201.181 Agent 5: 192.9.201.182 mimicsh> for {set i 1} {$i <= $last_agent} {incr i} { mimic agent assign $i; puts "Agent $i: [mimic agent get state]"} Agent 1: 2 Agent 2: 2 Agent 3: 2 Agent 4: 2 Agent 5: 2 mimicsh> mimic agent assign 1 mimicsh> mimic agent start mimicsh> puts "COMMENT: it takes a while for the agent to start..." COMMENT: it takes a while for the agent to start... mimicsh> mimic agent get state 6 mimicsh> mimic agent get state 6 mimicsh> mimic agent get state 1 mimicsh> puts "COMMENT: duplicate agent 1" COMMENT: duplicate agent 1 mimicsh> set mibs [mimic agent get mibs] cisco-5k.random,RFC1213-MIB,1 cisco-5k.random,IF-MIB,1 cisco-5k.random,EtherLike-MIB,1 cisco-5k.random,FDDI-SMT73-MIB,1 cisco-5k.random,RMON-MIB,1 cisco-5k.random,BRIDGE-MIB,1 cisco-5k.random,cisco/CISCO-STACK-MIB,1 cisco-5k.random,cisco/CISCO-CDP-MIB,1 cisco-5k.random,cisco/CISCO-VTP-MIB,1 mimicsh> puts "COMMENT: concat removes extra white-space" COMMENT: concat removes extra white-space mimicsh> set mibs [concat [eval list $mibs]] mimicsh> mimic agent assign [expr [mimic get last] + 1] mimicsh> mimic agent get state 5 mimicsh> mimic agent add 192.9.201.6 $mibs mimicsh> mimic agent get state 2 mimicsh> puts "COMMENT: since agent 1 has been running, check its stats" COMMENT: since agent 1 has been running, check its stats mimicsh> mimic agent assign 1 mimicsh> mimic agent get statistics 427 1 0 0 426 0 0 0 0 426 0 0 0 0 0 0 0 mimicsh> puts "----------- COMMENT: value space commands -----------------" ----------- COMMENT: value space commands ----------------- mimicsh> mimic value list directory mgmt experimental private mimicsh> mimic value pos mgmt iso.org.dod.internet.mgmt. mimicsh> mimic value list mib-2 mimicsh> mimic value pos mib-2 iso.org.dod.internet.mgmt.mib-2. mimicsh> mimic value list system interfaces at ip icmp tcp udp egp transmission snmp ifMIB mimicsh> mimic value pos ifEntry iso.org.dod.internet.mgmt.mib-2.interfaces.ifTable.ifEntry. mimicsh> mimic value list ifIndex ifDescr ifType ifMtu ifSpeed ifPhysAddress ifAdminStatus ifOperStatus ifLastChange ifInOctets ifInUcastPkts ifInNUcastPkts ifInDiscards ifInErrors ifInUnknownProtos ifOutOctets ifOutUcastPkts ifOutNUcastPkts ifOutDiscards ifOutErrors ifOutQLen ifSpecific mimicsh> mimic value oid ifType 1.3.6.1.2.1.2.2.1.3 mimicsh> mimic value name 1.3.6.1.2.1.2.2.1.3 ifType mimicsh> mimic value mib 1.3.6.1.2.1.2.2.1.3 IF-MIB mimicsh> mimic value mib 1.3.6.1.2.1 {Cannot find mib for object} mimicsh> mimic value mib 1.3.6.1.2.1.2 IF-MIB mimicsh> mimic value info ifAdminStatus readwrite leaf integer enum 3 1 up 2 down 3 testing enabled mimicsh> mimic value minfo ifAdminStatus ifDescr {readwrite leaf integer enum 3 1 up 2 down 3 testing enabled} {readonly leaf octetstring size range 0 255 enabled} mimicsh> mimic value instances sysDescr 0 mimicsh> mimic value eval sysDescr 0 HP LanProbe III Ver. A.01.00, (Boot ROM A.00.01 4M) mimicsh> mimic value meval sysDescr 0 ifSpeed 2 {HP LanProbe III Ver. A.01.00, (Boot ROM A.00.01 4M)} {1000000} mimicsh> mimic value instances ifSpeed 1 2 3 4 mimicsh> mimic value variables ifSpeed 2 v mimicsh> mimic value get ifSpeed 2 v 1000000 mimicsh> mimic value set ifSpeed 2 v 5000 0 mimicsh> mimic value get ifSpeed 2 v 5000 mimicsh> mimic value unset ifSpeed 2 v 0 mimicsh> mimic value get ifSpeed 2 v 1000000 mimicsh> mimic value add ifEntry 7 0 mimicsh> mimic value instances ifSpeed 1 2 3 4 7 mimicsh> mimic value remove ifEntry 2 0 mimicsh> mimic value instances ifSpeed 1 3 4 7 mimicsh> mimic value get ifType 7 v 6 mimicsh> set split [mimic value split 1.3.6.1.2.1.2.2.1.3.7] 1.3.6.1.2.1.2.2.1.3 7 mimicsh> mimic value get [lindex $split 0] [lindex $split 1] v 6 mimicsh> mimic value set ifType 7 v 39 mimicsh> mimic value get [lindex $split 0] [lindex $split 1] v 39 mimicsh> puts "---- enable/disable MIB tree --" mimicsh> mimic agent assign 1 mimicsh> mimic value state get ifTable enabled mimicsh> # press CTL-Z (if your shell has job control, otherwise mimicsh> # invoke in another terminal) to query the agent Suspended % snmpget 192.9.201.133 public .1.3.6.1.2.1.2.2.1.1.1 interfaces.ifTable.ifEntry.ifIndex.1 = 1 % snmpget 192.9.201.133 public .1.3.6.1.2.1.2.2.1.2.1 interfaces.ifTable.ifEntry.ifDescr.1 = sc0 % fg # to resume the MIMICShell mimicsh> mimic value state set ifTable 0 mimicsh> mimic value state get ifTable disabled mimicsh> # press CTL-Z (if your shell has job control, otherwise mimicsh> # invoke in another terminal) to query the agent Suspended % snmpget 192.9.201.133 public .1.3.6.1.2.1.2.2.1.1.1 Error in packet Reason: (noSuchName) There is no such variable name in this MIB. This name doesn't exist: interfaces.ifTable.ifEntry.ifIndex.1 % snmpget 192.9.201.133 public .1.3.6.1.2.1.2.2.1.2.1 Error in packet Reason: (noSuchName) There is no such variable name in this MIB. This name doesn't exist: interfaces.ifTable.ifEntry.ifDescr.1 % fg # to resume the MIMICShell mimicsh> puts "---------------------------- variable store examples" ---------------------------- variable store examples mimicsh> mimic store list mimicsh> mimic store set last_agent [mimic get last] mimicsh> mimic store list {last_agent} mimicsh> mimic store get last_agent 5 mimicsh> mimic store exists last_agent 1 mimicsh> mimic store unset last_agent mimicsh> mimic store exists last_agent 0 mimicsh> mimic store list mimicsh> mimic store set A 1 mimicsh> mimic store get A 1 mimicsh> mimic store mget A {1} mimicsh> mimic store lreplace A 3 4 mimicsh> mimic store get A 1 {} {} 4 mimicsh> mimic store lreplace A 2 3 mimicsh> mimic store get A 1 {} 3 4 mimicsh> mimic store lreplace A 2 5 mimicsh> mimic store get A 1 {} 5 4 mimicsh> mimic store set A "1" mimicsh> mimic store set B "10" mimicsh> mimic store mget A B {1} {10} mimicsh> mimic store mlreplace A 3 4 B 4 50 mimicsh> mimic store mget A B {{1} {} {} {4} } {{10} {} {} {} {50} } mimicsh> set A [lindex [mimic store mget A B] 0] {1} {} {} {4} mimicsh> llength $A 4 mimicsh> mimic store mlreplace A 2 "hello how are you" B 3 "I am fine" mimicsh> mimic store mget A B {{1} {} {hello how are you} {4} } {{10} {} {} {I am fine} {50} } mimicsh> mimic agent assign 1 mimicsh> mimic agent store list mimicsh> mimic agent store set ipaddr [mimic agent get host] mimicsh> mimic agent store list {ipaddr} mimicsh> mimic agent store get ipaddr 192.9.201.133 mimicsh> mimic agent store exists ipaddr 1 mimicsh> mimic agent store unset ipaddr mimicsh> mimic agent store exists ipaddr 0 mimicsh> mimic agent store list mimicsh> puts "---------------------------- catch examples" ---------------------------- catch examples mimicsh> mimic get return nocatch mimicsh> mimic agent assign 2 0 mimicsh> mimic agent start 0 mimicsh> mimic agent start mimic agent: Agent 2 is already running 1 mimicsh> proc a {} {mimic agent start; puts hello} mimicsh> a mimic agent: Agent 2 is already running hello mimicsh> puts "NOTE: the hello statement is executed" NOTE: the hello statement is executed mimicsh> mimic set return catch 0 mimicsh> catch {mimic agent start} msg 1 mimicsh> puts $msg mimic agent: Agent 2 is already running mimicsh> a mimic agent: Agent 2 is already running mimicsh> puts "NOTE: the hello statement is NOT executed" NOTE: the hello statement is NOT executed mimicsh> exitAccess Control
MIMIC is a multi-user simulation environment, and as such provides access control mechanisms to enforce access to the shared resources it provides.
Client Access Control
MIMIC allows access control to limit clients on remote hosts that are allowed to control your simulation. By default, and for backward compatibility, access control is disabled, allowing clients on any remote host to control MIMIC. To enable access control, add any number of lines to the config/mimicd.cfg configuration file of the form
remote_host = HOST
where HOST is a host address specification (FQDN). To allow no remote host to control MIMIC (only clients on the local host), add a line
remote_host = NONE
Agent Access Control
Before MIMIC 5.20 the Simulator did not enforce any user-based access control over agent operations such as addition/deletion/configuration, allowing any user to change any agent instance at will.
This works fine in environments where complete cooperation among users exists. For environments where such cooperation is not possible, this allows for inadvertent (or deliberate) interference. In "production" simulation scenarios, lack of access control is undesirable.
At version 5.20, agent access control assigns each agent instance an owner (or group of owners) who has exclusive access rights to change it. This allows to partition the set of agent instances into mutually exclusive sets of resources.
A special user, called the "MIMIC administrator", can change access control at run-time with the MIMICView Access Menu or MIMICShell Access Control commands. By default, access control is disabled and the user who installed MIMIC is the administrator.
To enable access control, specify the administrative settings at installation time. After installation, you can specify administrative settings by creating/editing the config/admin/settings.cfg file in your installation (shared) area. For example, assuming that MIMIC was installed in /usr/local/mimic, and you want to make the user mimicadmin the administrative user, it should contain
version = 5.20
admin = {
user = mimicadmin
dir = /usr/local/mimic.admin
}
After that, the administrative user mimicadmin can use the Access Menu in MIMICView to configure access control parameters.
Advanced Configuration
Normally you don't need to reconfigure the Simulator. But, sometimes users have special demands on MIMIC, that have to be optimized using extra configuration.
Configurable Number of Management Channels
MIMIC allows to configure the number of management channels for MIMIC clients from the default of 20. To change this limit, add a line to the config/mimicd.cfg configuration file of the form
max_mgmt_connections = N
where N the number of channels you want to allow. Each MIMIC client invocation (MIMICView GUI front-end, Tcl-based MIMICShell, Java, C++ or Perl client) will normally use up one or more of these channels. MIMICView uses one channel per invocation. The other programmable clients will use one channel per open session.
Updates
MIMIC is designed to be frequently updated with the minimal amount of pain. Normally, an update from an old version to a new version is transparent, not requiring any action from the user. This means that your data saved by the old version will be read by either old or new version of MIMIC, and your simulations will work identically in either version (barring fixed bugs).
Only rarely will there be an update procedure visible to the user. If so, the update procedure will be invoked on the first invocation of MIMICView in the new version, informing the user and prompting to complete the update. Below are recent update procedures.
Update to 4.10
The simulation data file hierarchy has changed in version 4.10 to handle special cases for enterprise-specific MIBs. The MIB directory name for enterprise-specific MIBs is now "enterprise"-"MIB". The update step which is invoked the first time you run MIMICView converts your simulation areas to this new naming scheme.
Update to 5.10
With MIMIC v5.10, lab configuration files live in config/agents/. This update moves existing lab configuration files from config/ to config/agents/ .
NOTE: after this update, older versions of MIMIC will not run with these lab configuration files. If you have to downgrade, you can move the files in config/agents/ back to config/ .
Usage Profiling
MIMIC is a complex product consisting of many subcomponents and internal subsystems. Usage profiling lets the Gambit support team empirically determine which subsystems are the most used, and thus the most important. This will let Gambit improve the product, by making better decisions as to which areas benefit most from improvement, or gauging as to how many customers are affected by proposed changes.
Profiling information is constantly collected by MIMIC. This collection is transparent to the end-user. The collected data is deposited in the config/profile/ directory in the private data area. Nothing in the profiling data identifies a particular user or site. The only identifying mark is a timestamp in the ID file, so that multiple profiles from the same site can be aggregated correctly. The timestamp is generated the first time you run MIMIC, and is virtually unique among all users. All files are in ASCII format, ready to be inspected.
This profiling data can optionally be reported to Gambit every so often (we recommend an interval of 30 days). If your MIMIC host is not connected to the Internet, then you should turn profile reporting off.
If you have enabled it (either when prompted or from the Configuration Wizard, the reporting is done automatically via e-mail to a profile collection account at Gambit, or via HTTP to the profile collection page at the Gambit web site. For e-mail to work, your MIMIC host has to be connected to the Internet, and the mail gateway has to be configured with the Configuration Wizard. The e-mail message inherently has some identifying information (such as the hostname where the e-mail originated), but is discarded by the profile collection software (you'll have to take our word for it). For HTTP transfer to work, your MIMIC host has to be connected to the Internet.
Once the profiling data is reported, it is deleted from your private data area, so that new data can be accumulated.
-