Quick Start Guide
-
Preface
This guide is an overview to using MIMIC Simulator. It describes the operations, concepts and processes of MIMIC. Its purpose is to introduce MIMIC's tool suite (see About MIMIC below), which consists of the following components:
- mimicd -- MIMIC Simulator daemon
-
Graphical User Interfaces (GUI)
-
SNMP tools
-
Protocol modules
-
Programming APIs
For SNMP Simulator, it presents the general processes to:
which assumes that you are familiar with networking and network management concepts, particularly Simple Network Management Protocol (SNMP) and Management Information Base (MIB).
For the optional protocol modules, please consult the Get Started pages at our document portal.
If you prefer videos, you can consult our video collection
 .
.
Organization
This guide is organized in the following major sections:
Using MIMICView gives an overview about the native MIMIC GUI and the overall functionality of the product.
Troubleshooting guides you through solving problems with MIMIC.
Important Concepts includes useful definitions.
MIMIC Process Overview presents flow charts to help you understand the process of using MIMIC.
Whenever you see the Youtube logo
 you'll be able to view a video for that section.
Installing MIMIC
Typography Conventions
Normal Text Typewriter Computer output; names of functions and data types Typewriter Interface components; menus, buttons and entry fields Italics Values you can input; variable names, numbers, strings Bold Normal What you have to type correctly, for example, filenames, Unix commands, function names, command-line entries -
Table of Contents
-
Chapter 1: Overview
Chapter Contents
About MIMIC
MIMIC (Multiple Instance Management Information Concentrator) is a software simulation framework of large networking environments for Network monitoring and the Internet of Things , and helps to address the following issues:
- Testing: Crisis situations in your network
- Evaluation: Test before deployment and plan for future growth
- Staff training: Without impacting your live network
- Demonstrating: In an environment familiar to a customer
- Development: Parallel development of SNMP agent and management application
Network management system (NMS) applications typically communicate with many manageable devices.
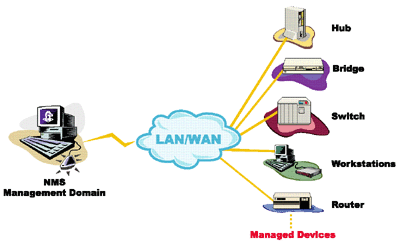
Figure - NMS with devices
To exercise (test, evaluate, train) the application, you would have to set up a lab with a facsimile of the expected environments. This entails such problems as buying all the devices relevant to your application; the interoperability of SNMP agents in various versions; and the nightmare of combinatorial scenarios of different devices and agents. MIMIC Simulator solves all these problems.
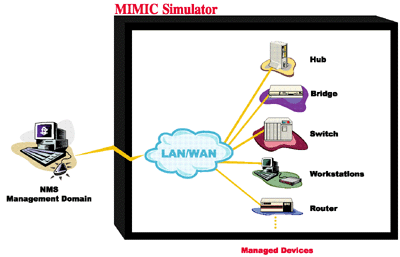
Figure - NMS with MIMIC
The MIMIC SNMP Agent Simulator lets you simulate up to 100,000 SNMP-manageable devices on one Intel-based PC. Your network management application can send SNMP (v1, v2, v2c, v3) requests to the simulated agent, which can return SNMP responses or traps. Any SNMP-based device is supported. You can run a variety of device configurations and customize them at runtime. Because MIMIC responds to SNMP queries on any of its configured IP addresses, it looks to the application as though it was communicating to actual devices.
The MIMIC IOS Simulator adds the capability to respond to Cisco IOS commands over Telnet or SSH. It gives Network Engineers an ability to practice for certifications instead of just reading from the instructions. Included in this simulation are the TFTP and SYSLOG protocols.
The MIMIC WEB Simulator adds WEB Services simulation such as SOAP, XML, JSON and REST via HTTP/HTTPS.
The MIMIC Cable Modem Simulator extends the MIMIC SNMP Agent Simulator with the protocols necessary for simulating cable modems from an Operations Support System (OSS) perspective. The additional protocols are DHCP, TFTP and TOD.
The MIMIC IPMI Simulator simulates the Intelligent Platform Management Interface (IPMI) available on servers.
The MIMIC Proxy Server simulates any number of TCP- or UDP-based services by proxying existing servers.
The MIMIC Netflow Simulator allows simulating large flow-based monitoring environments
The MIMIC sFlow Simulator adds sFlow-based simulation.
The MIMIC MQTT Simulator simulates large MQTT-based sensor networks for the Internet of Things.
The MIMIC CoAP Simulator creates CoAP servers.
MIMIC Tool Suite
MIMIC provides a variety of user interfaces as shown:
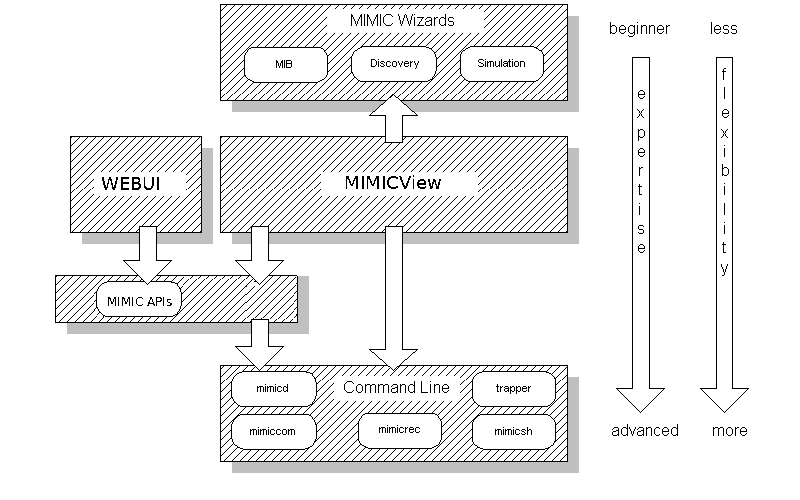
The starting point for most users is MIMICView, the desktop GUI front-end to MIMIC. It provides a graphical interface to virtually all MIMIC functions.
MIMICView can launch the MIMIC Wizards, which provide a powerful, yet user-friendly interface to the most common or most complicated tasks.
An alternate web-based WEBUI provides most of the operational features of MIMICView through most web browsers.
MIMIC contains the following main utilities:
GUIs
mimicview, WEBUI
Simulator daemon
mimicd
SNMP
mimicrec, mimiccom, trapper
WEB
webrec, webpcap, webconv
NetFlow
netflowrec
sFlow
sflowrec
IPMI
ipmiproxy, ipmirec
MQTT
mqttrec, mqttconv
APIs
mimicsh, Python, Perl, Java, C++, Go, PHP, OpenAPI
For most purposes, you can launch all of these utilities, except WEBUI, directly from MIMICView.
-
Chapter 2: Using MIMICView
Chapter Contents
Starting MIMIC

There are several options for controlling the MIMIC Simulator:
-
the MIMICView desktop Graphical User Interface (GUI);
-
the WEBUI web-based GUI;
-
a command-line interface, such as the Tcl-based MIMICShell, the Perl command-line, or the Python command-line.
-
a custom batch-script or application using the MIMIC API, such as Tcl, Perl, Python, Java, C++, or PHP.
This guide will introduce the MIMICView GUI. For detailed information about MIMICView, there will be links to the Simulator Guide, and for details about the scripting interfaces, such as the MIMICShell CLI, reference the other sections of the online help.
MIMICView is a user-friendly GUI for the simulator and most other MIMIC tools. It allows you to start/stop devices, create and modify simulations, view run-time activities, log and statistics, generate traps, compile MIBs, record real devices, control other protocols.
To start the GUI, invoke mimicview either from the MIMIC Program Group, or from the command line. The main front panel will be shown.
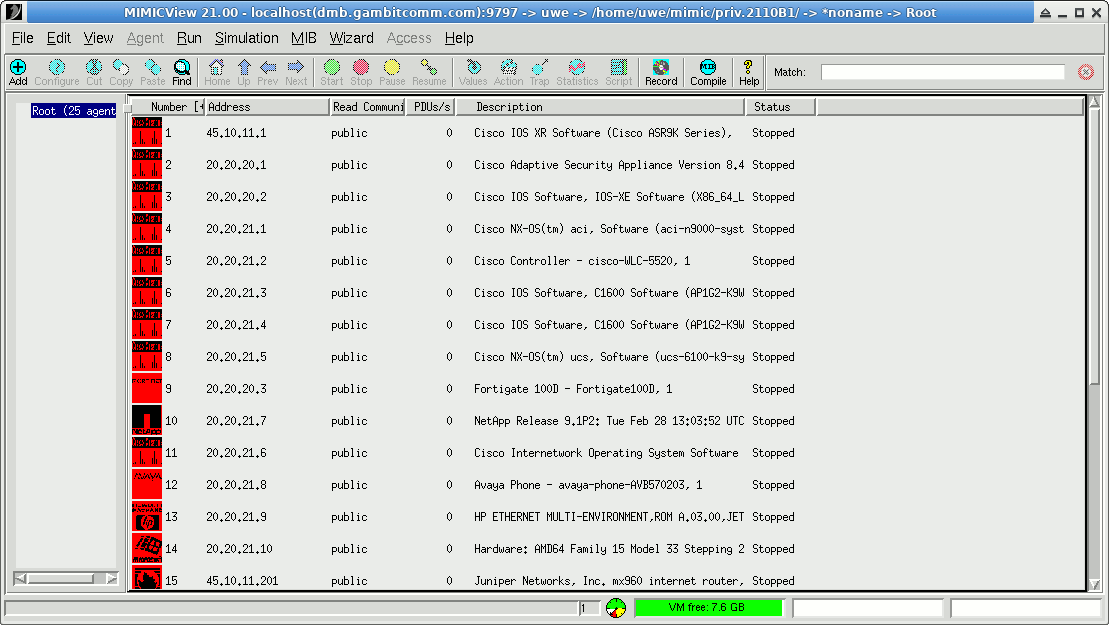
Figure - MIMICView Front Panel (default configuration)
The default Explorer view is fine for a small lab, but if you have a lot of agents you can switch to the more compact Classic view with the View -> Type submenu.
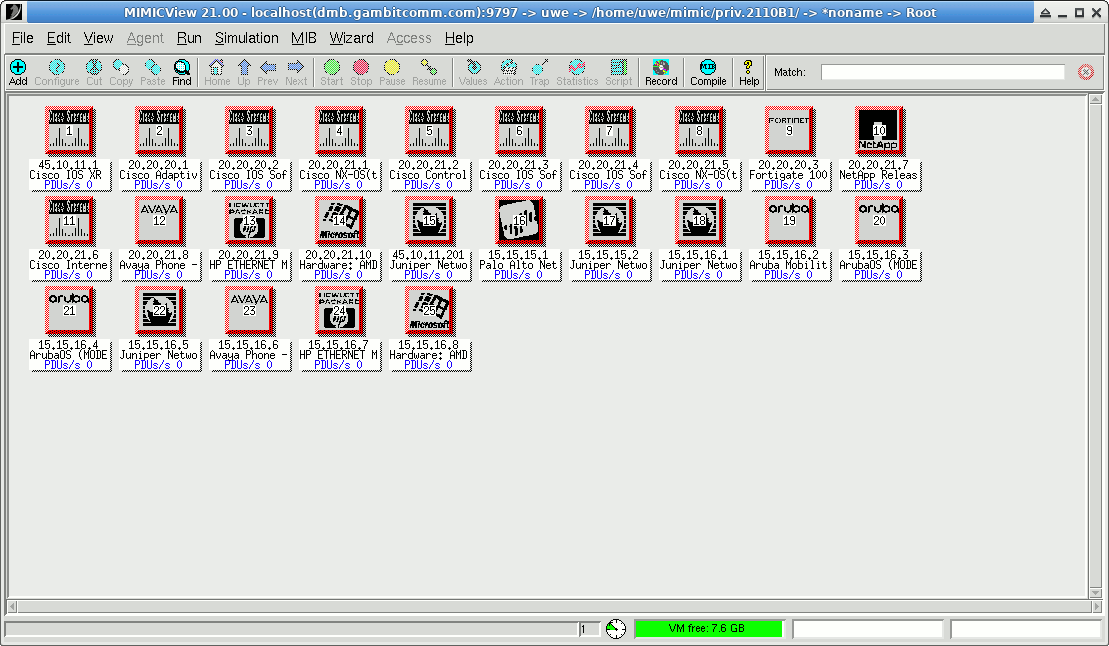
Figure - MIMICView Front Panel (Classic view)
When you first start mimicview, the MIMIC Simulator daemon will be invoked automatically if it is not already running. A log window will pop up with the output of the MIMIC Simulator daemon, mimicd. The log will start with lines similar to the following:
/usr/local/mimic/linux/mimicstart.sh
INFO 02/11.12:07:10 - MIMIC Simulator v21.00
INFO 02/11.12:07:10 - Copyright (c) 1997-2021 Gambit Communications, Inc.
INFO 02/11.12:07:10 - Registered individual license #2345
This running log is saved in the file shown in the title bar of the Log Window. It records important information and problems within the simulation.
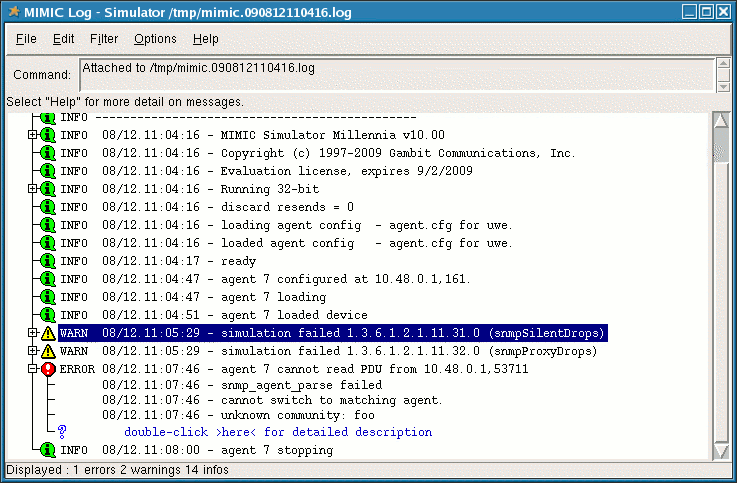
Figure - MIMICView Log Window
Using the GUI

The MIMICView GUI contains the following components:
- the main canvas;
- the title bar;
- the status bar;
- the menu bar; and
- the speed bar.
For details on their use see the Simulator Reference Guide.
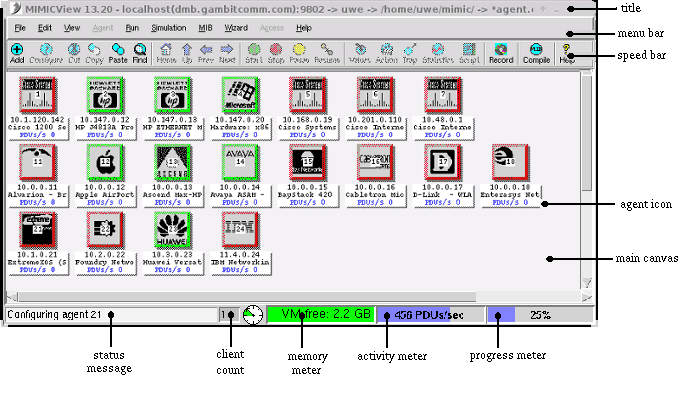
Figure - MIMICView Front Panel
The agents in the main panel are considered the running configuration that the simulator is running. In general, if you want to control the agents, you select their agent icons in the main canvas and perform actions with the Agent menu items menu items or speed bar buttons. The sections below introduce some of the tasks you can accomplish.
Controlling Agents

When you first start MIMICView, you will see several red icons in the main canvas. These are agent instances that have already been configured into the running configuration. Each icon shows the agent instance ID (a number from 1 to 100,000), its IP address, its device type, and its SNMP PDU statistics. The red color shows that the agents are stopped. We'll start them later. When you click on an agent icon, the blue border indicates that the agent is selected.

The menubar and speedbar are designed to give you a great deal of control over each of these agent instances, as described later.
For example, you can use Edit->Configure to display the general and advanced configuration information, as follows:
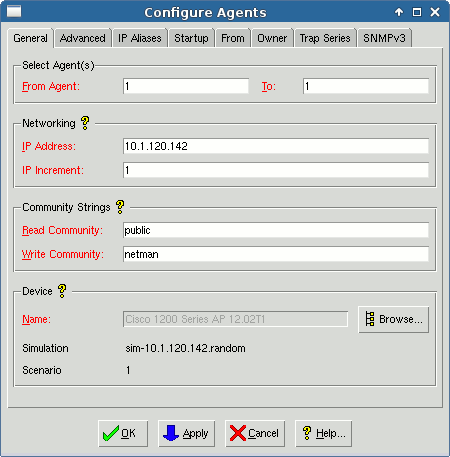
Figure - Dialogs for Configuring and Adding Agents
The selected agent instance number 1 is running at the specified IP Address, with the community strings and of device type shown.
Running Agent Simulations
Running a Configured Simulation

It is very easy to run a simulation that has already been configured. The icons in MIMICView's main canvas represent configured agents each running a simulation of a device.
To start them all, select Run->Start. All icons will turn green to show that the simulations on the instances are running.
To stop them all, use Run->Stop.
To start and stop subsets of the agent instances, select the subset and use Agent->Start and Agent->Stop as discussed later.Verifying the Simulation

Once the agent is running, it becomes accessible to the network management application at the IP address shown below its icon in the main canvas (plus any configured IP aliases ).
One of the easiest ways to verify the accessibility is by using the ping command. You can run this from the machine where the management application is running. If for some reason ping says it is unreachable, you need to use the route command to make the device visible, just like any real device. In case of problems, see the relevant FAQ entry for more details.
Now, you can try to access the device from the management application for example any MIB browser. You will be able to discover the device and perform management operations just as with the real device, like SNMP get/set, receive traps etc. You will see that you are using the simulator and your management application does not even realize it. In case of problems, see the relevant FAQ entry for more details.
With this, you have successfully run the application, started the simulations and connected your management application to query the MIB.
Creating a Simulation

A simulation of a device in MIMIC is more than just a set of MIBs. In database terms, the MIBs provide the schema of the information that the agent exports. The simulation needs more than the schema; it also needs the behavior, instances and values for each object in each MIB. For example, for the ifType MIB object in the IF-MIB, you have to know how many interfaces there are, and what type each is.
There are a number of ways of creating and customizing a new simulation of a device.
-
Use the ready simulated sample devices provided with the product.
-
Select from among many devices from the device and network libraries. They are included in the CD you have received or are downloadable with Update Wizard or from Gambit's website.
-
Record a real device using MIMIC Recorder. The Recorder basically traverses the entire MIB of the real device, retrieves the value of each MIB object, and creates a basic simulation from that.
-
Modify the existing simulation to fit your requirements.
-
If you cannot record a device (for example, you don't have it, or it is under development), then you can create the simulation by hand, as detailed in the Simulation Wizard Reference section.
Refer to the Create Simulation section below for details.
Running a Different Simulation

To run a new simulation, you need to configure a new agent instance in the Simulator:
-
In MIMICView, use Edit->Add->Agent... to add an agent instance. A dialog with the title Add Agents pops up, where you can fill out configurable parameters for the new agent instance. The Agent ID is filled in with the first available agent instance number.
-
Fill in the desired IP address in the IP Address text field.
-
Pick a simulation by clicking the Browse... button in the Device section. A selection list of available device simulations pops up. There will be an entry for each successful recording you performed with the MIMIC Recorder plus the pre-defined simulations that are provided with MIMIC.
Click OK to accept the parameters and add the agent.
-
A new agent icon pops up in the main MIMICView canvas for the agent instance you just added. This icon is red, because the instance is not running yet.
-
To start the instance, select the icon with a left mouse click. (A blue border means that an agent instance is selected.
-
Select Agent->Start, and the agent is started. (Its icon turns green.)
-
When done, stop the instance with Agent->Stop.
You can reconfigure a stopped agent instance with Edit->Configure..., which brings up the Configure Agents dialog. The input fields are the same as in the Add Agents dialog.
Shortcuts
Besides the ALT+letter keyboard shortcuts for menu entries, MIMICView also accepts the Tab key as a shortcut to the most common actions, which are shown in the speedbar below the top menu bar.

In addition, you can right-click on an agent icon to selects the agent, and pop up a copy of the Agent menu.
In this tutorial we will continue to use the menu entries for clarity. We suggest you use them until you get familiar, then start using the shortcuts.
Pausing an Agent
Once an agent instance is running, you may want to investigate certain behavior of a management application at a specific point in time, that is, as if time had stopped. MIMIC allows this by pausing the simulation running on an agent instance. This lets you compare values relative to each other or to values retrieved in prior sessions.
To pause an agent instance:
-
Select the desired agent icon(s).
-
Use Agent->Pause... to display a dialog with the title Agent Pause. Notice that the Now radio button is selected.
-
Click Apply to pause the simulation immediately.
Or, you can pause the simulation and set the time to a specific exact time:
-
Click the Set Time radio button.
-
Enter the time that you want the simulation to be set at. For example, to pause the agent as if it had been running for five days, enter 5 int the Days field.
-
Click Apply.
-
Click Cancel to exit the dialog.
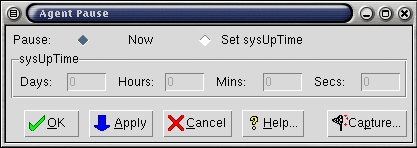
Figure - Dialog for Pausing Agents
The agent's icon turns yellow to show that its simulation is paused.
If you use any MIB browser, you will see that the sysUptime MIB object is stuck permanently at the desired time. Other objects, especially counters, return the appropriate values for that time.
You can resume the simulation with Agent->Resume. The simulation will resume at whatever time was set when the agent was paused.
Changing a Simulation

Changing a Value in the Value Space
MIMIC allows you to customize a running basic simulation in real-time by manipulating values returned by objects in the Value Space.
You can inspect values by taking the following steps:
-
Select an agent icon that is green, i.e., running.
-
Use Agent->Value Space... to pop up the Value Browser dialog.
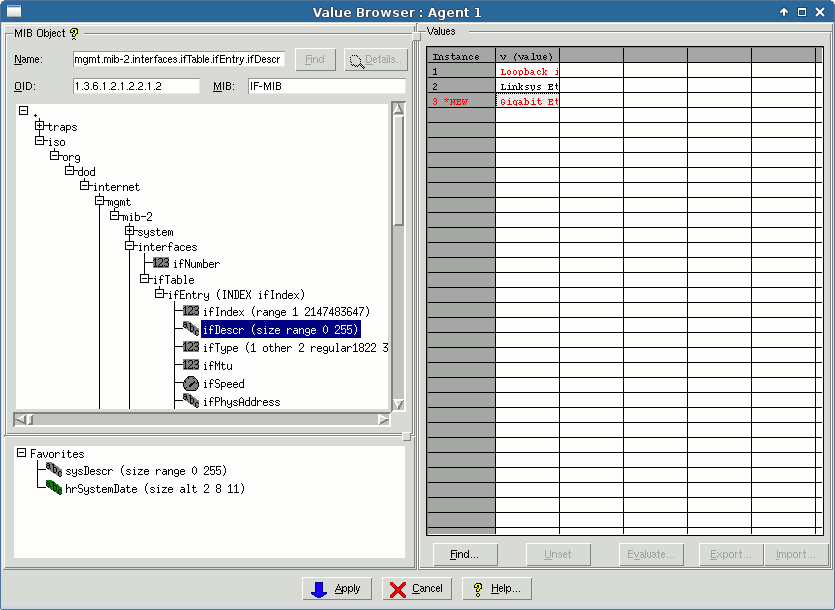
Figure - Value Browser Dialog
-
Enter or select the MIB object from the MIB tree; for example sysDescr. You can either type in the MIB object name in the Object field, then press Find, or browse through the MIB tree.
-
The right-hand matrix shows all instances of the object as rows. For scalar objects (such as sysDescr, the single 0 instance is shown.
-
The columns in the matrix show defined variables for this object. A non-counter object such as sysDescr should only have one variable, v. Since this MIB object is not a counter, this variable is used in its simulation.
-
The value of the variable is shown in the cell.
To change values in the Value Space:
-
Select the cell you want to change, by clicking on it once. The cell changes to edit mode.
-
Type in the desired value; for example foo.
-
Press RETURN. The cell returns from edit mode and shows the value in red to show its pending status.
-
Click Apply to commit the changes to the Value Space.
The value of the variable will be changed in the Value Space. Subsequent SNMP queries for this MIB object instance will return the new value.
This is uninteresting for the sysDescr MIB object, but useful to set the status of network interfaces via the ifOperStatus object, or to change rates of Counter objects in real time.
Generating Traps

Traps are generated with the trap_periodic simulation function, used by default for all traps in devices recorded with the MIMIC Recorder. The MIMICView Generate Traps dialog provides a simple interface to set the necessary parameters:
-
Use Edit->Trap Destinations... to display the Global Trap Destinations dialog or Agent->Trap Destinations... to display the Agent Trap Destinations dialog. With these, you can display, add and delete global or per-agent trap destinations.
-
In the Destination IP,port field type the address of your trap destination. This should be a host running a management application that is prepared to receive traps. The port number is optional, and should be used when your application is accepting traps at a non-standard port. Click Add >> to add the destination.
-
Click OK to accept it.
-
Select the agent icon that you want to start generating traps. To set the correct variables in the Value Space which control the traps you want to be sent, use Agent->Generate Traps... Agent->Generate Traps... to invoke the Generate Traps dialog.
-
Type the name, for example linkDown, of the trap into the Object text field, or click Browse... to browse for the trap name. SNMPv1 traps are listed in a separate hierarchy under the top node in the MIB OID tree. SNMPv2 traps are listed in their respective groups in the MIB OID tree. If there is no traps tree visible, double-click on the top node (the one marked .). For example, the linkDown trap is listed under .traps._iso._org._dod._internet._mgmt._mib-2._snmp . Notice that the path to the traps is analogous to the path to the enterprise OID under which they are defined. Keep double-clicking on the appropriate nodes until you reach linkDown. Double-click on it to select it.
-
Specify values to cause the traps. For the default trap simulation, the trap generation is controlled by three variables: the Rate, Time Unit and Cutoff Time parameters, which you can type in the text fields. The trap will be generated at the specified rate over time unit, for the time period specified in Cutoff Time.
-
To enable the linkDown trap at a frequency of 1 every 3 seconds for 5 minutes, set the Rate variable to 1, the Time Unit variable to 3, and the Cutoff Time variable to 300.
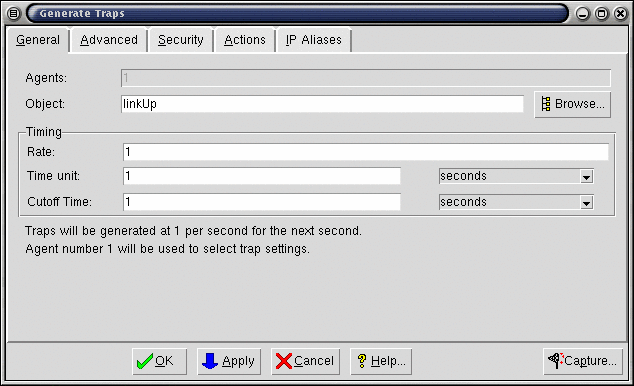
Figure - Dialog for Generating Traps
-
Click Apply. The specified traps will start to be generated for this agent instance.
To verify the trap generation, look at agent instance statistics Agent->Statistics for this agent instance.
If you look at the traps generated with a protocol analyzer, or examine the log at the trap destination (if it has one), you will see that the ifIndex variable sent with the traps is assigned a NULL value. You can assign the value of any of the MIB variables to be sent with a trap by specifying them in the Advanced tab of this dialog.
To assign, for example, a value to the ifIndex variable with the Generate Traps dialog (all fields should be filled in by now), click the Advanced tab, and select ifIndex from the list. In the text field type the value to be set for this variable, for example 5. Then click Modify.
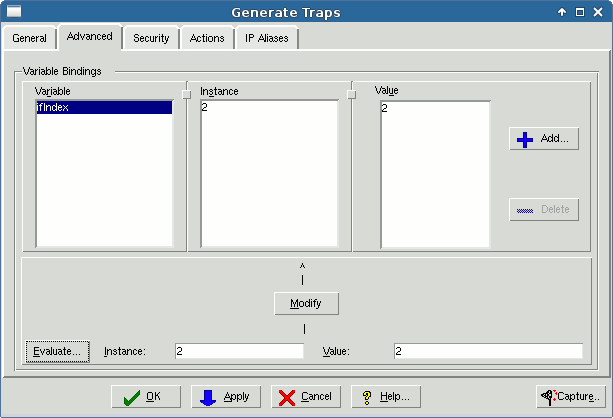
Figure - Dialog for Generating Traps
When you click Apply, the desired MIB variable value will be sent with the traps.
Recording a Device

The simplest way of creating a simulation is to record an actual real world device with the MIMIC Recorder. There are other alternatives as described in the Create Simulation section below.
To record a device:
-
Use Simulation->Record Live... in MIMICView.
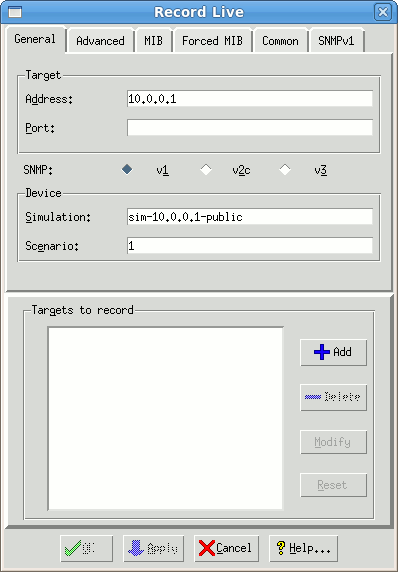
Figure - Dialog for recording a live device
-
In the Record Live dialog General tab, fill in the Target text field with the address or hostname of the target device to record. To use the default SNMP port (161), you do not need to fill in the Port field. Pick your SNMP version, the simplest being the SNMP v1 button.
-
The dialog suggests a default simulation name sim-address.community for your simulation. Alternatively, fill in any Simulation name, such as test, or a short name for the device you are recording, or your first name. Use any Scenario name, such as a small number, for example, 1.
These names will be significant once you start doing advanced tasks. Pick easy names to remember.
-
Use the SNMPv1 tab to specify the Community String with which to access the device. The simplest read community string is public, but will depend on device configuration in your network.
-
Use the MIB tab to restrict the MIB objects to record, such as excluding certain trees, starting at a desired MIB object, etc. You rarely have to fill in this information.
-
Click Add to add the target to the list.
-
Click OK. The Recorder will record all targets in the list.
-
A recording session starts, and a log window of the ongoing recording is displayed. This log is also saved for future reference in a file whose name is shown in the title. The successful recording will end with lines such as:
INFO 06/17.17:58:29 - line 3660, 15 sec elapsed, 100 % done
INFO 06/17.17:58:29 - added device "Cisco Systems WS-C5000 - test, 1234"
INFO 06/17.17:58:29 - errors for 0 objects out of 3660
INFO 06/17.17:58:29 - simulation phase: doneNotice that the Recorder keeps track of the number of errors when attempting to simulate the device. The fewer errors, the better the simulation will be.
-
Choose File->Close to remove the log window.
-
Press Cancel to exit out of the Record Live dialog.
Once you have successfully recorded a device, it is added to the list of known devices with the name of its system description, as returned by the sysDescr MIB object. You can then assign it to an agent instance and run it as described in Running a new Simulation.
-
-
Chapter 3: Troubleshooting
Chapter Contents
This chapter lists the recommended troubleshooting procedures for quickest resolution of your problem.
Online Help
All MIMICView dialogs have a context-sensitive online help section, which you can invoke with the Help button.
Known Problems
Each of the supported platforms has known problems. Check there first to see if yours is one of them:
Inspect the Log

Common Errors
Common errors in the log are detailed in Appendix C - Common Error Messages. Consult this section for details on your particular error.
Common Questions
Diagnostic Wizard
MIMIC, as any other complex software, sometimes will exhibit problems. If the other troubleshooting tips in this section don't help, then you are encouraged to submit a problem report to our Technical Support Department (support@gambitcomm.com). The Diagnostic Wizard makes it easy to submit a report for most problems.
Crashes
MIMIC, as any other complex software, occasionally terminates abnormally (crashes). In order to help us diagnose and fix the problem, we will request you to provide some additional information about the problem with the Diagnostic Wizard, such as
- how did the crash occur?
- what simulation was running?
- how long had MIMIC been running?
- can you reproduce the crash?
In addition, we will request you to enable dumping of process memory on the crash. Details for Solaris are in the Solaris Installation and for Windows in the Windows Installation sections.
-
Chapter 4: Process
Chapter Contents
Important Concepts
What Is a Device Instance?
In MIMIC terms, a device to be simulated is a real-world entity on a network that supports a well-defined interface, ie.
- managed primarily via the Simple Network Management Protocol
(SNMP); or
-
command-line interfaces (CLI) such as Cisco IOS,
JUNOS, TL/1; or
-
Web interfaces such as SOAP, XML; or
-
Intelligent Platform Management Interface (
IPMI); or
-
exporting Netflow, IPFIX; or
-
exporting sFlow; or
-
an Internet of Things (IoT) device publishing telemetry via MQTT; or
- Constrained Application Protocol (CoAP.
or a combination of all the supported interfaces. Through these interfaces the system under test interacts with one or more devices. MIMIC simulates these devices for purposes of development, testing, technical support, training, pre-deployment sizing.
To be manageable via SNMP, the device exports a Management Information Base (MIB) with embedded software called an SNMP agent. The MIB is usually composed of a collection of standard and enterprise-specific MIB fragments, for example, MIB-2, IF-MIB, or SNMP-REPEATER-MIB, which we just call MIBs. Each MIB is defined in a syntax called Structure of Management Information (SMI).
The system under test, ie. a SNMP-capable network management application, interacts with one or more SNMP agents by manipulating MIB objects.
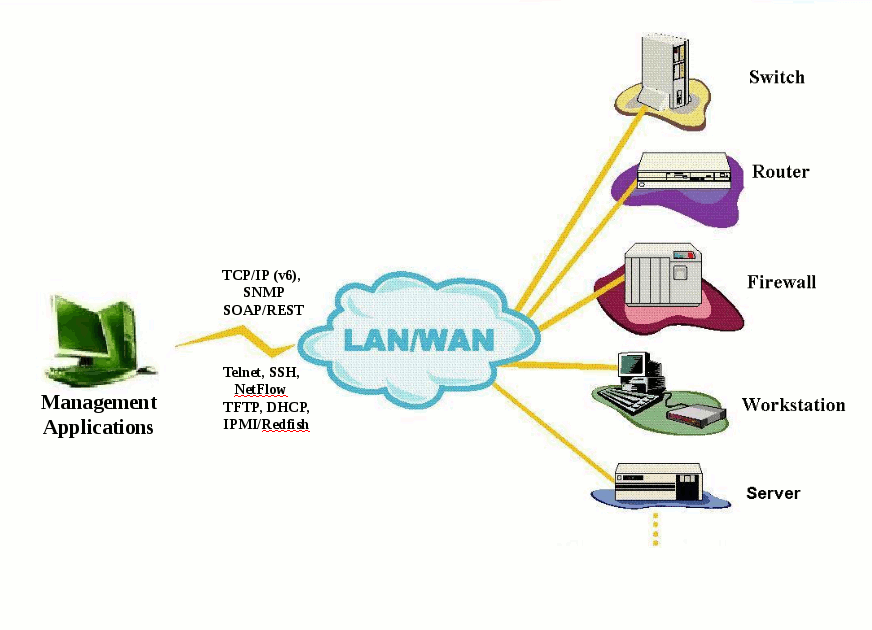
Figure - Network Management Topology
This can be generalized to all interfaces to say that the system under test interacts with the simulated devices through the interface, exactly as it would to a real device.
You use MIMIC to simulate one or more instances of a device from the interface perspective, eg. you simulate the SNMP agent, or command-line, or WEB server, etc. There are many different classes of devices, from data communications equipment to end systems, from tele-communications equipment to databases, to servers, to IoT sensors, gateways, etc.
A device has certain characteristics that distinguishes it from others:
-
A device type, that determines which MIBs the device exports, or which command-line, or WEB interface. Examples include a Cisco Catalyst 5000 switch, a Cabletron MMAC hub, an HP Lanprobe, or a Microsoft Windows NT PC, etc. To be managed by SNMP network management applications, each of these device types exports, via SNMP, a different set of MIB objects. If accessed through a CLI, the set of commands is different for a router than for a switch or a firewall.
-
A version number. A network typically has multiple versions of the same product coexisting at any point in time. Different versions of the same device type often have different MIBs, because the network management interface also evolves.
A device instance (agent) has additional characteristics particular to SNMP, among others:
-
An IP address that identifies it on the network.
-
A particular version of SNMP that it understands (v1, v2c, v2, v3).
-
Access parameters (ie. read and write community strings for SNMP v1) that provide access to the MIB
-
Specific instances and values of the MIB objects. For example, two devices of the same device type may have a different set of network interfaces.
-
Uptime, that is the time that the SNMP agent on the device instance has been running. For example, an RMON probe will have different data after it has been running for a while, as compared to when it was first booted.
The device may use other secondary protocols such as DHCP, TFTP, or TOD. to perform management functions, each with its own attributes.
What Is a Simulation?
A protocol simulation is the act of allowing protocol interface interaction with standard applications just as with a real-world device, but without the actual physical device.
For SNMP that means exporting MIB object instances and values, generating TRAPs.
For command-line interfaces (CLI) that means exporting a command set such as Cisco IOS via telnet or SSH.
For flow-based protocols the simulation exports via NetFlow or sFlow the template and data-flows.
For Web-based interfaces the protocol on top of HTTP or HTTP/S would be specific to the device type.
The network management applications interact with the simulations within MIMIC just as it would with real-world devices.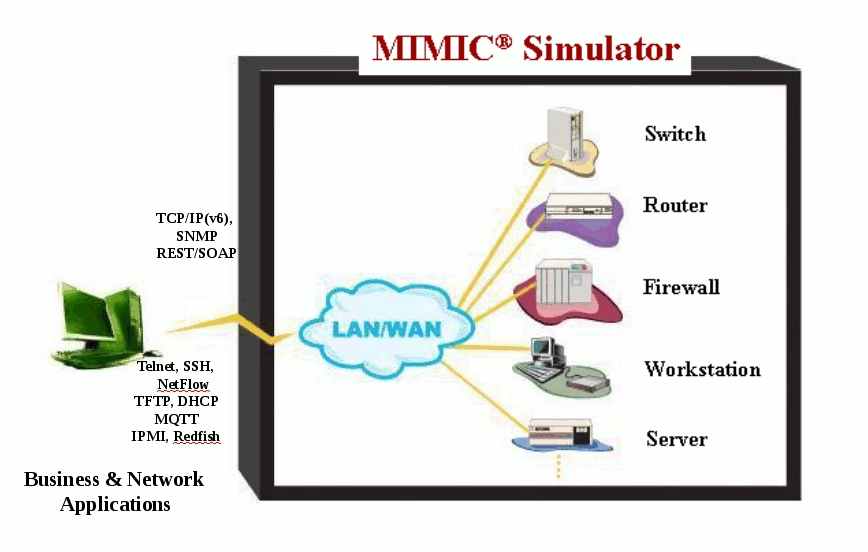
Figure - Simulations with MIMIC
The most common is a "realistic" simulation, i.e., it attempts to duplicate the behavior of a real-world device. Realistic simulations are good for demonstrating the capabilities of a network management application in a pre-sales situation, or as part of training exercises. MIMIC implements realistic SNMP simulations as follows:
-
MIB objects that are Counters are simulated with an average rate and are perturbed with a random fudge factor;
-
All other MIB objects assume the value that would be returned by the device.
For other interfaces, the values in responses are particular to the type and deployment of the device. For example, CLI commands or WEB requests yield responses with very specific values. You want the simulations of those interfaces to reflect the real responses.
For a particular device, you can run any number of simulations, just as in the real world there are a number of scenarios in which a device can be involved. For example, you can run a router simulation of a lightly loaded device or overburdened device, or any range of scenarios in between. Or, you can simulate an RMON probe on a healthy network segment, or a probe that is monitoring a segment with either a high traffic load or failing devices. From a network management perspective, the difference is seen merely in the instances and values of returned MIB objects.
Simulations with randomness have their limitations in the case of product development and testing, because the values of MIB objects are unpredictable. For this use, MIMIC allows to run "constant" simulations. This type of simulation makes Counter objects return a value with a constant rate.
What Is an Agent Instance?
An agent Instance is a simulation of a device instance within MIMIC. As such, the agent instance will have all the characteristics described in the previous section.
In addition, agent instances can be manipulated in ways that real-world devices cannot:
-
Time can be stopped and restarted. This is useful in a technical support situation for investigating a problem at any particular point in time.
-
Values of the simulation can be changed at will during the simulation. This allows "what-if" investigations and regression testing. For example, reaction time of an event correlation application to a certain set of events (as reflected in changes of MIB objects) can be accurately gauged.
What Is a Lab Configuration?

Since MIMIC can run multiple agent instances at once, the lab configuration describes what simulation each agent instance is running. For example, the first agent instance can be running a particular Cisco router simulation at a specific address, the next 50 agents could be running Windows end-node simulations. Or, you could have a different lab configuration with 10,000 sensors of different types publishing MQTT telemetry to an IoT application.
The lab configuration that is currently running on the Simulator is called the running configuration. MIMIC makes it very easy to use different lab configurations. You can load them, change them, and save them. This is the basis for the "virtual lab" concept: you can reconfigure your lab at any time with a different lab configuration.
MIMIC ships with a default lab configuration in the file agent.cfg. There is nothing special about it, except it is the one that is the first one you see after you install MIMIC, instead of an empty page. From then on it is up to you to manage your lab configurations.
What Is the MIMIC Value Space?
As described above , a simulation can take on several flavors, just as a real-world device can be involved in a variety of situations. A MIMIC simulation can similarly run a variety of scenarios. For example, a realistic simulation of a device can exhibit high traffic rates in one scenario, and low rates in another, and high error rates in yet another. And in more complicated scenarios, values and rates can change dynamically during the simulation.
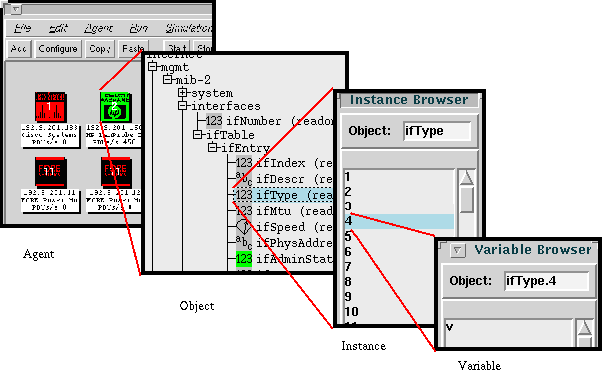
Figure - MIMIC Value Space
This is accomplished in MIMIC with the MIMIC Value Space. In simplest terms, the MIMIC Value Space contains the MIB object values for an agent.
More precisely, it is a 6-dimensional space which for every simulation scenario bound to an agent instance, stores for every MIB object instance, a set of variables each with its own value. For example, a different traffic rate for every interface of an agent can use a variable called "rate" in the MIMIC Value Space for the appropriate MIB objects; the simulation can then use this variable to simulate the different traffic rates.
MIMIC uses certain conventions for variable names in the Value Space (although any name can be used for any purpose). For all objects that are not Counters, MIMIC creates basic simulations that use the variable v (for value). For Counter objects, MIMIC uses the variables r (for rate) and tu (for timeunit). For Traps, MIMIC uses the variables r (for rate), tu (for timeunit) and c (for cutoff-time). (You will see how these are used later.)
The MIMIC Value Space allows you to manipulate variables at runtime; that is, change the way the simulation behaves in real time. For example, you can raise or lower the traffic rate seen on an interface by changing the values of the associated variables in the Value Space.
What Is the Basic Simulation?
By default, the MIMIC Recorder creates a "basic simulation" for a target device that is close to a realistic simulation described above . The basic simulation is created by default when recording a real device.
For SNMP here are the characteristics of this simulation:
-
static objects
For static objects, the basic simulation will return the value that was recorded by the Recorder. For GET* SNMP requests, this is accomplished by retrieving from the Value Space a variable "v" with the value for the MIB object instance. For SET requests, the value is stored in the "v" variable.
-
counter objects
The simulation for counter objects is rate-based. The variables in the Value Space that determine the value at any point in time are "r" (rate) and "tu" (time-unit in seconds). The value of the object is determined with the formula
value = current-time * r / tu
-
traps
The simulation for trap objects is rate-based. The variables in the Value Space that determine the trap frequency at any point in time are "r" (rate), "tu" (time-unit in seconds) and "c" (cutoff-time in seconds). A trap is generated at a rate of r/tu for the specified period of time. There are some more variables that control advanced aspects of trap generation, as detailed in the Agent->Generate Traps section.
For other protocol interfaces, the basic simulation is described in the specific protocol module guide.
What Are Actions?
As described in the previous section, by default the basic GET simulation of a MIB object looks up a variable in the MIMIC Value Space and returns its value. The basic SET simulation changes the appropriate variable in the MIMIC Value Space.
If you want to do more sophisticated things, like having side effects on a SET, or more complicated GET processing, you can accomplish this with MIMIC actions. These actions customize the behaviour of the Simulator for a variety of events. For example, if you wanted to change the values of other MIB objects as part of a SET or generate traps, you would use a SET action script for that object.
A MIMIC action script is a custom file that is executed by the simulator for the following pre-defined events.
-
SNMP Request action
The first type of action can be configured to be executed when a MIB object instance is accessed through SNMP requests (or Protocol Data Units (PDUs): GET, GETNEXT, SET, GETBULK). You can associate a request action script with the MIB object using the Agent->Actions->On GET/SET... dialog.
-
SNMP TRAP action
The second type of action can be associated with trap generation. Trap action scripts are run every time the associated trap is generated. These actions are executed before a trap is sent by an agent. They provide a good place to modify the contents of the trap as well as provide some side effects. E.g. trigger other traps, modify tables, modify varbinds etc. For details, see the Agent->Generate Traps... dialog.
-
Timer action
The third type of action can be scheduled to run periodically. These actions are executed repeatedly based on a timer specification. They can be executed either in a global context or an agent context. They provide an excellent way to implement constantly changing behaviour. For e.g. send traps or change table contents at varying interval. Timer action scripts can be scheduled with the Run->Timer Scripts... or Agent->Timer Scripts... menu item.
-
Agent startup/stop action
The fourth type of action script can be executed on starting or stopping an agent. If the simulation directory contains start.mtcl or start+*.mtcl scripts, then they are executed on agent start (in alphabetical order). Similarly, stop.mtcl or stop+*.mtcl scripts are executed on agent stop. These could be useful to issue certain traps on startup (eg. coldStart, warmStart) or shutdown.
-
Protocol action
The fifth type type of action script can be configured for other special events in the other protocol modules, such as on completion of downloading a file via TFTP, etc.
-
Simulator action
As an additional point of customization we support simulator- wide start and stop scripts. These actions are executed on startup or shutdown of the simulator. They provide a well defined point of customization to initialize and/or cleanup any simulator wide data. For e.g. a start action could be used to configure and start agents, while a stop action could be used to save any changes. All restrictions that apply to timer scripts or request action scripts apply to these too. These scripts will be located in scripts subdirectory in the searchpath.
Simulator start actions are named mimicd+start.mtcl or mimicd+start+*.mtcl. Stop actions similarly are named mimicd+stop.mtcl or mimicd+stop+*.mtcl. The actions are invoked in alphabetical order according to their names. The start actions are invoked after the steady state is reached. The stop actions are invoked as soon as the simulator is terminated.
Actions can be programmed using multiple languages. The following section details specifics for each of the supported languages :
-
Tcl scripts
Tcl is a popular scripting language available as an open-source project. It is also extensible with a lot of packages available freely to automate a lot of common scripting activities. Tcl scripts are interpreted on the fly (not compiled) and hence one can use a trial-and-error approach to writing quick and efficient action scripts. The commands to control MIMIC are the same as in the MIMICShell.
-
C++ based DLLs
Although Tcl is flexible and easy-to-use, it has performance limitations because of being an interpreted language. The C++ API, exported from the 'Mimic' namespace, was designed to alleviate this problem. The C++ actions however need to be compiled into a DLL binary. It also needs to export a specific interface that can be invoked by the simulator. The details are in the C++ API Guide
What Is the MIMIC Private Data Area?
The data files used in MIMIC can live in either a shared or private data area. The shared file space is under the MIMIC directory that is created when you install MIMIC. After the initial install, it contains the precompiled MIBs, pre-recorded simulations, and other files that are supplied with MIMIC (see Appendix A Directory Structure). The shared area is accessible to all users using MIMIC.
The private file space is outside of the MIMIC installation directory, commonly in a directory called mimic/ under your home directory (although you can optionally have it stored anywhere). The private area contains any changes to the data after you install MIMIC. For example, when you import a MIB, it will reside in your private area. Or when you compile a MIB, the compiled MIB will be in your private area.
When MIMIC looks for data, it will look in your private area first, then in the shared area. For example, if you recompile a MIB with the changes you need, your changes will override the MIB in the shared area. The File Browser in MIMICView will show your private data in red, while the shared data is shown in blue.
The benefit of the private area is that multiple MIMIC users can each have their own private data without interfering with the other users. Also, when you upgrade from one version of MIMIC to the next, all your data is automatically accessible in the new version because it is in the private area.
What are Maps?
The MIMICView interface lets you organize your lab configuration hierarchically into maps, rather than all in a flat view. Maps are modelled after folders or directories in operating system environments, or maps in network management applications. They organize agent instances according to your choice either by subnets, manufacturer, device type, etc.
By default, all agent instances are placed into the topmost "root" map. You can add maps underneath the root. Maps are depicted with a blue network diagram icon. The Explorer view shows the map hierarchy in usual tree fashion.
Maps are self-contained, isolated workspaces. What you do in one map does not carry over to another. For example, if you use the selection menus to select agent instances, that selection is cleared when you change maps. Also, if your selection specifies agents outside the map, eg. by number, only agent instances in the map are selected. Currently, the MIMICview GUI has no provision to work on multiple maps at once.
MIMIC Process Overview: When to Use the Tools
Overview

This section describes a process view of the MIMIC Simulator. Each process consists of discrete tasks that are described in detail in the following sections.
-
The first process compiles all relevant MIB files for the device that you want to simulate. MIMIC includes a large number of precompiled MIB files, as well as the MIB files themselves in the mibs/ subdirectory. You can add any missing MIBs with this process.
-
The second process creates a simulation, which can subsequently be run by the MIMIC Simulator. Each simulation represents a device, or part of a device (if you are only interested in a subset of the device).
-
The third process assigns simulations to agent instances in the simulator. This lets you configure any number of scenarios of device simulations. By separating the process of creating and running simulations, you are able to run one set of simulations while you are creating or customizing another.
-
The final process allows you to customize a simulation. Customizations can be transient or persistent, and they can be done while the agent instance is running or while it is stopped.
Although the order presented here is the natural flow, you can perform any of these processes simultaneously or in any order. MIMIC is also designed for feedback loops among the processes. For example, if you notice that you don't have the necessary MIBs while you are creating the simulation, you can easily go back to compiling new MIBs.
Follow the links in each of the sections to get more details.
Figure - MIMIC Process Overview
Compile MIBs
MIMIC needs to know about the objects it is going to simulate, in order to return the correct instance, type and value, etc. This is specified in the MIB source file that defines each object. The MIMIC install includes a large number of precompiled MIB files in the data/mibs/ subdirectory, as well as the MIB source files themselves in the mibs/ subdirectory.
Besides these MIBs already shipped in the core installation, many more optional MIBs can be added with the Update Wizard. We periodically scour the internet for any MIBs we can add, and clean any errors, so you don't have to do that. Select the necessary update packages in the MIB Library and they will be compiled in. You can check the list of currently known MIBs with the Manage MIBs... menu item in the MIB Menu.
The rest of this section details how to add your own MIBs that we don't already supply.
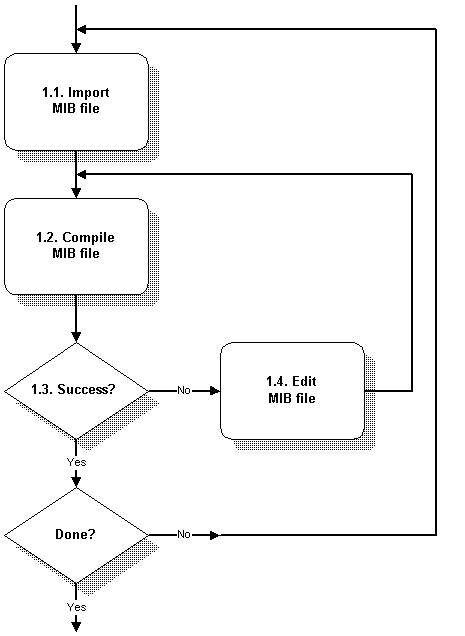
If there are many errors when you record a device, it may be exporting a MIB that MIMIC does not yet know about. The MIMIC Recorder will tell you about unknown MIB objects. If so, then you need to find out which MIBs the device exports, according to its manufacturer. You can then add any missing (enterprise-specific or standard) MIBs with this process. If you are not interested in certain MIBs, you can ignore them. If you don't have access to the MIBs, then as a last resort you can have the Recorder guess at the simulation of unknown objects with the --unknown option.
-
import the MIB source file into the MIMIC private data area. This is purely for organizational purposes, so that you can track down your MIB files. MIB source files are placed in the mibs/ subdirectory.
-
compile the MIB source file. This translates the source file into internal data that can be efficiently used by MIMIC. The internal MIB data are stored in the data/mibs/ subdirectory.
-
The compiler output will indicate whether the MIB was processed correctly. All MIMIC tools do extensive logging of diagnostic messages so that you can track exactly what they are doing.
-
if there are errors, edit the MIB source file to correct any them. Then recompile.
The MIB Wizard encapsulates these steps.
Figure - MIB Compilation Process
Create a Simulation
In this process you create a simulation. In MIMIC, this means assigning simulation statements to each MIB object, and populating table entries and values for individual MIB object instances.

Before you create a simulation of a device, make sure that MIMIC knows about the set of MIBs that the device exports, as documented by the device manufacturer. If you are not interested in certain MIBs, you can ignore them.
-
The simplest way to create a simulation is to record a real device. The MIMIC Recorder will take care of creating simulation expressions for each discovered MIB object and populating tables and MIB values. The Discovery Wizard enables you to record an entire network of devices. The Snapshot Wizard allows you to take multiple snapshots of the same device, and automatically simulates the changes from one snapshot to the next. The Trap Wizard captures traps generated by your device and creates a trap sequence which you can include in any simulation.
-
The next simplest solution is to copy an existing simulation, either one that is supplied with MIMIC (in the device and network libraries), or one that was previously recorded.
-
If you don't have the exact device available, or if the conditions are not exactly the way you want, you can still record the device and modify the simulation to suit your needs.
-
You can use the Simulation Wizard to populate a MIB with values. For example, you can automatically create default instances of variables having default values with the click of a few mouse buttons.
-
The last resort is to edit internal simulation files to create or change the simulation by hand. All internal MIMIC data resides in ASCII files, so that you can use your favorite editor or related text processing tools.
Figure - Creation Process
Run a Simulation
Once you have created the necessary simulations, you can run them in agent instances. You can do any of these operations in any order on any number of agent instances, but for a specific instance the natural flow is:

-
First you need to add one or more agent instances with the desired device simulation.
-
Once an agent instance is configured, you need to start it. This is equivalent to booting your real device. Until it is running, an agent instance does not respond to queries. You can do many things with a running agent instance, such as pausing, halting, and changing the behavior of the running simulation.
-
You can stop an agent instance at any point. This is equivalent to turning your real device off or shutting it down. Once an agent instance is stopped, you can reconfigure it or restart it.
-
Finally, you can delete your agent instance from the configuration.
Figure - Simulation Process
Customize a Simulation
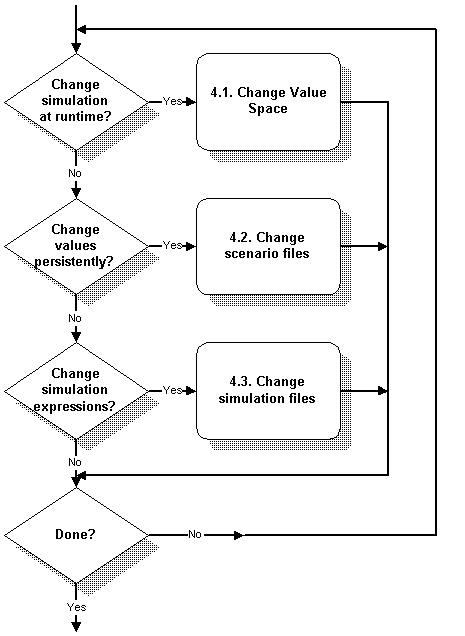
There are several ways to customize a simulation:
-
To change a simulation at runtime, you can use the graphical MIMICView or the scripting environments Tcl-based MIMICShell , Java API , or Perl API , to change the Value Space.
-
You can change the values and table entries for a scenario manually. These values will take effect the next time you run the simulation.
-
Finally, you can change the simulation expression for a MIB object. This is only necessary for the most advanced uses. For example, you can create relationships between MIB objects, where the value of one MIB object affects another.
Figure - Customization Process
References for Further Reading
For more information on Network Management and SNMP, we recommend these books:
- Marshall Rose, The Simple Book: An Introduction to Networking Management, Prentice Hall, 1994
- David T. Perkins and Evan McGinnis, Understanding SNMP MIBs, Prentice Hall, 1996
- David T. Perkins, RMON: Remote Monitoring of SNMP-Managed LANs, Prentice Hall, 1999
- William Stallings, SNMP, SNMPv2, and RMON : Practical Network Management, Addison-Wesley, 1996
- William Stallings, SNMP, SNMPv2, SNMPv3, and RMON 1 and 2, Addison-Wesley, 1999.
For more information on Tcl and Tk, which you will need to use to program simulation of device-specific behavior, we recommend these book titles
- John K. Ousterhout, Tcl and the Tk Toolkit, Addison-Wesley, 1994
- Brent B. Welch, Practical Programming in Tcl & Tk, Prentice Hall, 1995
- managed primarily via the Simple Network Management Protocol
(SNMP); or
-
Chapter 5: Energy Savings
Chapter Contents
Overview
MIMIC Simulator pays for itself very quickly even if one considers only energy savings.
One can calculate energy costs for a network, given a list of devices, the energy consumption for each, and energy prices. If you simulate this network, this translates into immediate energy savings. For a rough ballpark you can use our energy savings calculator.
You can also download the optional GREEN software update package with the MIMIC Update Wizard to monitor energy savings while running MIMIC in real-time.
The energy savings matrix at this page shows savings given a sample network of 100 common devices.
