MIMIC® Online Documentation
MIMIC Wizards Guide
-
Preface
The MIMIC Wizards are easy-to-use GUI front-ends to the most common or most difficult tasks in MIMIC.
Whenever you see the Youtube logo
 you'll be able to view a video for that section.
-
Table of Contents
-
MIB Wizard Reference
Overview
 The MIB Wizard is designed to easily import and compile new MIBs
for use with MIMIC. It is a user-friendly, graphical or
command-line
front-end to the
MIB compilation process
and
MIMIC Compiler.
The MIB Wizard is designed to easily import and compile new MIBs
for use with MIMIC. It is a user-friendly, graphical or
command-line
front-end to the
MIB compilation process
and
MIMIC Compiler.
The MIB Wizard lets you select a set of MIBs to import, which together with a set of existing MIBs will be compiled. The Wizard resolves all dependencies among the MIBs and compiles them in the correct order.
Select MIBs To Import
In this dialog, select the MIBs you want to import into MIMIC.
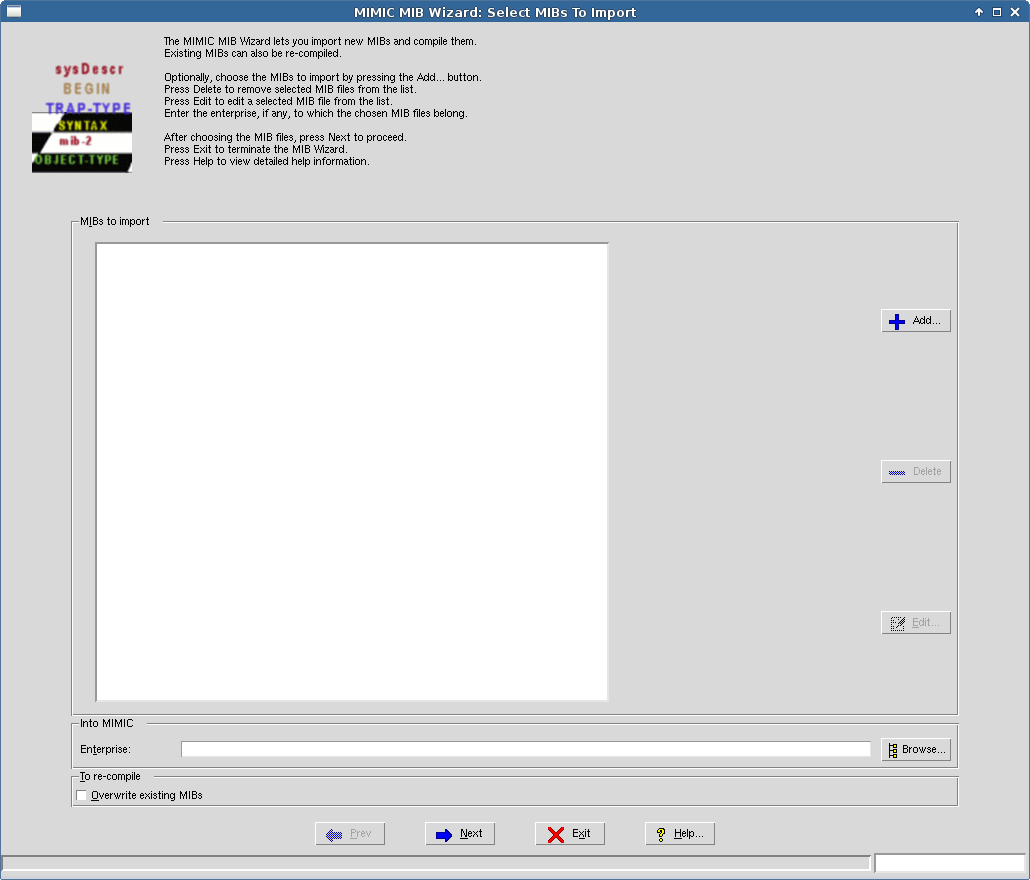
Figure 1: MIB Wizard: Select MIBs
The file selection dialog displayed by the MIB File Browse... button lets you select one or more MIB files to import.
Pick an enterprise name in the Enterprise field. This should be a short name for the enterprise of your enterprise-specific MIBs. For example, you can browse the existing enterprise names with the Browse... button.
By default, the MIB Wizard will automatically skip over MIBs that are already compiled into MIMIC. The Overwrite existing MIBs field can be left unchecked, unless you indeed want to overwrite MIBs that were already compiled into MIMIC.
You need to click <<Add to add the MIBs to the list.
You can edit the list of MIBs further with the Delete button, and even edit MIB files with the Edit button.
Select Existing MIB Files To Compile
In this dialog, select the existing (imported into MIMIC) MIBs you want to recompile. You need to do this if a previous compile failed. This allows for an iterative process until the MIB compiles correctly.

Figure 2: MIB Wizard: Existing MIBs
From the Command Line
If you cannot use the MIMICview GUI to import and compile your MIBs, you can use the command-line as follows:
% ./mibwiz.sh --nogui --help Usage: --nogui No GUI [--help] Show this usage help [--import file|dir] Import file or all files in directory [--overwrite] Overwrite files if they already exist [--ent enterprise] Import into specified enterprise [--existing file] Compile existing MIB file ERROR - user specified --help, printed usage % ./mibwiz.sh --nogui --import /tmp/mib-force/mibs/force10 --ent force10 INFO Parsing input files for MIB dependencies. Please wait... WARN skipping MIB IEEE8021-PAE-MIBrce10/IEEE8021-PAE-MIB.txtVATE-MIB.txt imported file /tmp/mib-force/mibs/force10/IEEE8021-PAE-MIB.txt was already compiled before in the standard area Reading /tmp/mib-force/mibs/force10/F10OS-OUTBOUNDTELNET-PRIVATE-MIB. Reading /tmp/mib-force/mibs/force10/SFTOS-PORTSECURITY-PRIVATE-MIB.tx WARN skipping MIB MGMD-STD-MIBs/force10/MGMD-STD-MIB.txtB.txtMIB.txt.txt imported file /tmp/mib-force/mibs/force10/MGMD-STD-MIB.txt was already compiled before in the standard area Reading /tmp/mib-force/mibs/force10/SFTOS-QOS-DIFFSERV-PRIVATE-MIB.tx WARN skipping MIB LLDP-MIB/mibs/force10/LLDP-MIB.txtG-MIB.txt imported file /tmp/mib-force/mibs/force10/LLDP-MIB.txt was already compiled before in the standard area Reading /tmp/mib-force/mibs/force10/SFTOS-QOS-DIFFSERV-EXTENSIONS-MIB Reading /tmp/mib-force/mibs/force10/F10OS-DENIALOFSERVICE-PRIVATE-MIB INFO Importing /tmp/mib-force/mibs/force10/f10-products.mib ... 98% Compiling MIB force10/SFTOS-QOS-ACL-MIB.txt (58 out of 59) INFO 10/07.10:04:20 - MIMIC Compiler v20.00 built Sep 24 2020 11:52:41 INFO 10/07.10:04:20 - Evaluation license, expires 11/4/2020 INFO 10/07.10:04:20 - Compiling input file : mibs/force10/SFTOS-QOS-ACL-MIB.txt INFO 10/07.10:04:20 - loading mib : force10/SFTOS-QOS-ACL-MIB INFO 10/07.10:04:20 - done 100% Compiling MIB force10/f10-ss-chassis.mib (59 out of 59) INFO 10/07.10:04:20 - MIMIC Compiler v20.00 built Sep 24 2020 11:52:41 INFO 10/07.10:04:20 - Evaluation license, expires 11/4/2020 INFO 10/07.10:04:20 - Compiling input file : mibs/force10/f10-ss-chassis.mib INFO 10/07.10:04:20 - loading mib : force10/F10-S-SERIES-CHASSIS-MIB INFO 10/07.10:04:20 - done -
Discovery Wizard Reference
Overview
 The Discovery Wizard allows you to create a network simulation by
discovering SNMP Agents on a network
and record them as simulations which can be played back later. It is
a front-end to the
MIMIC Recorder,
designed to record large networks.
The Discovery Wizard allows you to create a network simulation by
discovering SNMP Agents on a network
and record them as simulations which can be played back later. It is
a front-end to the
MIMIC Recorder,
designed to record large networks.
In addition to recording from a live network, it can create network simulations from a group of previously recorded walkfiles.
Check out this 2-minute
video
for a quick intro.
Discovery Wizard Sessions
In this dialog, you can create a new session or select an existing session that you wish to use. The Discovery Wizard allows you to interrupt and continue discovery sessions. A new session will be useful to run the discovery at a remote site without creating the simulation, then continue and create the simulation at your local site by selecting that existing session.
Create New Session: perform a fresh discovery and record the simulation
Select Existing Session: resume the discovery or recreate the simulation
You can annotate your discovery in the Comments field.
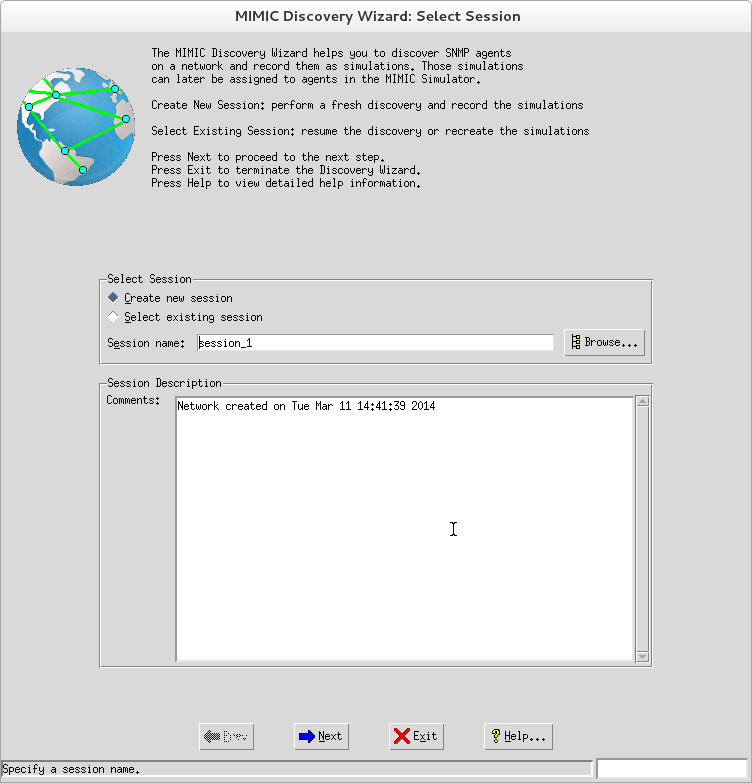
Figure 3: Discovery Wizard: Select Session
Discovery Method
In this dialog, select the discovery method. The Discovery Wizard supports three methods to generate the network simulation.
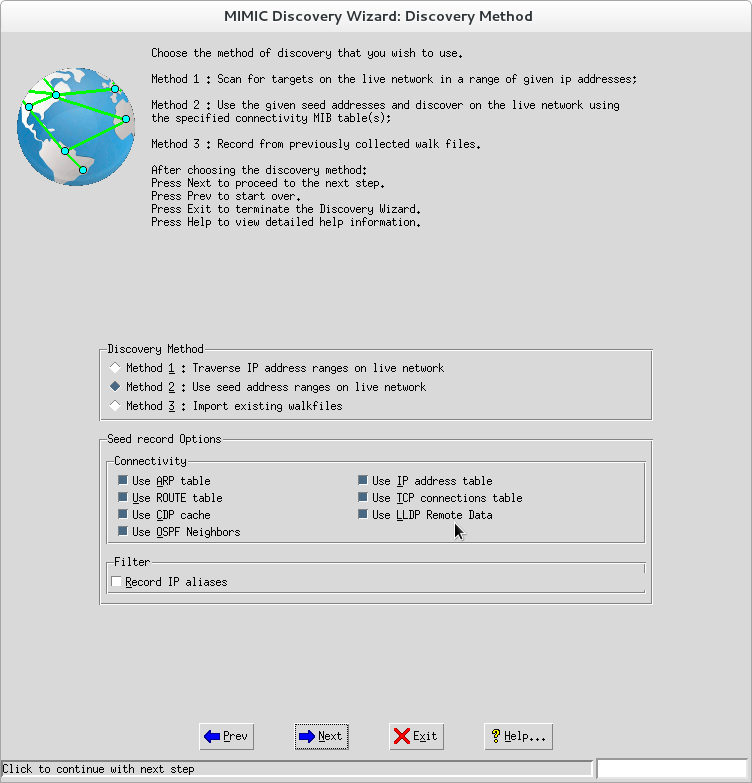
Figure 4: Discovery Wizard: Discovery Methods
Choose method 1 Traverse IP address ranges on live network, if you wish to discover SNMP Agents on the live network within specified ranges of IP addresses. This is useful to limit the discovery to a very specific set of addresses.
Choose method 2 Use seed address ranges on live network, if you wish to discover SNMP Agents on the live network from the tables maintained by special "seed" agents (routers, hubs, etc) within the specified ranges of IP addresses. You may select any combinaton of the ARP, ROUTE, IP Address, TCP Connections, CDP Cache, LLDP Remote and OSPF tables. Discovery will traverse those MIB tables, and try to probe addresses pointed to by these tables. This method is useful if you have a large network, and only know addresses of the main routers.
NOTE: the TCP Connections table could be very large, and point to many systems to continue discovery.
NOTE: by default, the wizard will detect IP aliases of devices (multiple network interfaces), and will record only one instance of the agent through one of the interfaces. This will generate a correct simulation, assuming that the data presented through each of the interfaces is the same. Some devices present different MIBs through different interfaces, if so, you can select the option Record IP Aliases to record agents on all interfaces.
Choose method 3 Import existing walkfiles, if you wish to create the network simulation from previously recorded walkfiles. This allows you to import walkfiles into MIMIC and generates a network simulation from them.
IP Addresses
In this dialog, enter the IP address ranges. If the Discovery method of "IP Address ranges" was chosen, these ranges will be used to discover the actual SNMP Agents. If the Discovery method of "Seed address ranges" was chosen, these ranges will be used to discover the seed agents. The chosen tables from these discovered seed targets will then be used for discovering the actual SNMP Agents.
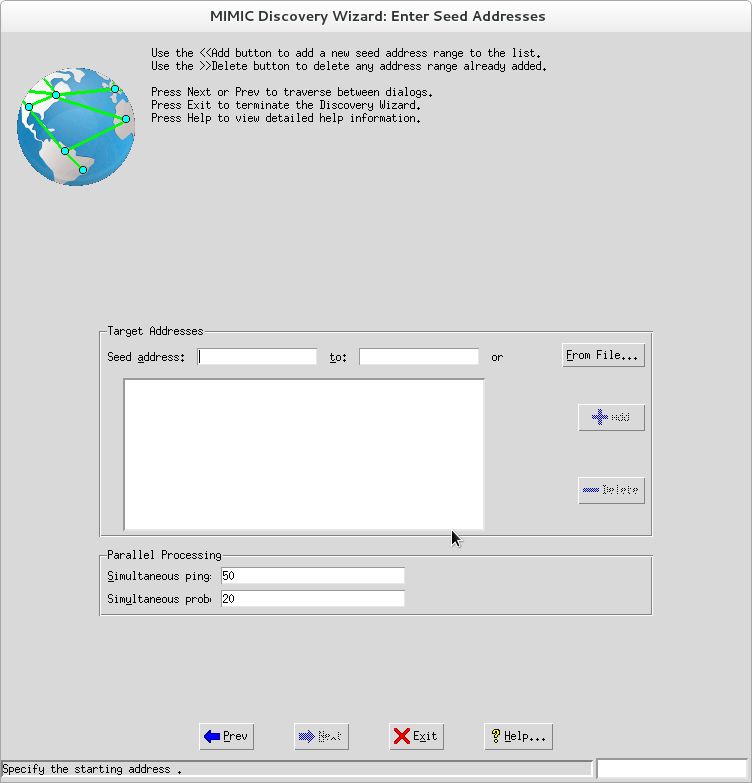
Figure 5: Discovery Wizard: Seed Addresses
Rather than inputting the addresses by hand, you can feed a file containing the addresses in the From File... dialog. The file needs to have one address or one address range per line.
In this dialog, you may also choose the number of simultaneous Pings to use for the discovery process.
Filters to Limit Discovery
In this step you may optionally specify Include and Exclude patterns. These patterns will be used to determine if an IP address from the specified ranges will be included or excluded.
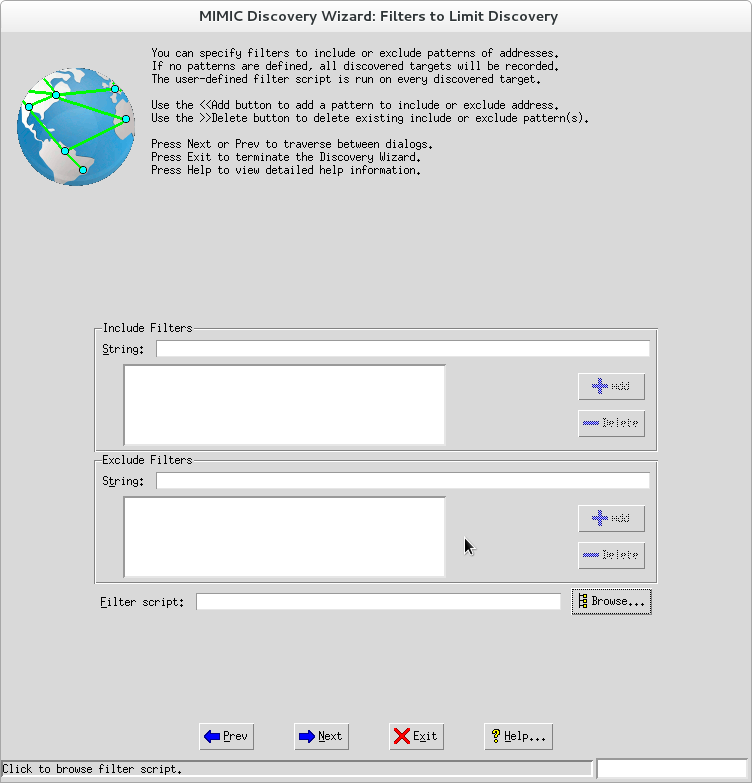
Figure 6: Discovery Wizard: Filters
The patterns can use the special characters "*" and "?". The "*" would match 1, 2 or 3 digits. The "?" would match a single digit.
The filter script lets you define a TCL script, which will dynamically be loaded into the Wizard to do advanced filtering of discovered devices. This lets you do incremental discovery, for example. MIMIC ships with sample filter scripts (scripts/discwiz_filter*.mtcl).
SNMP Parameters
In this dialog, you may enter the SNMP parameters to use.
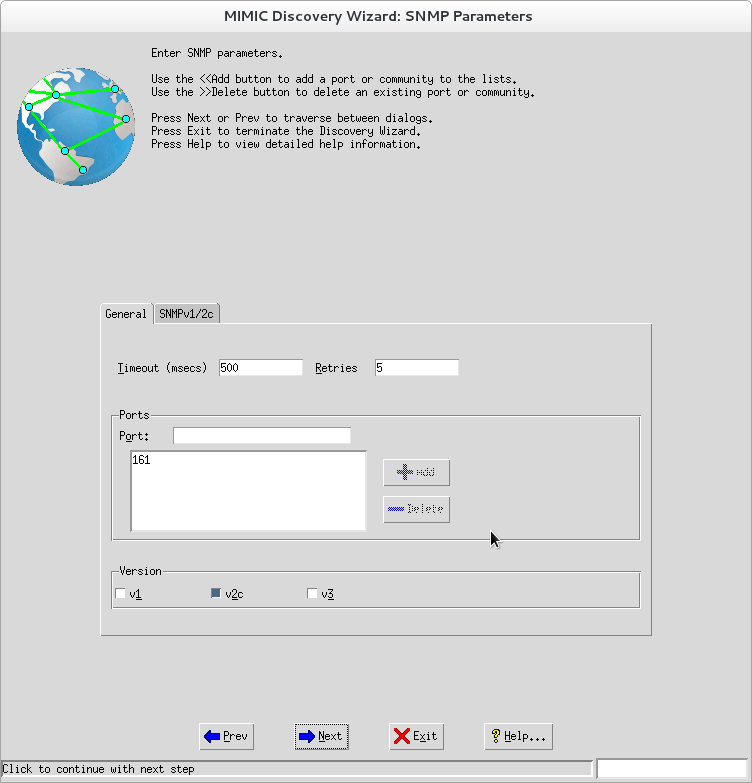
Figure 7: Discovery Wizard: SNMP Parameters
In the General tab you may change the Timeout (in msecs) and Retries. You may specify any number of ports, which will be probed in turn for each target, until one of them returns a valid response. You can select any of the supported SNMP versions, which will be used in turn for each of the selected ports for each target.
In the SNMPv1/v2c tab you specify the read community names to try. The default community is "public".
In the SNMPv3 tab you specify the user names and contexts to try.
Recorder Options
In this dialog, you may specify the options to be used with the MIMIC Recorder.
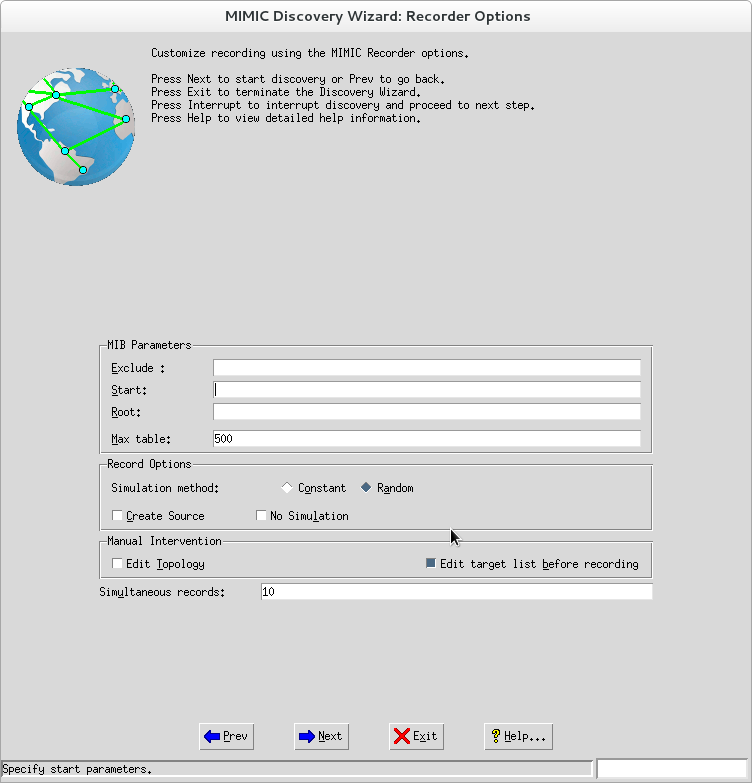
Figure 7: Discovery Wizard: Recorder Options
Optionally, specify a Start Oid. By default, the Recorder walks the entire MIB exported by the target agent. This options lets you specify the starting OID to start recording. This is useful if you want to restart a recording that previously failed for any reason.
Optionally, specify the Root Oids. By default, the Recorder walks the entire MIB exported by the target agent. This options lets you specify MIB subtrees to record. This option is useful if you are interested in only a small part of the MIB.
Optionally, specify the Exclude Oids. By default, the Recorder walks the entire MIB exported by the target agent. This option is useful if you want to exclude parts of the MIB from being simulated. For example, some MIB tables (such as RMON history tables) can be extremely dynamic (and large). Other tables implement proprietary retrieval schemes (e.g., getTable). Some agents even crash when you access certain parts of the MIB. This option allows to skip these MIB subtrees.
Optionally, specify the Max Table size. Selecting this option limits the size of large tables to the specified number of table entries. It applies both at discovery time, where only the selected number of entries are traversed, and at simulation time, where only the selected number of entries are simulated. This is useful for agents with large tables, such as RMON tables, etc.
Choose the Simulation Method. This option allows two choices: random or constant, to specify which of two simulation methods to use for counter simulations.
Optionally, choose to Create Source. Selecting this option generates the simulation source file so that you can change the simulation later on.
Selecting the No Simulation option skips the simulation phase and only generates a walk file. This is useful for example if you are at a remote site, and want to generate the simulation later.
Selecting the Edit target list before recording allows you edit the list of targets before actually performing the recording.
When you press Next> the discovery starts. A Log Windows displays results of the discovery and the progress bar shows the progress.
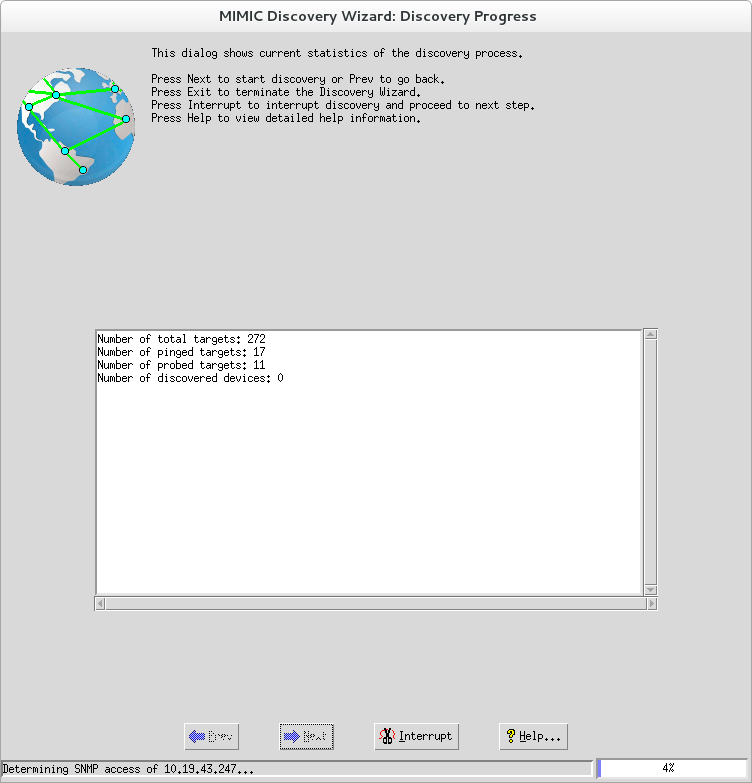
Figure 8: Discovery Wizard: Progress
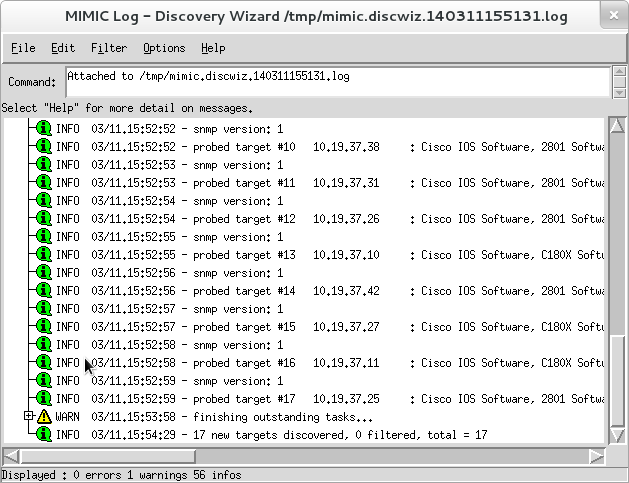
Figure 9: Discovery Wizard: Log
Select Walkfiles
This dialog allows you to specify a group of previously recorded walkfiles to import into the Discovery Wizard in lieu of live recording of devices.
Discovered Targets
In this dialog, the discovered SNMP Agents are displayed in a listbox. You may, optionally, delete some of them.
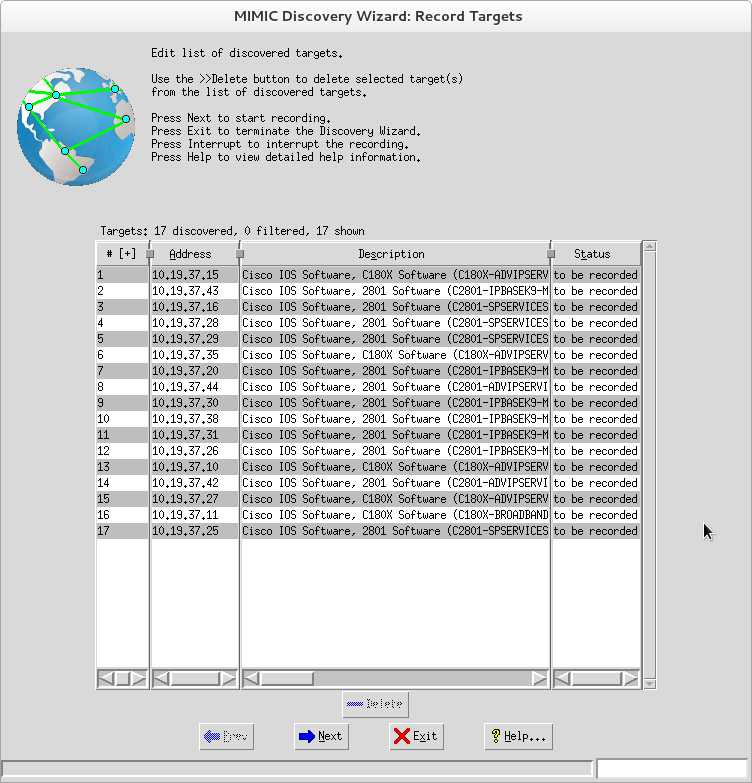
Figure 10: Discovery Wizard: Discovered Targets
To record the discovered SNMP Agents, press Next>. The Log Window displays the results of each recording.
In real-time, the Status column shows the current status of each target, one of to be recorded, recording or recorded.
Recorded Targets
The Discovery Wizard allows to record agents at one site, then resume the simulation creation at another. This is accomplished by selecting No Simulation in the original session, then resuming it. In this dialog, the recorded SNMP Agents in a resumed session are displayed in a listbox. You may, optionally, exclude some of them by deleting them from the list. Simulations will not be regenerated for excluded targets.
To specify recorder options for regenerating simulations, press Next>.
Create Lab Configuration
Once the targets are recorded, they are categorized into the device catalog in a new category under Devices -> Discovered with the same name as the discovery session named above.
Then you can save the recorded lab configuration so that you can later load it into the Simulator.
Interrupted Session
In this dialog, the summary of user inputs for the last interrupted session as well as state of the engine at which the engine was interrupted is shown.
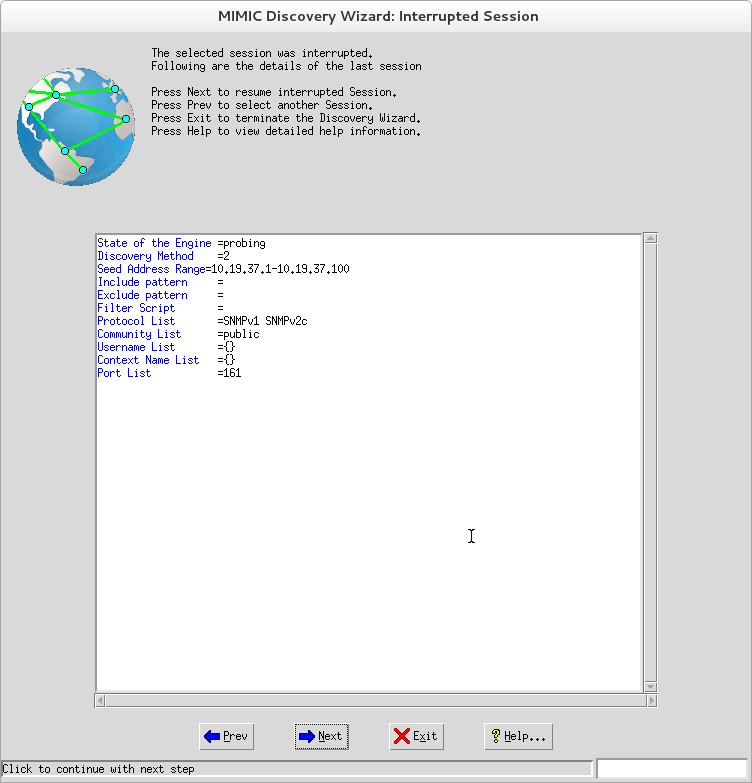
Figure 11: Discovery Wizard: Interrupted Session
The wizard continuously checkpoints its state, so that on any interruption it can continue where it left off, as if it had never been interrupted.
-
Snapshot Wizard Reference
Overview
 The Snapshot Wizard makes it easy to take multiple snapshots of a device
over time and automatically change the simulation to account for changes.
This is specially useful if you take an initial snapshot, make some changes
on your device (reconfigure it, such as take cards in/out of service,
make operational changes such as higher loads, etc), then take another
snapshot after the change. The Wizard will automatically detect the changes
(different MIB object values, new/deleted table entries, different counter
rates, etc), and create timer scripts to change the simulation. In addition
to manual snapshots (like a camera click), you can also take periodic
snapshots, such as every hour, to capture long-term trends.
The Snapshot Wizard makes it easy to take multiple snapshots of a device
over time and automatically change the simulation to account for changes.
This is specially useful if you take an initial snapshot, make some changes
on your device (reconfigure it, such as take cards in/out of service,
make operational changes such as higher loads, etc), then take another
snapshot after the change. The Wizard will automatically detect the changes
(different MIB object values, new/deleted table entries, different counter
rates, etc), and create timer scripts to change the simulation. In addition
to manual snapshots (like a camera click), you can also take periodic
snapshots, such as every hour, to capture long-term trends.
Snapshot Option
You can create a new snapshot series, or add new snapshots to an existing series. To create a new snapshot, you need to give it a new name that you can remember, preferably a short word or phrase, like test1, or cisco5k-under-stress.
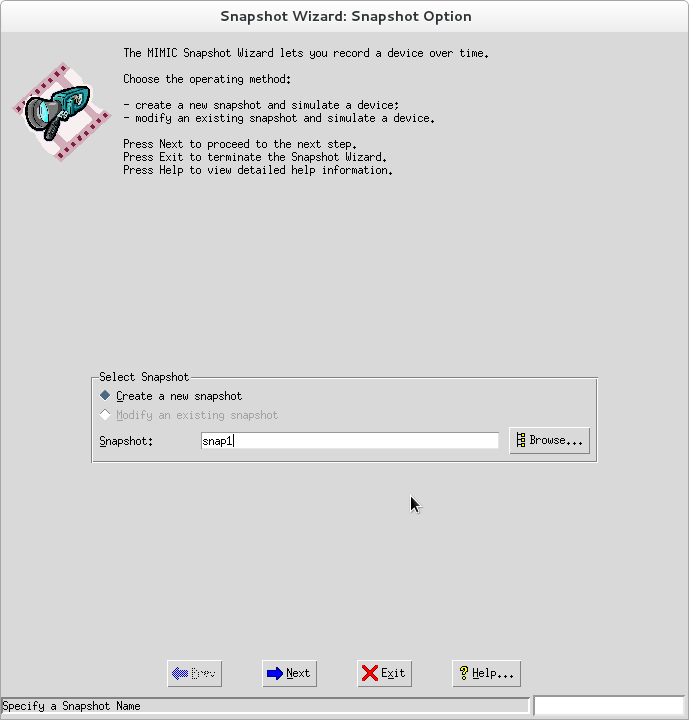
Figure 12: Snapshot Wizard: Option
Simulation Option
You can create a new simulation, apply the snapshots to an existing simulation, or copy an existing simulation and apply the snapshots to it. To create a new simulation, you need to give it a new name that you can remember, preferably a short word or phrase, like test1, or cisco5k.
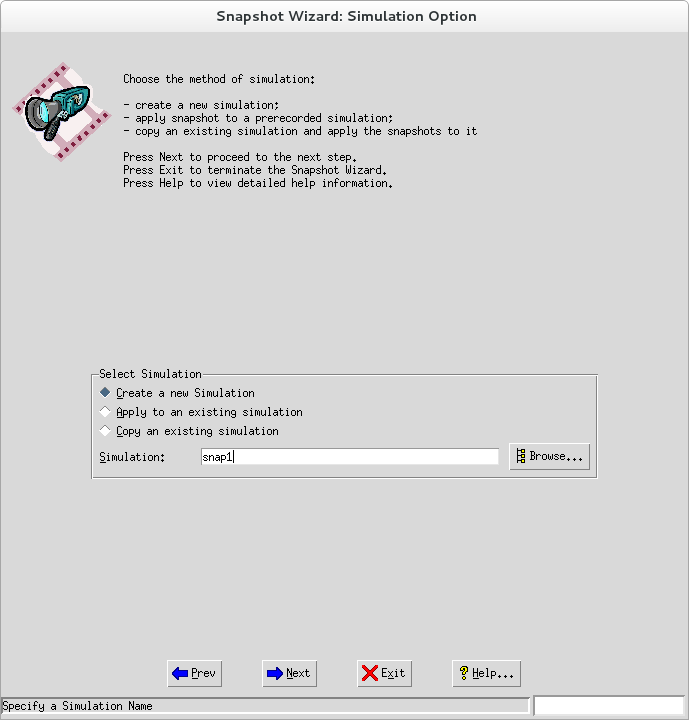
Figure 13: Snapshot Wizard: Simulation
Choose a Live Target
Specify the mandatory target parameters to be recorded. See the MIMIC Recorder Guide for more details.
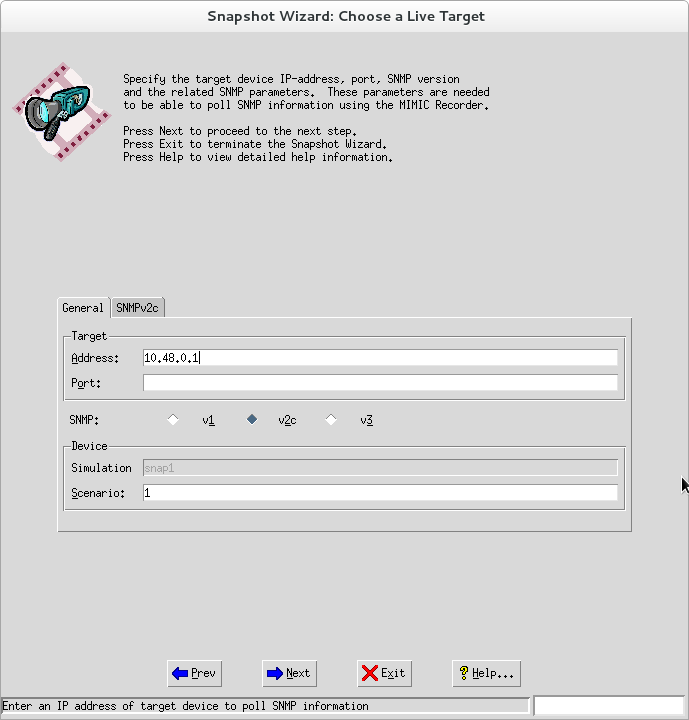
Figure 14: Snapshot Wizard: Target
Recorder Options
These optional parameters modify the default recording. See the MIMIC Recorder Guide for more details.
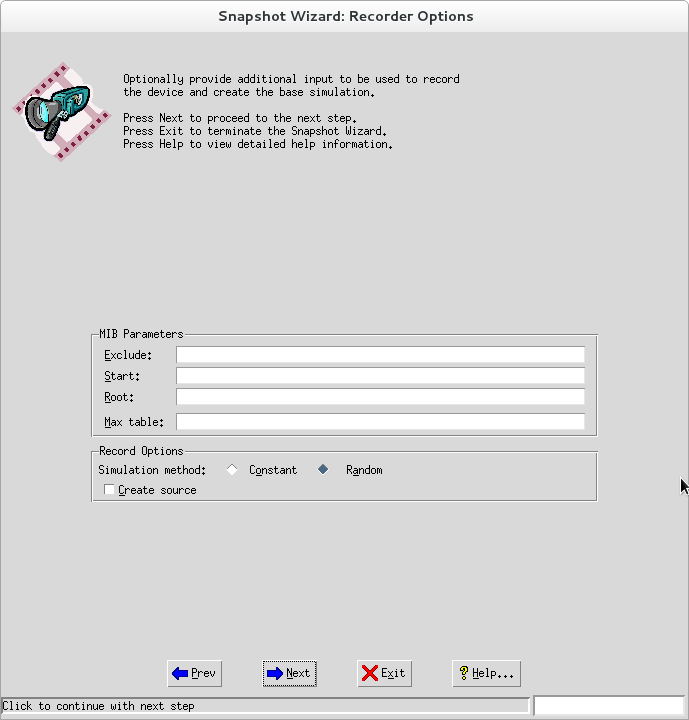
Figure 15: Snapshot Wizard: Recorder
Once you click Next, the MIMIC Recorder will record the target. To continue, dismiss the log viewer window that pops up.
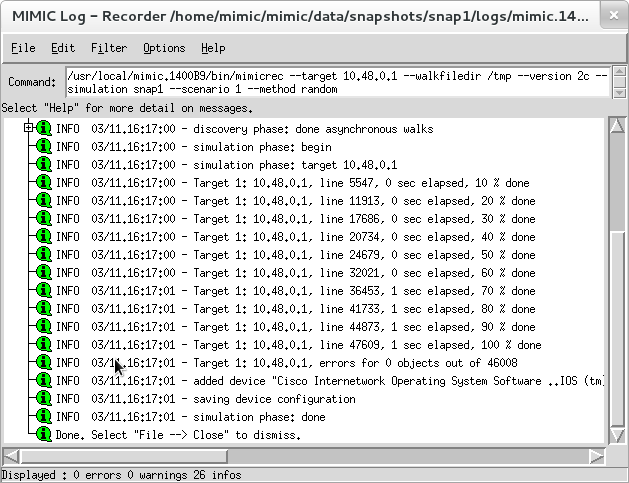
Figure 16: Snapshot Wizard: Log
Snapshot Constraints
From here on you will take snapshots of the device at different times. But, your snapshots may not need to record the entire device, if you know that the changes will be confined to a particular area. In this dialog you can impose constraints on the snapshots.
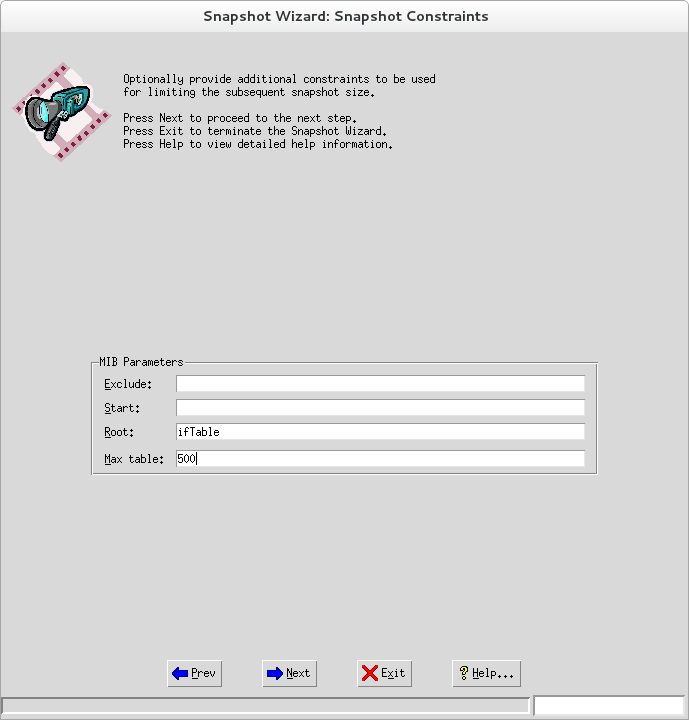
Figure 17: Snapshot Wizard: Constraints
These optional constraints further restrict all subsequent snapshots. If the snapshot is of the entire MIB, that is very expensive both in terms of the amount of data, and the computing to detect differences. It is usually better to concentrate on MIB subtrees (Root), and/or exclude large MIB subtrees.
Take Snapshots
You can take an immediate snapshot or schedule periodic snapshots.
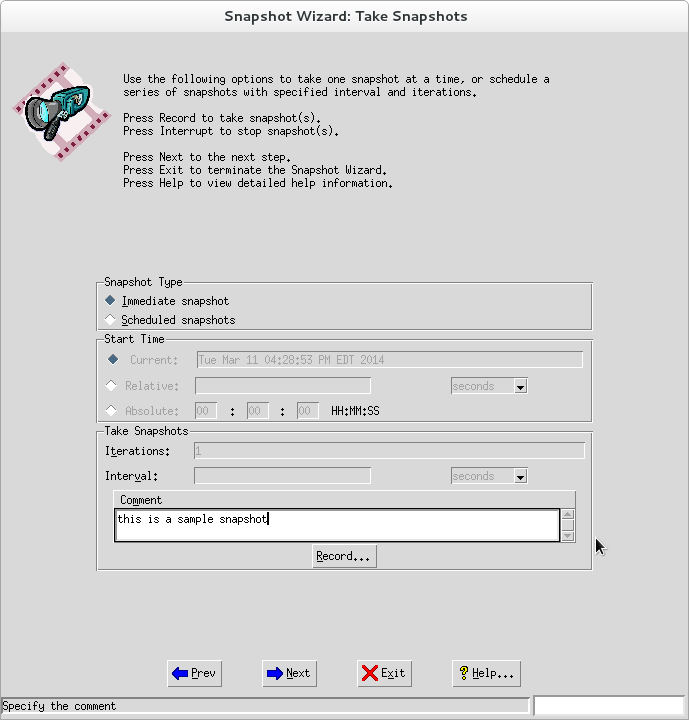
Figure 18: Snapshot Wizard: Take Snapshots
If you select Immediate Snapshot, when you press the Record... button the snapshot will happen immediately. This is equivalent to pressing the snapshot button on a camera. Optionally, you can input an informative Comment for your snapshot.
When you choose Scheduled Snapshots, you can use the Start Time frame and Take Snapshots frame to schedule your periodic snapshots.
Create Change Script
This dialog allows you to edit the sequence of snapshots you took. Once you click Finish, a script will be created in the simulation directory to transition the simulation through the desired changes.
You need to select at least 2 walkfiles to create change script(s).
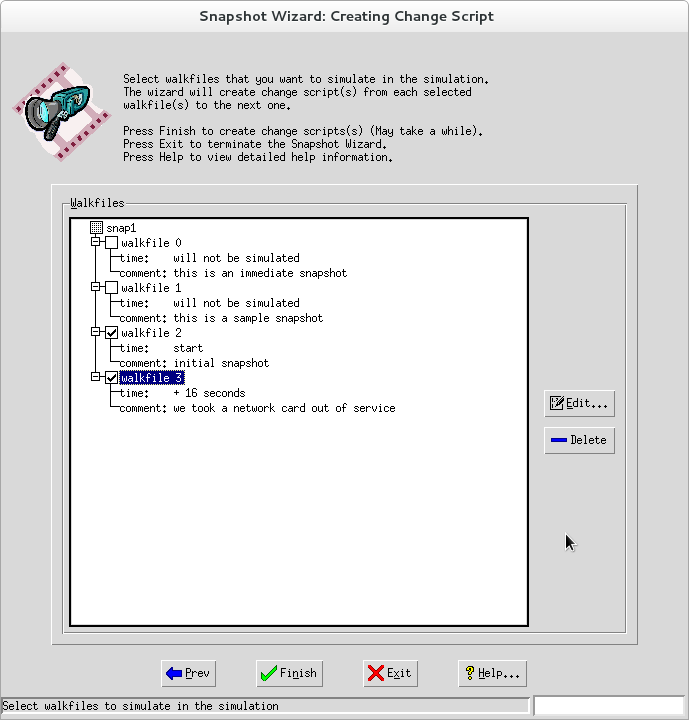
Figure 19: Snapshot Wizard: Create Script
Apply Change Script Manually
By default, after you apply a snapshot series to a simulation device, all changes occur automatically in the background at the same pace as the recorded device. The change script(s) are change.{0,1,2...}.mtcl file(s) in the same device simulation directory, like these,
$ ls data/sim/procurve530/
BRIDGE-MIB                       IPV6-MIB
change.0.mtcl                    microsoft-LanMgr-Mib-II-MIB
change.1.mtcl                    OLD
dev.cfg                          RFC1213-MIB
HOST-RESOURCES-MIB               SFLOW-MIB
hp-HP-PROCURVE-WLAN-AP-MIB       SNMP-FRAMEWORK-MIB
hp-HP-PROCURVE-WLAN-AR-MIB       SNMP-MPD-MIB
hp-HP-PROCURVE-WLAN-SYSTEM-MIB   SNMP-USER-BASED-SM-MIB
hp-HP-WLAN-SFLOW-EXTENSIONS-MIB  SNMPv2-MIB
IF-MIB                           SNMP-VIEW-BASED-ACM-MIB
invoke.0.mtcl                    start+snapshot.mtcl
invoke.1.mtcl                    stop+snapshot.mtcl
invoke.2.mtcl                    TCP-MIB
IP-FORWARD-MIB                   UDP-MIB
$
.To manually apply the changes at your own pace, you can use MIMICShell to invoke the change script(s), such as this,
$ ./mimicsh --nogui --agent 4 --script ~/mimic/data/sim/procurve530/change.1.mtcl
.You can also copy the change.*.mtcl script(s) to the private area's scripts directory and use the Agent->Script window to invoke the change script(s).
-
Trap Wizard Reference
Overview
 The Trap Wizard allows you to capture a series of traps from a target
device and creates scripts that will play them back in the Simulator.
This consist of 2 distinct recording processes: first to record the
MIB of the live target device to create the base simulation, then to
capture the generated traps from the device.
The Trap Wizard allows you to capture a series of traps from a target
device and creates scripts that will play them back in the Simulator.
This consist of 2 distinct recording processes: first to record the
MIB of the live target device to create the base simulation, then to
capture the generated traps from the device.
While the initial MIB recording is a one-time process, the capture of traps can be done multiple times. You could for example cause your device to generate a sequence of traps for a certain reason (eg. some abnormal condition), verify this is what you captured, then generate another sequence for the restoration to normal operations.
You can further use the MIMICView Agent->Generate Traps... dialog to manually generate any trap for a group of agents.
Check out this 3-minute
video
for a quick intro.
Series Options
The end-result of the Trap Wizard is a Trap Series that will be played back in a simulation. This playback is implemented as a group of Timer Scripts that will be invoked upon starting an agent that runs the simulation.
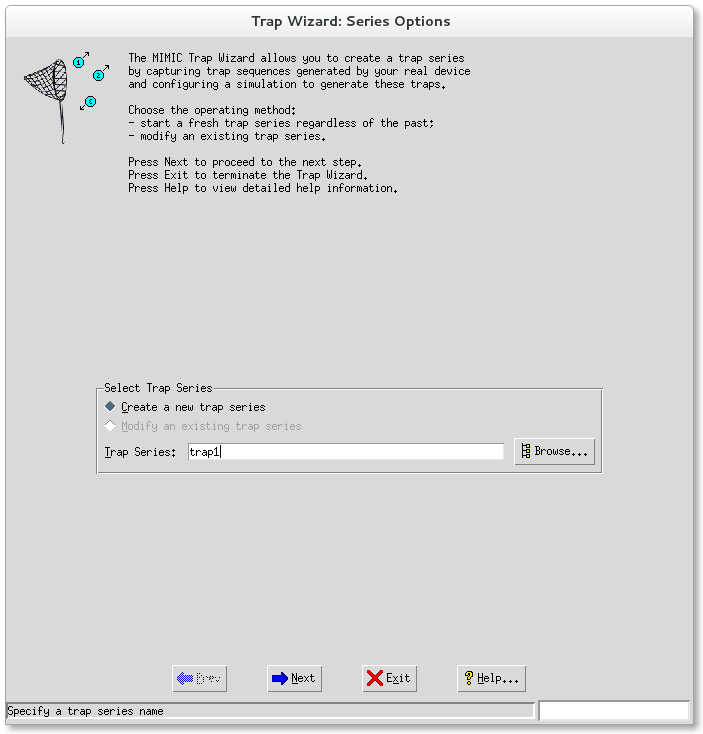
Figure 20: Trap Wizard: Options
This dialog lets you start a fresh series or modify an existing one. To create a new series, you need to give it a new name that you can remember, preferably a short word or phrase, like test1, or cisco5k-booting.
Simulation Options
The trap series will be applied to a simulation. This dialog lets you specify a fresh simulation, an existing one, or a copy of an existing one. If you create a new simulation, the MIMIC Recorder will be invoked to create it. If you copy an existing simulation, the original is not touched.
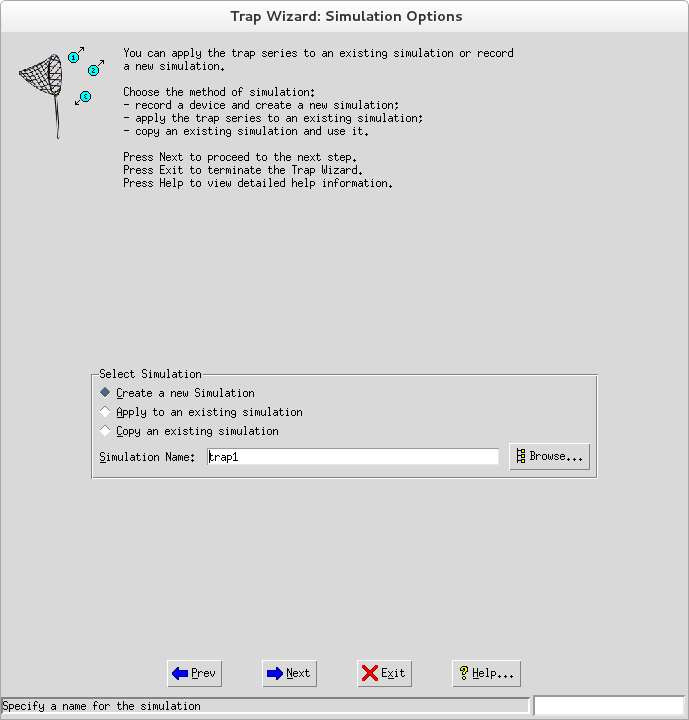
Figure 21: Trap Wizard: Simulation
Choose a Live Target
If you selected to create a new simulation, then this dialog lets you specify the mandatory target parameters, such as its address, version of SNMP, etc. These parameters will be used by the MIMIC Recorder to record the target.

Figure 22: Trap Wizard: Target
Recorder Options
These optional parameters modify the recording of the MIB. See the MIMIC Recorder Guide for more details.
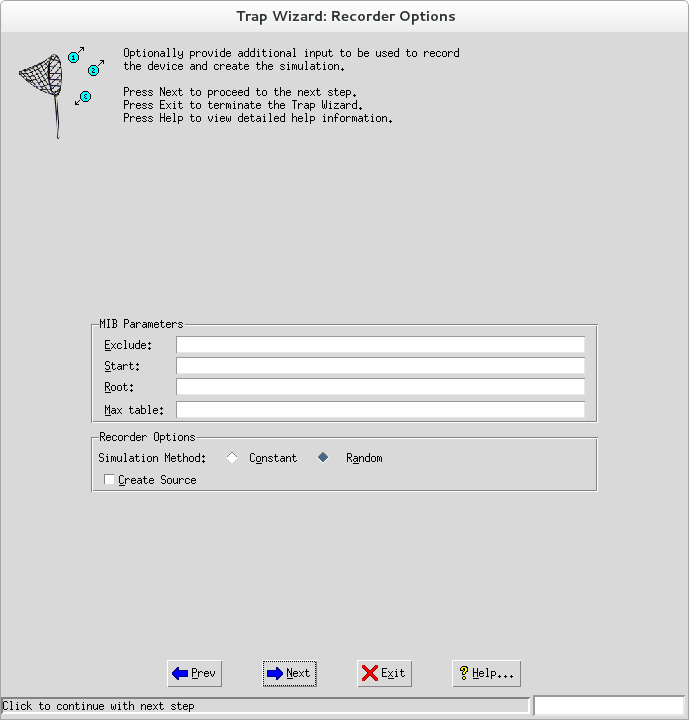
Figure 23: Trap Wizard: Recorder
Once you click Next, the MIMIC Recorder will record the target. Dismiss the Log Windows to continue.
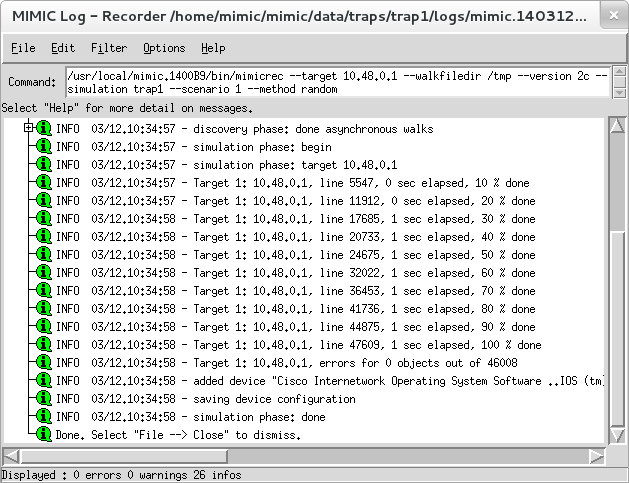
Figure 24: Trap Wizard: Log
Trap Capture Options
You can select to capture traps live, by invoking the Trap Recorder with these optional parameters to control the capture of traps. See Record Traps for more details.
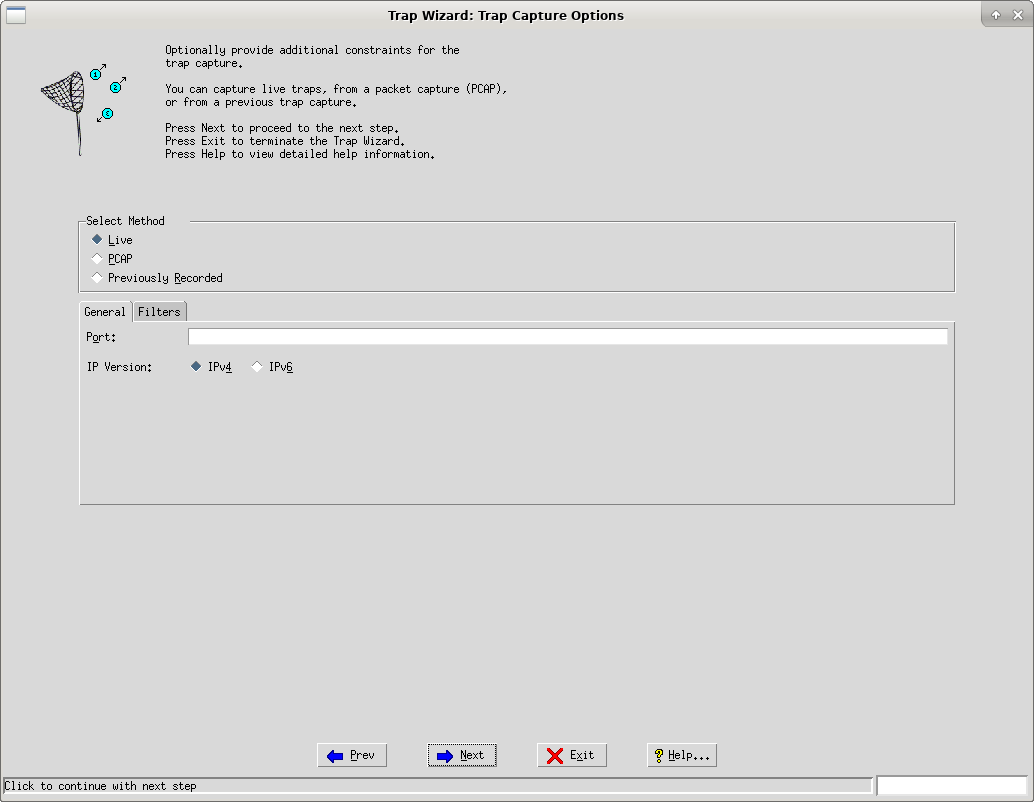
Figure 25: Trap Wizard: Capture
Instead of a live capture you can record from a PCAP file that contains captured TRAP messages. Through this wizard, all TRAP messages in this PCAP are recorded, but the trapper tool has filtering options. If you want to filter certain traps only, then you need to either use the trapper from the command line, or filter your PCAP in a utility like wireshark.
Otherwise, if you previously recorded traps with the Trap Recorder, then the wizard can read the Trap Recorder output. This way, you can deploy the Trap Recorder remotely, capture traps, and import them back into the MIMIC installation.
Capture Trap Series
This dialog is the heart of the wizard, and lets you capture multiple sequences of traps for this series. The capture can be delayed, and its duration controlled. When you press the Capture... button, then the capture starts and captured traps are displayed in real-time. The capture stops when you press the Interrupt button or when the Duration expires.
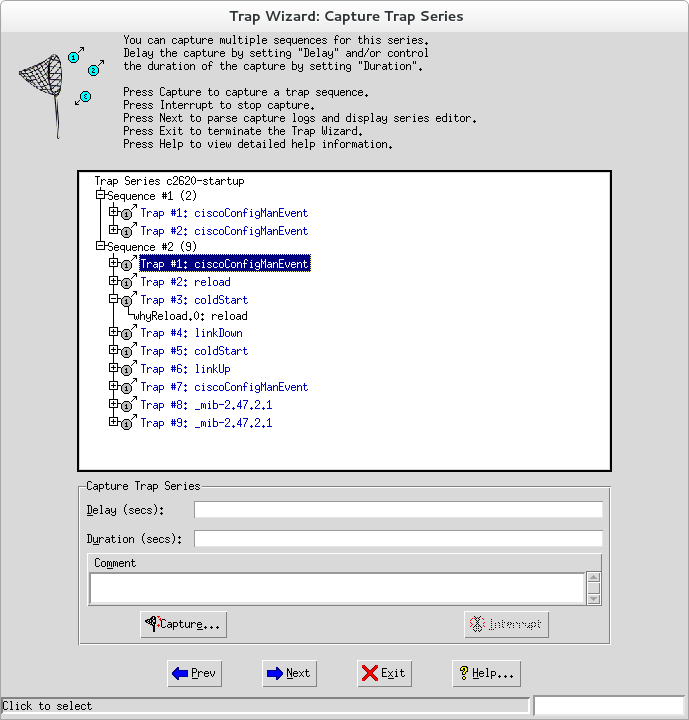
Figure 26: Trap Wizard: Series
The traps displayed in this dialog are all the captured traps, whether deleted or not. You can delete entire sequences / individual traps in the next dialog, and select / deselect them to be generated.
Edit Trap Series
Once you are done with the capture, you can edit the trap series that you want to simulate with this dialog.
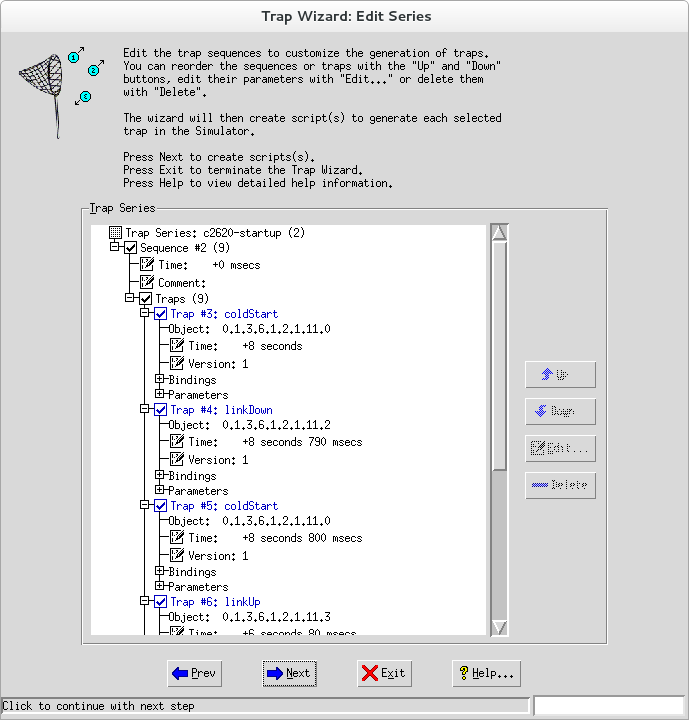
Figure 27: Trap Wizard: Edit Series
You can select the sequences and individual traps that you want the wizard to generate scripts for. Click on a node with a checkbox to select/deselect the item (and it's children). For example, selecting a sequence selects all the traps in the sequence.
You can delete sequences that you don't want to consider in the future, eg. if the sequence is empty. Click on a sequence, and press the >>Delete button.
You can edit parameters of sequences (Time, Comment) and traps (Time, Version). Click on the node, then press the Edit button to change the value. Changed items are shown in red.
The Up and Down buttons move the selected trap up or down in the series, thus changing the order of the generated traps.
Play Back Testing
When the scripts are created, you can play back the traps on your simulated device.
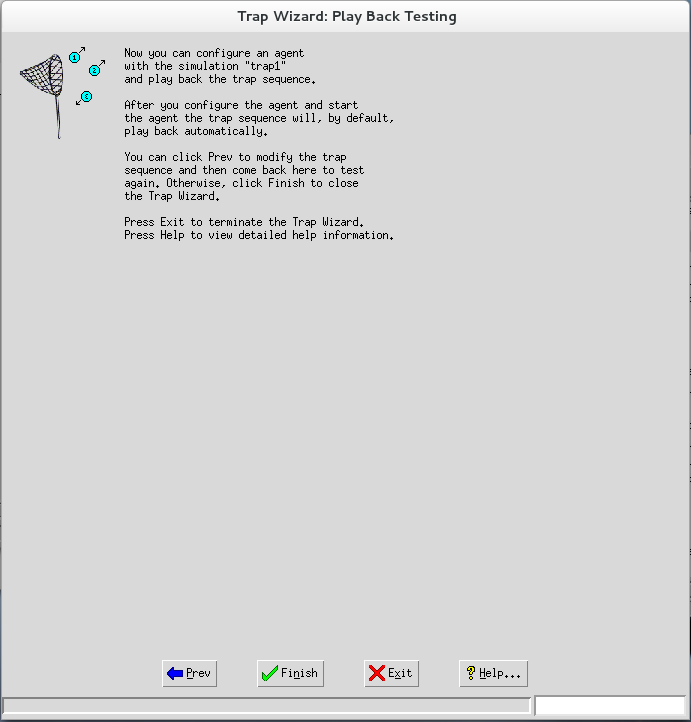
Figure 28: Trap Wizard: Play Back
When you start an agent with that simulation, you can control the generation of the traps with the Agent->Trap Series... dialog.
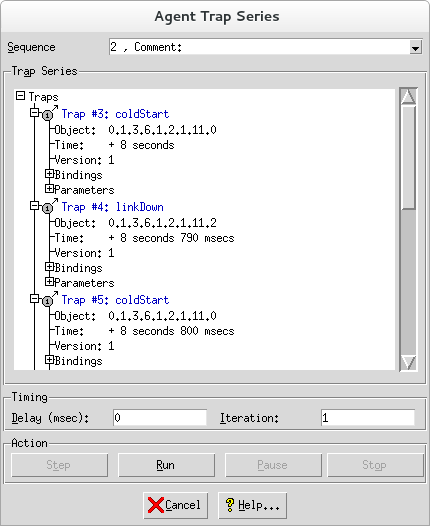
Figure 29: Trap Wizard: Run
-
Simulation Wizard Reference
Overview
 The Simulation Wizard is designed to easily create a basic simulation from
a set of walkfiles and MIBs. It is a user-friendly, graphical front-end to the
mib2walk utility, and the
Record from File functionality.
The Simulation Wizard is designed to easily create a basic simulation from
a set of walkfiles and MIBs. It is a user-friendly, graphical front-end to the
mib2walk utility, and the
Record from File functionality.
Through a graphical interface, you define instances and values for each of the MIB objects and save them in a walkfile, which is fed to the MIMIC Recorder to create the simulation.
Select Walkfile To Load
By loading an optional walkfile, you seed the simulation with instances and values of your MIB objects. This walkfile can be from a previous live recording with the MIMIC Recorder, or saved by the Simulation Wizard.
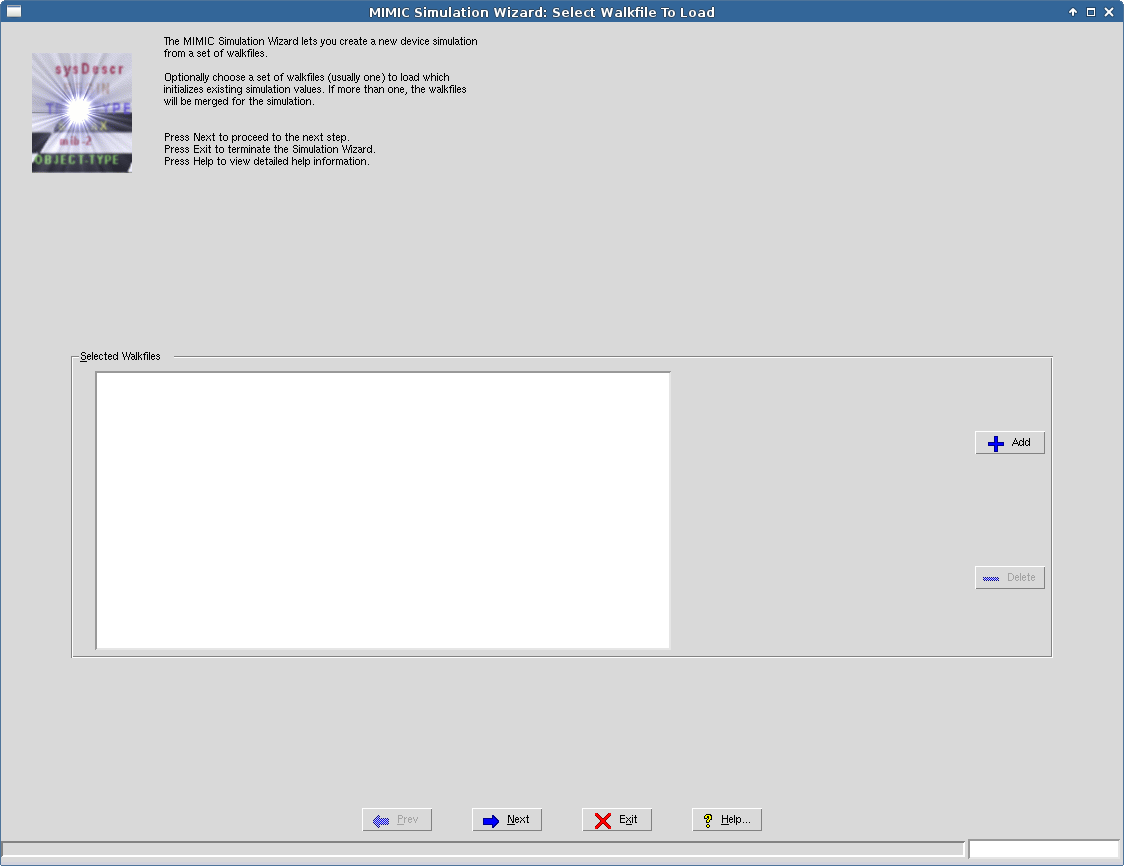
Figure 30: Simulation Wizard: Walkfile
If you load more than one walkfile, they will be merged. This is useful if you have walkfile fragments for distinct (disjoint) parts of your MIB.
Press Add... to add walkfiles from a file browser dialog. Select a walkfile and press Delete to delete it from the list.
If you don't have a walkfile, you will have to specify instances and values for MIB objects you want to simulate.
Select MIBs
In this dialog, select the MIBs you want in your simulation. If you loaded a walkfile in the previous dialog, the set of MIBs is detected from that walkfile.
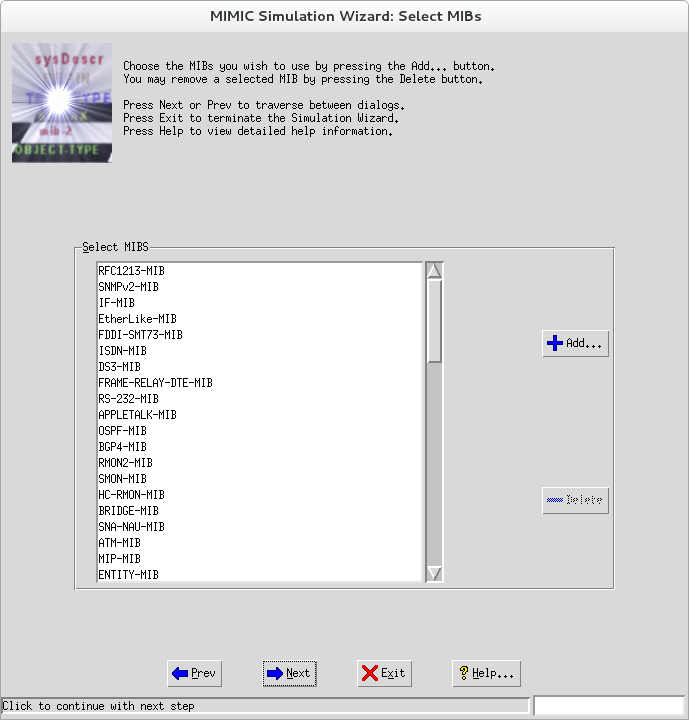
Figure 31: Simulation Wizard: MIBs
You can incrementally add more MIBs to your simulation. Start with a small set, e.g., just RFC1213-MIB. Then add more MIBs as you complete the simulation.
Press Add... to add MIBs from a MIB selection dialog. Selecting an enterprise and clicking Ok in the Browse MIB Directory adds all the MIBs in that enterprise to the list. Select one or more MIBs and press Delete to delete them from the list.
Specify Default Values
The Simulation Wizard can seed all objects for which you don't specify values with default values. To accomplish this, check off the Use Default Values button. Then enter the default values you want for each of the types of MIB objects. These values will be used only if the object does not already have a DEFVAL clause defined in the MIB.
For tables, a single instance will be created with an index whose value is determined by the default value of its type.
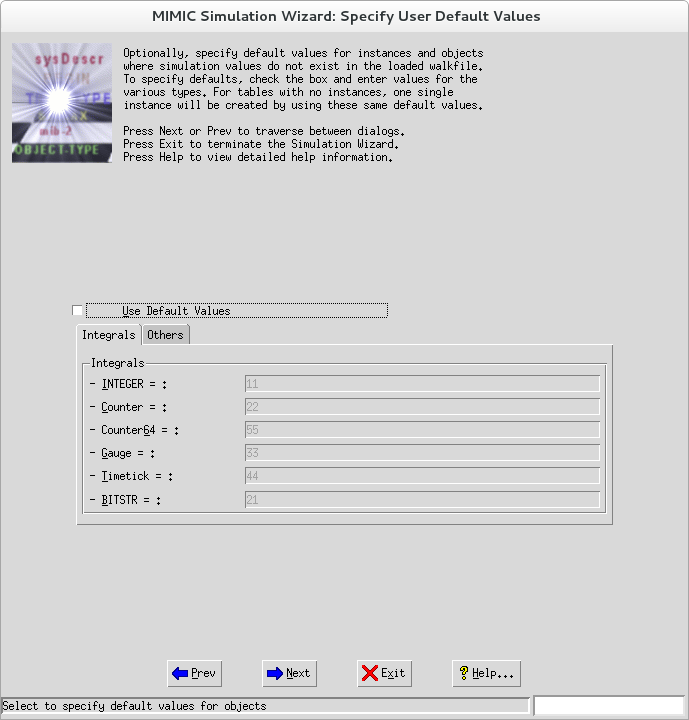
Figure 32: Simulation Wizard: Defaults
Edit Object Simulations
In this step you instantiate MIB objects and successively assign them values.
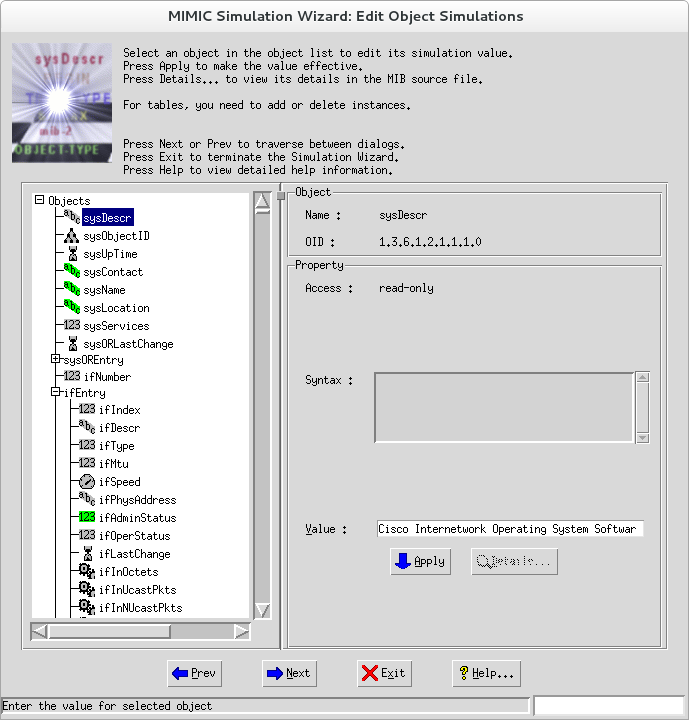
Figure 33: Simulation Wizard: Edit
For all tables, you need to instantiate rows in the table. For all MIB objects that are not Counters, MIMIC creates a simulation that returns the value that you set here. For Counter objects, MIMIC generates a rate-based simulation, based on the value you give to the object, and the current value of sysUpTime.0:
rate = value(object) / value(sysUpTime.0)
Select Walkfile To Save
We recommend that you save the walkfile, since you can later load it again into the Wizard. This walkfile is saved in the walks/ directory in your private area.
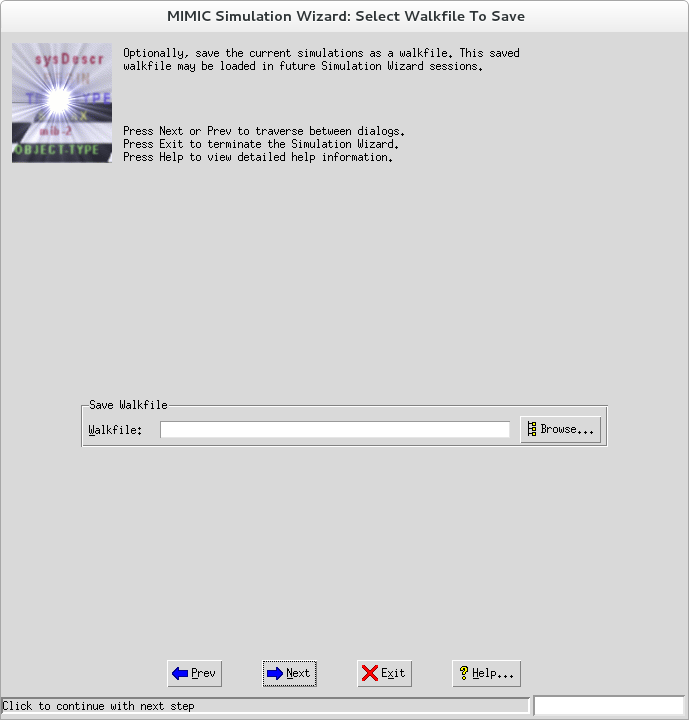
Figure 34: Simulation Wizard: Save
Select Simulation to Create
In this final step, you specify the new device simulation to create.
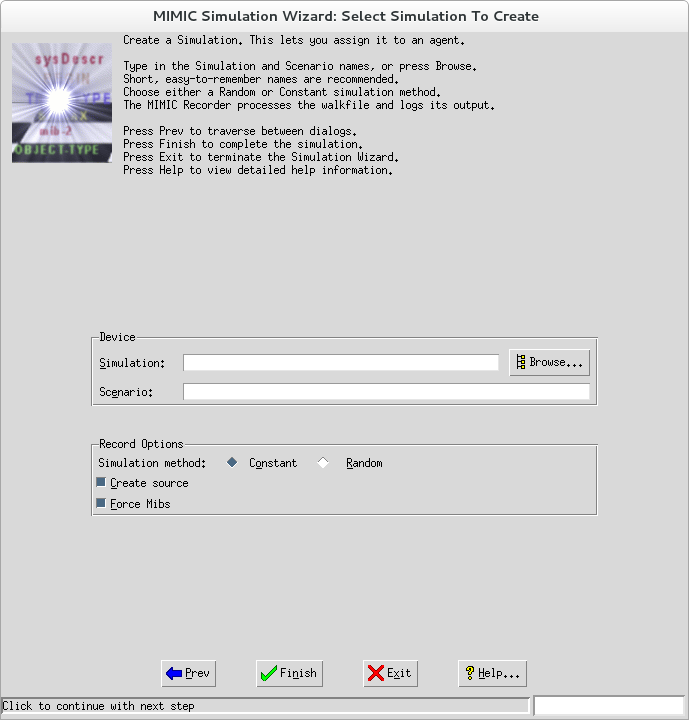
Figure 34: Simulation Wizard: Simulation
Fill in any Simulation name, such as test, or a short name for the target you are recording, or your first name. Use any Scenario name, such as a small number, e.g., 1.
These names will be significant once you start doing advanced tasks. Pick easy names to remember.
Choose a constant simulation method for regression tests: Counter objects will increment at a constant rate, causing predictable values. Use a random simulation method for realistic simulations: Counter objects will increment at the specified rate, but with a minor random fudge factor. Values in this type of simulation are not predictable.
-
CLI Wizard Reference
Overview
 The CLI Wizard helps you to create a command line interface (CLI) Simulation
from a real device with a command line interface, such as Cisco IOS, Juniper
JUNOS, etc. It combines and integrates the functionality of the
IOS Explorer
and the
IOS Recorder.
The wizard creates a CLI simulation to be loaded into the
MIMIC Telnet Protocol Module.
Instead of requiring a third party NMS application to issue commands, it
discovers the commands on the device dynamically, which are then recorded.
The CLI Wizard helps you to create a command line interface (CLI) Simulation
from a real device with a command line interface, such as Cisco IOS, Juniper
JUNOS, etc. It combines and integrates the functionality of the
IOS Explorer
and the
IOS Recorder.
The wizard creates a CLI simulation to be loaded into the
MIMIC Telnet Protocol Module.
Instead of requiring a third party NMS application to issue commands, it
discovers the commands on the device dynamically, which are then recorded.
The results of the wizard will be a rule file that maps CLI commands to responses. Each command detected will result in a rule entry and its corresponding response .mtcl file. It will also dump a transcript of the commands and responses for future processing.
Method Choice
Choose to record from a live device, a previously captured PCAP file, or from a transcript of a telnet session.
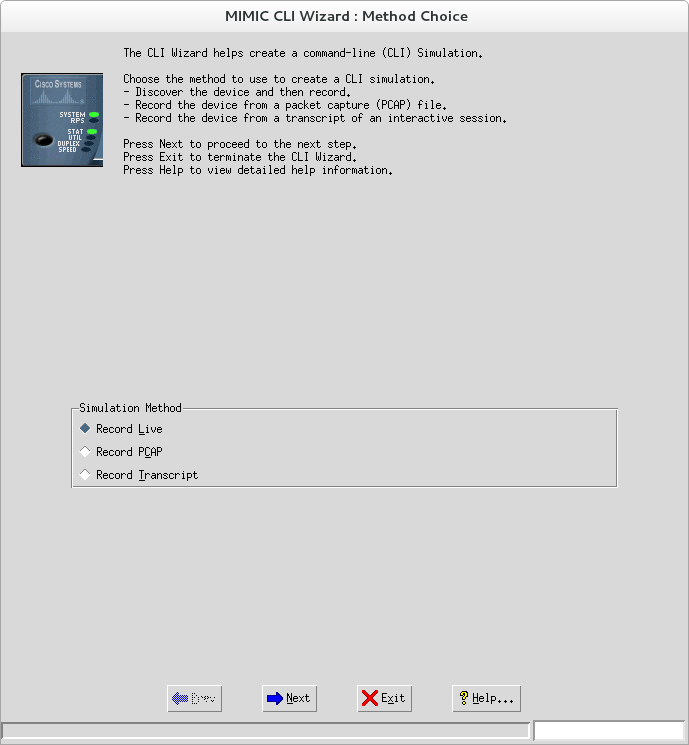
Figure 44: CLI Wizard: Method
Recording Parameters
This dialog specifies the parameters for live recording or from PCAP. For the latter, you need to specify the PCAP In File below.
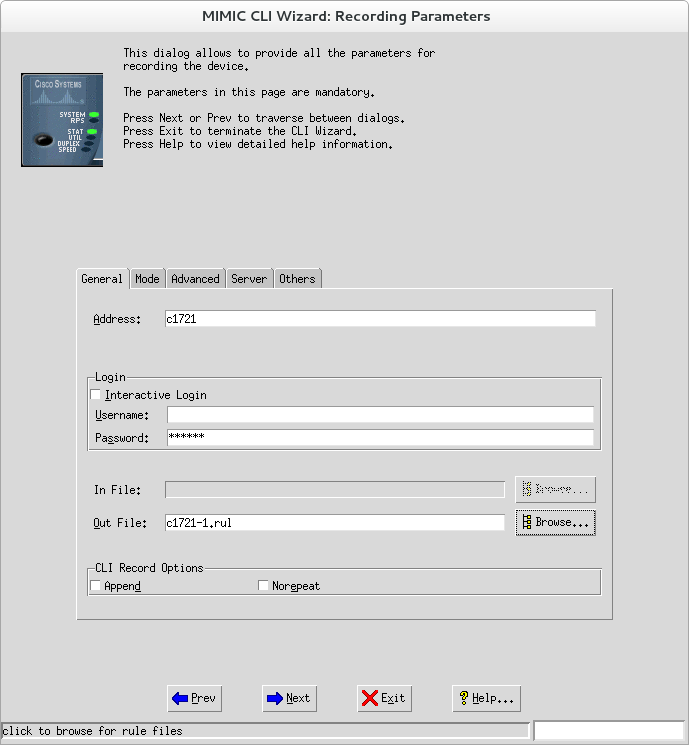
Figure 45: CLI Wizard: Parameters
The following General parameters have to be specified:
-
Address
The IP Address of the device to be recorded. This is mandatory.
-
Interactive Login
This indicates you want to discover in interactive mode. A simple terminal dialog is presented. You will need to interactively enter login information. This is useful if you need to go through terminal servers, or other frontends before reaching your target device. You are done when you are logged into the device and you see its command prompt and can press Next.
-
Username
The username to use to login to the device.
-
Password
The password to login to the device.
-
In File
This is only used in Method 2 Record From PCAP.
-
Out File
The Rule file to be created. It is recommended that this be in its own folder, ie. a name of the form YOUR-FOLDER/YOUR-RULE where YOUR-FOLDER is your folder name, and YOUR-RULE is your rule name. The Wizard will put all related files for your CLI simulation in that folder.
-
Append
To append to the existing rule file.
-
Norepeat
To add rule without repeat
Optionally, you can also specify these Mode parameters:
-
Modes
Select to discover different modes.
-
Enable Password
Enable password to enter enable mode.
-
Interface Command
Interface command to enter config-if mode.
-
Router Command
Router command to enter config-router mode.
-
Line Command
Line command to enter config-line mode
-
Command1 ... Command5
Commands to discover other modes.
-
Prompt1 ... Prompt5
Corresponding prompts to expect in other modes.
Optionally, you can also specify these Advanced parameters:
-
Template Rules
TBD
Optionally, you can also specify these Telnet server parameters:
-
Port
The telnet port to use (default 23).
-
Login Prompt
The login prompt to be detected, if it is non-standard. The IOS Recorder uses patterns like the login prompt ("Username: "), password prompt ("Password: ") and login failure message ("Login incorrect") to construct the connection welcome message. These default values can be overriden by setting the Login Prompt, Password Prompt and Login Failure Message configurables in this tab.
-
Password Prompt
-
Login Failure Message
In the Others tab you can specify these parameters:
CLI Discovery Options
-
Discovery Depth
How many subcommand levels to traverse.
-
Timeout
Timeout to wait for response.
-
Ignore Output Redirect Commands
This options lets you ignore output redirections. The Output Redirect Symbol field specifies a space-separated list of redirect symbols.
-
Include Permutational Commands
If you are recording a live device, pressing Next goes to the next step.
If you are recording from a PCAP file, pressing Finish will process any Telnet requests and responses in that PCAP for the specified server address and create the rule file in the Out File you specified above.
Transcript Recording Parameters
This dialog allows you supply the recording parameters from a transcript.
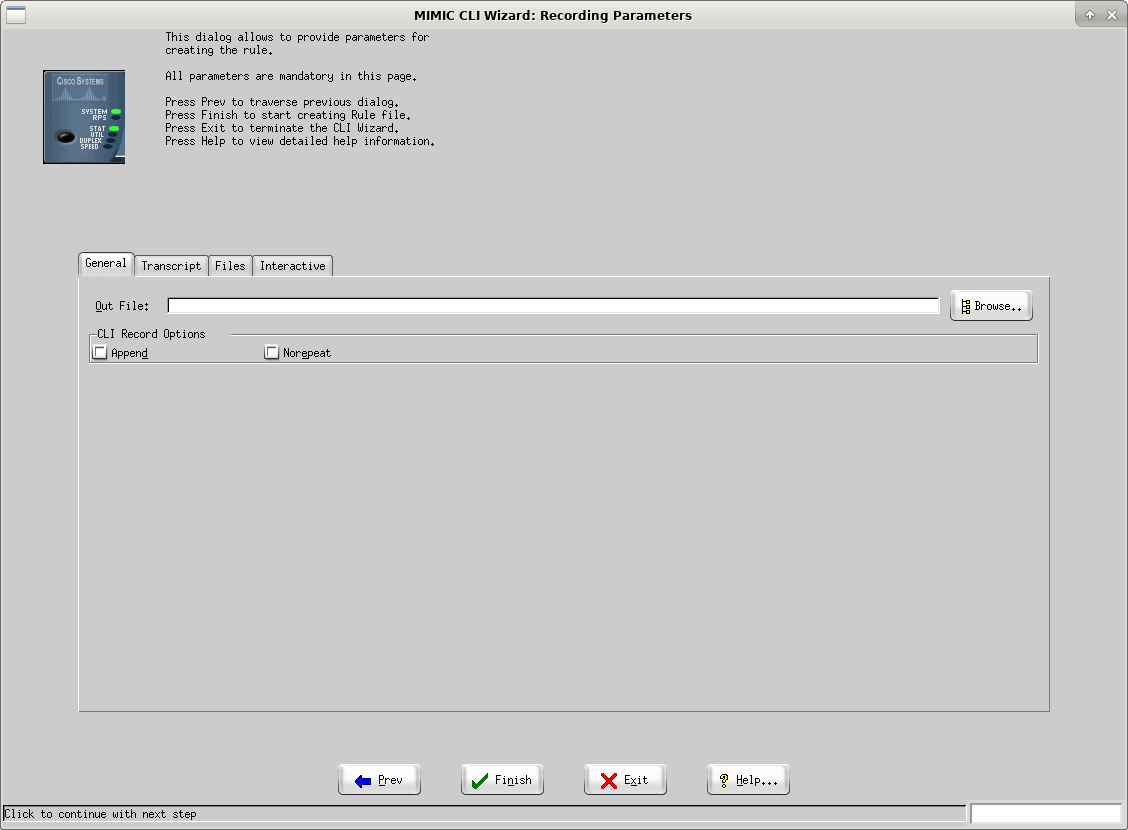
Figure 45b: CLI Wizard: Record Transcript
The following General parameters have to be specified:
-
Out File
The Rule file to be created. It is recommended that this be in its own folder, ie. a name of the form YOUR-FOLDER/YOUR-RULE where YOUR-FOLDER is your folder name, and YOUR-RULE is your rule name. The Wizard will put all related files for your CLI simulation in that folder.
The Transcript tab allows you to interactively enter (eg. copy / paste) snippets of Telnet interaction (command / response) to Add to the Command List.
The Files tab lets you do the same by reading transcript files.
In the Interactive tab you can manually add commands and responses.
When you click Finish, the rule file will be generated for the commands in the cumulative Command List.
Discover Commands
The user has the ability to either completely discover the device by specifying no commands to be included and no commands to be excluded. In the first dialog you can restrict the discovery by specifying the commands to be included and commands to be excluded. Approriately only included commands will be discovered and excluded commands will be ignored.
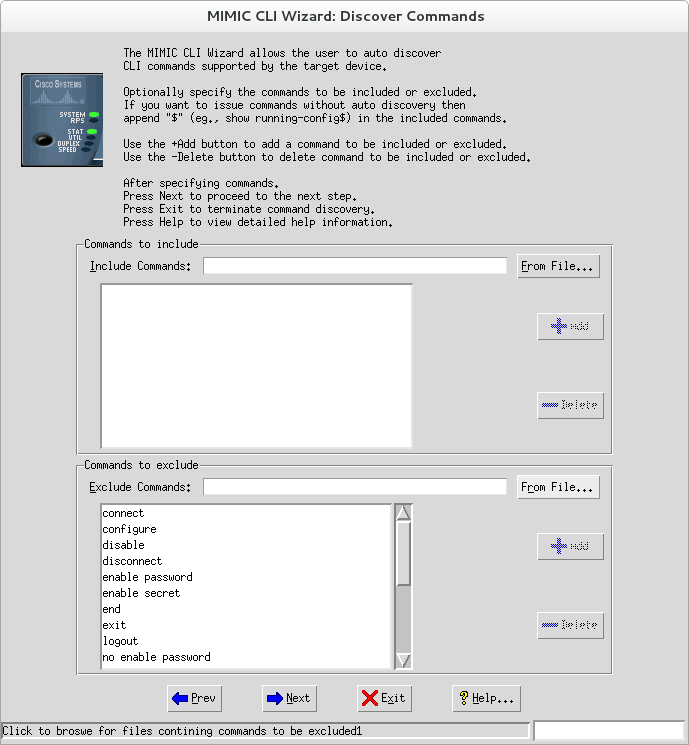
Figure 46: CLI Wizard: Discover
Issue Commands
Once the commands are discovered, this dialog allows the commands to be issued after editing them by providing required arguments. The checklist shows all the commands with a checkbox indicating the command to be issued. Commands in red indicate they were excluded from the discovery process. The argument of the command appear as a leaf in the tree. When selected it allows the user to add the arguments through the graphical interface, which becomes the issued command.
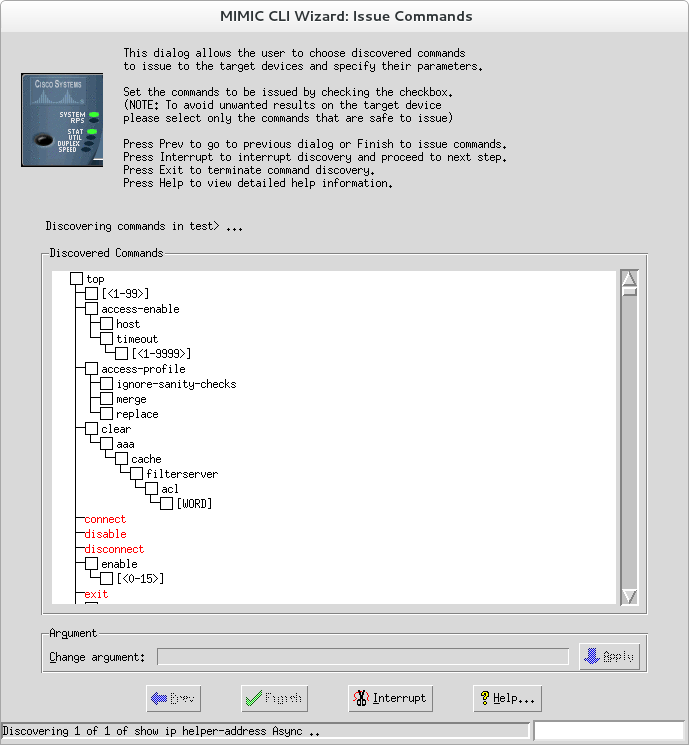
Figure 47: CLI Wizard: Issue
All the checked commands will be issued to the device when you click on the Finish button.
-
Address
-
NetFlow Wizard Reference
Overview
 The NetFlow Wizard allows you to easily create a NetFlow Simulation
from a real Cisco device by capturing a packet capture of the generated
flows. Additionally, once you have created a simulation, the wizard
allows you to modify it to suit your needs.
The NetFlow Wizard allows you to easily create a NetFlow Simulation
from a real Cisco device by capturing a packet capture of the generated
flows. Additionally, once you have created a simulation, the wizard
allows you to modify it to suit your needs.
Check out this 2-minute
video
for a quick intro.
Create or modify
In this initial dialog you can choose to create a fresh simulation from a live NetFlow Exporter or modify an existing simulation.
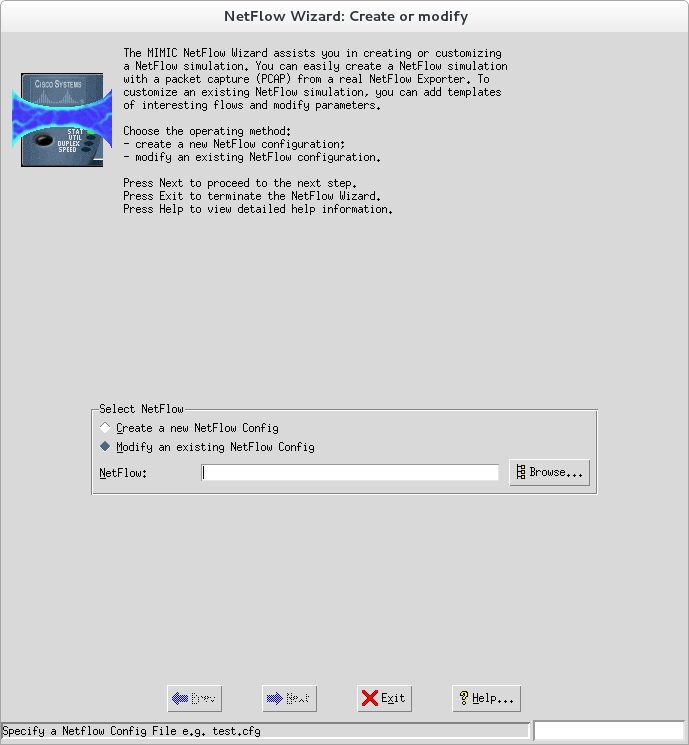
Figure 48: NetFlow Wizard: Method
Create Config file using PCAP file
In this dialog you can enter the parameters to the netflowrec utility to create a fresh simulation from a packet capture (PCAP) of a real NetFlow Exporter. Check the netflowrec documentation for details.
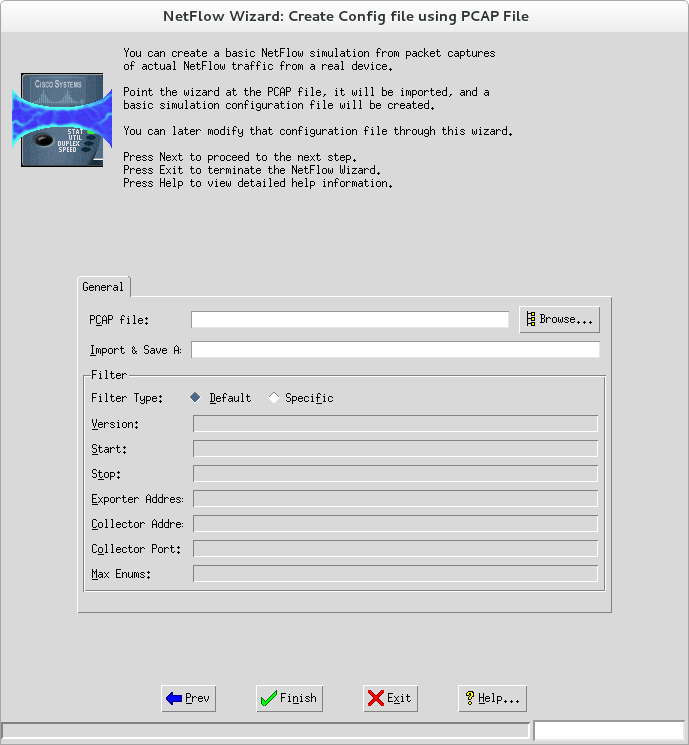
Figure 49: NetFlow Wizard: PCAP
Modify Config File
This dialog lets you modify the previously selected configuration file. The left pane shows the sections of the NetFlow configuration.
The right pane shows the flows and their values.
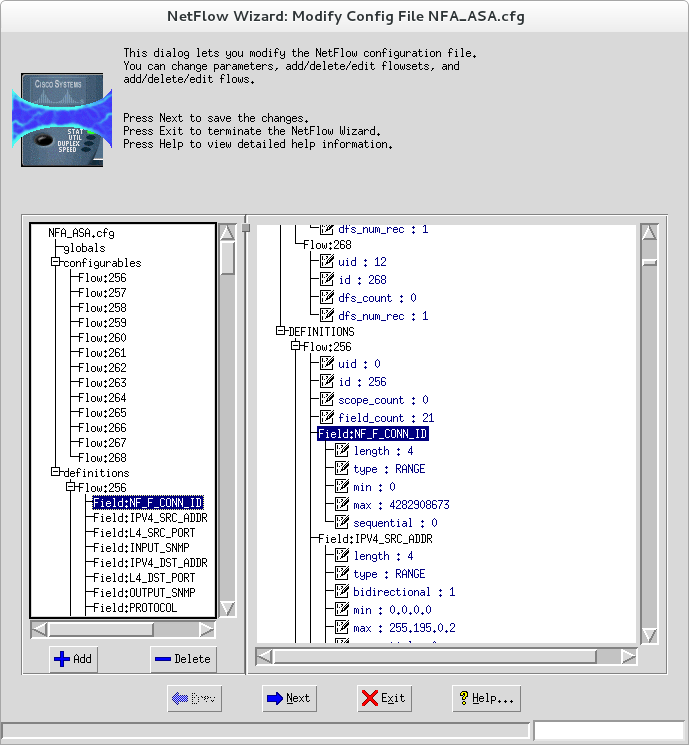
Figure 50: NetFlow Wizard: Modify
-
sFlow Wizard Reference
Overview
 The sFlow Wizard allows you to easily create a sFlow Simulation
from a Cisco device by capturing a packet capture of the generated
flows. Additionally, once you have created a simulation, the wizard
allows you to modify it to suit your needs.
The sFlow Wizard allows you to easily create a sFlow Simulation
from a Cisco device by capturing a packet capture of the generated
flows. Additionally, once you have created a simulation, the wizard
allows you to modify it to suit your needs.
Create or modify
In this initial dialog you can choose to create a fresh simulation from a live sFlow Exporter or modify an existing simulation.
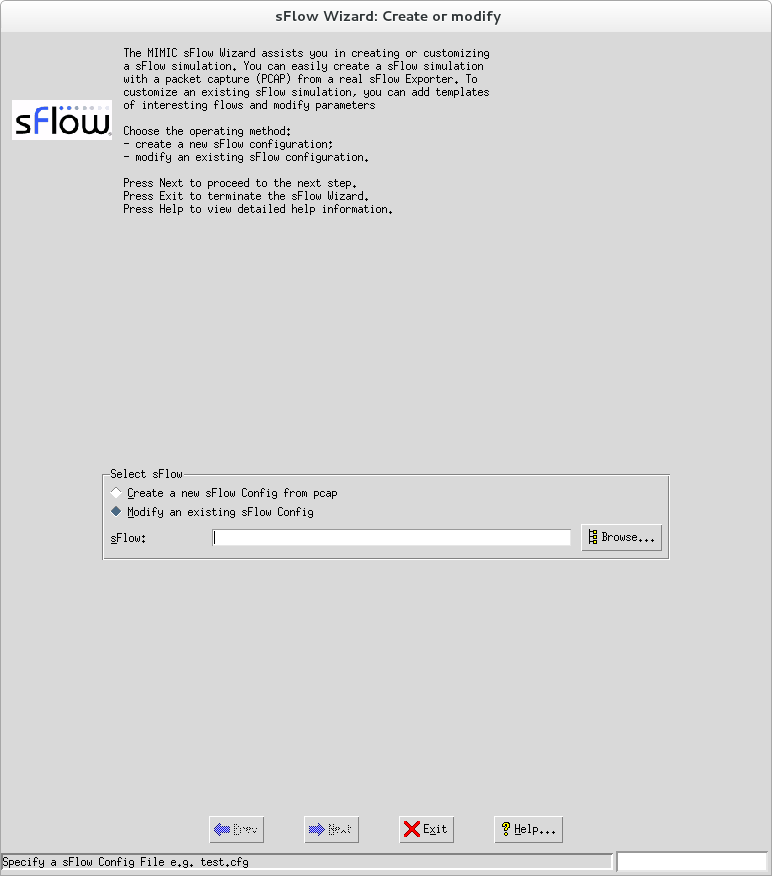
Figure 51: sFlow Wizard: Method
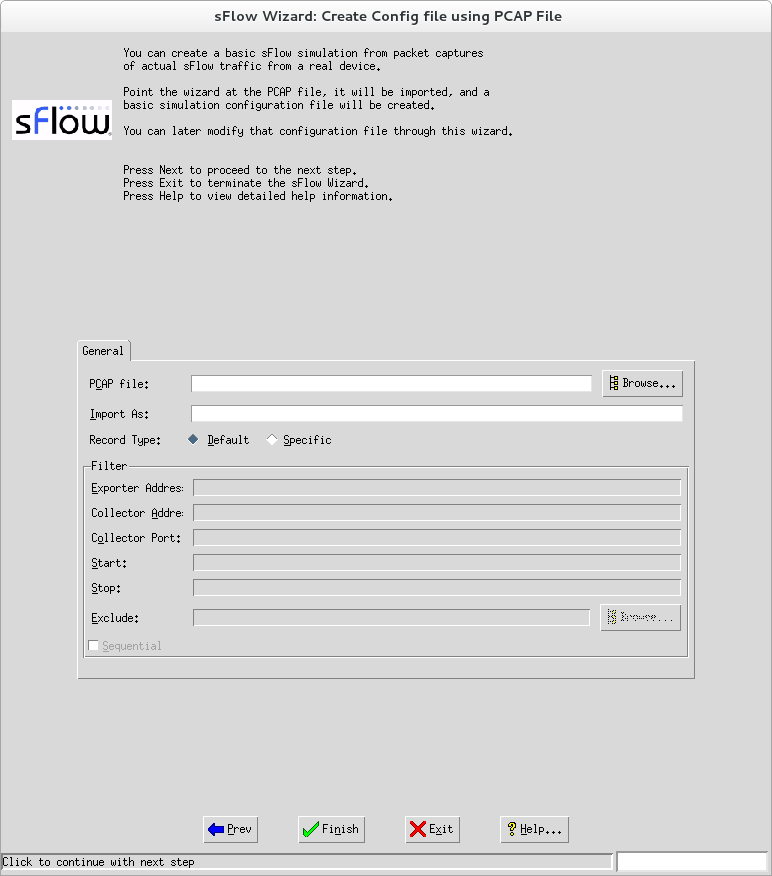
Create Config file using PCAP file
Modify Config File
This dialog lets you modify the previously selected configuration file. The left pane shows the sections of the sFlow configuration.
The right pane shows the samples and their values.
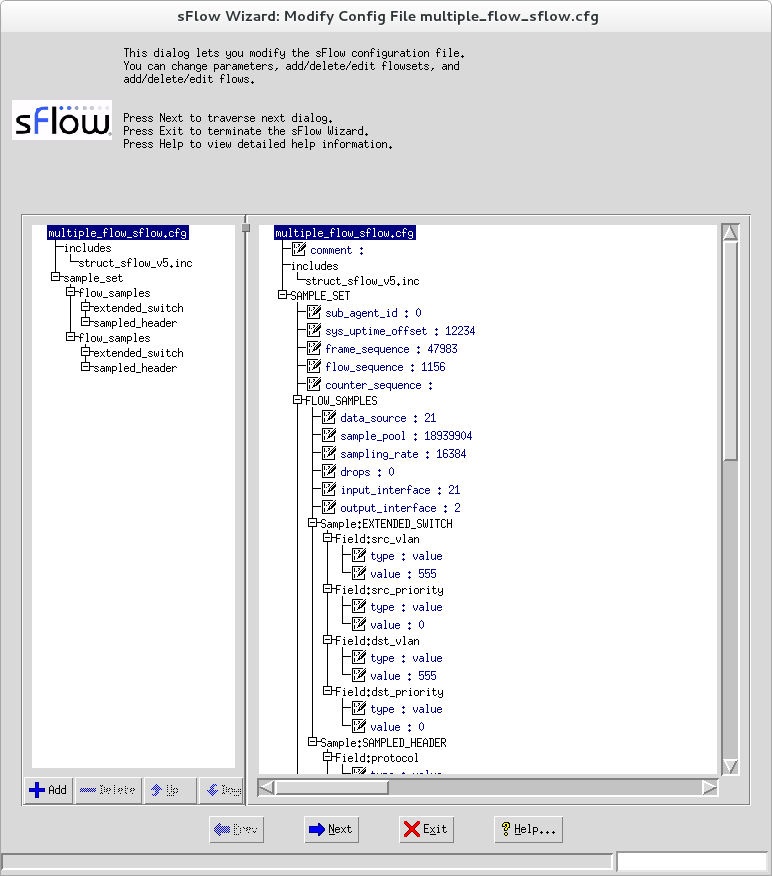
Figure 53: sFlow Wizard: Modify
-
IPMI Wizard Reference
Overview
 The IPMI Wizard allows you to easily create a IPMI Simulation
by capturing a session between a IPMI device and a management app.
Additionally, once you have created a simulation, the wizard
allows you to modify it to suit your needs.
The IPMI Wizard allows you to easily create a IPMI Simulation
by capturing a session between a IPMI device and a management app.
Additionally, once you have created a simulation, the wizard
allows you to modify it to suit your needs.
Check out this 3-minute
video
changing an IPMI simulation in real-time.
Create or modify
In this initial dialog you can choose to create an IPMI simulation from a live IPMI session, record from an existing walkfile, or modify an existing simulation at runtime.
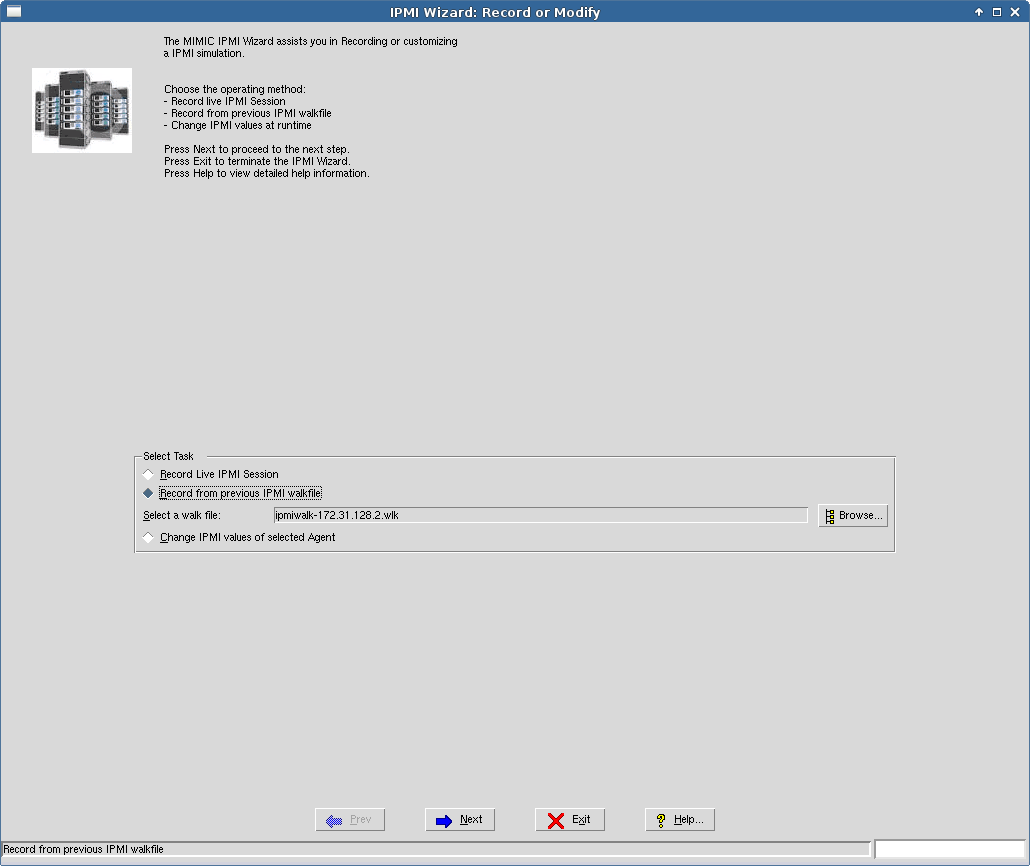
Figure 56: IPMI Wizard: Method
Record Live Session
To record the live session, the ipmirec tool implements a proxy server between the IPMI management app and the IPMI device, storing the requests and responses in an IPMI walkfile.
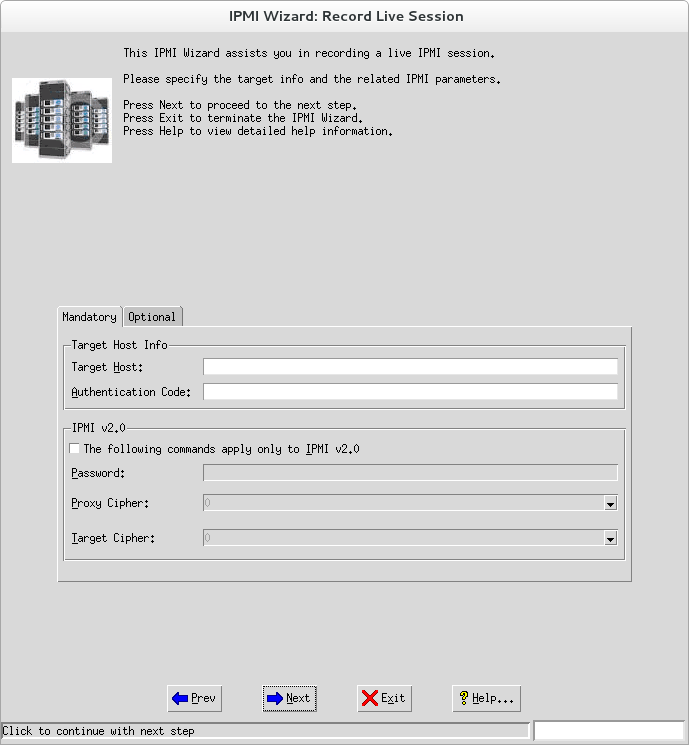
Figure 57: IPMI Wizard: Live
The mandatory options are the target host IP address and the authentication code.
Simulation Options
You can apply the IPMI simulation to a new SNMP simulation that will be recorded from the live device, to an existing simulation that you created previously, or copy an existing simulation so that you don't modify it.
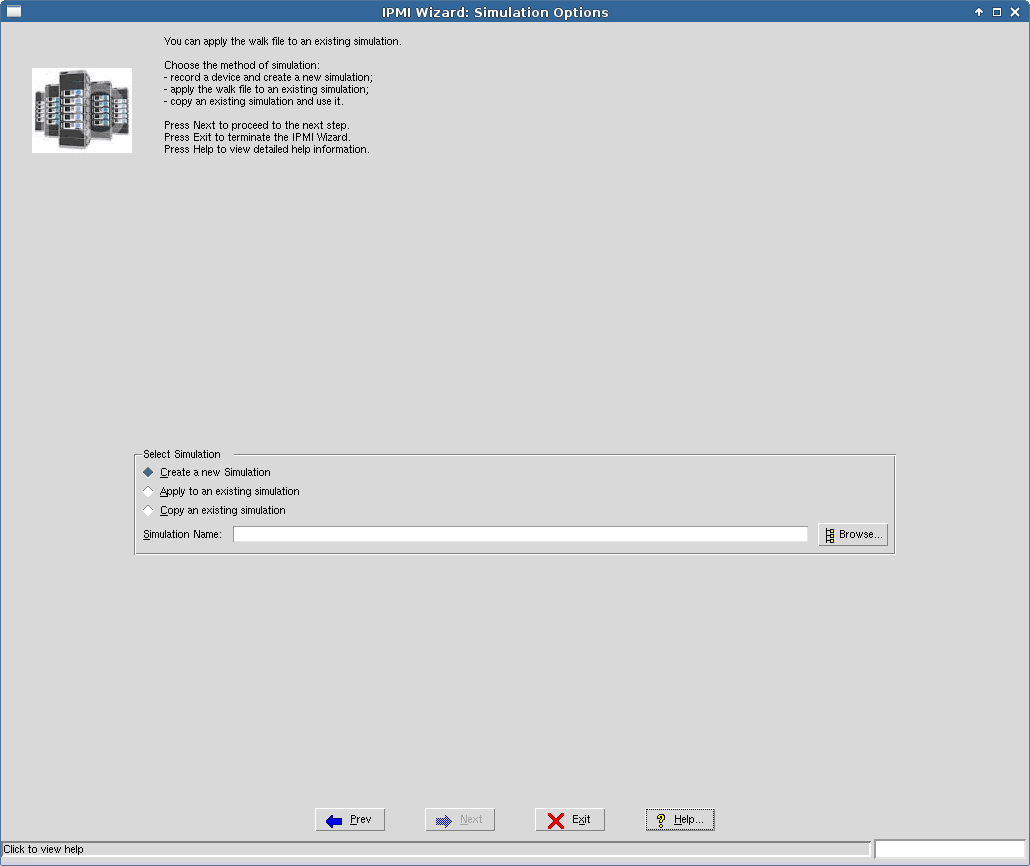
Figure 58: IPMI Wizard: Simulation Options
Pressing Next will present the Create IPMI Simulation dialog to summarize the selections. Pressing Next again will actually create the simulation.
Change IPMI Values
After you select a running agent with an IPMI simulation, this dialog allows you to change the simulation at runtime. You can modify any of the field values in responses for any of the supported requests, and add or delete instances to requests.
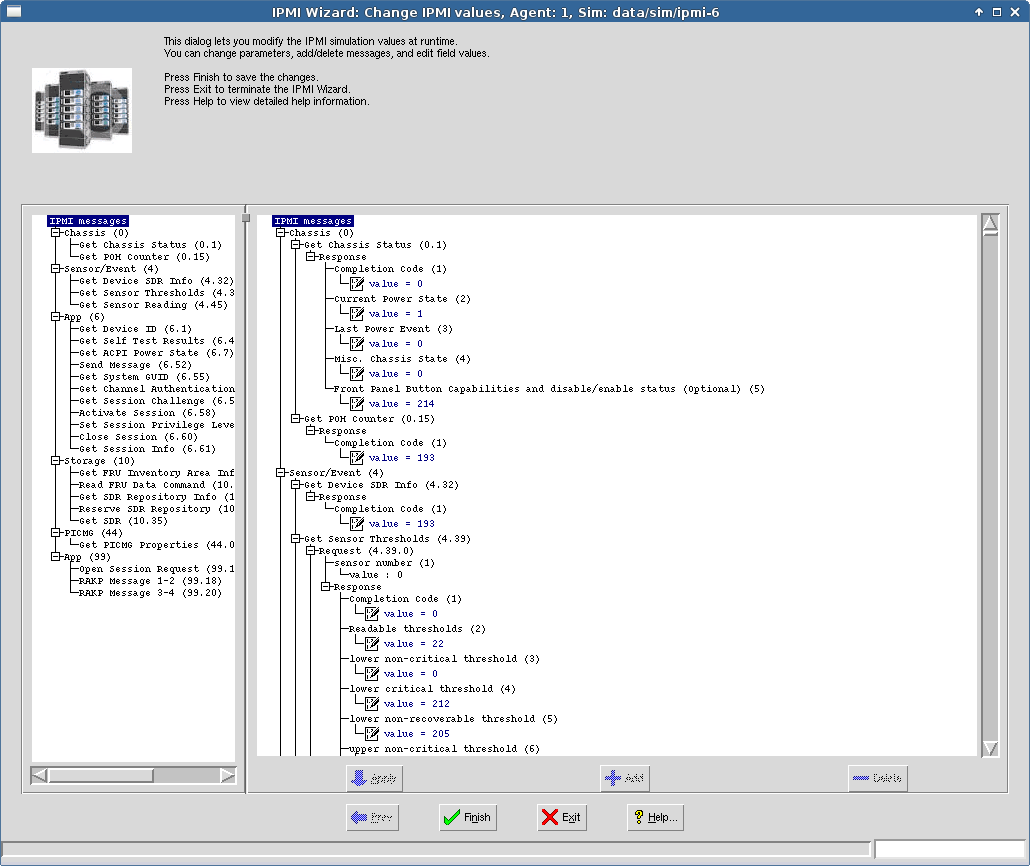
Figure 59: IPMI Wizard: Modify
-
Web Wizard Reference
Overview
 The Web Wizard allows you to easily create a Web Services Simulation
by capturing a session / conversation between a Web Server and client.
Additionally, once you have created a simulation, the wizard
allows you to modify it at run-time to suit your needs.
The Web Wizard allows you to easily create a Web Services Simulation
by capturing a session / conversation between a Web Server and client.
Additionally, once you have created a simulation, the wizard
allows you to modify it at run-time to suit your needs.
Create Web Service Simulation
Unless you already have recorded before, you start by recording a new conversation between a web client and a server.
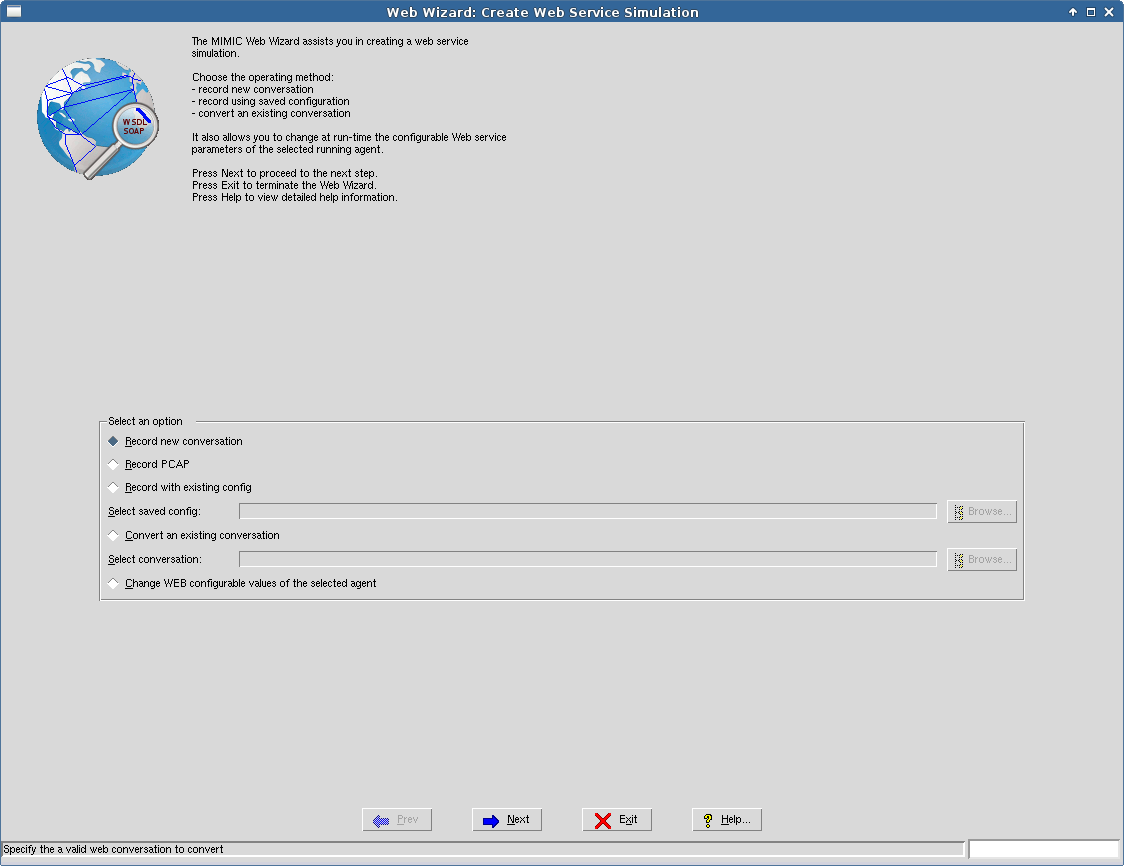
Figure 60: Web Wizard: Create
If you have never recorded before, then you have 2 choices to record a web service session.
First, select Record new conversation to record a live conversation between your application and your web service. The Recording Parameters dialog will be displayed when pressing Next allowing you to specify the parameters of the live session to record.
Second, if you have a packet capture (PCAP) that you recorded, you can use Record PCAP to record it. The Record PCAP dialog will allow you to record from the packet capture. This allows you to record sessions with a packet capture tool like Wireshark where you cannot record live.
Alternatively, use Record with existing config if you have recorded before and saved the recording configuration. The Recording Parameters dialog will be displayed when pressing Next of the previously recorded session, allowing you to record again.
Select Convert an existing conversation to convert an existing session that was recorded to a Web Services simulation.
Finally, if you want to change a WEB simulation while it is running, select Change WEB configurable values of the selected agent. The Change WEB Values dialog will be displayed when pressing Next.
Recording Parameters
To record a conversation, specify the conversation file name, and the web server you want to record. The HTTP port is usually port 80, and the SSL port is usually 443, although you should verify these before you record.
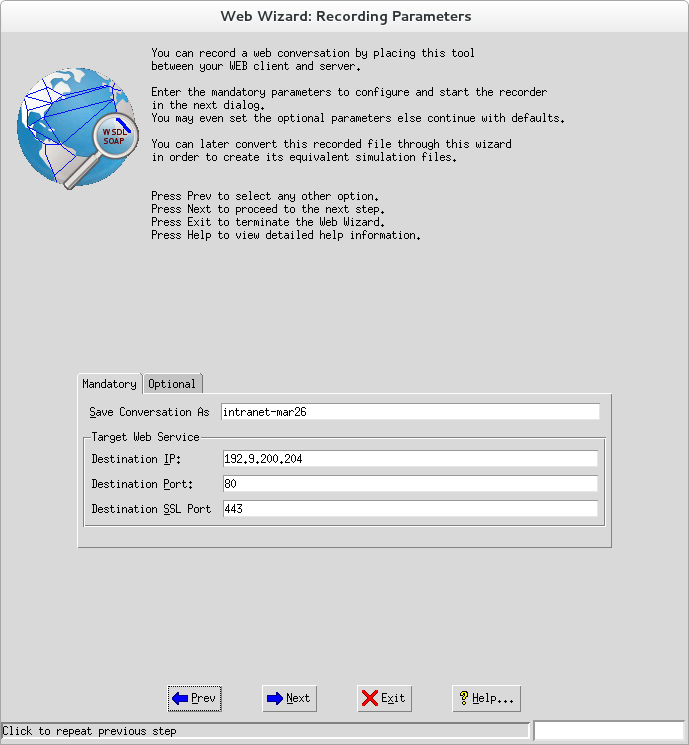
Figure 61: Web Wizard: Record
When you press Next, the Recorder Settings dialog appears, allowing you to start a recording.
Record PCAP
Specify the PCAP file to record, and if there are multiple WEB conversations in it, you can pick the one between a specific server and a client, or between specific packet numbers.
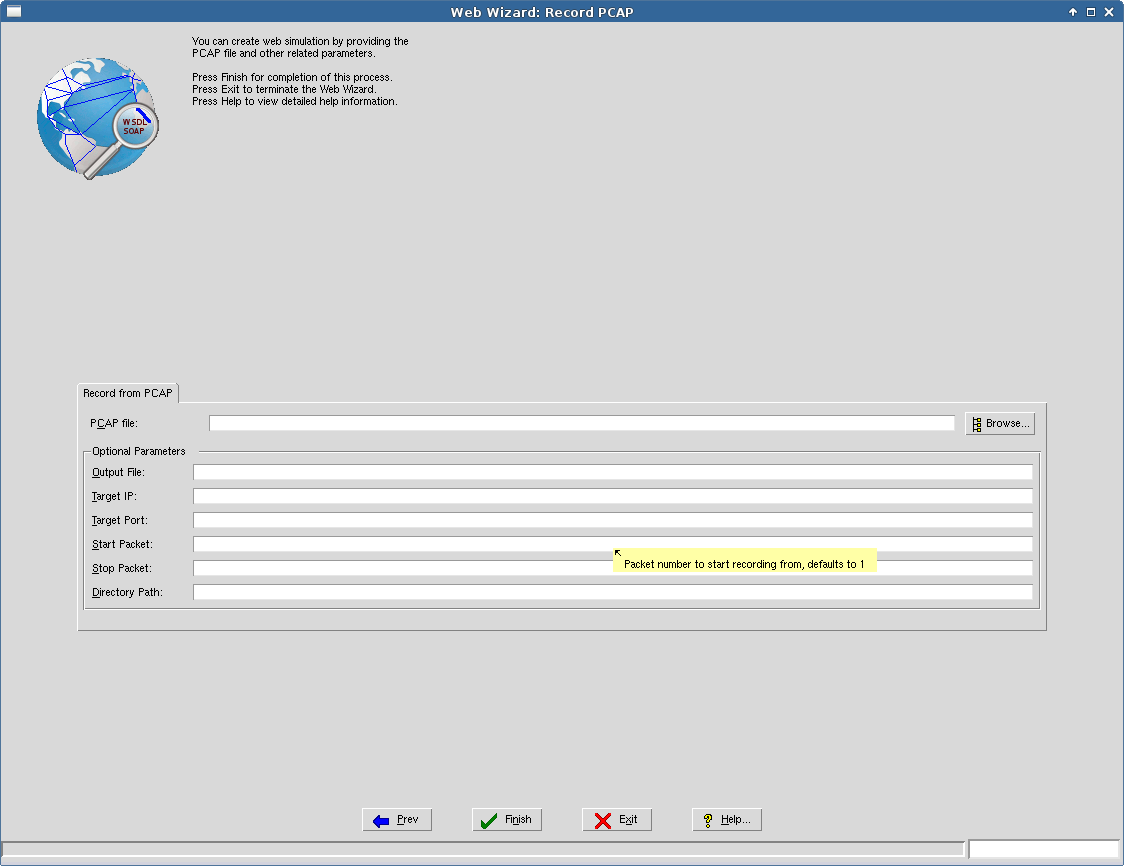
Figure 62: Web Wizard: Record PCAP
Configurable Values
WEB module simulations can implement configurable values, which can be changed at run-time in real-time on a running agent.
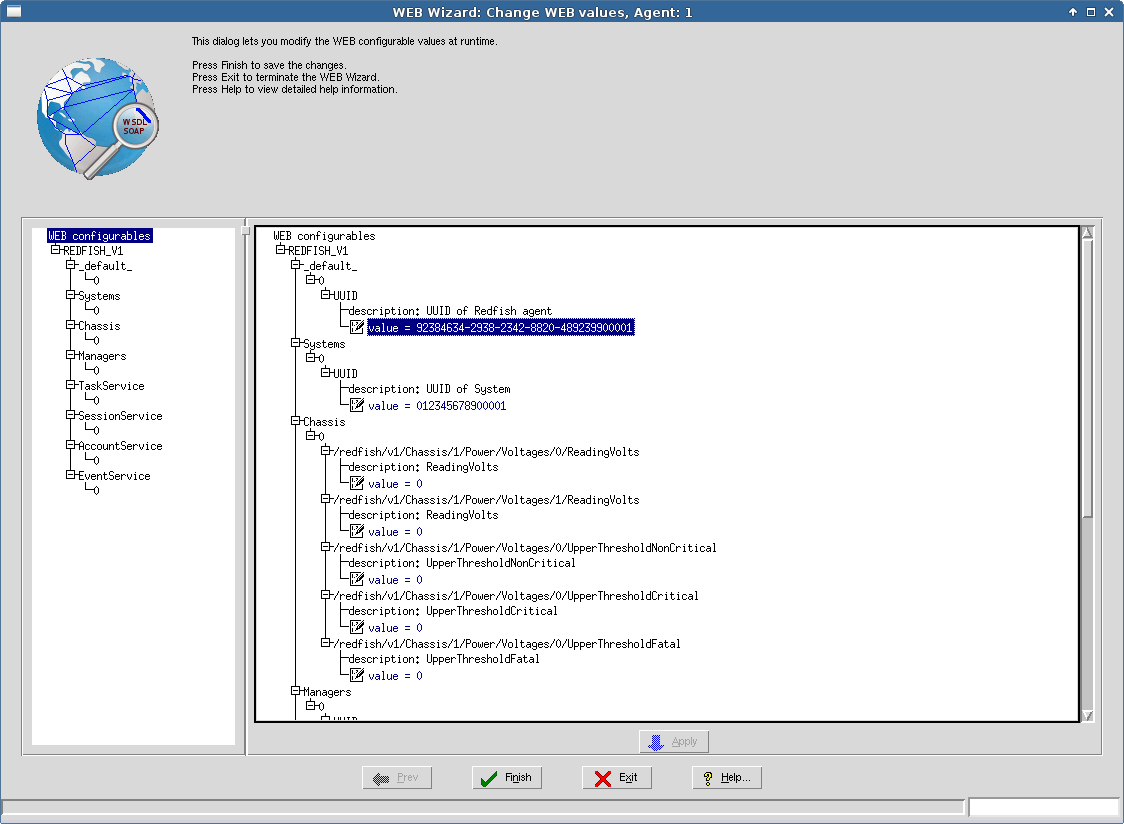
Figure 63: Web Wizard: Configurable Values
-
Tutorial Wizard Reference
Overview
 The MIMIC Tutorial Wizard guides you through the MIMIC software.
The process to run SNMP simulations is described in the
QuickStart manual.
This wizard will follow that process.
The MIMIC Tutorial Wizard guides you through the MIMIC software.
The process to run SNMP simulations is described in the
QuickStart manual.
This wizard will follow that process.
As a short-cut, you may want to watch the videos
in the QuickStart Tutorial.
The process we follow here is the most efficient to get you going. The Tutorial Wizard will invoke the existing tools to accomplish each task. You can at any point invoke the tools manually.
The 4 main steps covered here are:
You can skip any of the steps, for example if you just want to run the simulation that ships with MIMIC, go to step 3 . MIMIC is designed so you can easily come back to an earlier step later. The wizard lets you do this, in effect exploring the steps and the tools necessary to complete them.
MIBs
The first step in the process is to make sure you have all the MIBs you need for your simulations. Ultimately, you will need a MIB only if your management application accesses the objects in that MIB.
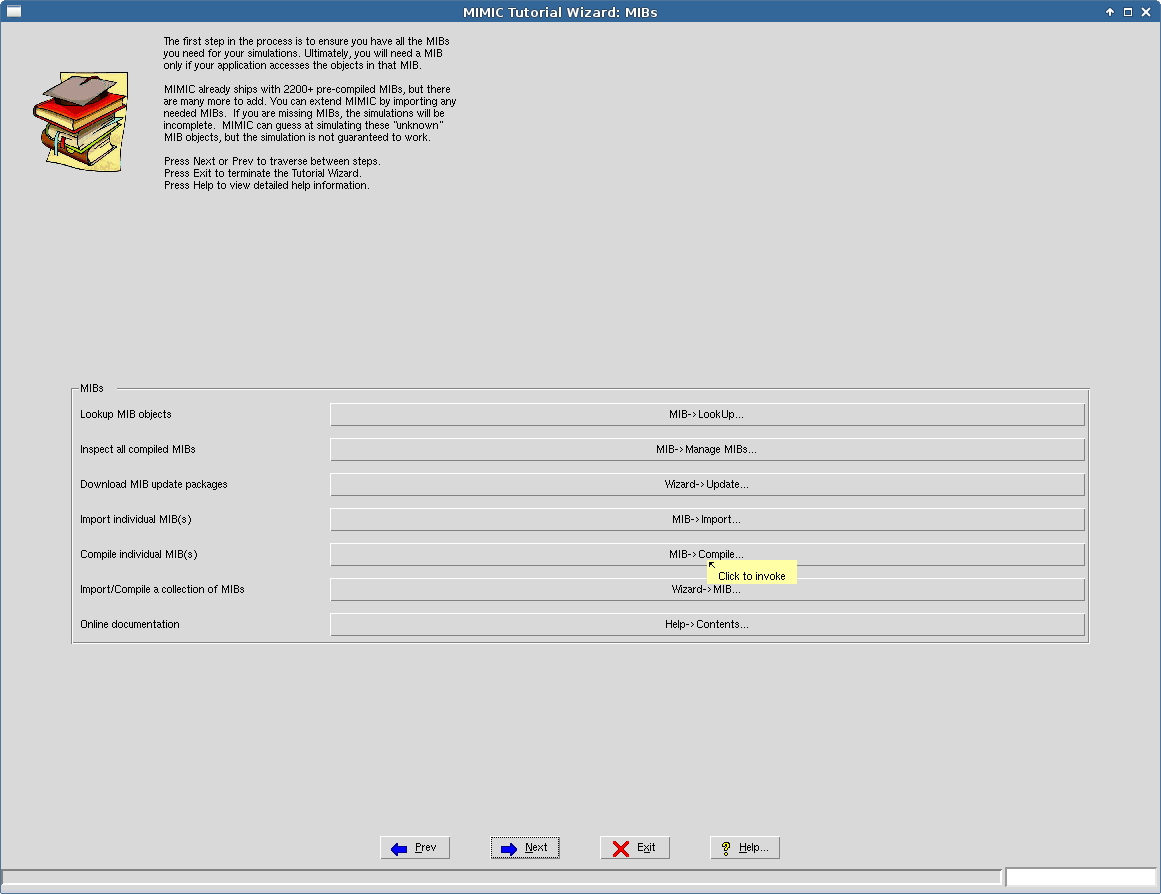
Figure 70: Tutorial Wizard: MIBs
MIMIC already ships with 2100+ precompiled MIB files , but there are many more. You can extend MIMIC by importing any needed MIBs. If you are missing MIBs, the simulations will be incomplete. MIMIC can guess at simulating these "unknown" MIB objects, but the simulation is not guaranteed to work.
Remember that you can get more help at any time by clicking the Help... button.
If you are not sure whether MIMIC knows about your required MIB, you can lookup objects, to see whether they are known. When you click the MIB->Lookup... button, the corresponding Lookup... menu item in the MIB menu will be invoked.
You can inspect all the MIBs known to MIMIC by clicking the MIB->Directory... button. The MIBs that come pre-compiled with MIMIC are shown in blue, while the MIBs that you compiled are shown in red. This is due to the difference between the shared and private data areas.
If the MIBs you require are not already known, you can extend MIMIC in various ways. First, you want to see if Gambit supplies them in the optional updates that you can download from the Web. To do this, use the Update Wizard. Initially, install only patches necessary from the Patches section, then look at the MIB Library section to install required MIBs. You can install MIBs even if they are not required. The overhead on MIMIC is minimal, because the software is designed to efficiently handle a large amount of MIBs. If you will be looking at the details of MIBs, it may be useful to download the optional "MIB source files" update.
If the MIBs you require are not in any of the updates in the Update Wizard, then you can import and compile them yourself. To do this, you need the MIB source files (in standard SMI format). You first import the MIB source files into MIMIC with MIB->Import..., then compile them with MIB->Compile..., You can look at a flash demo of this task at the MIMIC demo page.
If you have a number of MIBs to add to MIMIC, the MIB Wizard will make this job much easier, resolving any dependencies among them automatically. You can look at a flash demo of this task at the MIMIC demo page.
Create Simulations
The second step is to create a simulation of a device (which as a short-cut we call "device"). This step assigns MIBs to the device, and specifies values to be returned for each MIB object instance. For example, we need to specify what string to return for the sysDescr object.
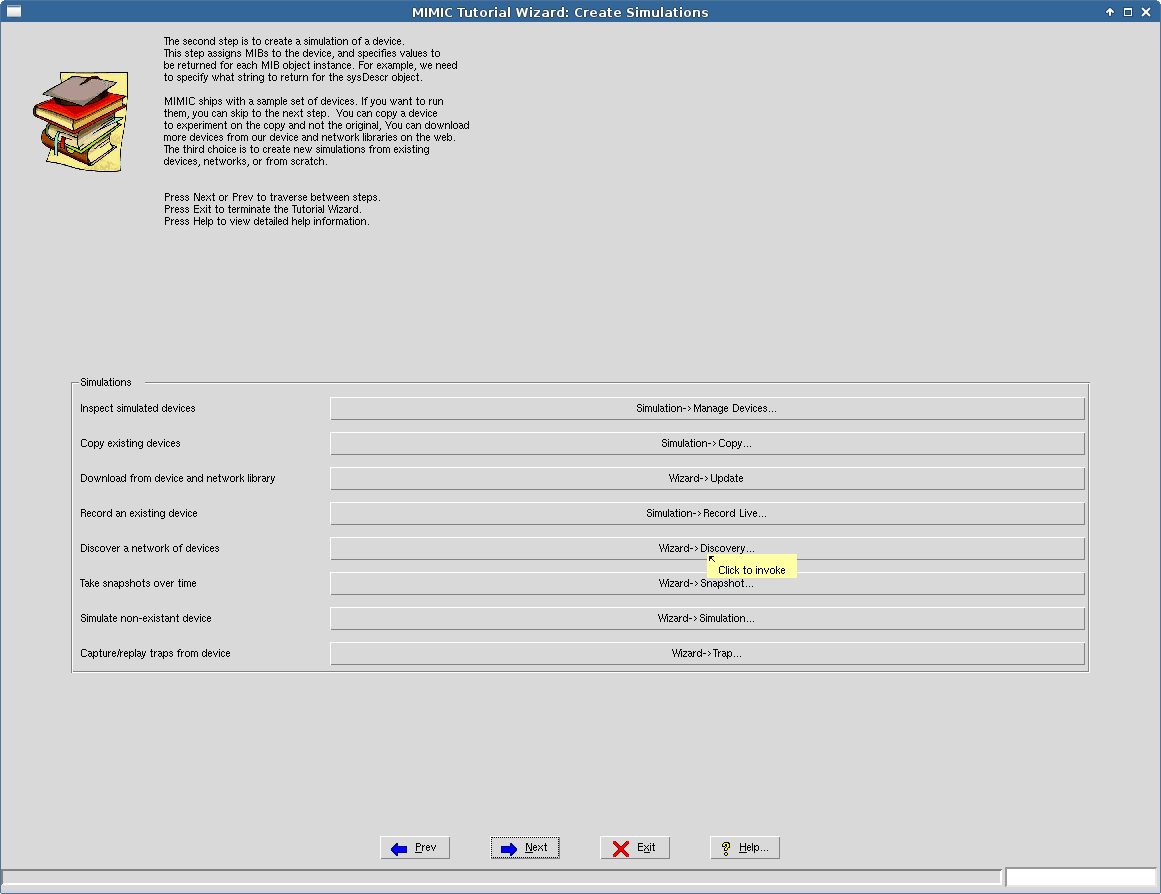
Figure 71: Tutorial Wizard: Simulations
MIMIC ships with a sample set of devices. If you want to use them, you can skip to the next step. To inspect the currently known set of devices, use the Simulation->Devices... button.
Else, you can download more devices from our device and network libraries on the web with the Update Wizard. Look at the Device Library and Network Library sections. You can browse for the available devices from several manufacturers, and complete networks. Expand a node, and double-click to get extra info. To install them, most of them require you to have installed the permanent license keys, but the Cisco VLAN network is available for evaluators.
The third choice is to create new simulations from existing devices, networks, or from scratch. To record a small group of existing devices, use the Simulation->Record Live... button. You can look at a flash demo of this task at the MIMIC demo page.
To discover a larger network of interconnected devices, use the Discovery Wizard. You can look at a flash demo of this task at the MIMIC demo page.
The Snapshot Wizard. allows to take snapshots from an existing device, so that the simulation changes just like the device does.
If you don't have a device to record, you can use the Simulation Wizard. to create the simulation. This involves specifying values for all relevant MIB objects.
The Trap Wizard. lets you capture traps from a real device, which can then be replayed from one of the simulations.
Run Simulations
This step configures MIMIC to run simulations.
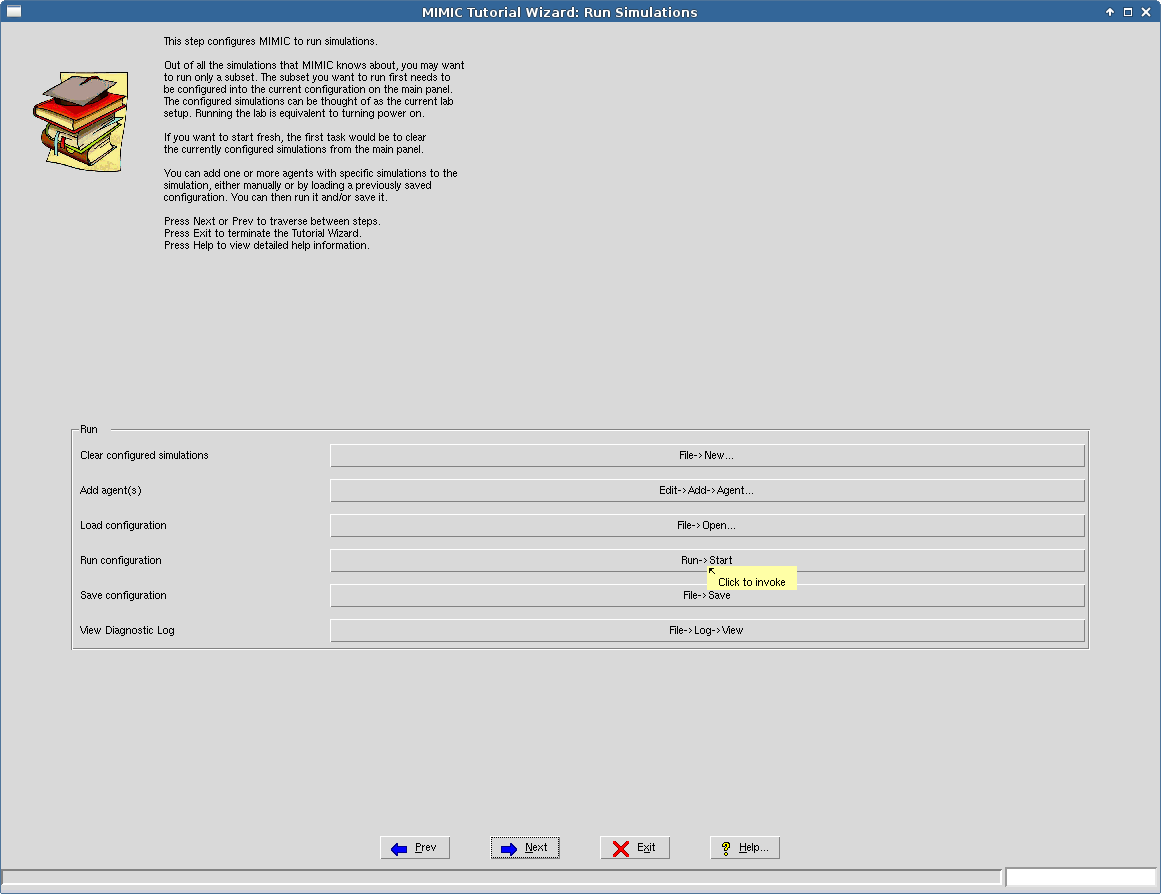
Figure 72: Tutorial Wizard: Run Simulations
Out of all the simulations that MIMIC knows about, you may want to run only a subset. The subset you want to run first needs to be configured into the current configuration on the main panel. The configured simulations can be thought of as the current lab setup. Running the lab is equivalent to turning power on.
If you want to start fresh, the first task would be to clear the currently configured simulations from the main panel.
You can add one or more agents with specific simulations to the simulation, either manually or by loading a previously saved configuration. You can then run it and/or save it.
The diagnostic log lets you troubleshoot the MIMIC simulations.
Customize Simulations
MIMIC allows you to change simulations at run-time, dynamically. You can control these changes interactively through MIMICView, or via scripts in the supported APIs (Tcl, Perl, Java, C++).
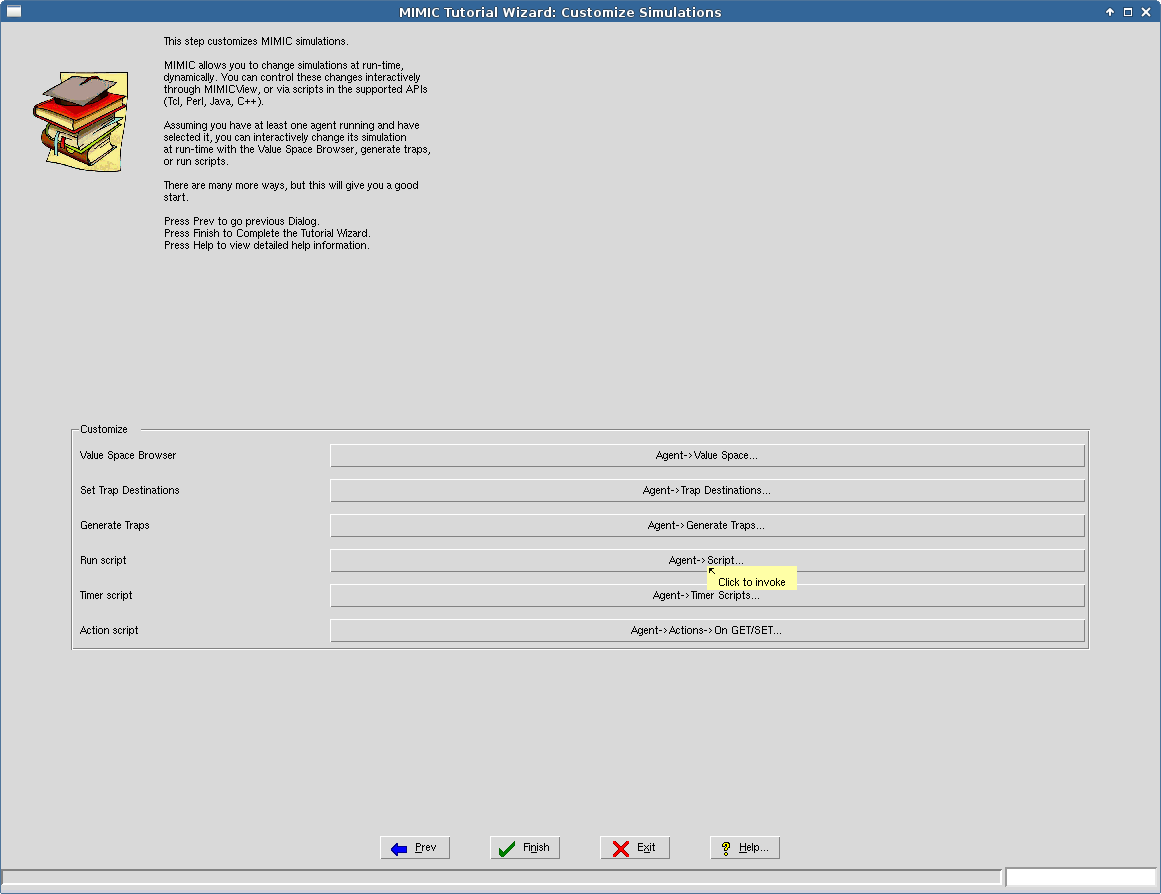
Figure 73: Tutorial Wizard: Customize Simulations
Assuming you have at least one agent running and have selected it, you can interactively change its simulation at run-time with the Value Space Browser, generate traps, or run scripts.
-
Configuration Wizard Reference
Overview
MIMICView Configuration
Each of the tabs lets you configure parameters in MIMICView:
-
Update Notification
Turn Automatic Update Notification on or off.
We recommend to enable notification, unless you are not connected to the Internet.
Proxy configuration is only needed if you require a proxy to access the Internet. MIMIC Update Wizard works through SOCKS proxy servers with the help of the socat relay utility which is an optional installable on newer versions of Fedora Linux. For details see this FAQ entry.
-
Colors
You can choose colors for various aspects of the GUI. You can re-configure other aspects of the user interface with the MIMICView resource file (see also the FAQ section).
-
Help
Pick your favorite help viewer for viewing the context-sensitive online documentation. By default, on Windows the Microsoft HTML Help Control (HH.exe) is used, on Unix the first popular HTML browser it can find.
You can also turn off the yellow balloon tooltips.
-
Agent
You can toggle the address label of the agent icon to show its IP address or resolved fully qualified domain name (FQDN).
NOTE: currently the FQDN will only show after starting the agent.
You can toggle the description label of the agent icon to show its name (as shown in Simulation -> Devices ) or simulation,MIB,scenario triplets.
You can configure the status message hint of the agent icon to show any information that the display subsystem knows about. By default it shows
Agent $id, address $_host_name
-
Maps
The Max agents in root map configurable limits the number of agents in the root map. Once the limit is surpassed, agents are automatically placed in submaps in batches of this configurable. Eg. if this number is 100, if the number of agents added is more than that, then submaps will be created with 100 agents each. Any leftover agents will be placed in the root map.
This results in better GUI performance for large lab configurations.
-
Log
Lets you turn on/off the automatic switching of the Simulator Log. If enabled, then the Log is switched to a new file every midnight. This is useful for management of large logs.
-
Graph
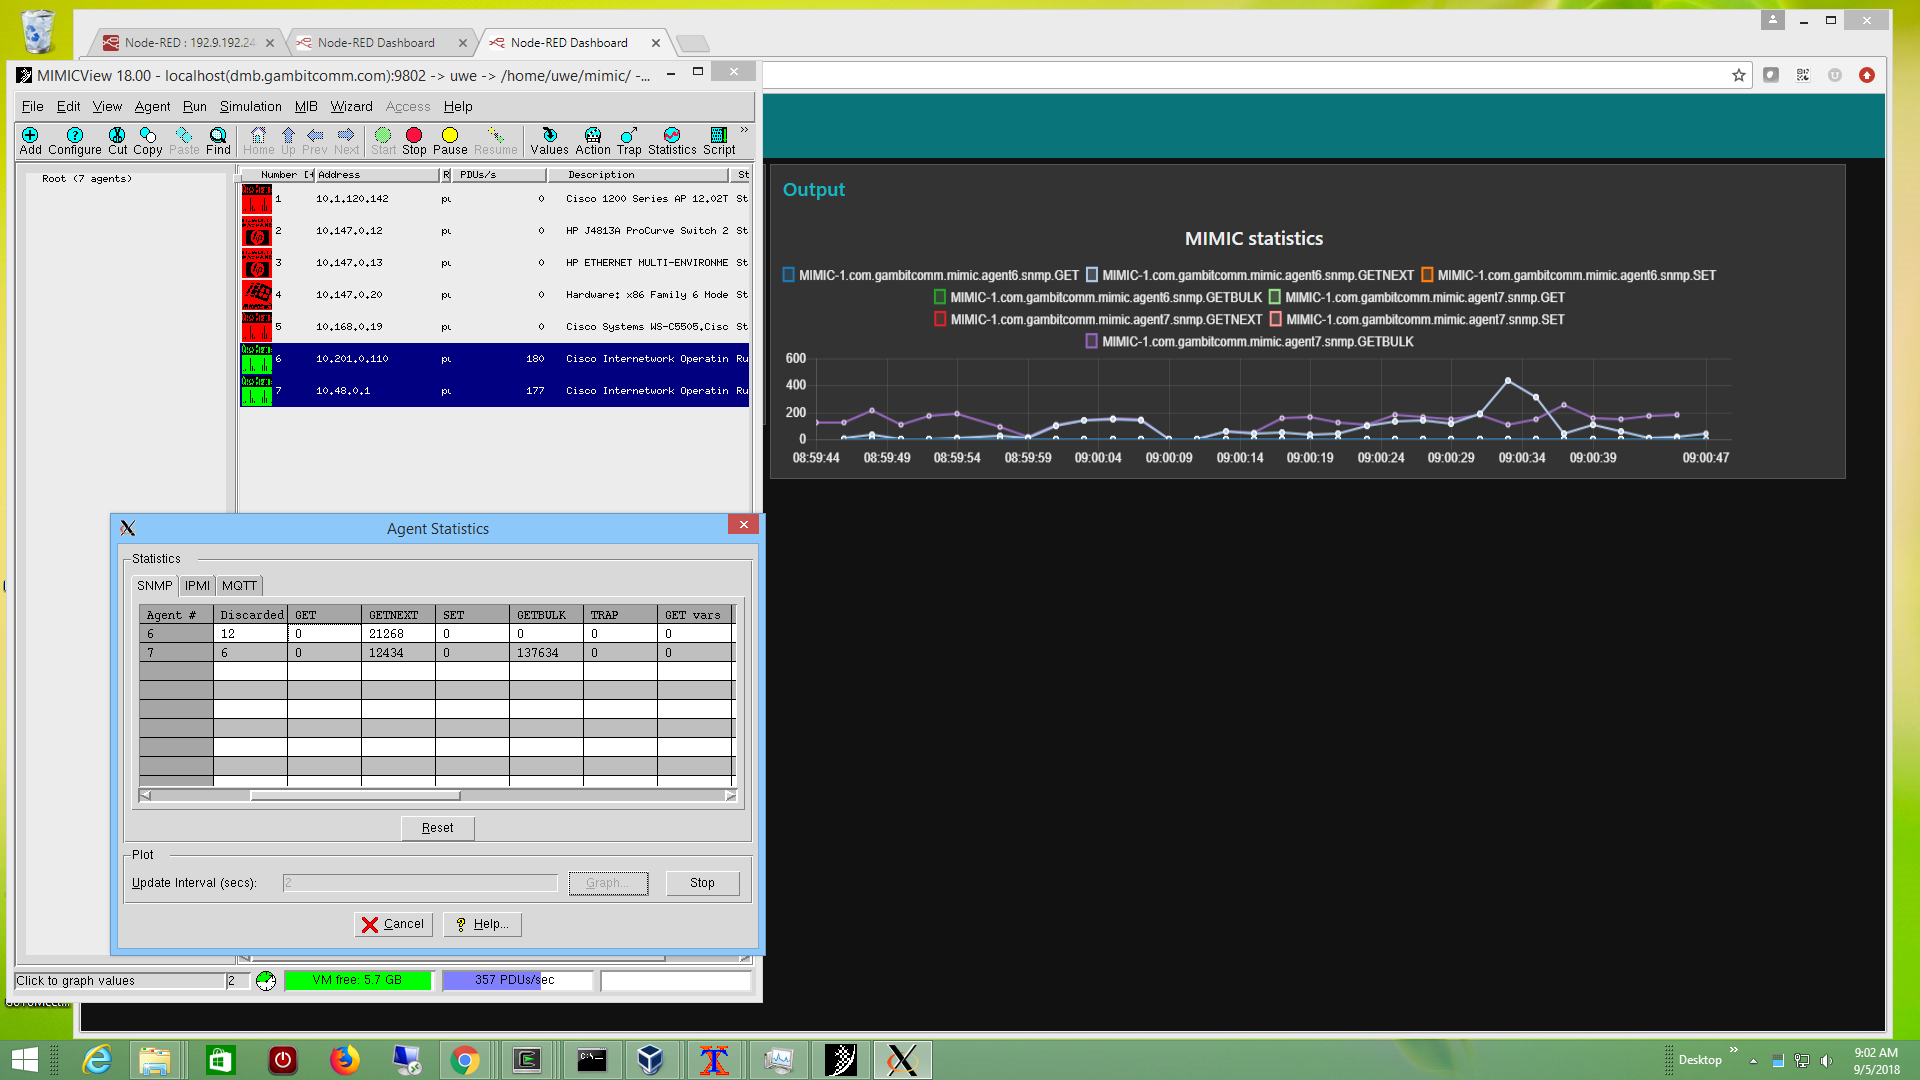
These configurables are for graphing agent statistics in the Agent -> Statistics dialog. You can change from Built-in to Graphite to integrate with Graphite or Grafana . The following fields can be set:
- CARBON_ADDR specifies the IP address of the Graphite server. This is required.
- CARBON_PORT specifies the TCP port of the Graphite server. This is required.
- CARBON_PREFIX set the prefix for the statistics. This is useful if you have multiple MIMIC instances that are exporting agent statistics.
For example, this shows agent PDU statistics for agents 6 and 7 for an MIMIC instance named MIMIC-1.
MIMIC Log Configuration
You can limit the number of lines to be shown in the log windows, by selecting the Limited button. Enter the number of lines to be displayed in the Lines to log text field.
You can store new log files in a different Log Directory.
Java Configuration
MIMIC needs to know about the Java Runtime Environment (JRE) installed on your machine. It attempts to detect it in the default paths, but you may have to point it to the correct location (bin/ subdirectory of the JRE install area).
E-mail Configuration
Certain MIMIC components ( Diagnostic Wizard, profile reporting) need to know how to send information back to Gambit. Here you configure your mail gateway.
Profiling Configuration
-
Update Notification
-
Update Wizard Reference
Introduction
 The Update Wizard makes it easier to install optional software packages,
or to update to newer versions of MIMIC over the Internet (if available).
It automatically notifies you of new software updates, and presents a
friendly front-end to install them.
The Update Wizard makes it easier to install optional software packages,
or to update to newer versions of MIMIC over the Internet (if available).
It automatically notifies you of new software updates, and presents a
friendly front-end to install them.
NOTE: in order to work, MIMIC requires access to the internet, in particular to HTTP port 80 for the Gambit update servers update.gambitcom.com, www.gambitcomm.com and mirror2.gambitcommunications.com. If you do not have direct access, then it can also work with a proxy.
The Update Wizard can be invoked in 3 different ways as detailed in the rest of this section:
-
in the desktop
MIMICview GUI
via the Wizard -> Update... menu item;
-
on the command line, via the updwiz.sh tool
detailed below;
- in web-browser based WEBUI via the Wizard -> Update... menu item detailed below;
If you have it enabled , MIMICView will notify you of the availability of new updates of MIMIC. This occurs whenever you start MIMICView, but at most once a day. MIMICView will download the MIMIC update database, and check for applicable updates to your software.
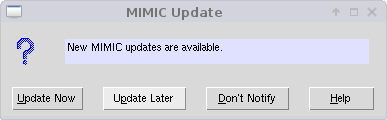
Figure 80: Update Wizard: Notify
If there are new updates, you will be notified with a dialog. This lets you either:
-
update immediately, by invoking the Update Wizard.
-
update later. You have to manually invoke the Update Wizard from
the Wizards menu.
- don't notify. This turns off the automatic update notification feature just as in the Configuration Wizard.
In order to use the Update Wizard, you will need write permissions to the MIMIC shared area (the directory where you installed MIMIC).
First you need to select the source of your update, either over the Internet from the Gambit Web site, or from CD-ROM. Since the CD-ROM can be at a different directory path on each system, you will need to supply it's location in the Path field.
If you have installed MIMIC previously, you can select the same packages that you had already installed then, to be installed for this release with Select packages from previous release of MIMIC. This selection is done automatically and a Previous installation dialog pops up, then can be reviewed and modified in the next Select Package dialog.
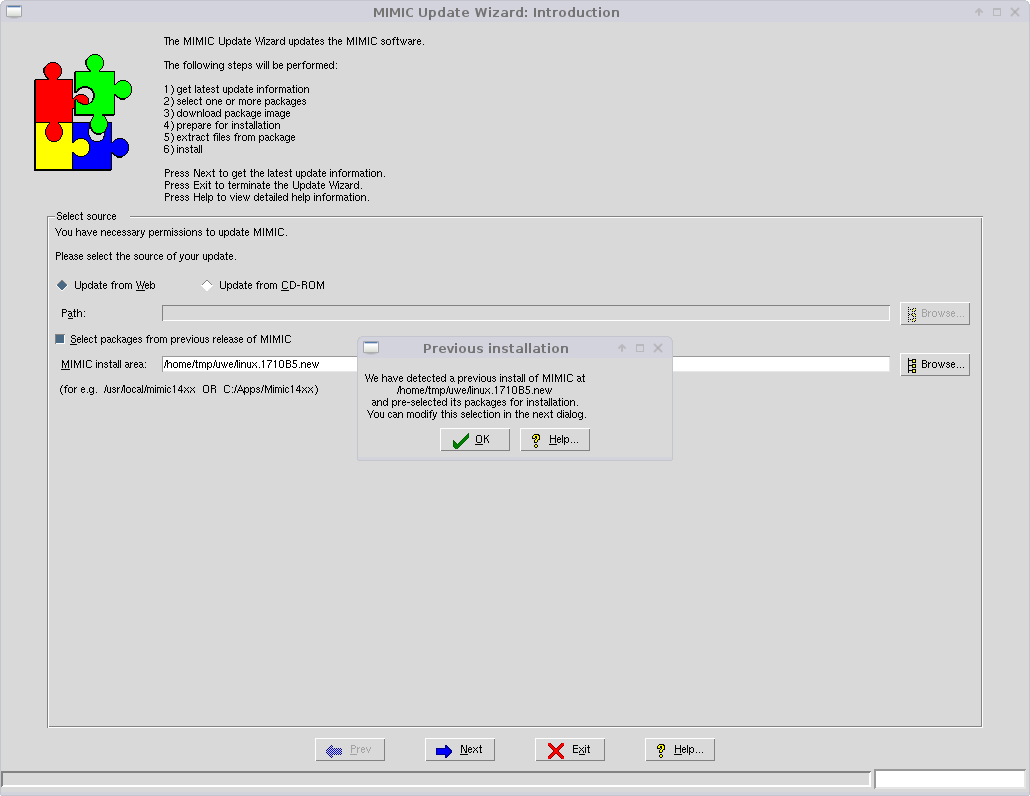
Figure 81: Update Wizard: Introduction
Select Package
A Log Window is displayed which logs all steps taken in the update.
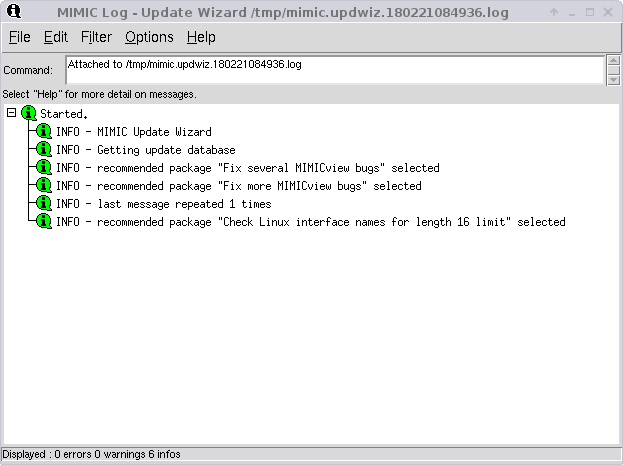
Figure 82: Update Wizard: Log
In this dialog, select one or more updates you want to install for your version of MIMIC. If there are no applicable updates, you are done.
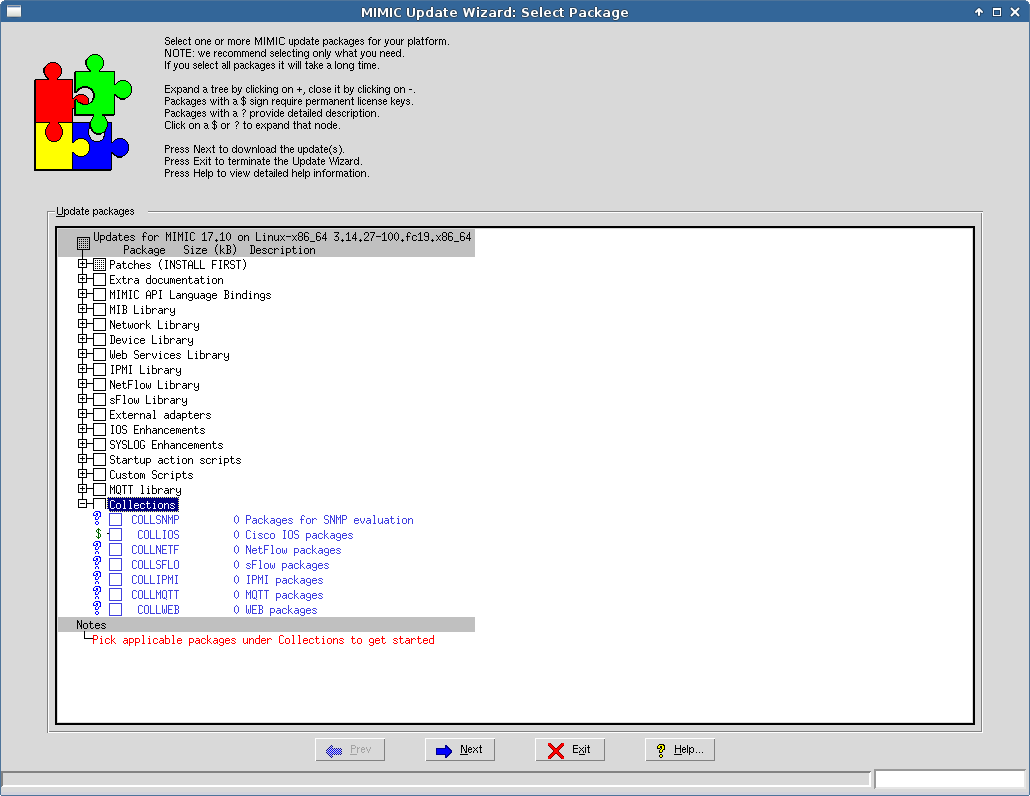
Figure 83: Update Wizard: Select
Pressing Next displays the Selection Summary dialog allowing you to verify your selected update package(s).
Pressing Next downloads the selected update package(s).
Download Images
Each update is downloaded from the Gambit Communications Web site. The download progress is displayed on the Status and Progress bars at the bottom.
If the update has already been downloaded, you are asked whether to download again.
If the extraction tools (gzip, tar) are not executable, they are also downloaded.
Pressing Next prepares for installation. The wizard automatically continues after some number of seconds, as displayed in the status bar.
Prepare For Installation
Certain updates need extra preparation to complete the update. This is done here. You will be prompted for any extra steps.
Pressing Next extracts the files. The wizard automatically continues after some number of seconds, as displayed in the status bar.
Extract Files
Files are extracted from the update. The list of files is displayed for your information.
Pressing Next extracts the contents of the update, and moves files to the shared area. Any existing files are backed up. The wizard automatically continues after some number of seconds, as displayed in the status bar.
Move Files
First, the contents of the update are extracted into a temporary directory. Then files are moved from the temporary directory to the shared area.
While files are being moved, the progress is displayed on the Status and Progress bars.
From the Command Line
If you cannot use the MIMICview GUI to update your optional packages, you can use the command-line as follows:
% ./updwiz.sh --nogui --help Usage: --nogui No GUI [--help] Show this usage help [--offline path] Install from offline path instead of Internet (default) [--noprevious] Don't select previously installed packages [--norecommended] Don't select recommended packages [--list] List eligible packages [--continue] Automatically continue and accept the defaults [--select package] Select a package to install [--select section] Select entire section of packages to install [--select everything] Select every package to install [--exclude package] Exclude a package from install [--noinstall] Just list the selected packages, don't install ERROR - user specified --help, printed usage % ./updwiz.sh --nogui --list INFO - You have necessary permissions to update MIMIC. INFO - Getting update database INFO - Updates for MIMIC 20.00 on Linux-x86_64 3.14.27-100.fc19.x86_64 Package Size(kB) Description ------------------------------------- Patches (INSTALL FIRST) BUGS-2 114 Fix miscellaneous bugs BUGS-3 77 Fix miscellaneous bugs INTERF 1 Check Linux interface names for length 16 limit ... COLLWEB 0 WEB packages COLLWEBUI 0 Web-based MIMIC GUI packages NOTE 0 Pick applicable packages under "Collections" to get started INFO - recommended package "Fix miscellaneous bugs" selected INFO - recommended package "Fix miscellaneous bugs" selected INFO - recommended package "Check Linux interface names for length 16 limit" selected ------------------------------------- Already Installed INFO - Total packages selected: 3 INFO - Total size: 192 kB INFO - Estimated download time: < 1 second INFO - BUGS-2 114 kB Fix miscellaneous bugs INFO - BUGS-3 77 kB Fix miscellaneous bugs INFO - INTERF 1 kB Check Linux interface names for length 16 limit INFO - Total download size: 192 kB INFO - Continue? y or n and ENTER (C = continue automatically with --continue) ERROR - user does not want to continue % ./updwiz.sh --nogui --noprevious --norecommended --select QUICKPDF --select MIMICPDF INFO - You have necessary permissions to update MIMIC. INFO - Getting update database INFO - Selecting package QUICKPDF from --select INFO - Selecting package MIMICPDF from --select INFO - Total packages selected: 2 INFO - Total size: 8444 kB INFO - Estimated download time: 22 seconds INFO - QUICKPDF 2193 kB QuickStart Guide in PDF format INFO - MIMICPDF 6251 kB MIMIC 20.00 documentation in PDF format INFO - Total download size: 8444 kB INFO - Continue? y or n and ENTER (C = continue automatically with --continue) C INFO - no license key and no dependencies, package "QuickStart Guide in PDF format" can be installed. INFO - no license key and no dependencies, package "MIMIC 20.00 documentation in PDF format" can be installed. INFO - Downloading Package "QuickStart Guide in PDF format"(1 out of 2). INFO - Checking http://www.mirror4.gambitcommunications.com/update/images/PDPCMOHLEBEEJKBGHLBAJFJMACAA/quick2000pdf.tar.gz INFO - Downloading http://www.mirror4.gambitcommunications.com/update/images/PDPCMOHLEBEEJKBGHLBAJFJMACAA/quick2000pdf.tar.gz INFO - GET url: http://www.mirror4.gambitcommunications.com/update/images/PDPCMOHLEBEEJKBGHLBAJFJMACAA/quick2000pdf.tar.gz done INFO - No preparations needed, continuing... INFO - Preparing to extract quick2000pdf.tar.gz [size 2193 KB], please wait... INFO - contents pdf/ pdf/quickstart2000.pdf INFO - Total 2 files to be extracted INFO - created temporary directory /tmp/mimic.updwiz.200924144038 INFO - Please wait, extracting 2 files, this can take a while... INFO - Extracting Package "QuickStart Guide in PDF format"(1 out of 2). INFO - extracted into temporary directory /tmp/mimic.updwiz.200924144038 INFO - Extracted 2 files INFO - Moving 2 files, this can take a while, please wait... INFO - installed pdf/ doneINFO - Downloading Package "MIMIC 20.00 documentation in PDF format"(1 out of 2). INFO - Checking http://www.mirror4.gambitcommunications.com/update/images/PDPCMOHLEBEEJKBGHLBAJFJMACAA/mimic2000pdf.tar.gz INFO - Downloading http://www.mirror4.gambitcommunications.com/update/images/PDPCMOHLEBEEJKBGHLBAJFJMACAA/mimic2000pdf.tar.gz INFO - GET url: http://www.mirror4.gambitcommunications.com/update/images/PDPCMOHLEBEEJKBGHLBAJFJMACAA/mimic2000pdf.tar.gz done INFO - No preparations needed, continuing... INFO - Preparing to extract mimic2000pdf.tar.gz [size 6252 KB], please wait... INFO - contents pdf/ pdf/mimic2000.pdf INFO - Total 2 files to be extracted INFO - created temporary directory /tmp/mimic.updwiz.200924144051 INFO - Please wait, extracting 2 files, this can take a while... INFO - Extracting Package "MIMIC 20.00 documentation in PDF format"(1 out of 2). INFO - extracted into temporary directory /tmp/mimic.updwiz.200924144051 INFO - Extracted 2 files INFO - Moving 2 files, this can take a while, please wait... doneFrom WEBUI
If you cannot use the MIMICview GUI to update your optional packages, you can use the Wizard -> Update menu from WEBUI as follows:
-
List...
List the available and installed packages in a new web browser tab.
-
Install...
Install one or more packages separated by a space. The Select previously installed packages option only applies to fresh installations of MIMIC, without any updates installed, and is meant to be used on MIMIC version updates. The Select recommended packages allows you to automatically installed packages marked as recommended, eg. bug fixes.
The log will be displayed in a new web browser tab.
-
Help...
Display this page.
-
in the desktop
MIMICview GUI
via the Wizard -> Update... menu item;
-
Diagnostic Wizard Reference
Introduction
 The Diagnostic Wizard makes it easier to diagnose and report problems
with MIMIC. In case of technical problems, you can use this wizard
to collect information from your installation to be sent to Gambit
Technical Support. You traverse a set of dialogs, each collecting
different information, and the last dialog sends it after your explicit
confirmation.
The Diagnostic Wizard makes it easier to diagnose and report problems
with MIMIC. In case of technical problems, you can use this wizard
to collect information from your installation to be sent to Gambit
Technical Support. You traverse a set of dialogs, each collecting
different information, and the last dialog sends it after your explicit
confirmation.
Select Configuration Files
This dialog lets you select the various MIMIC configuration files. You can click on the + box on a node to expand it, on the - to collapse it. You can click on a checkbox to include a file in the report. You can click on a checkbox of a category to include all files in the category. You can double-click on a file to examine its contents.
By default, relevant system and thread information is included. You can review the information with the Details... button.
The next 9 dialogs let you add more MIMIC files to send in your report. As a shortcut, if you want to skip the rest of the dialogs, you can select Skip adding files and send report and press Next.
Select MIB Files
This dialog lets you select your compiled MIB files. This will not send the source code of your MIBs, to prevent divulging proprietary MIB files. If you need to transfer the source code of your MIBs, Gambit support will give you instructions to transfer them manually.
Select Simulation Files
You can select simulations to be collected. Since these are quite large, select only the simulations necessary to diagnose your problem.
Select Walkfiles
This dialog lets you select your Walkfiles. You can additionally select walkfiles from other areas by pressing the "Browse..." button. Since these are quite large, select only the walkfiles necessary to diagnose your problem. You can inspect the walkfiles by double-clicking on them.
Select Snapshot Files
You can select snapshots to be collected. Since these are quite large, select only the snapshots necessary to diagnose your problem.
Select Discovery Files
You can select discovery sessions to be collected. Since these are quite large, select only the discoveries necessary to diagnose your problem.
Select Trap Series Files
You can select trap series to be collected. Since these are quite large, select only the trap series necessary to diagnose your problem.
Select Log Files
Any necessary log files to diagnose your problem can be selected here. The logfiles are sorted in reverse temporal order (most recent first), and show the highest severity in the file. Since these are quite large, select only the log files necessary to diagnose your problem. You can inspect the log files by double-clicking on them.
Review Selected Files
Send Files
Currently, only manual and e-mail transfer mode are supported. Manual transfer just creates the compressed tar-ball with your selected files. You can transfer it to Gambit manually, eg. as an attachment in an e-mail message.
If your mail configuration is defined in the Configuration Wizard then E-mail mode can send the e-mail for you. You just have to fill in your e-mail address in the From field. All other fields are optional.
-
Sanity Wizard Reference
Introduction
 The Sanity Wizard lets you check the integrity of your MIMIC data
(ie. the files in your private area).
You can use this wizard upon request from the Gambit Technical Support team.
The Sanity Wizard lets you check the integrity of your MIMIC data
(ie. the files in your private area).
You can use this wizard upon request from the Gambit Technical Support team.
Select Items
In the first dialog you select the items to be checked. By default, all checks will be performed, as indicated with the checkmarks on the items. The set of checks is broken down by
- Lab Configurations
- Device Configurations
- MIB Directory
Detection Results
This dialog shows a summary of the check results. It will indicate how many checks have been performed, and how many have passed/failed. The Log Window will show details of the checks.
-
Performance Wizard Reference
Introduction
 The Performance Wizard lets you check the SNMP performance of your system
running MIMIC. It runs a standard test which simultaneously walks
a varying number of agents with the MIMIC Recorder. This attempts to
capture the performance characteristics of a typical scenario involving
a network of agents being accessed by a small set of management
applications.
The Performance Wizard lets you check the SNMP performance of your system
running MIMIC. It runs a standard test which simultaneously walks
a varying number of agents with the MIMIC Recorder. This attempts to
capture the performance characteristics of a typical scenario involving
a network of agents being accessed by a small set of management
applications.
This process is useful if you want to gauge the performance of your system in a standard way. You can also incrementally tune the system and measure whether the performance is actually improved.
The wizard will first collect system information and will allow you to identify the system.
Then it will run a series of performance tests using the MIMIC Recorder. This test lasts a couple of minutes.
Finally you can choose to report this data. By doing so, you will be able to contribute to a database of systems.
System Information
In the first dialog the wizard collects information about your system. The Details... button displays the collected information.
Optionally you can identify the brand, model and description of your system. For example, if you have multiple MIMIC systems of the same type, you can put the system name in the Description field. If you decide to share your results with Gambit, the more identifying information you provide about your system, the better our database will be.
Setup Test
The performance test consists of configuring 10 agents, and simultaneously walking subsets of them using the MIMIC Recorder.
If you want to preserve your lab configuration, save it now with the File -> Save As... menu command.
By default the agent addresses are 10.0.0.1 to 10.0.0.10. Optionally specify alternative addresses of the agents in this dialog, then press Next to start the test.
The test will run for a couple of minutes, and display its progress in a Log Window.
Performance Results
Send Files
This dialog sends the files for inclusion in Gambit's database.
Currently, only manual and e-mail transfer mode are supported. Manual transfer just creates the compressed tar-ball with your selected files. You can transfer it to Gambit manually, eg. as an attachment in an e-mail message.
If your mail configuration is defined in the Configuration Wizard then E-mail mode can send the e-mail for you. You just have to fill in your e-mail address in the From field. All other fields are optional.
-
Protocol Wizard Reference
Introduction
 The Protocol Wizard lets you install and uninstall optional protocol
modules into MIMIC. Here we show how to do it in the MIMICview GUI, and
below
the details on how to use the command line.
The Protocol Wizard lets you install and uninstall optional protocol
modules into MIMIC. Here we show how to do it in the MIMICview GUI, and
below
the details on how to use the command line.
First, you can select the protocol modules to be installed or uninstalled. The currently installed modules are already selected in the list.
Next, you need to supply the license keys for each protocol module to be installed. Once you proceed, the modules are installed.
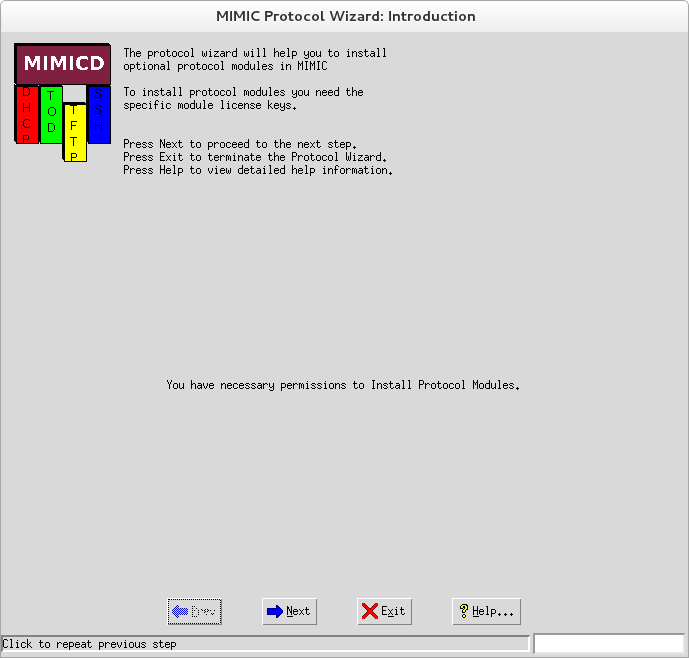
Figure 90: Protocol Wizard: Introduction
Select Protocols
In the first dialog the wizard collects information about protocol modules to be installed or uninstalled.
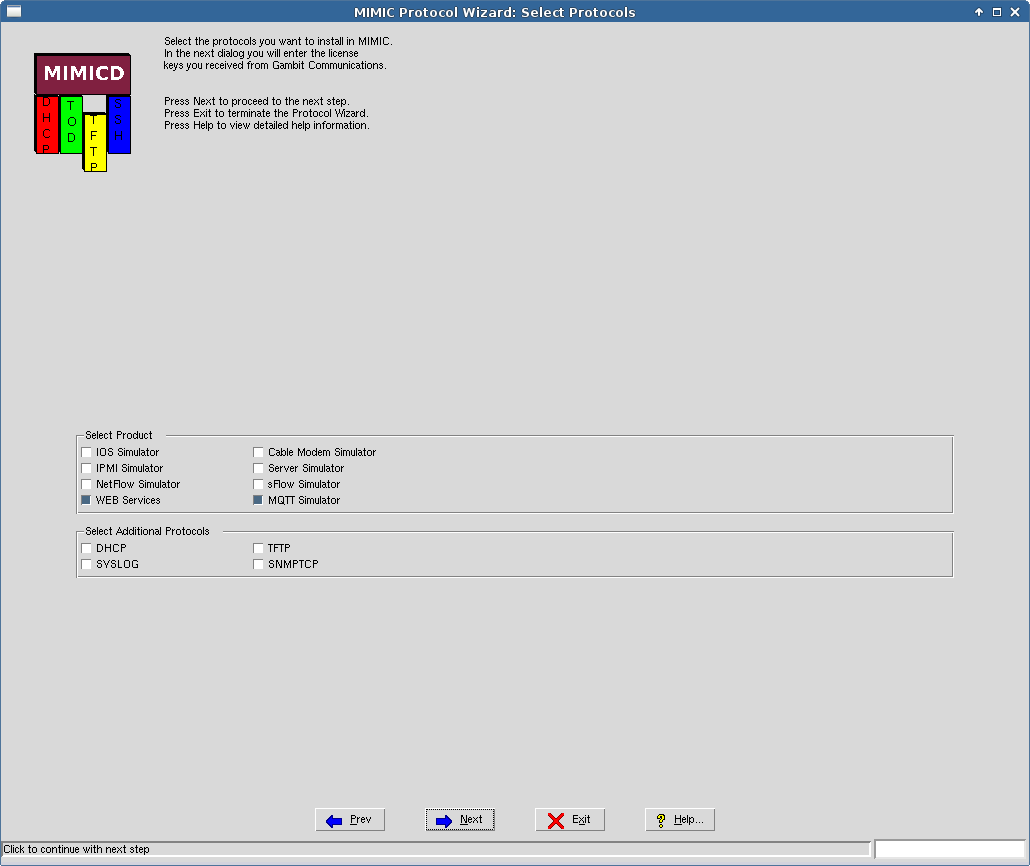
Figure 91: Protocol Wizard: Protocols
Supply License Keys
For each selected protocol which needs a license key, enter the key string you received from Gambit Communications.
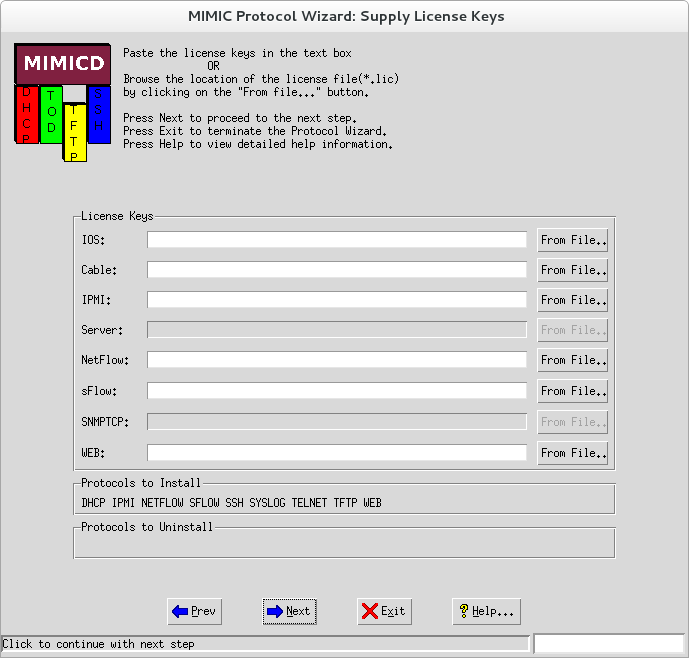
Figure 92: Protocol Wizard: Keys
Results Installing/Uninstalling Protocols
This dialog displays the results of the install/uninstall.
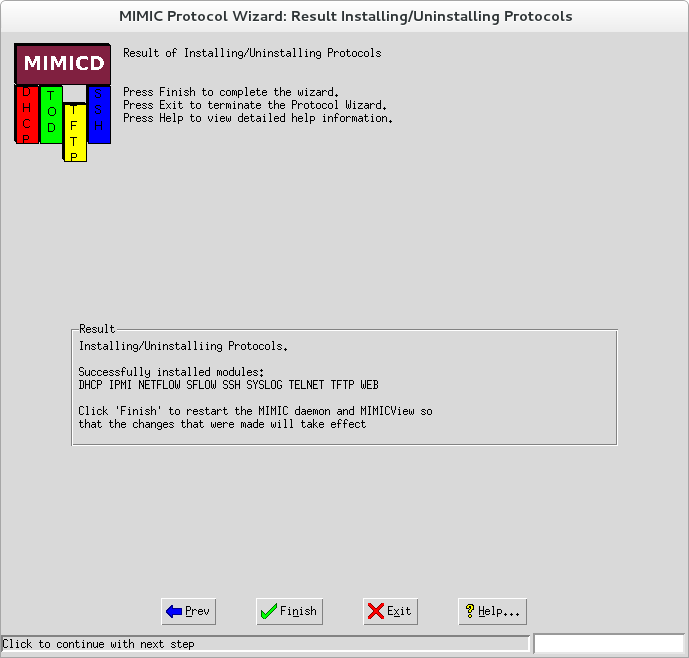
Figure 93: Protocol Wizard: Results
From the Command Line
If you cannot use the MIMICview GUI to configure your protocols, you can use the command-line as follows:
% ./protowiz.sh --nogui --help
Usage:
--nogui                 No GUI
[--help]                Show this usage help
[--available]           List available products
[--enable product]      Enable a product / module
[--key key]             key for previous --enable
[--disable product]     Disable a product / module
ERROR - user specified --help, printed usage

% ./protowiz.sh --nogui
INFO - You have necessary permissions to Install Protocol Modules.
INFO - installed protocols TELNET SSH SYSLOG TFTP
INFO - installed products: {IOS Simulator} {TFTP } {SYSLOG }
INFO - to install
INFO - to uninstall
INFO - Nothing to install / uninstall, done...

% ./protowiz.sh --nogui --enable netflow --key YOURKEY
INFO - You have necessary permissions to Install Protocol Modules.
INFO - installed protocols TELNET SSH SYSLOG TFTP
INFO - installed products: {IOS Simulator} {TFTP } {SYSLOG }
INFO - to install netflow
INFO - to uninstall
INFO - installed netflow
 with key YOURKEY

% ./protowiz.sh --nogui --disable netflow
INFO - You have necessary permissions to Install Protocol Modules.
INFO - installed protocols TELNET SSH SYSLOG TFTP NETFLOW
INFO - installed products: {IOS Simulator} {NETFLOW Simulator} {TFTP } {SYSLOG }
INFO - to install
INFO - to uninstall NETFLOW
INFO - uninstalled NETFLOW